-
Notifications
You must be signed in to change notification settings - Fork 2
Zephyr Lab Revert Workspace
Following all the lab guides at Training Zephyr Getting Started will make changes to the local Zephyr repo, and the VS Code workspace. This guide provides the steps to revert the repo and workspace to a clean starting point.
- Close all open tabs in the Editor. Right-Click on a tab, and select Close All.
-
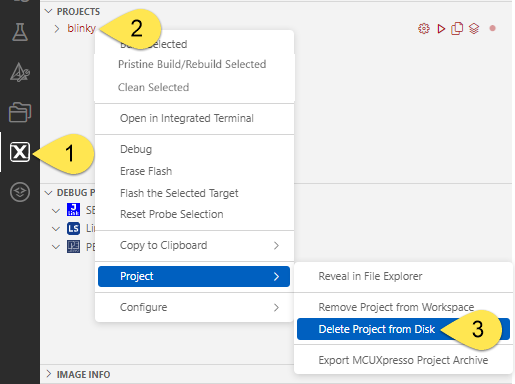
Click the MCUXpresso view on the left toolbar. Find any open projects, the example shown here is the
blinkyproject. Right-Click on the project, and selectProject > Delete Project from Disk. Confirm the deletion of the project.
Note When working with Repository Application projects like these, where the project folder is left in the local Zephyr repository, MCUXpresso does not delete the source or project files original to the repo. Instead it deletes the generated files the extension adds for VS Code.
If files have been modified in the local repo, VS Code can revert these using the Source Control view.
-
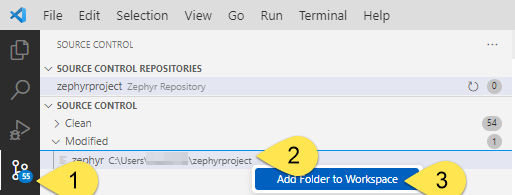
Click the Source Control view (Ctrl+Shift+G). Under
Source Control -> Modified ->, this View will show the modifiedzephyrprojectrepo. Right-click on this repo, and selectAdd Folder to Workspace. VS Code will need some time to refresh the View.
-
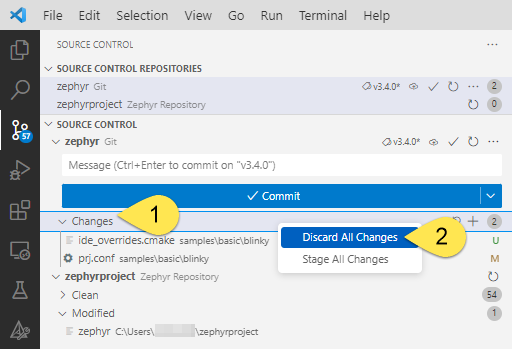
The Zephyr repo is now added under
Source Control. Under the Zephyr repo, Right-Click onChanges, and selectDiscard All Changes.
-
Click the button
Discard All Files.
Now the workspace has been reset to its starting point.
Lab completed. Return to the Zephyr Labs Overview Training Zephyr Getting Started
Use this GitHub Issues section to report ambiguities or problems encountered in this documentation. For MCUXpresso for Visual Studio Code extension issues, feedback or search for solutions and ideas please follow Community page.
Table of contents
Dependency Installation
General
Software Repositories
Project Management
Flash and Debug
Reference Guides
- Getting Started with MIMXRT1060-EVK
- Training Zephyr Getting Started
- TrustZone Examples on LPC55S6x and MCUXpresso SDK
- Multicore Examples on LPC55S6x and MCUXpresso SDK
- SDRAM Examples on RT1060 and MCUXpresso SDK
- Getting Started with MCX using Application Code Hub
- AN14120: Debugging Cortex-M on i.MX 8M, i.MX 8ULP, and i.MX 93
Troubleshooting
Useful links