-
Notifications
You must be signed in to change notification settings - Fork 2
Dependency Installation
In addition to the extension itself, some extra tools and software components are required for the full development flow within VS Code.
All of these dependencies are managed by the MCUXpresso Installer tool, designed to guide you through the installation process. When clicking Open MCUXpresso Installer from Quickstart Panel view, if the extension does not find it, it will automatically download and start the tool.
Alternatively, you can download MCUXpresso Installer tool from the following links:
After installation, the Installer layout can be found in the following locations:
- Windows: %userprofile%\AppData\Local\Programs\MCUXpressoInstaller
- Linux: $HOME/MCUXpressoInstaller
- macOS: The Installer is a disk image file (.dmg) and can be easily mounted in /Applications by dragging and dropping the Installer icon
Note: The Installer does not require admin rights on any platform. Additionally, the installation with admin rights is prevented by default on Linux.
This will provide options to install:
- Python/west to run scripts and understand complex repositories;
- git for the ability to clone source repositories and add version control;
- ninja, cmake for build process infrastructure;
- Zephyr SDK minimal bundle if you want to develop applications based on Zephyr. Also, some additional libraries and tools are required for build process;
- GNU Arm Toolchain if you want to develop applications based on MCUXpresso SDK; on top of the toolchain, additional NXP libraries and headers are provided to facilitate various extra features like semihosting stubs, macros to create MTB support (for Cortex M0+), macros to allow code/data to be placed into alternate memory banks, etc;
- LinkServer, Segger J-Link and PEmicro debug probes software support;
- CMSIS-Toolbox to work with an Open-CMSIS-Pack environment.
- MCUXpresso Configuration Tools to allow developers to quickly build a custom SDK and leverage pins, clocks and peripherals to generate initialization C code or register values for custom board support.
- MCUXpresso SEC Secure Provisioning Tool to simplify generation and provisioning of bootable executables on NXP MCU devices.
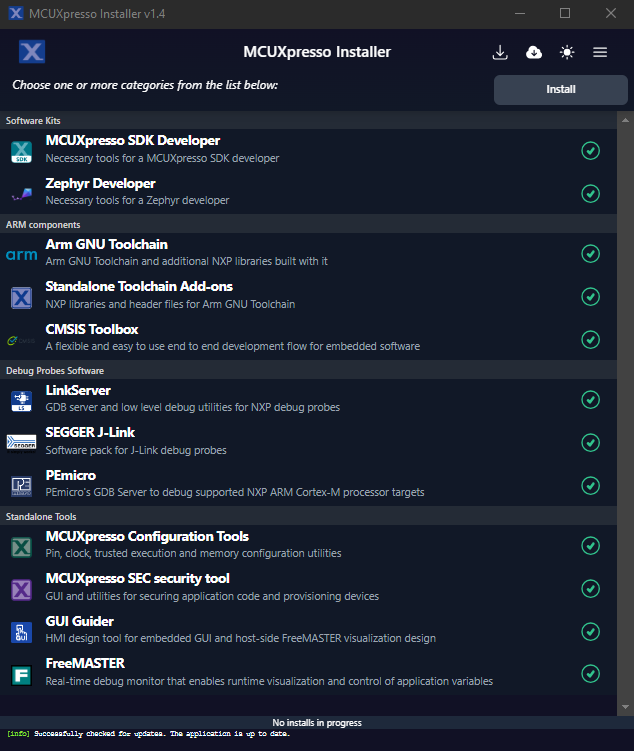
MCUXpresso Installer involves a few steps, aiming to install (or upgrade to a minimal required version) the dependencies from above:

You can select one or multiple items from the available list. Clicking the "Install" button will install those items that do not already exist at the required minimal versions:
- MCUXpresso SDK Developer - it contains necessary dependencies for users targeting to develop applications based on MCUXpresso SDK.
-
Zephyr Developer - aims to create an environment for Zephyr RTOS based applications. Pip, west and other Python requirements are installed in a Python virtual environment located on:
- Windows: %userprofile%/.mcuxpressotools/.venv
- Linux and macOS: $HOME/.mcuxpressotools/.venv
The steps performed by the Installer to create a development environment for Zephyr can be manually run:
Windows:
- Open a cmd.exe terminal window
- Create a virtual environment:
python -m venv %userprofile%/.mcuxpressotools/.venv - Activate the virtual environment:
%userprofile%/.mcuxpressotools/.venv/Scripts/activate.bat - Install pip
python -m ensurepip --upgrade - Install west:
pip install west --upgrade - Zephyr’s requirements.txt file declares additional Python dependencies. Download and unzip the requirements, then install them with pip.
    wget https://www.nxp.com/lgfiles/updates/mcuxpresso/requirements-1.0.zip
    7z x requirements-1.0.zip -o requirements
    pip install -r ./requirements/requirements.txt
Linux:
- Use apt to install Python venv package:
sudo apt install python3-venv - Create a virtual environment:
python3 -m venv $HOME/.mcuxpressotools/.venv - Activate the virtual environment:
source $HOME/mcuxpressotools/.venv/bin/activate - Install pip
python -m ensurepip --upgrade - Install west:
pip install west --upgrade - Zephyr’s requirements.txt file declares additional Python dependencies. Download and unzip the requirements, then install them with pip.
    wget https://www.nxp.com/lgfiles/updates/mcuxpresso/requirements-1.0.tar.bz2
    tar -xf requirements-1.0.tar.bz2 -C requirements
    pip install -r ./requirements/requirements.txt
    ```
macOS:
- Create a virtual environment:
python3 -m venv $HOME/.mcuxpressotools/.venv - Activate the virtual environment:
source $HOME/.mcuxpressotools/.venv/bin/activate - Install pip
python -m ensurepip --upgrade - Install west:
pip install west --upgrade - Zephyr’s requirements.txt file declares additional Python dependencies. Download and unzip the requirements, then install them with pip.
    wget https://www.nxp.com/lgfiles/updates/mcuxpresso/requirements-1.0.tar.bz2
    tar -xf requirements-1.0.tar.bz2 -C requirements
    pip install -r ./requirements/requirements.txt
- Arm GNU Toolchain - toolchain for MCUXpresso SDK development plus NXP extension pack used to provide extra functionalities (i.e. additional runtime libraries, semihosting, trace, multicore, etc.).
- Arm GNU Toolchain add-ons - NXP toolchain extension pack used to provide extra functionalities that can be used on top of an Arm GNU Toolchain distribution (i.e. runtime libraries, semihosting, trace, multicore, etc.). Although it is built and tested with a particular baseline version of Arm GNU Toolchain (which also gives this pack version number) it can be also copied on top of a user custom Arm GNU Toolchain version in order to benefit on all provided MCUXpresso for VS Code extension functionalities. To achieve this, be sure the content of this archive is unzipped and copied on top of the desired Arm GNU Toolchain root installed file layout.
- CMSIS-Toolbox - aims to work with an Open-CMSIS-Pack environment.
- LinkServer - NXP software for LinkServer based NXP debug probes (LPC-Link2, MCU-Link, ...).
- Segger J-Link - software support for SEGGER J-Link debug probes.
- PEmicro - GDB server for PEmicro debug probes.
- MCUXpresso Configuration Tools - optimized for designing with Arm® Cortex®-M-based devices from NXP to allow developers to quickly build a custom SDK and leverage pins, clocks and peripherals to generate initialization C code or register values for custom board support
- MCUXpresso SEC security tool - simplify generation and provisioning of bootable executables on NXP MCU devices.
- GUI Guider - HMI design tool for embedded GUI and host-side FreeMASTER visualization design using LVGL.
- FreeMASTER - Real-time debug monitor that enables runtime visualization and control of application variables.
Each component indicates with a colored badge its update status as following:
-
 (green badge): component is up to date. Tooltip indicates each sub-component and its installed version.

-
 (gray badge): component or sub-component missing. Tooltip indicates each sub-component and its status and installed version. If this component is needed, select it and install it.

-
 (yellow badge): component or subcomponent with an older version than the latest one available. Tooltip indicates sub-component installed version and newer available version. If this component is intended to be used, it is recommended to update it.

-
 (red badge): component or sub-component does not meet minimum required version. Tooltip indicates sub-component installed version and required version. If this component is intended to be used, it is highly recommended to update it.

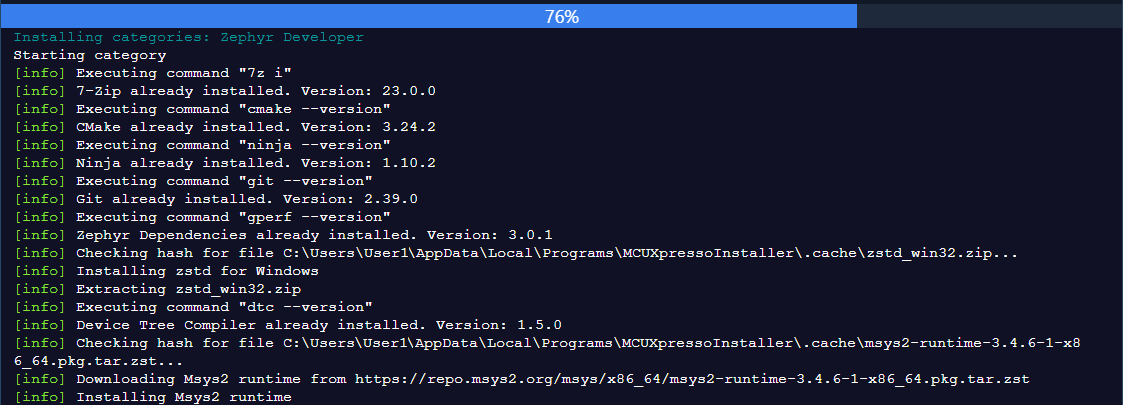
Once the installation process starts, a console with a progress bar will display the status and execution details. The colored badge status will also be updated at the end of installation process.

The console output displays details of where a tool is downloaded from and also where it is installed.

A check for component updates is available on toolbar, forcing a rescan of installed tools.

In case of a successful installation, the previously selected components will become unselected. If the Installer has updated the environment variables, then a warning message will be displayed.

In case of errors, the component selection remains active and the console will report the encountered issues. If the cause of error can be fixed by user, pressing again the "Install" button will restart the previous component selection.
The installer will skip previously installed components after finding the minimal version exists.
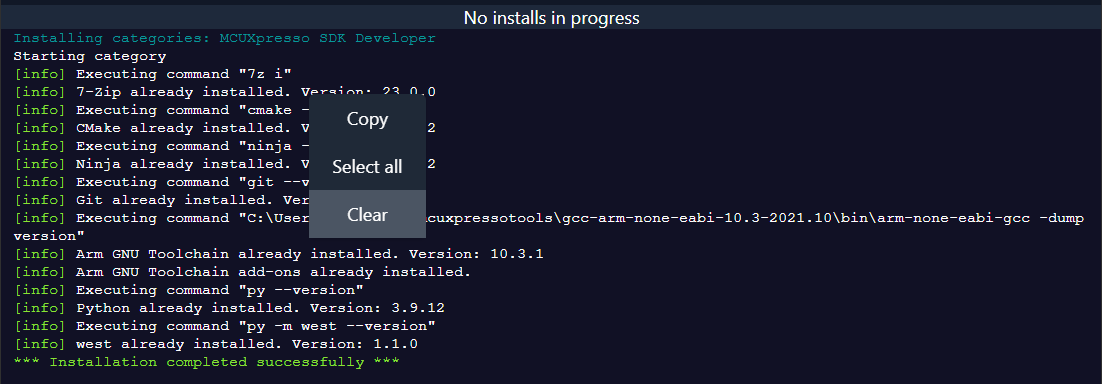
A context menu is available within the console area, to allow Select All / Copy and Clear operations over the generated log.

From the top toolbar, user can switch between dark and light themes.


Use this GitHub Issues section to report ambiguities or problems encountered in this documentation. For MCUXpresso for Visual Studio Code extension issues, feedback or search for solutions and ideas please follow Community page.
Table of contents
Dependency Installation
General
Software Repositories
Project Management
Flash and Debug
Reference Guides
- Getting Started with MIMXRT1060-EVK
- Training Zephyr Getting Started
- TrustZone Examples on LPC55S6x and MCUXpresso SDK
- Multicore Examples on LPC55S6x and MCUXpresso SDK
- SDRAM Examples on RT1060 and MCUXpresso SDK
- Getting Started with MCX using Application Code Hub
- AN14120: Debugging Cortex-M on i.MX 8M, i.MX 8ULP, and i.MX 93
Troubleshooting
Useful links