-
Notifications
You must be signed in to change notification settings - Fork 2
Zephyr Lab Installation and Preparation
In this lab, you will learn to install/import the tools below. This guide is written for Windows10. But Linux or macOS can also be used following similar steps.
- Visual Studio Code
- MCUXpresso Extension for VS Code
- Dependencies for Zephyr development, including the Zephyr SDK
- Zephyr Repository in VS Code
- MCUXpresso SDK Repository in VS Code
Before importing the Zephyr repository, determine the Zephyr revision to checkout. Upstream Zephyr manages the revisions with Git: Zephyr releases have Git tags for the versions, or the latest code is in the main branch.
For development, it is ideal to use a Zephyr release. Releases go through the Zephyr Project's release flow and quality checks. This is why the Repository Importer in the MCUXpresso extension defaults to the latest Zephyr release. To learn more about Zephyr releases, see Releases. However, as boards and features are added after a release, it may be necessary to use the latest code in the main branch. For example, NXP's FRDM-MCXN947 board was upstreamed after Zephyr's v3.6.0 release. Until v3.7.0 was released in July 2024, the main branch was imported if using this board.
One resource available to confirm support in different revisions is the Zephyr Project documentation. For example, this latest URL is a living document for the Supported Boards currently in the main branch, and is updated frequently. Clicking a board link will detail the latest features supported on that board. But this v3.6.0 URL is the same page, but frozen for the v3.6.0 release. Clicking a board link there will show the board documentation and supported features in the v3.6.0 release. The upstream repo also has release notes for each release. Here are the v3.6.0 Release Notes.
- To install Visual Studio Code (VS Code), download the installer here: https://code.visualstudio.com/download
-
Open VS Code, and install the MCUXpresso extension.
Click the Extensions view (Ctrl+Shift+X) in VS Code. Click the search field at the top of the Extensions view, and enter
mcuxpresso.Click the
Installbutton to install the extension.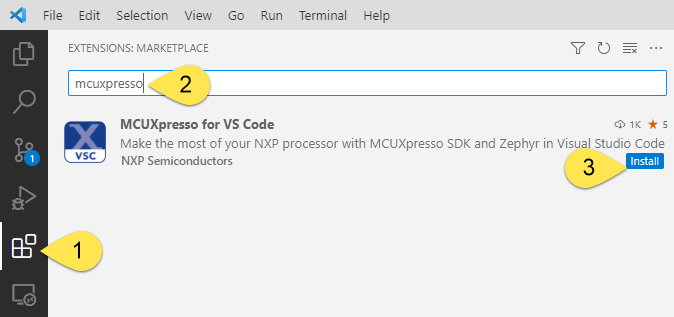
The MCUXpresso extension will be added to the Installed list after successful installation.
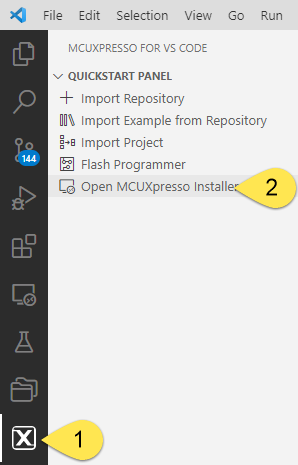
- Open the MCUXpresso Extension. In the Quickstart Panel, click
Open MCUXpresso Installer.
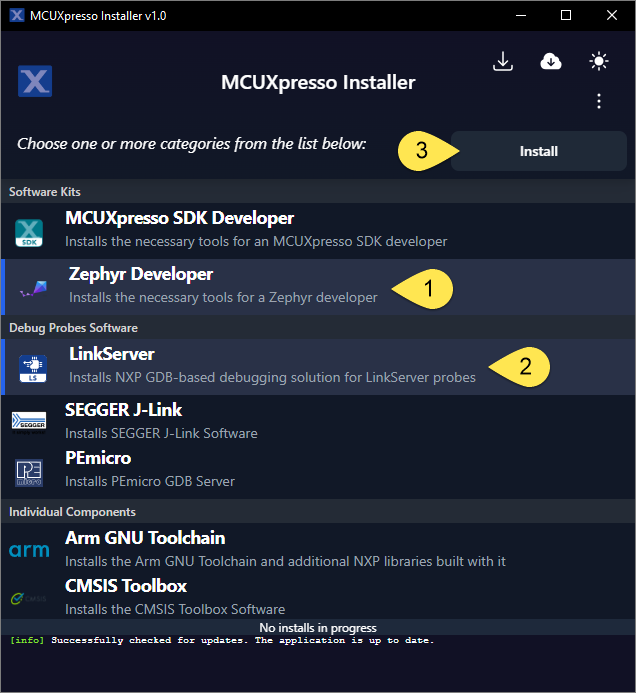
- The Zephyr Developer option is required to support CMake, Python, the Zephyr SDK (includes the GCC build tools) and other Zephyr dependencies. LinkServer is also required to debug with the NXP on-board probes.
Note this lab guide assumes a LinkServer debug probe is used, which is default on the evaluation boards. When using other supported debug probes, this Installer can also install Segger JLink and PEmicro tools.
After selecting the install options, click the Install button. The status bar at the bottom displays the status of the installation.
- Restart VS Code to enable the changes to enviornment variables.
-
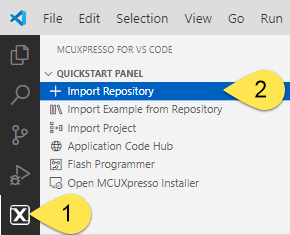
To import the Zephyr repository, open the MCUXpresso view in VS Code and click Import Repository in the Quickstart Panel.
Note The next two steps show options for importing different revisions of the Zephyr repo. The first option imports a Zephyr release tag. The second option imports the
mainbranch for the latest code in the repo. For more details, see Zephyr Revision.
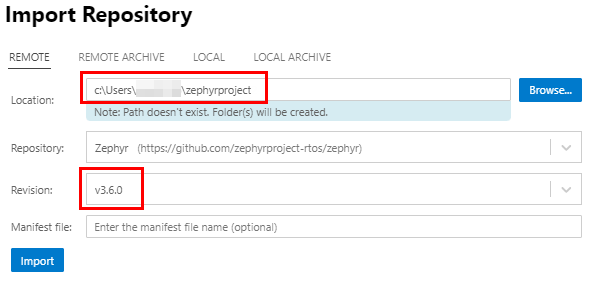
7a. Import Zephyr Release: Select the folder location C:\Users\...\zephyrproject and Zephyr Repository. For revision, the Importer defaults to the latest Zephyr release, shown here as v3.6.0. If desired, change to a different release. When finished, click Import.
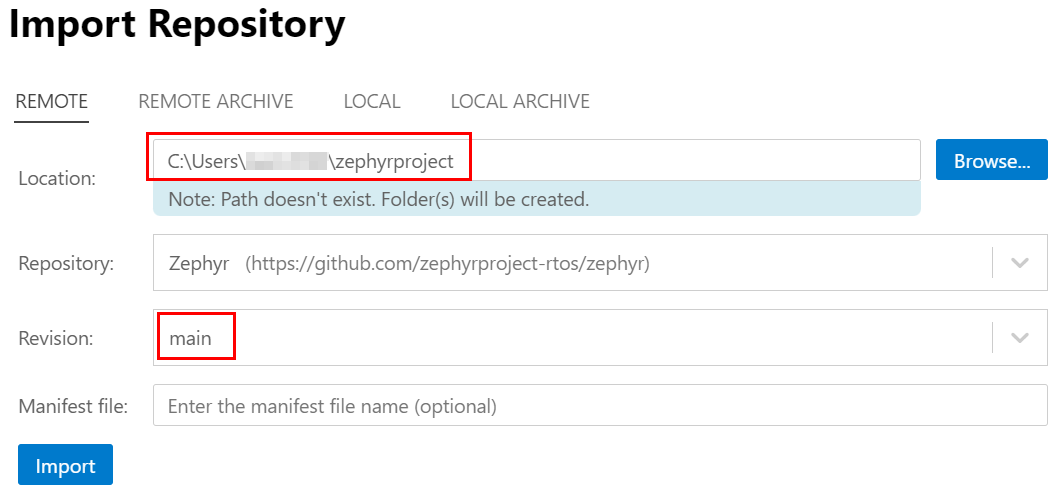
7b. Import Zephyr main branch: Select the folder location C:\Users\...\zephyrproject and Zephyr Repository. Change the revision to main. When finished, click Import.
> **Note** This import step takes a long time to clone the Zephyr repo, and dependency repos (currently 55!). VS Code shows a progress bar pop-up with the status of the West tool as it clones all the repos. The repository should be added to the Imported Repository view once the import is successful.
-
Optionally, the MCUXpresso SDK repository can be imported the same way. This is not required when working with Zephyr. But the debugger guide in Training Zephyr Getting Started shows how to add the Peripheral Register view to the debugger, and this requires some SVD files located in the MCUXpresso SDK repository. To add this repo, select the folder location:
C:\Users\...\mcux-sdk
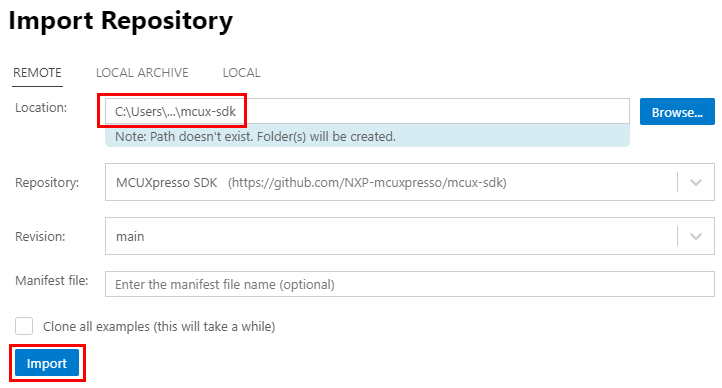
The repositories are successfully added to the Imported Repository view once the import is successful.

-
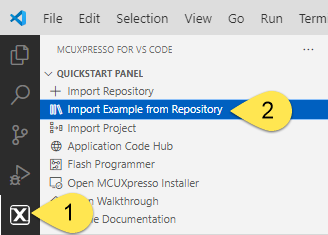
To import any example application from the Zephyr Repository, click Import example from Repository in the Quickstart Panel. The imported Zephyr SDK is selected automatically as the default SDK (if no other SDK version is located in the same path).
-
To ensure successfull installation, follow the steps in the Hello World guide to run the hello_world example from the Zephyr repo.
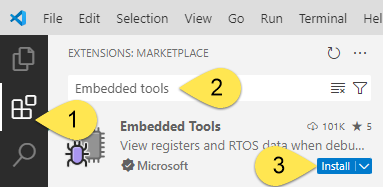
When debugging Zephyr applications, thread awareness can be enabled, and can be viewed in the debugger with the Embedded Tools extension. The debug lab guides in Training Zephyr Getting Started detail how to use thread awareness. To install this additional extension:
-
Click the Extensions view, type embedded tools in the search field, and then click the Install button for the Microsoft Embedded Tools extension.
Lab completed. Return to the Zephyr Labs Overview Training Zephyr Getting Started
Use this GitHub Issues section to report ambiguities or problems encountered in this documentation. For MCUXpresso for Visual Studio Code extension issues, feedback or search for solutions and ideas please follow Community page.
Table of contents
Dependency Installation
General
Software Repositories
Project Management
Flash and Debug
Reference Guides
- Getting Started with MIMXRT1060-EVK
- Training Zephyr Getting Started
- TrustZone Examples on LPC55S6x and MCUXpresso SDK
- Multicore Examples on LPC55S6x and MCUXpresso SDK
- SDRAM Examples on RT1060 and MCUXpresso SDK
- Getting Started with MCX using Application Code Hub
- AN14120: Debugging Cortex-M on i.MX 8M, i.MX 8ULP, and i.MX 93
Troubleshooting
Useful links