-
Notifications
You must be signed in to change notification settings - Fork 2
Zephyr Lab RT1060 Kconfig
In this lab, you will learn:
- How to verify Kconfig settings for a Zephyr application
- How to modify Kconfigs for an application
- How to open the guiconfig tool, and explore or search for Kconfig settings and details
- How to create board-specific Kconfig files in an application
- How to change the compiler optimization Kconfigs
- How to increase Kconfigs for stack sizes
The software used to build Zephyr applications can be configured at build time to adapt for specific application and platform needs. Configuration is handled through Kernel Config (Kconfig), which is the same configuration system used by the Linux kernel. The goal is to support configuration without having to change any source code.
Configuration options (often called symbols) are defined in Kconfig files, which also specify dependencies between symbols that determine what configurations are valid. Kconfig definitions and settings come from many sources in the Zephyr tree, including:
- Application-specifc Kconfigs, like samples/basic/blinky/prj.conf
- board-specific Kconfigs, like boards/arm/mimxrt1060_evk/mimxrt1060_evkb_defconfig
- SOC-specific Kconfigs, like soc/arm/nxp_imx/rt/Kconfig.soc
- SOC family Kconfigs, like soc/arm/nxp_imx/rt/Kconfig.defconfig.series
- Kernel Kconfigs, like kernel/Kconfig
- Driver Kconfigs, like drivers/gpio/Kconfig
- Subsystem Kconfigs, like subsys/console/Kconfig
- Kconfigs for other open-source modules, like modules/mbedtls/Kconfig
The outputs from Kconfig are build-time generated files for the application. One text file .config is the final merged Kconfig symbols from all Kconfig sources used by the application. Another file autoconf.h is a C header file with macros that can be tested at build time. These lab steps will demonstrate how these files are useful, to confirm the Kconfig settings used during the most recent build of the application.
Kconfigs can be defined as different types. In this lab, we will explore 3 different types: boolean, integer, and choice Kconfigs. The lab steps will modify the following Kconfigs, and demonstrate how they configure the application:
-
CONFIG_CONSOLE: (type boolean) selects if Zephyr’s Console subsystem is included in the application -
CONFIG_COMPILER_OPTIMIZATIONS: (type choice) selects which compiler optimization setting is used when the application is built -
CONFIG_MAIN_STACK_SIZE: (type integer) sets the stack size in bytes for the Main thread
For Zephyr application development, typically Kconfig options are set at the application level. This lab will give some simple examples to get familiar with how Kconfigs are modified for applications. These lab sections include modifying the prj.conf file, which is the Kconfig file at the application level. And also create a new board-specific Kconfig file, which configures the app when it is built for a specific board.
First we will import a Zephyr sample application into VS Code, build it, explore the existing Kconfig symbols, and make a simple Kconfig change. This section uses the blinky application, and will modify the application Kconfig in prj.conf.
-
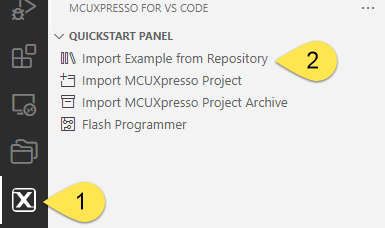
Open VS Code. In the Quickstart Panel, click Import Example from Repository. If needed, the steps to import an example, build, and debug it are included in Zephyr Lab RT1060 Hello World.
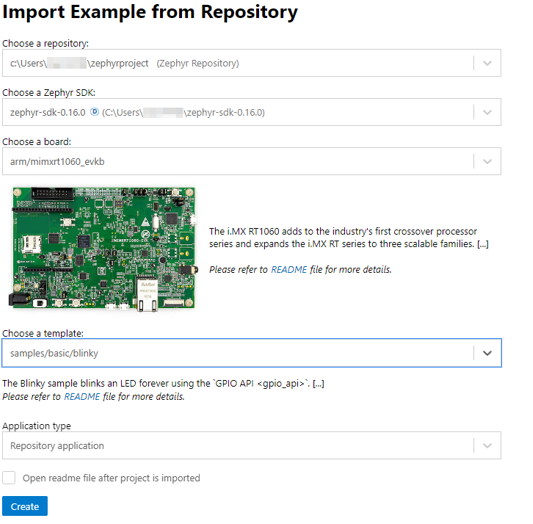
- Import the blinky sample with the following settings:
-
For the board, you can type RT1060 to filter the board arm/mimxrt1060_evkb. Be sure this is the board with ‘B’ on the end of the EVKB name, otherwise the LED will not blink on your board.
-
For the example template, type blinky to filter the app samples/basic/blinky
-
For Application type, select Repository Application
-
Click Create
-
-
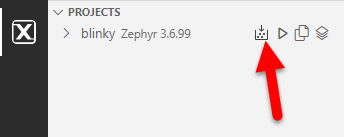
Build the blinky project
-
If not already connected to the board, connect the micro-USB cable to J1, to power and debug the EVK. In VS Code, connect the Serial Monitor to the EVK’s COM port, and click Start Monitoring.

-
When the build completes, take note of the memory sizes. We will refer back to this memory usage in the later steps in this lab. In VS Code, this is found in the Output view after the build completes.

-
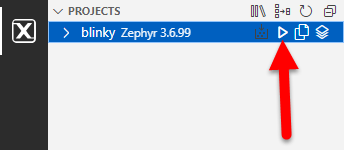
Debug the blinky project.
-
When first connecting to a device and using the LinkServer debug probe, VS Code will use a pop-up to ask for the device part number. In the search field, enter MIMXRT1062xxxxx:MIMXRT1060-EVKB. You can search with part of the device or board part number.

Note: In future revisions of the tool, this step will go away, and the extension will select the device automatically.
-
The execution will pause. To continue execution click Continue on the debug options.

-
In the Serial Monitor view, you will see the app prints the boot banner during the startup code, before main() is reached. It also prints the Zephyr version used during the build:
Blinky boot banner in Serial Monitor:
*** Booting Zephyr OS build zephyr-v3.4.0 *** -
Continue executing the application. The green LED near the center of the EVK board should be blinking.

-
Stop the debugger

Now that we have the default blinky sample working, we will explore some Kconfig settings, and make some simple changes.
-
In the Explorer view, find the build folder under the blinky project. This is a generated folder created when building the blinky project. Every Zephyr application has a build folder after it is built. It contains all the generated files from the build tools, like the object code from the compiler, and the linker outputs.
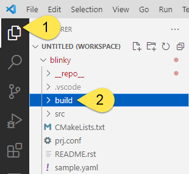
-
In the build folder, open the file zephyr/.config.
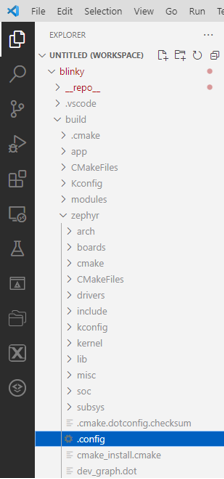
The .config file is the final merged Kconfig settings for the application, generated when the application is built. It is a helpful resource to use to confirm the Kconfig settings used by the application. The Kconfig settings can come from many different source files during the build. They can also have dependencies on other Kconfigs. Sometimes a Kconfig setting can be confusing when reviewing the sources. Verifying the Kconfig in the .config file confirms the setting used during the build. And these lab steps demonstrate, after making Kconfig changes, it is helpful to review the generated .config file to confirm those changes were used during the build.
Another good tip is to review the .config file to optimize your application. You may find there are features/drivers/subsystems enabled that you do not need in your application, and you can make changes to remove them. Or the .config file may reveal settings that are not ideal for your application, and you can change them.
Because the .config file is generated during the build, it is important to understand what happens when changing this file. Any modifications to this file can be reverted if the .config file is re-generated again during a build. For Kconfig changes to be retained, it is best to make the change in a Kconfig source file. In this lab section, we will demonstrate modifying the application’s prj.conf file, and then confirming the modification in the .config file.
-
In the .config file, search for the symbol
CONFIG_CONSOLE. This is a boolean Kconfig, and shows as “=y”. Booleans useyfor Yes andnfor No. Here “=y” means the symbol is selected, or enabled. Symbols that are not selected (or disabled) are commented out. In this example .config file below, we see thatCONFIG_CONSOLEis selected by default in the blinky sample, andCONFIG_LORAis not selected.# # Device Drivers # # CONFIG_LORA is not set CONFIG_CONSOLE=y
-
In the Explorer view, open the prj.conf file under the blinky project.
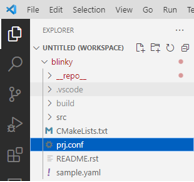
-
Modify the prj.conf file, by adding the line highlighted below for
CONFIG_CONSOLE. This will disable the Console subsystem, and it will be removed from the application. Save the prj.conf file (Ctrl-S)CONFIG_GPIO=yCONFIG_CONSOLE=n # Add this line
Notice after saving this file, the build tools are run immediately. It does not build the application image or run the C compiler. But it does run the Kconfig tools, and re-generates the .config file with this change.
-
Go back to the .config file already open in the editor. Notice that
CONFIG_CONSOLEis no longer set in this generated file.# CONFIG_CONSOLE is not set -
Rebuild the blinky application. When the build finishes, the memory usage in the Output view shows a slight reduction in the flash size, since the Console subsystem has been removed from the application:
Memory region Used Size %age Used FLASH: 28714 B 0.34% RAM: 4160 B 0.01% Memory region Used Size %age Used FLASH: 28590 B 0.34% RAM: 4160 B 0.01%
- If you debug the blinky application now with the Serial Monitor connected, you will find the app no longer prints the boot banner with the Console removed. You can see the application still executes correctly with the LED blinking.
In this section, we will introduce a tool integrated with Zephyr called guiconfig. This is an interactive tool to explore and configure Kconfig symbols. Guiconfig can be helpful to search for Kconfig symbols, see the different options, understand the dependencies with other symbols, and find where the symbols are located in the source files.
Zephyr offers two similar tools for this, the other is called menuconfig. The difference is menuconfig is text-based for CLI, while guiconfig opens a new window and works with the mouse. The MCUXpresso extension enables opening guiconfig for a project directly in VS Code.
-
In VS Code, return to the .config file already opened in the editor.
-
Search for the word OPTIMIZATIONS. You will find these symbols:
CONFIG_SIZE_OPTIMIZATIONS=y
# CONFIG_SPEED_OPTIMIZATIONS is not set
# CONFIG_DEBUG_OPTIMIZATIONS is not set
# CONFIG_NO_OPTIMIZATIONS is not set
These Kconfig symbols are for the compiler optimizations. When debugging an application and stepping through code, it is helpful to disable optimizations. You can see Zephyr offers an optimization setting for debugging. But we prefer to disable all optimizations when single-stepping or setting breakpoints.
But how does one find that these Kconfigs exist, or how to use them? One option we will use for this is guiconfig.
-
To open guiconfig, click the MCUXpresso view, Right-Click the blinky project, and select Open Zephyr Kernel Configuration.
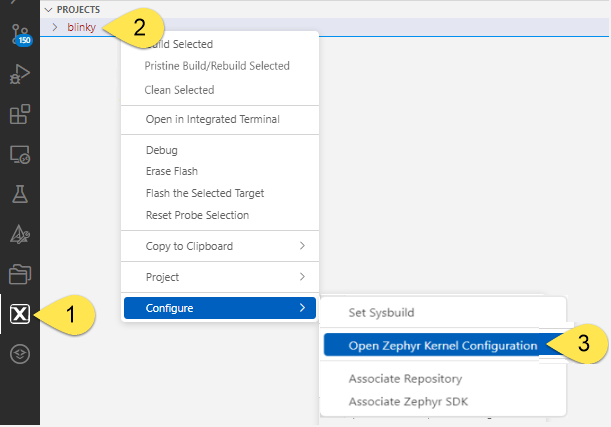
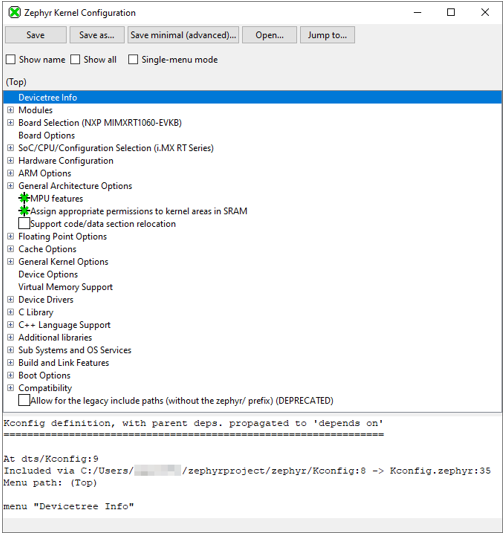
VS Code needs some time to open the tool. Then the guiconfig window will open.
-
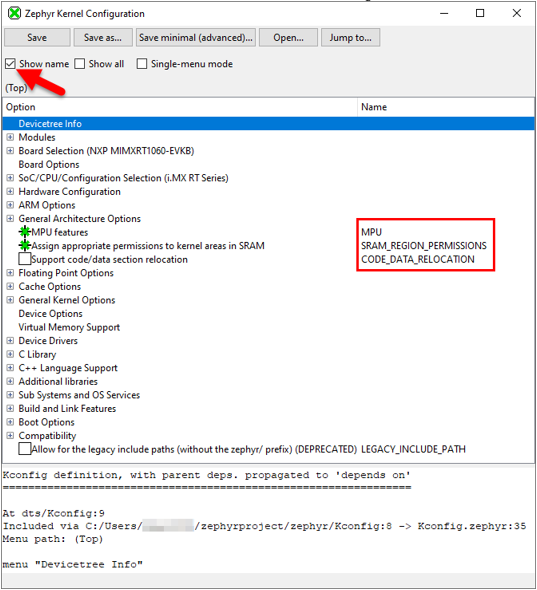
Check the “Show name” box. This adds a column on the right with the name of the Kconfig symbols.
-
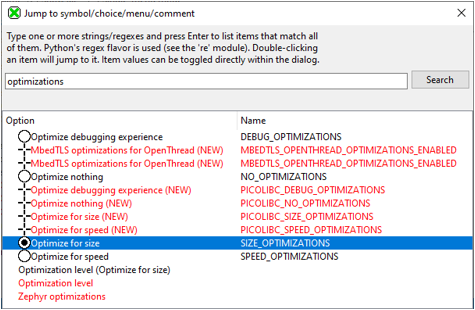
To search for a Kconfig symbol, click the Jump to button.

-
Search for the word OPTIMIZATIONS. The results below are found.
-
To see a more intuitive view, double-click on the “optimize for size” result.
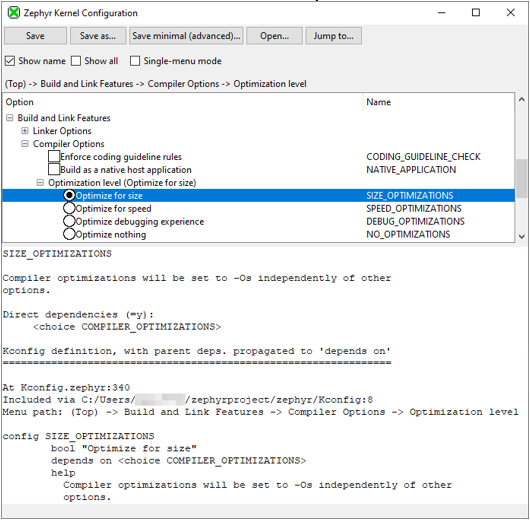
Guiconfig helps illustrate that Kconfigs are like a hierarchical menu. You can use guiconfig (or menuconfig) to browse through the menu to find all the Kconfig settings, and make changes. We also see here the OPTIMIZATIONS setting is a choice Kconfig. Guiconfig uses a radio button for this choice, to pick 1 of the 4 options. The text in the lower window shows details about each symbol, like a description, and the source where this Kconfig is defined.
-
Click the setting Optimize nothing to disable compiler optimizations, then click the Save button, and close the guiconfig window.
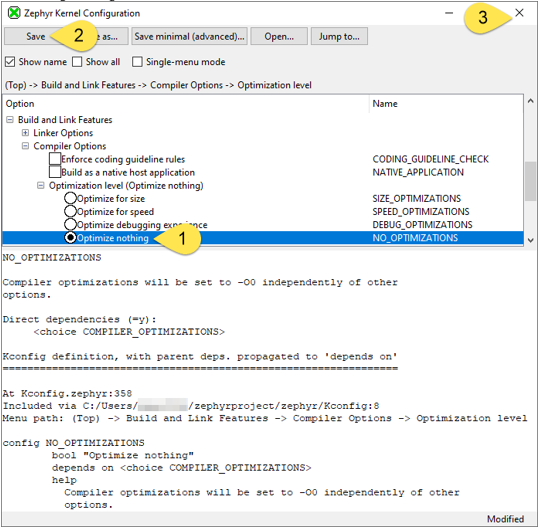
- Back in VS Code, return to the .config file already open in the editor. Notice guiconfig made changes to the
OPTIMIZATIONSsettings. We saw in guiconfig, thisOPTIMIZATIONSKconfig is a choice of 4 options. But to select a choice, we select the booleanCONFIG_NO_OPTIMIZATIONS=y, which also deselectedCONFIG_SIZE_OPTIMIZATIONS.# CONFIG_SIZE_OPTIMIZATIONS is not set # CONFIG_SPEED_OPTIMIZATIONS is not set # CONFIG_DEBUG_OPTIMIZATIONS is not set CONFIG_NO_OPTIMIZATIONS=y
Guiconfig made this change in the .config file. But remember, this is a generated file, and will not retain this change if it is rebuilt. We could build the app with this change right now, and see the change’s effect on the app. But to make this change permanent, we should add this Kconfig selection to our app’s prj.conf file.
-
Return to the prj.conf file already open in the editor. Add the highlighted line below for
CONFIG_NO_OPTIMIZATIONS, and save the file.CONFIG_GPIO=y CONFIG_CONSOLE=nCONFIG_NO_OPTIMIZATIONS=y # Add this line
-
In the MCUXpresso view, rebuild the blinky application. At the end of the build, the memory usage shows a large increase in flash usage after optimizations are disabled. But this change can also make the app much easier to debug.
Memory region Used Size %age Used FLASH: 28590 B 0.34% RAM: 4160 B 0.01% Memory region Used Size %age Used FLASH: 53738 B 0.64% RAM: 4160 B 0.01%
The previous sections set application Kconfigs using the app’s prj.conf file. Kconfigs in the prj.conf apply across any hardware platform that app is built on. Another option is to create a board-specific Kconfig file for the application. This is useful when you want the same application to build on multiple boards, and may want different Kconfigs depending on the hardware. This method is frequently used by the sample applications in the Zephyr repository, like samples/net/zperf/boards/mimxrt1060_evk.conf. This lab section will give an example of setting board-specific Kconfigs for an app.
In the last section, the lab steps disabled compiler optimizations to ease debugging. A common consequence of disabling optimizations for an application is that a stack size may need to increase to enable the larger RAM requirement. These steps will first intentionally overflow the existing stack size for the Main thread, and then increase the Main thread stack size using CONFIG_MAIN_STACK_SIZE. Other stack size settings frequently used in Zephyr applications include:
CONFIG_IDLE_STACK_SIZECONFIG_ISR_STACK_SIZE- Plus each thread has an individual stack size
For the first steps, we will confirm the current CONFIG_MAIN_STACK_SIZE. And then intentionally overflow this stack size.
-
In VS Code, return to the .config file already open in the editor. Search for
CONFIG_MAIN_STACK_SIZE, and take note of the current size. This is an example of an integer Kconfig, setting the size in bytes:CONFIG_MAIN_STACK_SIZE=1024
-
In the Explorer view, open main.c, in the src folder.
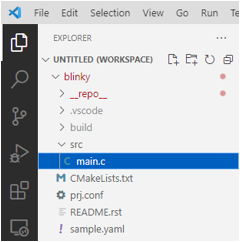
-
To overflow the Main thread stack, copy and add the middle section of code below, and add to the beginning of
main()in main.c. To overflow the stack, we are declaring an array that is size1+CONFIG_MAIN_STACK_SIZE. Save main.c (Ctrl-S).void main(void) { int ret;/* Add an array that is too large for the Main thread stack */ uint8_t large_buf[1025] = {0}; if(large_buf[0] != 0) /* to force compiler to keep large array */ while(1);
if (!gpio_is_ready_dt(&led)) { return; } -
Optional, if you build and debug the application now, you will find the app builds, but it no longer blinks the LED, and instead ends up in a fault when the stack overflows.
The next steps will increase the size of CONFIG_MAIN_STACK_SIZE, using a board-specific Kconfig file.
-
In the Explorer view, right-click the blinky project folder, and select New Folder.
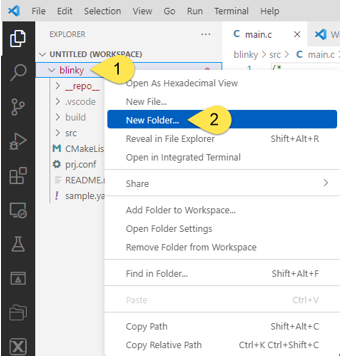
-
Name the new folder boards.
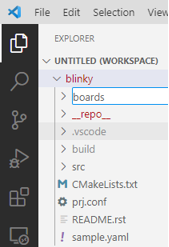
-
Right-click the boards folder, and select New File.
-
The new file must be named after the board we are building for: mimxrt1060_evkb.conf.
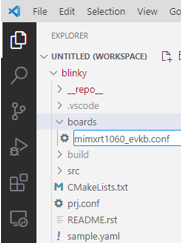
-
Copy the line below, and add to the new file. Save mimxrt1060_evkb.conf (Ctrl-S).
CONFIG_MAIN_STACK_SIZE=2048
-
Clean the project. Note that asking VS Code to build the project right now will not work. The build system will not detect that a new Kconfig file was added to the application, so it will think nothing has changed since the last build. To force the build system to include the new file, go to the MCUXpresso view, right-click the blinky project, and select Clean Selected.
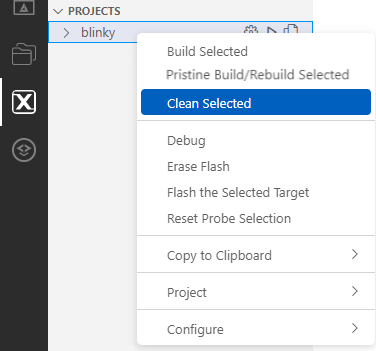
-
Debug the blinky project, and run on the board. The LED blinks again, now with the larger Main thread stack size.
-
Building the project also processed all the Kconfigs, and re-generated the .config file. If you return to .config already open in the Editor,
CONFIG_MAIN_STACK_SIZEhas been updated to 2048.
This Kconfig lab is completed. But the following steps will clean up the VS Code workspace:
-
Stop the Debugger

-
Close all Editor tabs. Right-Click on a tab, and select Close All.
-
If this is the last lab and you are done using the board, you should disconnect the Serial Monitor. Find the Serial Monitor view, and click Stop Monitoring.

- Zephyr Kconfig documentation
- guiconfig and menuconfig interactive Kconfig tools
- Sources of Kconfig symbols, and how they are merged
- Webinar with more Kconfig training: Application Portability Made Easy With Zephyr OS and NXP
Lab completed. Return to the RT1060 Zephyr Labs Overview Training Zephyr Getting Started RT1060
Use this GitHub Issues section to report ambiguities or problems encountered in this documentation. For MCUXpresso for Visual Studio Code extension issues, feedback or search for solutions and ideas please follow Community page.
Table of contents
Dependency Installation
General
Software Repositories
Project Management
Flash and Debug
Reference Guides
- Getting Started with MIMXRT1060-EVK
- Training Zephyr Getting Started
- TrustZone Examples on LPC55S6x and MCUXpresso SDK
- Multicore Examples on LPC55S6x and MCUXpresso SDK
- SDRAM Examples on RT1060 and MCUXpresso SDK
- Getting Started with MCX using Application Code Hub
- AN14120: Debugging Cortex-M on i.MX 8M, i.MX 8ULP, and i.MX 93
Troubleshooting
Useful links