-
Notifications
You must be signed in to change notification settings - Fork 137
Brush Volumes
Brushes can be turned into Volumes. A volume could be a trigger, an area with a strong wind, a body of water, a loading zone or anything else you want.

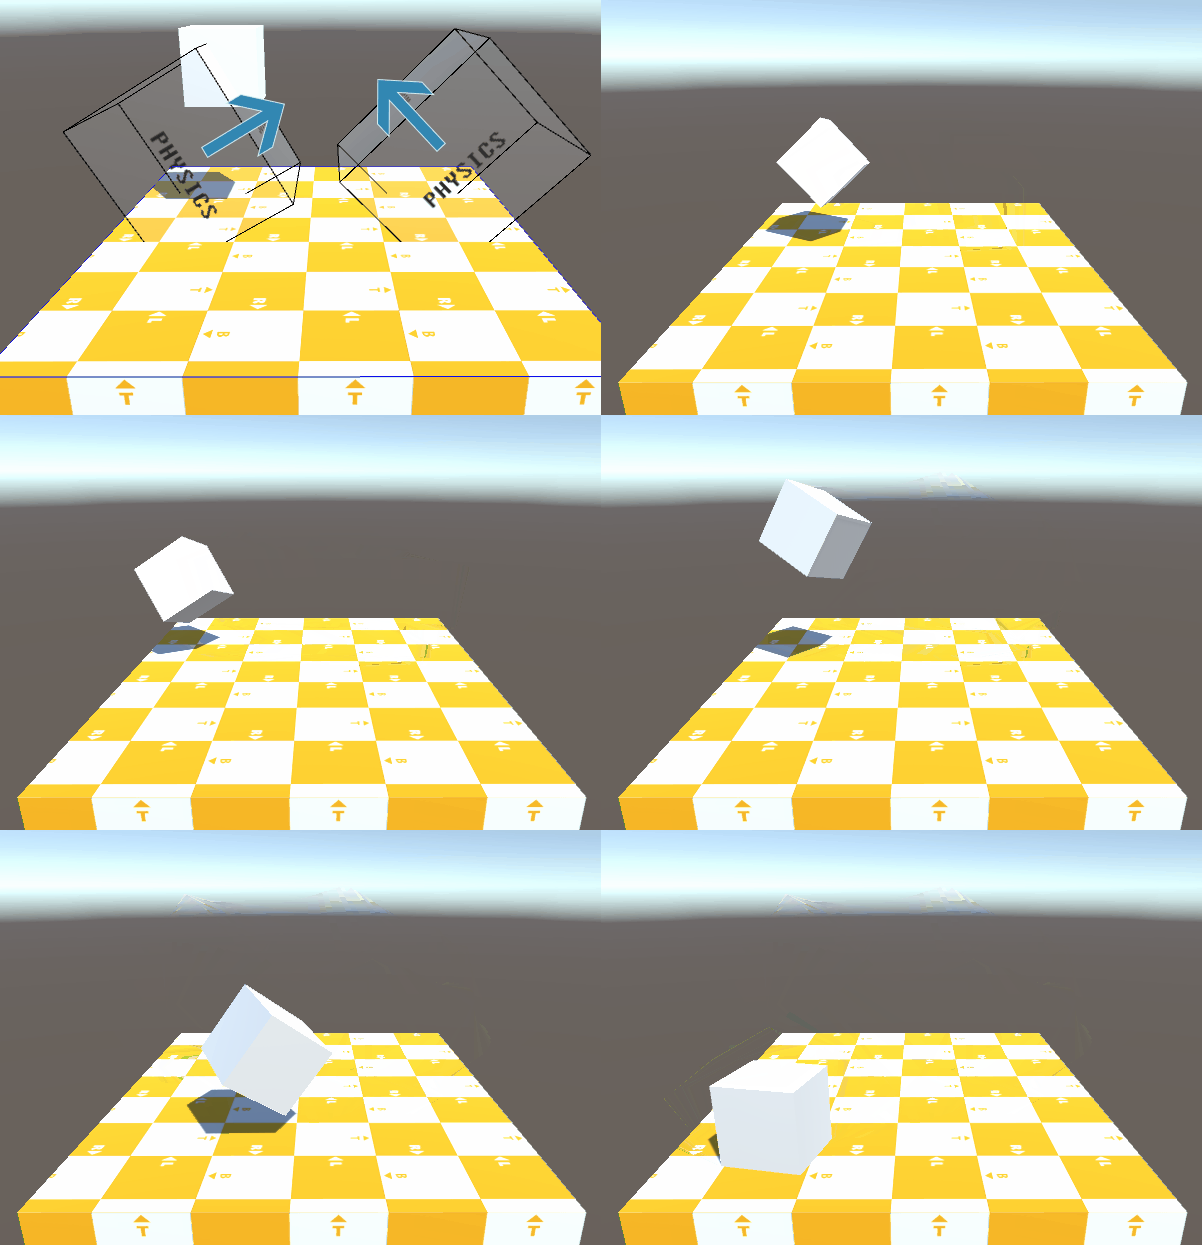
Two physics volumes pushing a cube around
Select a primitive brush like a "Cube Brush (2 x 2 x 2)" and in the mode of "Add" or "Subtract" set the brush to "Volume". You will see a new section in the inspector where you can select and configure the volume type, for example the "PhysicsVolume". Hit play and it works out of the box! No rebuild is necessary, this workflow makes it incredibly simple to create new volumes in any shape or size.

Turning a brush into a volume
You can change the brush mode back to "Add" or "Subtract", you can clip volumes in half, it all works like you'd expect.
SabreCSG comes shipped with a couple generic use-case volume types. You can find more specialized volumes here:
Daniel Cornelius - SabreCSG Volume Addons - GitHub - Visit
00Laboratories - Volumetric Audio for SabreCSG - Unity Asset Store - Visit
The physics volume is able to manipulate rigid bodies that enter it. You could use it to build wind tunnels or zero gravity areas without writing a single line of code.

Two physics volumes pushing a cube around

The physics volume inspector
| Force Type | Description | Method |
|---|---|---|
| Force | Adds a force to the rigid body. | Rigidbody.AddForce |
| Relative Force | Adds a force to the rigid body relative to its coordinate system. | Rigidbody.AddRelativeForce |
| Torque | Adds a torque to the rigid body. | Rigidbody.AddTorque |
| Relative Torque | Adds a torque to the rigid body relative to its coordinate system. | Rigidbody.AddRelativeTorque |
| Force Mode | Description |
|---|---|
| None | Doesn't do anything, the option is disabled. |
| Force | Adds a continuous force to the rigid body, using its mass. |
| Impulse | Adds an instantaneous force impulse to the rigid body, using its mass. |
| VelocityChange | Adds an instantaneous velocity change to the rigid body, ignoring its mass. |
| Acceleration | Adds a continuous acceleration to the rigid body, ignoring its mass. |
| Force Space | Description |
|---|---|
| Relative | Rotates physical forces relative to the volume brush's rotation. |
| World | The physical forces are applied in world space. |
| Gravity Mode | Description |
|---|---|
| None | Doesn't do anything, the option is disabled. |
| Enable | Enables gravity on the rigid body. |
| Disable | Disables gravity on the rigid body. |
| ZeroGravity | Disables gravity on the rigid body while inside the volume, enables it on exit. |
| ZeroGravityRestore | Disables gravity on the rigid body while inside the volume, restores the original gravity settings on exit. |
The trigger volume calls Unity Events when rigid bodies enter, stay inside of or exit the volume.

The trigger volume inspector
For example, this trigger will have the "Main Camera", "Look At" the "Cube" while some rigid body is inside of the volume. This is called every frame and is a great way to create a cinematic experience without writing any code:

An event that has the camera looking at a cube

A cinematic experience using triggers to switch cameras
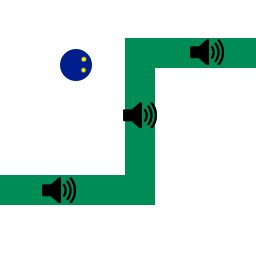
The problem with default Unity audio sources is that they are emitting sound from a fixed position. If you have a large sewer pipe with water streaming through it you should be able to hear it coming from the sewer pipe itself no matter where you stand. By default you’d have to place multiple sound sources and then it may appear to come from the side as illustrated in this image:

For our player the sound would appear to come from the right and at the center of each pipe segment. It’s unrealistic, doesn’t make much sense and it takes him out of the immersion of the game.
Volumetric Audio solves this problem by having a sound source that follows the player along the exterior of the pipe. By doing so it appears that the sound comes from the pipe no matter where he stands. It even blends the sound to 2D if he were to enter the pipe so that the sound surrounds him completely (similar to the music), allowing the player to truly immerse in the vast environment of sound with great realism.

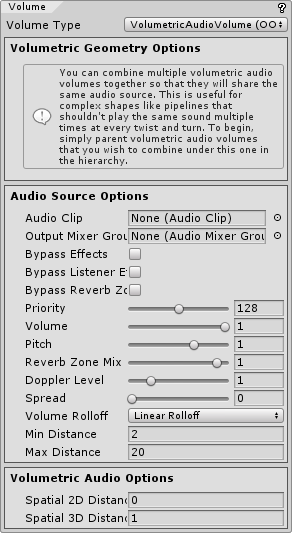
The volumetric audio volume inspector
| Property | Description |
|---|---|
| Audio Clip | The audio clip played by the volumetric audio source. |
| Output Mixer Group | Set whether the sound should play through an Audio Mixer first or directly to the Audio Listener. |
| Bypass Effects | Bypass/ignore any applied effects on the volumetric audio source. |
| Bypass Listener Effects | Bypass/ignore any applied effects from the Audio Listener. |
| Bypass Reverb Zone | Bypass/ignore any reverb zones. |
| Priority | Sets the priority of the volumetric audio source. Note that a sound with a larger priority value will more likely be stolen by sounds with smaller priority values. |
| Volume | Sets the overall volume of the sound. |
| Pitch | Sets the frequency of the sound. Use this to slow down or speed up the sound. |
| Reverb Zone Mix | Sets how much of the signal this volumetric audio source is mixing into the global reverb associated with the zones. [0, 1] is the linear range (like sound volume) while [1, 1.1] lets you boost the reverb mix by 10 dB. |
| Doppler Level | Specifies how much the pitch is changed based on the relative velocity between the audio listener and the volumetric audio source. |
| Spread | Sets the spread of a 3D sound in speaker space (prevents having sound all in one ear sometimes). |
| Volume Rolloff | Which type of volume rolloff curve to use for the volumetric audio source. |
| Min Distance | The minimum distance where the volumetric audio source volume stays the loudest possible. Outside of this minimum distance it begins to attenuate. |
| Max Distance | The maximum distance the volumetric audio source stops attenuating at. |
| Spatial 2D Distance | The spatial 2D distance affects the distance from the volume before the volumetric sound fully transitions to 2D (inner radius). |
| Spatial 3D Distance | The spatial 3D distance affects the distance from the volume before the volumetric sound fully transitions to 3D (outer radius). |
To immediately hear the amazing volumetric sound all you have to do is assign the “Audio Clip” in the inspector.

You do not have to enter play mode as this extension features live audio preview in the editor. It’s important that you disable/enable the scene view audio icon often as it tends to be a little buggy, this is not our fault.

If you wish to mute the audio you must use the “Mute Audio” button in the Game tab.

C# recompilations during play are fully supported.
When you have the Volumetric Audio Volume brush selected you can see several spheres, blue, red and possibly even green. In the center of them is the audio source (it doesn’t have the usual speaker horn icon). When you fly around in the scene you can see that it tries to follow you and when you enter the volume you will be inside of the spheres. The next chapter will go into more details on what these spheres mean.
The spatial 3D distance is indicated by the red sphere around the volumetric audio source. When the audio listener is outside of this sphere the sound will be completely 3D (usually changed using the “Spatial Blend” property in the inspector) and will appear to come from a point in space.
The spatial 2D distance is indicated by the green sphere around the volumetric audio source. When the audio listener is inside of this sphere the sound will be completely 2D (usually changed using the “Spatial Blend” property in the inspector) and will appear to surround you, similar to the music, just a stereo sound played equally in both speakers.
The blue spheres are the default Unity spheres. They display attenuation. When the audio listener is inside of the small sphere the sound will play at full volume and anything outside of the large sphere will no longer be heard.
Similar to how the audio fades away when you get further away from it as indicated by the blue spheres, the 2D sound fades into 3D sound when you get further away from it as indicated by the green and red spheres.

You can combine multiple volumetric audio volumes together so that they will share the same audio source. This is useful for complex shapes like pipelines that shouldn't play the same sound multiple times at every twist and turn (SabreCSG only supports convex shapes so a pipeline would have to exist out of multiple brushes). To begin, simply parent volumetric audio volumes that you wish to combine under this one in the hierarchy.

The inspector will change to indicate that the child volumetric audio volume brush no longer has its own audio source, as this is now simply additional geometry used by the parent volume.

Select one of the brushes and have a look at the volumetric audio source while you fly around the scene, it will jump between them or smoothly follow along the geometry that you have created. This allows for realistic long curvy hallways or large ocean bodies without any intersections where you’d suddenly hear the same sound twice. Please note that you cannot parent a child volume to a child volume.
Primitive brushes must be convex. Unity's mesh collider with "Is Trigger" enabled requires meshes to be convex. This shared rule makes brushes a perfect candidate to define areas of space. The brush volumes generate a game object with a mesh collider trigger using the brush as the mesh.
Each volume type comes in two parts. The first part is an editor script that contains a custom inspector and code to add components to the built volume game objects (e.g. Sabresaurus.SabreCSG.Volumes.TriggerVolume, inherits from Sabresaurus.SabreCSG.Volume).
The second part is the component itself that will be active during play (e.g. Sabresaurus.SabreCSG.Volumes.TriggerVolumeComponent) which is an ordinary MonoBehaviour that receives OnTriggerEnter events by Unity because there is a mesh collider trigger.
The ability to create your own volume types is the most powerful feature. You could create your own water volumes, kill zones, loading zones or even volumes that alert nearby enemies, truly anything you want!
First we have to create a script that builds the volume. These types of scripts don't exist in the final build of your game and thus require the use of "#if UNITY_EDITOR" pre-processor directives. The C# documentation will provide more details:
#if UNITY_EDITOR

using Sabresaurus.SabreCSG;
using System;
using System.Linq;
using UnityEngine;

namespace MyGame
{
    /// <summary>
    /// This is a custom volume type that SabreCSG will recognize.
    /// </summary>
    [Serializable] // this lets unity know that we wish to save this class when the scene is saved.
    public class TestVolume : Volume
    {
        /// <summary>
        /// An incredible string that will be printed to the console.
        /// </summary>
        [SerializeField] // this lets unity know that we wish to save this variable.
        public string incredibleString = "Enter a message";

        /// <summary>
        /// Called when the inspector GUI is drawn in the editor.
        /// </summary>
        /// <param name="selectedVolumes">The selected volumes in the editor (for multi-editing).</param>
        /// <returns>True if a property changed or else false.</returns>
        public override bool OnInspectorGUI(Volume[] selectedVolumes)
        {
            var testVolumes = selectedVolumes.Cast<TestVolume>();
            bool invalidate = false;

            // we provide a text field for the user:
            string previousText = incredibleString;
            incredibleString = UnityEditor.EditorGUILayout.TextField(new GUIContent("Message", "This is the incredible string."), incredibleString);

            // if the user has input a new text:
            if (incredibleString != previousText)
            {
                // we loop over all selected volumes and apply this change.
                // this allows for multi-editing in the editor.
                foreach (TestVolume volume in testVolumes)
                    volume.incredibleString = incredibleString;

                // tell sabrecsg to update the volume brushes:
                invalidate = true;
            }

            return invalidate;
        }

        /// <summary>
        /// Called when the volume is created in the editor.
        /// </summary>
        /// <param name="volume">The generated volume game object.</param>
        public override void OnCreateVolume(GameObject volume)
        {
            // here we can customize our volume game object that will be active during play.
            // it already has a mesh collider component in place at this point.

            // let's add our component and pass on the parameters.
            TestVolumeComponent component = volume.AddComponent<TestVolumeComponent>();
            component.incredibleString = incredibleString;
        }
    }
}

#endifNext we have to create a script that executes our volume logic during play, the C# documentation will provide more details:
using UnityEngine;

namespace MyGame
{
    /// <summary>
    /// This is the test volume component that is active during play.
    /// </summary>
    public class TestVolumeComponent : MonoBehaviour
    {
        /// <summary>
        /// An incredible string that will be printed to the console.
        /// </summary>
        public string incredibleString = "Enter a message";

        /// <summary>
        /// Called when a collider enters the volume.
        /// </summary>
        /// <param name="collider">The collider that entered the volume.</param>
        private void OnTriggerEnter(Collider collider)
        {
            // print our incredible string to the console.
            Debug.Log(incredibleString);
        }
    }
}
Don't forget, a rigid body has to fall into the trigger volume in order to have the message be printed to the console!
If you need to detect any collider and not just rigid bodies, add a Rigidbody component to your volume and set Rigidbody.isKinematic to true. This will give triggers the ability to detect colliders. It does not physically interact with the scene.
For more information visit the official http://sabrecsg.com/ website, or join the official discord server:

Tutorials
Brush Tools
Primitive Brushes
Compound Brushes
Resources
Requests for comments
