-
Notifications
You must be signed in to change notification settings - Fork 18
Calibration
1.1 Activate the camera.
*Set the color and resolution same as Autoware.
1.2 Activate Velodyne.
1.3 Run Autoware.
1.4 On the Setup tag, start the TF of Baselink to Localizer.
1.5 On the Sensing tag, start the camera node of Cameras.
1.6 On the Sensing tag, start the Velodyne node of LIDARs.
1.7 On the Sensing tag, start Calibration Tool Kit or RViz and monitor camera image and
Velodyne point cloud image.
1.8 Check the standing position at a short distance (about 5 m).
Hold the checkerboard in portrait orientation (Note:1) and the checkerboard is completely
positioned at the center-lower end, center-upper end, lower-right end, upper-right end,
lower-left end, upper-left end position of the camera image screen (within your reach)
check the range shown in the camera image and the Velodyne point cloud image.
It is good to set a coin on the ground for the standing position.
*If the camera image or Velodyne point cloud image of the checkerboard is missing,
it can not be used for calibration.
*For accurate calibration, it is necessary to record many poses of checkerboard in the widest
possible area within the camera and Velodyne's field of view.
1.9 As in the previous section, confirm the standing position at a long distance.(Note:2)
*If too far, accurate calibration will not be possible.
2.1 At the beginning, we start with the pose of near-middle-bottom and front. (see movie)
*In the far position, as the point clouds on the board decrease, please hide the body
in the back of the board, so as not to be confused with the point cloud of the body.
2.2 In ROSBAG, start recording the topics of "/image_raw" and "/points_raw".
2.3 In total of 60 poses in the following order, stop for about 2 seconds for each pose.
at the near-middle-lower, front -> right tilt -> left tilt -> down tilt -> up tilt
at the near-middle-upper, front -> right tilt -> left tilt -> down tilt -> up tilt
at the near-right-lower, front -> right tilt -> left tilt -> down tilt -> up tilt
at the near-right-upper, front -> right tilt -> left tilt -> down tilt -> up tilt
at the near-left-lower, front -> right tilt -> left tilt -> down tilt -> up tilt
at the near-left-upper, front -> right tilt -> left tilt -> down tilt -> up tilt
at the far-middle-lower, front -> right tilt -> left tilt -> down tilt -> up tilt
at the far-middle-upper, front -> right tilt -> left tilt -> down tilt -> up tilt
at the far-right-lower, front -> right tilt -> left tilt -> down tilt -> up tilt
at the far-right-upper, front -> right tilt -> left tilt -> down tilt -> up tilt
at the far-left-lower, front -> right tilt -> left tilt -> down tilt -> up tilt
at the far-left-upper, front -> right tilt -> left tilt -> down tilt -> up tilt
Tilt the board about 30 degrees.
*It is not necessary to get all the poses perfectly.
2.4 Stop recording the topic of ROSBAG.
3.1 Play the ROSBAG for calibration acquired in the previous section, for a moment.
Pause immediately after Play.
3.2 Start Calibration Tool Kit.
- For "Select Input Image Topic", select "/image_raw" and press OK.
- For "Calibration Type", select "Camera->Velodyne" and press OK.
*It can start after Play->Pause ROSBAG.
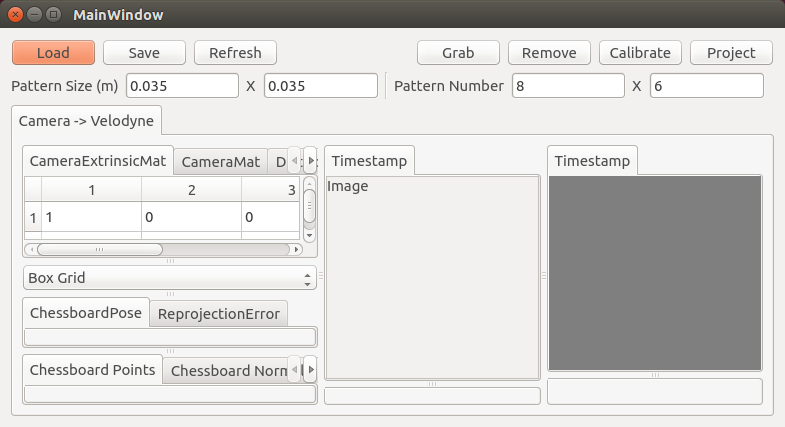
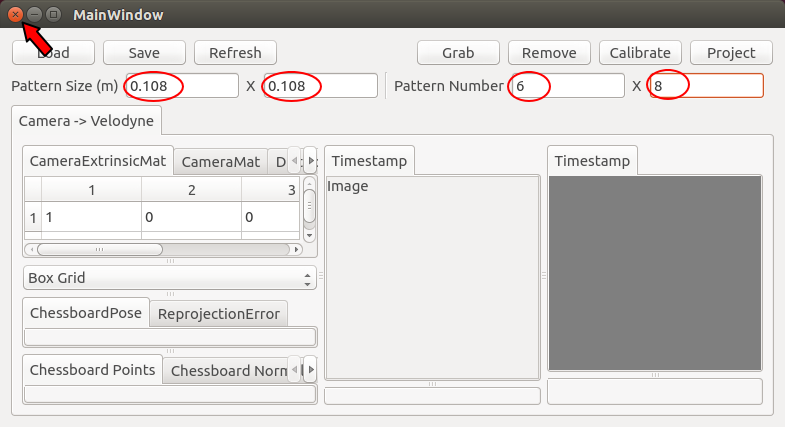
3.3 To change Pattern Size and Pattern Number, after changing the value, click (X)
on the upper left to temporarily exit and restart the Calibration Tool Kit.
*The setting values of Autoware standard checkerboard are as follows.
- Pattern Size: 0.108 X 0.108
- Pattern Number: 6 X 8
3.4 Release Pause of the ROSBAG for a moment, and Pause again.
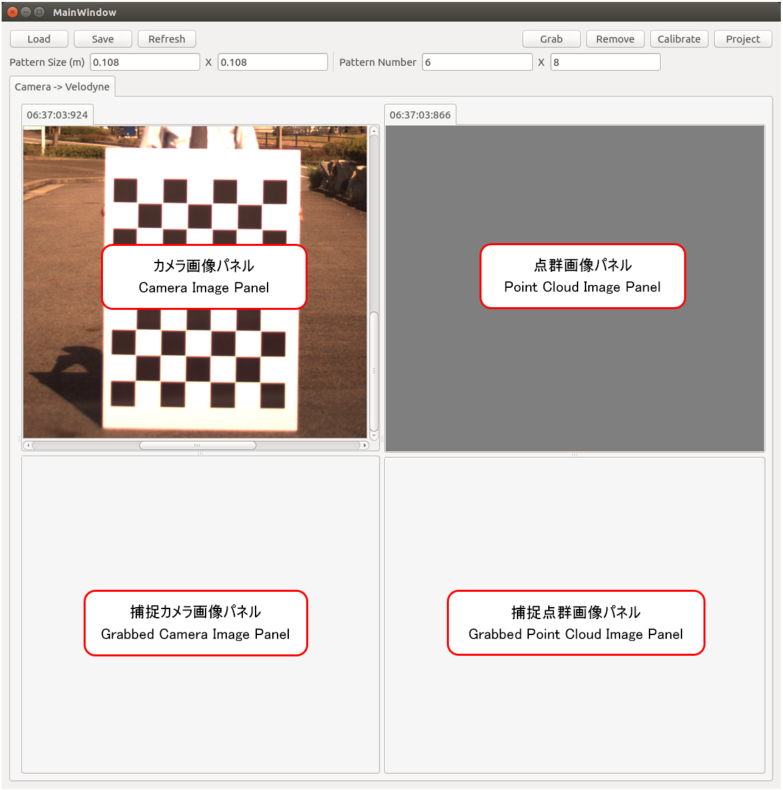
3.5 At large display, align the four image display panels in quarters.
At small display, make the upper-left and upper-right panels larger and the lower-left and
lower-right panels smaller, as below.
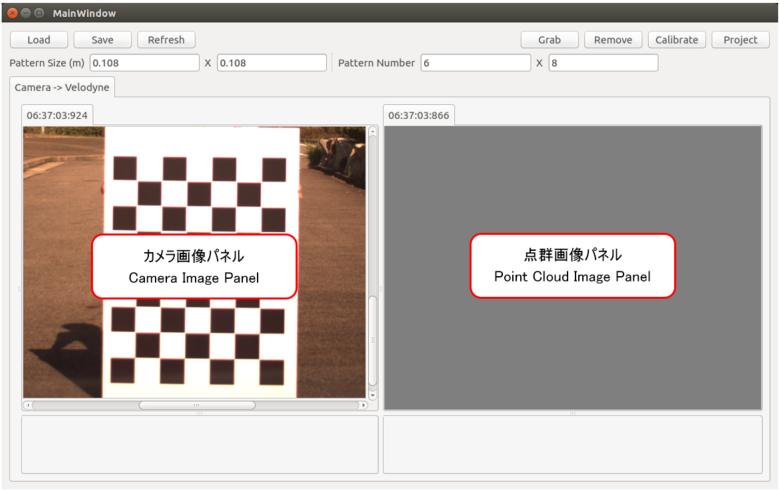
3.6 The upper-left Camera Image Panel displays the current camera image.
Adjust the image position so that the checkerboard is at the center of the panel.
Confirm that the checkerboard is a near-center-lower-front pose, otherwise release
ROSBAG Pause and Pause again in the near-center-lower-front.
*The operation on the Camera Image Panel is as follows.
- With the scrollbar or the cursor keys, the image moves vertically and horizontally.
- With the mouse wheel, the image moves up and down.
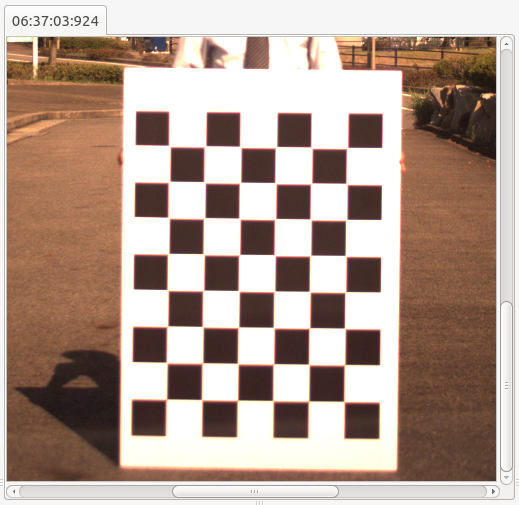
3.7 The upper-right Point Cloud Image Panel shows the current Velodyne point clouds.
At first the view point is downward from Velodyne, so it's too low to see anything.
Press "↓" once to display point clouds as if Velodyne look down from above.
(If the background color is black, press "b" to change the background color to gray.Note:3)
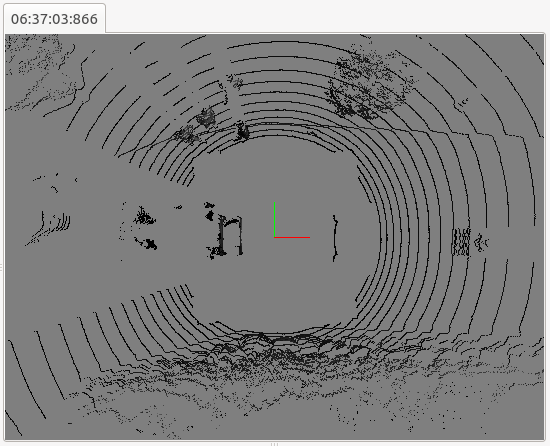
*The operation in the Point Cloud Image Panel is as follows.
- Viewpoint movement: ↑=forth, ↓=back, ←=left, →=right, PgUp=up, PgDn=down
- Viewpoint rotation: a=left, d=right, w=up, s=dowm (q=left-tilt, e=right-tilt)
- Projection mode: 1=perspective, (2=orthographic)
- Point size: o=small. (p=large)
- Change background color: b
- Change viewpoint movement: mouse wheel forward=increase, backword=decrease
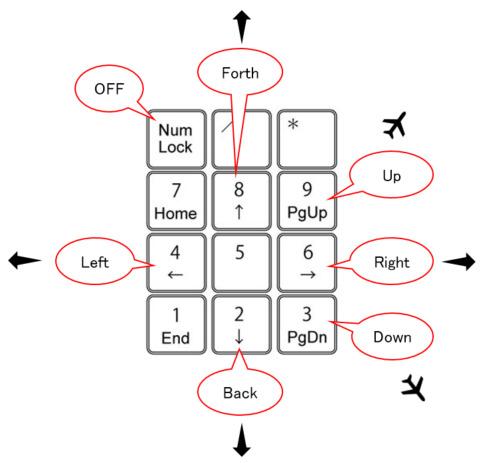
Key operation of viewpoint movement in Point Cloud Image Panel.
Please release Num Lock.
Adjust the amount of viewpoint movement with the mouse wheel.
*As the viewpoint moves, the image moves in the opposite direction.
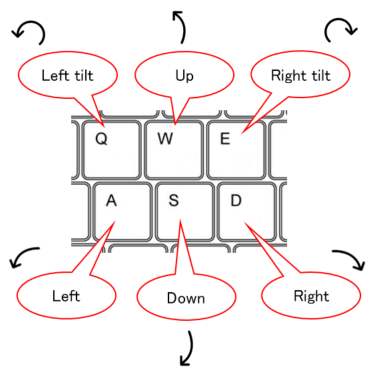
Key operation of viewpoint rotation in Point Cloud Image Panel.
*As the viewpoint rotates, the image moves in the opposite direction.
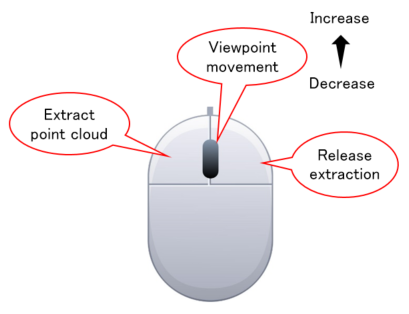
Mouse operation on Point Cloud Image Panel.
(For point cloud extraction/cancellation, only the Captured Point Cloud Image Panel.)
The red, green and blue origin mark at the center of the Point Cloud Image Panel
represents the position and direction of Velodyne (red=forward, green=left, blue=up).
Move the viewpoint to a viewable position with the following operations.
(1) Hold "e" and rotate so that the viewpoint is in front of the car.
(2) Rotate the mouse wheel backward to minimize the amount of viewpoint movement.
(3) Hold "↑" so that the ground can be seen at the moment.
While holding "↑", rotate the mouse wheel to adjust the moving speed.
(4) Hold "w" and rotate the viewpoint upwards to see the point clouds on the checkerboard.
(5) ↑, ↓, ←, →, PgUp, PgDn, a, d, w, s key to correct the checkerboard to a viewable position.
At this time, if you adjust not only the middle-lower, but also the right, left, upper
and lower pose to the position where the checker board can be seen, the later
operation becomes easy.
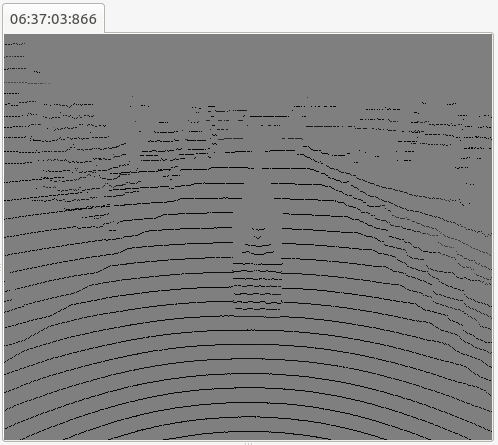
3.8 Press the Grab button to capture the camera image and Velodyne point clouds.
When fail to capture, you can cancel with the Remove button.
*If the checkerboard image is missing and the intersection of the checker can not
be acquired, Grab can not be done.
3.9 The lower-left Grabbed Camera Image Panel displays the captured camera image.
A tab of "Image_0" has been created.
Adjust the image position so that the checkerboard is at the center of the panel.
Confirm that the checker intersection recognition result is displayed on the image.
After confirmation, make the panel smaller.
*The operation method of the Captured Camera Image Panel is the same as the
Camera Image Panel on the upper-left.
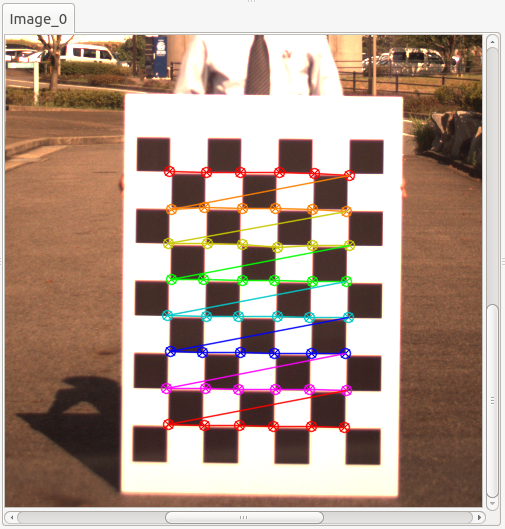
3.10 The lower-right Grabbed Point Cloud Image Panel displays the captured Velodyne clouds.
A tab of "Velodyne_0" has been created.
When you hover the cursor over the checkerboard, a green circle and two lines are
displayed.
One is the center axis of the circle (the line perpendicular to the circle) and the other
is the line parallel to the circle.
Here, only the center axis of the circle is important, so you can ignore the line parallel
to the circle.
*The method of operating the Grabbed Point Cloud Image Panel is the same as the
Point Cloud Image Panel on the upper-right.
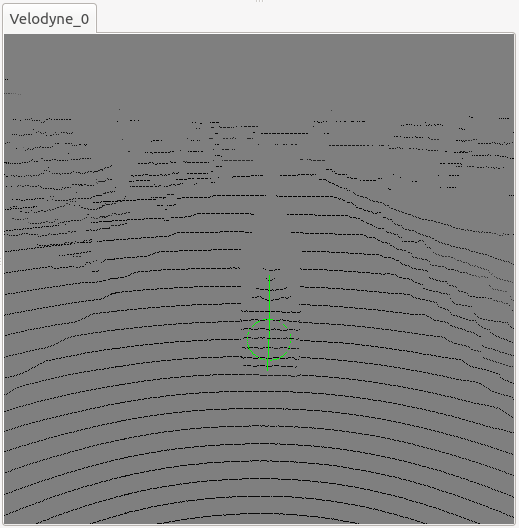
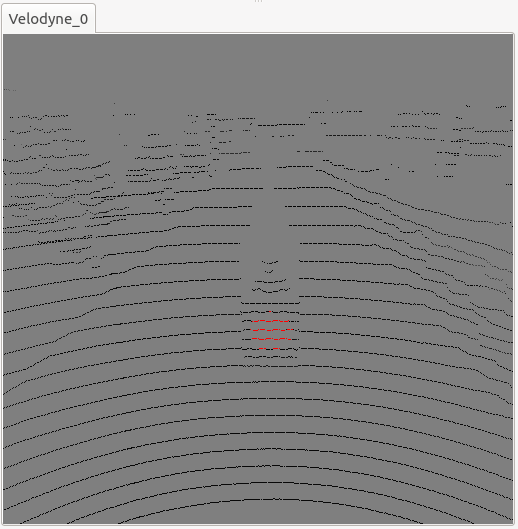
3.11 Visually check that the cursor (circle) is placed at the center of the checkerboard,
the circles overlap in parallel with the checkerboard face, and the line perpendicular to
the circle is perpendicular to the checkerboard face, then left click to extract point cloud.
Make sure that the extracted checkerboard point clouds displayed in red are in the center
of the checkerboard.
If extraction fails, cancel with right click and extract with left click again.
The diameter of the green circle is the actual size (see ※2), it is a size inversely
proportional to the distance from the viewpoint, and displayed so as to be parallel to
the point cloud in the circle.
3.12 Release Pause of ROSBAG and grab the remaining 29 near poses consecutively while
watching the upper-left Camera Image Panel and the upper-right Point Cloud Image Panel.
Tabs of "Image_1-29" are created in the lower-left Grabbed Camera Image Panel.
Tabs of "Velodyne_1-29" are created in the lower-right Grabbed Point Cloud Image Panel.

3.13 Pause the ROSBAG once the camera image is far-center-lower-front pose.
Adjust the image position of the upper-left Camera Image Panel and the upper-right
Point Cloud Image Panel to make it easy to see.
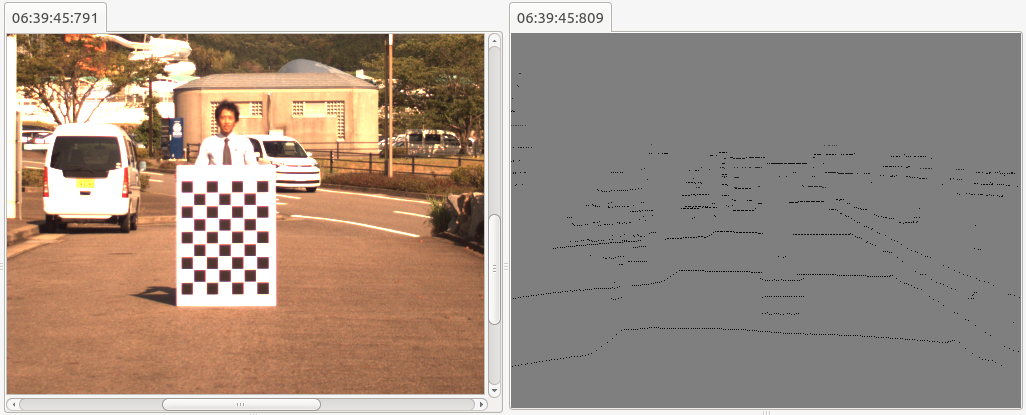
3.14 Release Pause of ROSBAG and grab the remaining 30 far poses consecutively while watching
the upper-left Camera Image Panel and the upper-right Point Cloud Image Panel.
Tabs of "Image_30-59" are created on the lower-left Grabbed Camera Image Panel.
Tabs of "Velodyne_30-59" are created in the lower-right Grabbed Point Cloud Image Panel.

3.15 Stop ROSBAG.
3.16 When the display is small, expand the lower-left Grabbed Camera Image Panel and the
lower-right Grabbed Point Cloud Image Panel to the maximum upward.
3.17 In the same way as in Section 3.11, "Velodyne_59-1" will be extracted by clicking
the center point cloud of the checkerboard.
3.18 After extracting all center point clouds of "Velodyne_0-59", press the Calibrate button
to calculate the calibration data.
Because it takes time to calculate, monitor the CPU load of Runtime Manager and wait for
it to finish.
3.19 After calculation is completed, press the Project button.
Make sure that the red extracted point clouds overlap at the center of the checkerboard
of each of "Image_0-59"
in the Grabbed Camera Image Panel on the lower-left.
If the accuracy of the overlapping position is not good, correct the position of the
extracted point cloud of "Velodyne_0-59" of the lower-right Grabbed Point Cloud Image
Panel, (cancel by right click, and re-extract with left click), then try again
Calibrate button and Project button.
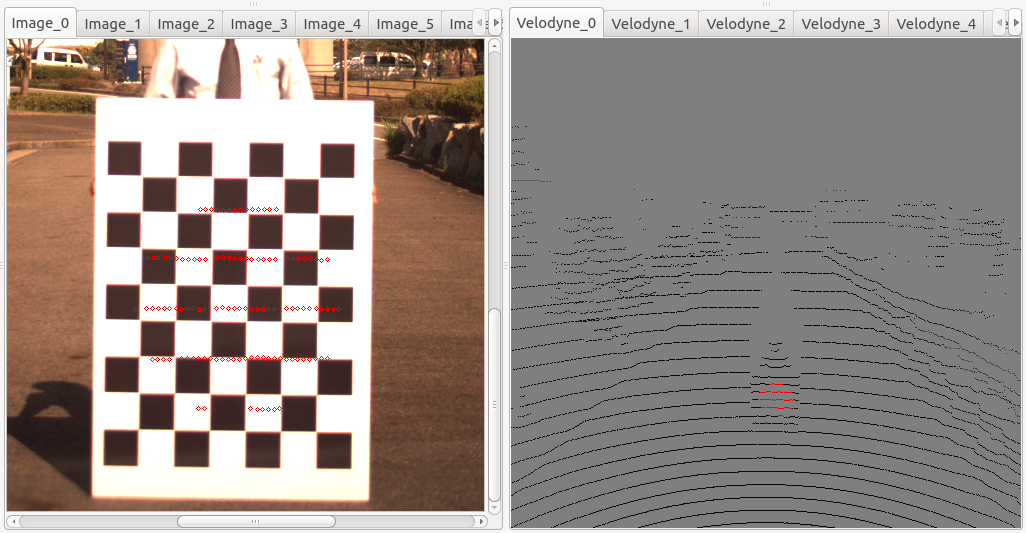
3.20 If there is no problem, press the Save button and save the calibration result with an
appropriate file name (extension ".yaml" is recommended).
As the Save Option dialog is displayed, press "No" for "Save Camera Calibration Data ?",
and "No" for "Save Velodyne Calibration Data ?".
3.21 Click (X) at the top-left to exit the Calibration Tool Kit.
In normal camera calibration, the viewing angle of the camera is large in the horizontal direction,
so use the checkerboard sideways.
In the calibration of Autoware, we calibrate the camera (high resolution) and Velodyne
(coarse resolution in the height direction) at the same time.
In order to improve accuracy, it is necessary to calibrate at a long distance as much as possible,
so a certain size is required for the checkerboard.
For Autoware, we recommend A0 size (841 x 1189 mm) board.
And a vertical hold is to make it easier to hold the board, make it easier to hide the body
behind the board, to reduce Velodyne's scan line projected on the board when tilting the board
back and forth.
Checker pattern reference URL:
http://wiki.ros.org/camera_calibration/Tutorials/MonocularCalibration?action=AttachFile&do=view&target=check-108.pdf
Grasping the position of the checkerboard with Calibration Tool Kit is done by the following
method.
- For camera images, automatic detection of checker pattern.
- In the Velodyne point cloud image, a manual click on the Grabbed Point Cloud Image Panel.
In the Grabbed Point Cloud Image Panel, at least two Velodyne scanlines must be included in
the green circle displayed on the panel in order to be able to click and position input possible.
With only one line, the green circle can not be correctly displayed on the checkerboard surface
because the surface can not be determined.
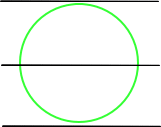
*The worst case is when the scanline is in the center of the green circle. (see left figure)
In this case, if there is no next scanline within half the diameter of the circle,
it will not be detected as a plane.
Condition for including two scanlines at least: half of the circle diameter > scanline interval
The diameter of the green circle for extracting point cloud is the smaller of the following:
- Pattern Size (m) [width] × Pattern Number [column]
- Pattern Size (m) [height] × Pattern Number [row]
and with standard checkerboard of Autoware:
・Pattern Size [width/height] = 0.108 [m]
・Pattern Number [column] = 6
so, the diameter of the circle is:
0.108 × 6 = 0.648 [m]
and the maximum of scan interval for always containing two Velodyne scanlines in this circle is:
0.648/2 = 0.324 [m]
Therefore, the maximum distance between Velodyne and checkerboard is:
maximum distance = 0.324 / tan(interval angle of vertical scan)
| Model number | Vertical scan number | V. scan range[deg] | V. scan interval[deg] | Max distance[m] |
|---|---|---|---|---|
| HDL-64e | 64 | 26.8 | 0.425 | 43.7 |
| HDL-32e | 32 | 41.3 | 1.332 | 13.9 |
| VLP-16(30) | 16 | 30 | 2 | 9.3 |
| VLP-16(20) | 16 | 20 | 1.333 | 13.9 |
In addition, when the board is tilted back and forth, the circle deforms so as to be parallel
to the board, so the apparent circle height seen from Velodyne decreases according to the tilt
of the board.
For example, the minor axis when tilted 30 degree back and forth is:
0.648×cos(30 [deg]) = 0.561 [m]
In this ellipse, two scan lines are always included, the maximum of Velodyne's scan interval is:
0.561/2 = 0.281 [m]
Therefore, the maximum distance from Velodyne is:
maximum distance = 0.281 / tan(interval angle of vertical scan)
| Model number | Vertical scan number | V. scan range[deg] | V. scan interval[deg] | Max distance[m] |
|---|---|---|---|---|
| HDL-64e | 64 | 26.8 | 0.425 | 37.9 |
| HDL-32e | 32 | 41.3 | 1.332 | 12.1 |
| VLP-16(30) | 16 | 30 | 2 | 8.0 |
| VLP-16(20) | 16 | 20 | 1.333 | 12.1 |
The initial background color of the Point Cloud Image Panel at the upper-right and the
Grubbed Point Cloud Image Panel at the lower-right is black, and it is not appropriate to see
the point cloud.
By changing the source code of Autoware, and by catkin_make_release, you can make
the initial background color gray.
Modify line 45 of Autoware/ros/src/util/packages/RobotSDK/glviewer/GLViewer/glviewer.cpp
- cameraparameters.background=Eigen::Vector4d(0,0,0,1);
+ cameraparameters.background=Eigen::Vector4d(0.5,0.5,0.5,1);
