-
Notifications
You must be signed in to change notification settings - Fork 41
Development Manual
Algorithms in Action is written in JavaScript, using the React framework. To work on it locally, you will need to install Node.js on your computer. Node.js (sometimes just called "node") is a JavaScript-based web server that will allow us to view the website locally. This will also install npm, a multipurpose tool that will install 3rd party dependencies, start the app, and run test suites. Many modern text editors have good support for JavaScript development. If you are using IntelliJ, this codebase is already an IntelliJ project you can open. Visual Studio Code is another good alternative.
First-time Setup
cd aia to enter into the project directory. Run npm install. This downloads all the 3rd party code needed
Running the Program
cd aia to enter into the project directory, run npm start. This will start a web server on your computer. If it doesn't automatically open a web browser tab, go to http://localhost:3000 to see the project.
Test the Program
Currently, we use Jest as the testing framework to test the React application. Create-React-App already uses and ships with Jest.
Writing Tests
Follow Jest's official doc to see examples and APIs.
Running Tests
Check out Create-React-App Running Tests for detailed information. Run Jest:
npm test
It will launch in watch mode. Every time you save a file, it will re-run the tests. Note that, by default, Jest will only run the tests related to files changed since the last commit. Coverage Reporting:
npm test -- --coverage
It will run tests and generate a coverage report. Note that the coverage threshold can be configured in package.json.
algorithms: A file for export algorithms include name, amination, explanation, and pseudocode.
components: Graph: A file for drawing animations by using the tracer library. context: A file for managing the status of the system. Panel js files: Reaction component for panel implementation.
markdown: A file for formatting the display of the pseudo-code.
pseudocode: Convert pseudocode code into the machine-understandable format by using the parser.
resource: A file for logo display.
styles: The CSS files for customizing page style.
Note: it is strongly advised you create a new repository branch for development of the new algorithm before making any code changes.
To illustrate adding a new algorithm, let’s use a sorting algorithm named test as an example. It can be a good strategy to pick an existing algorithm which has some similarities with the new algorithm and essentially clone it with a new name, then edit it to convert it to the new algorithm. That way you can start with working code rather than a blank state. However, note that some algorithms are not coded in the simplest and most elegant style. It is worthwhile looking at the heap sort code (which was the first algorithm developed) and the documentation below.
- Go to ‘ src/algorithms/controllers ’, and add a new-algorithm.js under this folder. (for example, Test.js)
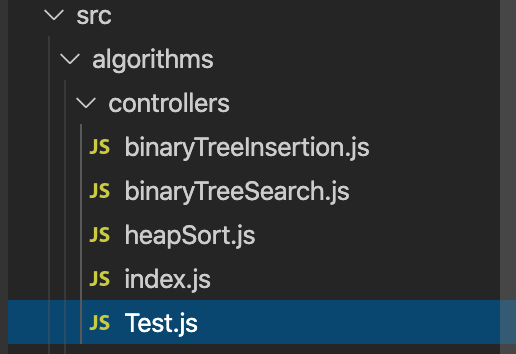
- Register the new file in src/algorithms/controllers/index.js

- Go to ‘src/algorithms/explanations’ and add a new-algorithmExp.md file under this folder.

- Export the new file in src/algorithms/explanations/index.js

- Go to ‘src/algorithms/extra-info’, and add a new-algorithmInfo.md file under this folder.

- Export the new file in src/algorithms/extra-info/index.js

- Go to ‘src/algorithms/parameters’, and add a new-algorithmParam.js file under this folder.
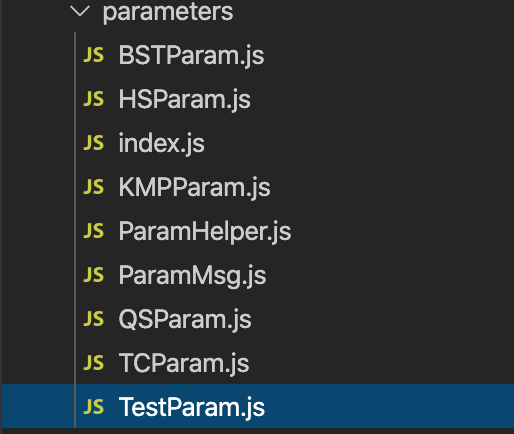
- Initialize the param.js file use the following format.

Note that for non-trivial parameter files the HTML will have one or more parameter blocks and they will have a 'name' that must match the key used for the algorithm where is it listed in src/algorithms/index.js (see 1.14 and the example in 7.6).
- Export the new file in src/algorithms/parameters/index.js.

- Go to ‘src/algorithms/pseudocode’, and add a new-algorithm.js file under this folder.

- Export the new file in src/algorithms/pseudocode/index.js.

-
Go to src/algorithms/instructions/index.js and add an exported definition of TestInstruction.
-
Go to src/algorithms/index.js

- Add the new algorithm in the const ‘allalgs’ by the format below. Note the key for each algorithm must be unique and (for non-trivial parameter files), it must match the name of parameter blocks returned by the parameter function of 1.8. The fields explanation, param, extraInfo, pseudocode, and controller are the files that we built at 1.3, 1.7, 1.5, 1.10, and 1.1. The field ‘name’ is the title of this algorithm as displayed for the user. If the field noDeploy is supplied and set to true, the code for the algorithm will be included but the algorithm will not be included in the index, essentially making it invisible.

- Set the controller and pseudocode use the format mode-name: Pseudocode. Pseudocode file’s name of this algorithm(build in 1.9) mode-name: Controller. Controller file’s name of this algorithm(build in 1.1)

- Set the category value as the category’s name( for example, sorting)

If you want to add an algorithm in a new category, you only need to put the new category’s name in the parameter category, then the new category will be created automatically.
-
Go to ‘src/algorithms/explanations.’
-
Go to the new-algorithmExp.md file that we built in step 1.3.
-
Add a brief description of the test-algorithm in the new file.

-
Go to ‘src/algorithms/extra-info.’
-
Go to the new-algorithmExp.md file that we built in step 1.5.
-
Add the extra information of the test-algorithm in the new file.

We provide many methods here to help you create a graph in 'src/components/DataStructures/Graph/GraphTracer.js.' See also 'src/algorithms/parameters/helpers/MatrixParam.js' and 'src/algorithms/parameters/helpers/EuclideanMatrixParams.js.' The methods show here:
- How to draw a graph
set(array2d?: any[][]): voidWe use the Two-dimensional array to represent the graph and the method ’set‘helps to display the graph on the screen with nodes and edges.
directed(isDirected?: undefined | false | true): thisWe use this method to make the graph directed.
weighted(isWeighted?: undefined | false | true): thisWe use this method to make the graph weighted.
addEdge(source: any, target: any, weight?: any): voidWe use this method to add an edge.
Parameters:
source: The id of the node where the edge starts.
target: The id of the node where the edge ends.
weight: Use when the edge has a weight.
addNode(id: any, weight?: any, x?: undefined | number, y?: undefined | number): voidWe use this method to add a node.
Parameters:
Id: node’s id. x: The x position. y: The y position.
removeEdge(source any, target: any): voidWe use this method to remove an edge.
Parameters:
source: The id of the node where the edge starts.
target: The id of the node where the edge ends.
removeNode(id: any): voidWe use this method to remove a node.
Parameters:
Id: node’s id.
select(target: any, source?: any): voidWe use this method to select a node (Highlight a node to blue).
Parameters:
source: The id of the node to select from.
target: The id of the node to select.
updateEdge(source: any, target: any, weight?: any): voidWe use this method to update an edge.
Parameters:
source: The id of the node where the edge starts.
target: The id of the node where the edge ends.
updateNode(id: any, weight?: any, x?: undefined | number, y?: undefined | number): voidWe use this method to update a node.
Parameters:
Id: The id of the node we want to update.
x: The x position.
y: The y position.
weight: the weight of the node.
[visit(target: any, source?: any, weight?: any): void]We use this method to visit a node (highlight a node to pink).
Parameters:
target: The id of the node to visit.
Source: The id of the node to visit from.
weight: The weight of target to set to.
deselect(target: any, source?: any): voidWe use this method to stop selecting a node.
Parameters:
target: The id of the node to stop selecting.
Source: The id of the node to stop selecting from.
leave(target: any, source?: any, weight?: any): voidWe use this method to leave after visiting a node.
Parameters:
target: The id of the node to leave.
source: The id of the node to leave to.
weight: The weight of target to set to.
log(logTracer: LogTracer): voidWe use this method to synchronize with a log tracer.
layoutCircle(): thisWe use this method to arrange nodes on a circular layout.
layoutRandom(): thisWe use this method to arrange nodes randomly.
layoutTree(root?: any, sorted?: undefined | false | true): thisWe use this method to arrange nodes on a tree layout.
- How to add an array
- We provide many methods to help you to draw a One-dimensional array in src/components/DataStructures/Array/Array1DTracer.js
set(array1d?: any[]): voidWe use this method to set an array to visualize
patch(x: number, v?: any): voidWe use this method to notify that a value has been changed.
Parameters:
x: The index of the array. v: The new value to change to.
depatch(x: number): voidWe use this method to Stop notifying that a value has been changed.
Parameters:
x: The index of the array.
select(sx: number, ex?: undefined | number): voidWe use this method to Select indices of the array.
Parameters:
ex: The index to select inclusively to.
deselect(sx: number, ex?: undefined | number): voidWe use this method to Stop selecting indices of the array.
Parameters:
sx: The index to stop selecting inclusively from. ex: The index to stop selecting inclusively to.
chart(chartTracer: ChartTracer): voidWe use this method to Synchronize with a chart tracer.
- We provide many methods to help you to draw a Two-dimensional array in src/components/DataStructures/Array/Array2DTracer.js
set(array2d?: any[][]): voidWe use this method to Set a two-dimensional array to visualize.
patch(x: number, y: number, v?: any): voidWe use this method to notify that a value has been changed.
Parameters:
x: The row index of the array. y: The column index of the array. v: The new value to change to.
depatch(x: number, y: number): voidWe use this method to Stop notifying that a value has been changed.
Parameters:
x: The row index of the array.
y: The column index of the array.
select(sx: number, sy: number, ex?: undefined | number, ey?: undefined | number): voidWe use this method to Select indices of the array.
Parameters:
sx: The row index to select inclusively from.
sy: The column index to select inclusively from.
ex: The row index to select inclusively to.
ey: The column index to select inclusively to.
selectRow(x: number, sy: number, ey: number): voidWe use this method to Select indices of a row of the array.
Parameters:
x: The row index to select. sy: The column index to select inclusively from. ey: The column index to select inclusively to.
selectCol(y: number, sx: number, ex: number): voidWe use this method to Select indices of a column of the array.
Parameters:
y: The column index to select. sx: The row index to select inclusively from. ex: The row index to select inclusively to.
deselect(sx: number, sy: number, ex?: undefined | number, ey?: undefined | number): voidWe use this method to stop selecting indices of the array.
Parameters:
sx: The row index to stop selecting inclusively from. sy: The column index to stop selecting inclusively from. ex: The row index to stop selecting inclusively to. ey: The column index to stop selecting inclusively to.
deselectRow(x: number, sy: number, ey: number): voidWe use this method to stop selecting indices of a row of the array.
Parameters:
x: The row index to stop selecting. sy: The column index to stop selecting inclusively from. ey: The column index to stop selecting inclusively to.
deselectCol(y: number, sx: number, ex: number): voidWe use this method to stop selecting indices of a column of the array.
Parameters:
y: The column index to stop selecting. sx: The row index to stop selecting inclusively from. ex: The row index to stop selecting inclusively to.
- How to combine the graph to pseudocode. (Use binary search tree as an example)
- Make sure you have created a file named transtiveClosure.js according to step 1.1

- Import all modules you use.

- Export a module named ‘default’ with 2 methods.
Methods:
initVisualisers(){}: run(chunker, {params} ){}
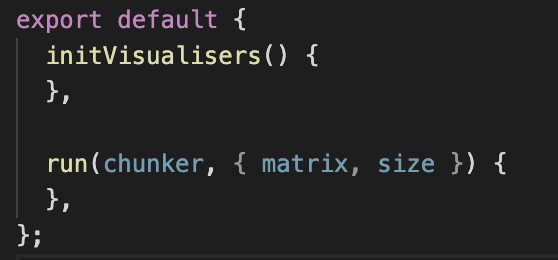
- Initialize the middle panel by method initVisualisers(){}.

(**NOTE**: If there are two types of animation in the middle panel, use the following format, and the value of order determines the position of the two animations)

- Determine the parameters that we use in the run method (for example, we use matrix and single number as parameters)

- Use the methods in 'src/components/DataStructure' to draw the initial graph of the new algorithm animation in method run{ }. For example, we use method set() to show this graph on the screen and use method layoutCircle() to set the layout of nodes as a circle.

- Write the implementation code for the new algorithm in method run{}

- Use the method in 'src/components/DataStructure' to add actions to the execution code, which means adding actions to static graphics, making them an animation showing the steps of the algorithm.

- Use chunker.add(‘bookmark‘, func, values) to bind the animation and the pseudocode together. (for example: When the program runs to here, highlight the pseudocode corresponding to bookmark 3, and execute the animation: add the edge i-j and visit this edge.

-
Go to ‘src/algorithms/pseudocode’.
-
Open the test.js file that we built for the new algorithm in step 1.10.
-
Import parse.

- Use pseudocode format to add pseudocode and line explanation in the parse:

- Pseudocode format:
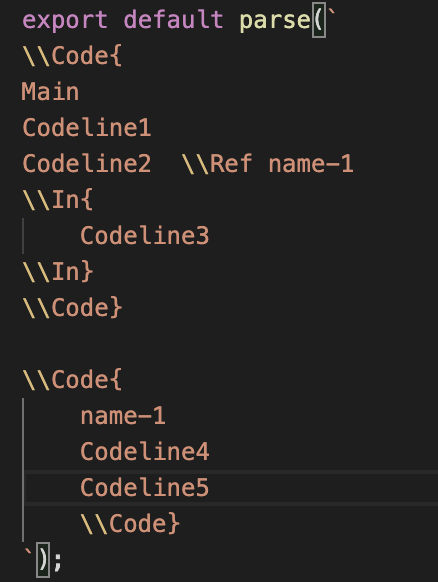
\Code is a code container used to store pseudocode block, and the name is the name of this block of pseudocode. For example:
\\ Code {
name
…
\\Code }

\ In is used to indentation, so use the \ In label to wrap the code that needs to be indented. For example:
\\ In {
...the code that needs to be indented...
\\In }
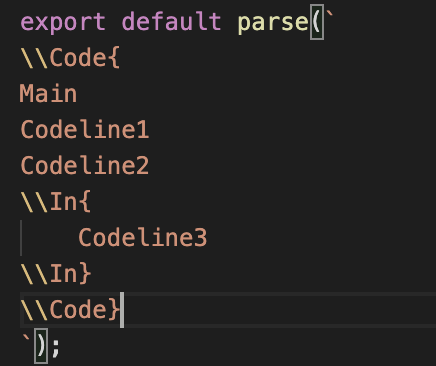
\ Ref is used to expanding the pseudocode. Put the label: \ Ref + Ref-name after the code that can be expanded( the Ref-name is the code block name we set in 4.4.1), then when the user clicks the expandable code it will be replaced by the code block named as Ref-name. For example:
Expandable code line \\ Ref Ref-name
\Expl is used to store line explanation. Place this label after the line of code to be explained, then when this line of code is highlighted, the line explanation will be displayed in the explanation area. For example:
Code that we want to be explained.
\\ Expl { ...line explanation…
 \\Expl}

The more example of the pseudocode format is included in the pseudocode format document.
- Pre-Implemented Param Components
To handle common user input, we have implemented three types of parameter components:
SingleValueParam
used when the parameter input accepts a single number
ListParam
used when the parameter input accepts a list of numbers
MatrixParam
used when the parameter input accepts a list of lists of numbers (a matrix), typically used for representing graphs using an edge matrix
EuclideanMatrixParam
used for input of graphs where each node has specified X,Y coordinates (input can be via lists of coordinates and edges or via matrices)
Based on the algorithms, you could choose which Param component to use. For example, for heap sort, a list of numbers need to sort, so use ListParam; for graph algorithms like Prim’s, a search will be done on a graph, therefore enters an adjacency matrix to define the graph.
- handleDefaultSubmit
- For SingleValueParam and ListParam, there is a default handle function called handleDefaultSubmit, these handle functions first check if the input value is valid, then dispatch the particular algorithm using the input value.
(For example, for heap sort, the user enters a list of numbers that needs to sort, the handleDefaultSubmit function checks if the list is valid, then uses the list to dispatch the heap sort algorithm. If the input is invalid, then an error message will prompt, and no algorithm will be run.)
- For MatrixParam and EuclideanMatrixParam, this default function is temporarily called handleSearch, which implements the similar logic as the other handle functions do. It parses and checks the validity of the matrix, and then uses the matrix data to run graph algorithms.
- Write your own handle function
In some other cases, the default handle function is not enough. For example, to search a node in a binary search tree, we only need to enter the target value that we want to search. However, we cannot directly use the handleDefaultSubmit function that is built in the SingleValueParam because we need a tree to search the target. To work around this, write your own handle function in the BSTParam and pass the handle function as a prop to the SingleValueParam, the SingleValueParam will then use the provided handle function instead.
Another example is TCParam and PrimsParam. In Prim’s algorithm or Transitive Closure, the first parameter defines the size of the matrix, we don’t want to use that single value to run the algorithm, therefore we need to write our own handle function just to pass the value to the matrix.


- Create Your Own Param Components
We have provided three types of inputs that can cover most of the algorithms. However, in case that new parameter inputs are needed, you will have to create your own.
Some basic components you may reuse:
ControlButton: a button can that can be configured
ParamForm: a component that encapsulates a form, an input, and a ControlButton, you can also pass an icon before the button
EditableCell: a component that represents a cell in a table
Table: a component that renders a table
ParamMsg: renders the message according to the data that passed in
-
Go to ‘src/algorithms/parameters.’
-
Go to the new-algorithm-param.js file that we built in step 1.7.
-
Import all modules that we need. ( for example, we set the parameters of transitive closure is a matrix and a number named size, so we need to import MatrixParam and SingleValueParam )

- Set the default value displayed on the parameter panel. ( for example, the default size is 4, and the name of this algorithm is TRANSTIVE_CLOSURE )

- For Transitive Closure, since the first param is just to set the matrix's size, we don't want to dispatch an algorithm only using the size, we need to implement a new handle function instead of using the default one. ( we checked the value and output the success/error message here, and we use the setSize method to set the size of the matrix by input value size)

- Write the HTML item under return.

Note the 'name' here, "transitiveClosure", must match the key for this algorithm in the definition of 'allalgs' in src/algorithms/index.js. When parameters are changed by the user, the algorithm must be re-run with the new parameter values.
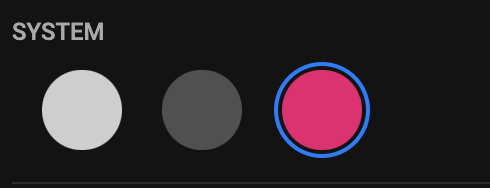
8.1.1. Go to ‘src/styles/Setting.scss.’

8.1.2. Add a color called "test" for the new theme button.

(Note This color will be used on the theme button.)
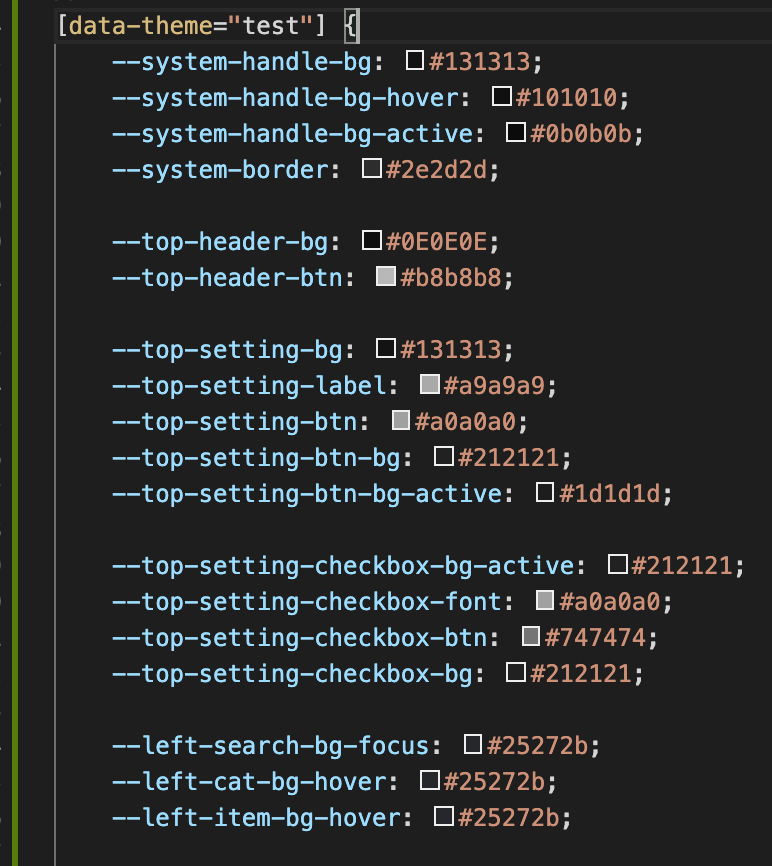
8.2.1. Go to ‘src/styles/golbal.scss.’
8.2.2. Add a theme named test, and all the colors used for the new theme.
8.3.1. Go to ‘src/styles/component/top/helper.js’

8.3.2 Add a const SYSTEM_THEME_n equals to the name of the new theme, which we defined in 8.2.2

8.3.3. Add the button information and theme id under the const allSystemCol.
(id is the const we defined in step 8.3.2, primary and secondary is the color of the new theme button, which we defined in 8.1.2)
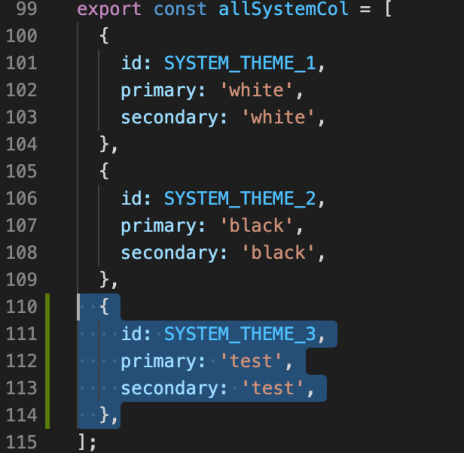
8.3.4. Add a Judge sentences in function setTheme(theme);

8.3.5 Add a Judge sentences in function getSystemColorMode()

9.1.1. Go to ‘src/styles/Setting.scss.’

9.1.2. Add two colors called testMode1 and testMode2 for the new algorithm color mode button.
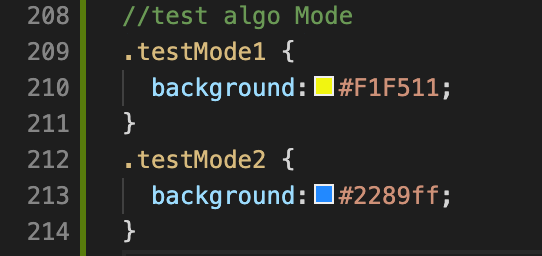
(Note This color will be used on the new algorithm color mode button.)

9.2.1. Go to ‘src/styles/golbal.scss.’
9.2.2. Add a new mode named testMode, and all the colors used for the new mode.

9.3.1. Go to ‘src/styles/component/top/helper.js’

9.3.2 Add a const ALGO_THEME_n equals to the name of the new mode, which we defined in 9.2.2

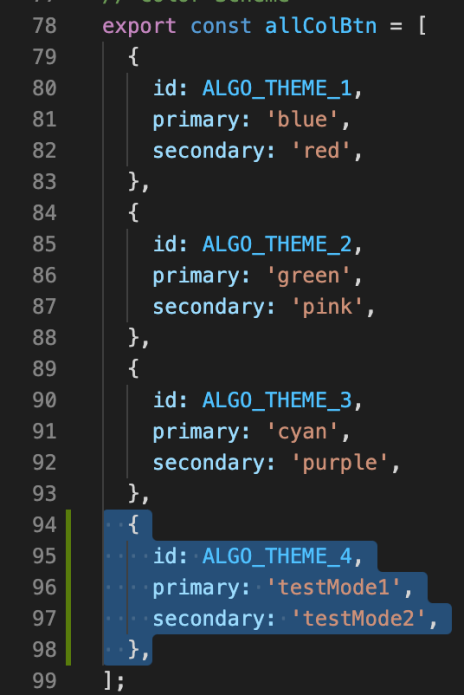
9.3.3. Add the button information and mode id under the const allColButton
(id is the const we defined in step 9.3.2, primary and secondary are the two colors of the new theme button, which we defined in 9.1.2. The primary is the left half of the circle button and the secondary is the right half of the circle button.)
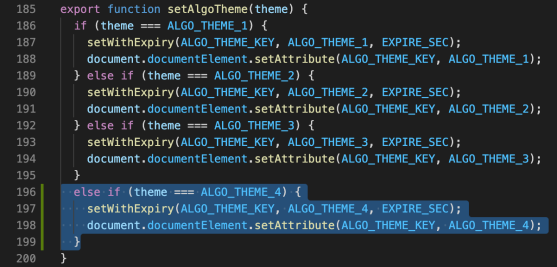
9.3.4. Add a Judge sentences in function setAlgoTheme(theme)
By AIA Organization