The Xelera Suite is a powerful tool that allows users to utilize hardware accelerators like the Xilinx U200/U250 without requiring any knowledge about them. It can be used to accelerate a variety of applications like machine learning, data analytics and AI by up to 100X.
If you are interested in learning more about Xelera visit us at xelera.io or contact us directly: [email protected]
To run the test cases below certain hardware is required. They cun be executed on the same machine or on different machines if there is no single machine matching all requirements:
Requirements for native scenario:
64 GB of RAM (100 GB recommended)
Requirements for accelerated scenario:
12 GB of RAM (16 GB recommended), inference is still done in software and requires more memory (see native scenario above)
Xilinx Alveo U250
These instructions will guide through the process of setting up the Suite and running a first test case.
The system requires Docker. Find the installation instructions here:
https://docs.docker.com/install/linux/docker-ce/ubuntu/
The software uses Xilinx Runtime (XRT version 2019.1) and Deployment Shell (version 2018.3) and currently only runs on Alveo U200 and U250. You can download and install runtime and shell from the Xilinx Website. Click on 2019.1 XDMA and download and install the Xilinx Runtime for your operating system. Then click on 2018.3 XDMA and download and install the Deployment Shell for your operating system:
Alveo U200: https://www.xilinx.com/products/boards-and-kits/alveo/u200.html#gettingStarted
or
Alveo U250: https://www.xilinx.com/products/boards-and-kits/alveo/u250.html#gettingStarted
Alternatively the runtime (XRT) can also be downloaded and installed from source using git:
git clone https://github.com/Xilinx/XRT.git XRT
git checkout 2019.1
Afterwards follow the installation instructions inside the repository:
https://github.com/Xilinx/XRT/blob/master/src/runtime_src/doc/toc/build.rst
The Xelera Suite is deployed on a docker container. To gain access to the Xelera docker registry enter the credentials you have received from Xelera Technologies:
docker login <docker-registry-url>
If this shows a "permission denied" error, try adding your local user to the docker group or run the command as sudo.
This version of the Xelera Suite comes with a single example use case: Flight Delay Forecast This uses data about domestic flights inside the US to create a Random Forest Classification Decision Tree Model that can be used to predict delays of future flights. The dataset of the year 2004 was downloaded from the American Statistical Association: http://stat-computing.org/dataexpo/2009/the-data.html Download the datasets using the following commands:
mkdir data
wget -P data https://s3.amazonaws.com/xelera-rf-datasets/example/2004_2000000.txt
wget -P data https://s3.amazonaws.com/xelera-rf-datasets/example/2004_nona.csv
To process the dataset the big data framework Apache Spark (https://spark.apache.org/) is used. It contains a machine learning library with a large variety of algorithms including the used Random Forest Classification. However, while Spark is designed to be an efficient and scalable way to handle big amounts of data it is known to be slow on the machine learning side. The Xelera Suite contains an integration hook into Spark which replaces the machine learning algorithms with plugins on the FPGA. That way the user can utilize the accelerator hardware without having to change any code.
The example comes in two different flavors which can be found inside the examples folder of this repository: Scala and Python. The Scala version is using an already preprocessed dataset (2004_2000000.txt) where the label has already been created. The Python version is using the raw dataset (2004_nona.csv) hence the preprocessing is conducted in the example script. Explanations of the different steps inside the scripts are given as comments. Download the examples using the following commands:
wget -P data https://raw.githubusercontent.com/xelera-technologies/SparkAccelerator/master/examples/airline.scala
wget -P data https://raw.githubusercontent.com/xelera-technologies/SparkAccelerator/master/examples/airline.py
Find out the device identifier of your Alveo card:
ls /dev/ | grep xclmgmt
Start up the docker container which is pulled from the Xelera docker repository. Replace the device identifier (e.g. xclmgmt44800) with the one you found out in the previous step.
docker run -it --rm -v ${PWD}/data:/app/data --device /dev/xclmgmt44800 --device /dev/dri --name cont-alveo-xrt-rf-evaluation-release containerhub.xelera.io:443/201830.2_16.04:alveo-xrt-rf-evaluation-release:201830.2_16.04
First the Xelera Suite has to be initialized. This readies the hardware accelerators and makes them available for plugins (e.g. the Random Forest Training). If more than one device should be used simultaneously for one plugin, the "num_devices" inside the config.json must be adjusted.
./init.sh
Spark can be used in two different configurations: Native, where the whole processing takes place inside the CPU and Xelera, where the majority of the processing is offloaded onto the FPGA(s). The configuration can be changed by entering the Spark directory and running the respective script:
cd spark-2.3.0-bin-hadoop2.7
./SwitchToNative.sh
OR
./SwitchToXelera.sh
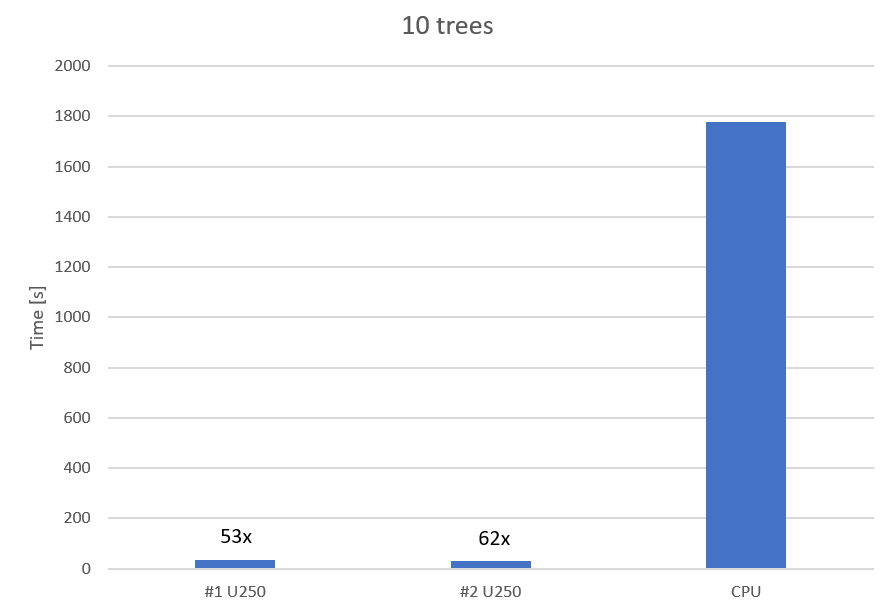
The Scala version of the example can be simply configured and run by starting the Spark Scala shell using a few arguments. Spark will read in the dataset and create the Random Forest Model. If the Xelera version was activated before this will take about 50 times less time than with the native variant.
bin/spark-shell --driver-memory 100G --executor-memory 100G -i /app/data/airline.scala
The Python version is a bit more complicated to handle since its shell does not take arguments as the Scala shell does. In order to utilize the system resources correctly the configuration has to be adapted. Therefore see the Spark manual: https://spark.apache.org/docs/latest/configuration.html Then content of the airline.py script can directly be copied into the Python shell (PySpark) to run the example. Python3 is recommended for better usability:
export PYSPARK_PYTHON=python3
bin/pyspark
In order to conduct changes to the example scripts (e.g. increase the size of the model by increasing the number of trees) please consult the official Apache Spark MLlib documentation: https://spark.apache.org/docs/latest/ml-classification-regression.html#random-forest-classifier
Both example scripts will output a "training time" which represents the amount of time it took to create the machine learning model. This number will be significantly higher for the native solution compared to the accelerated one.
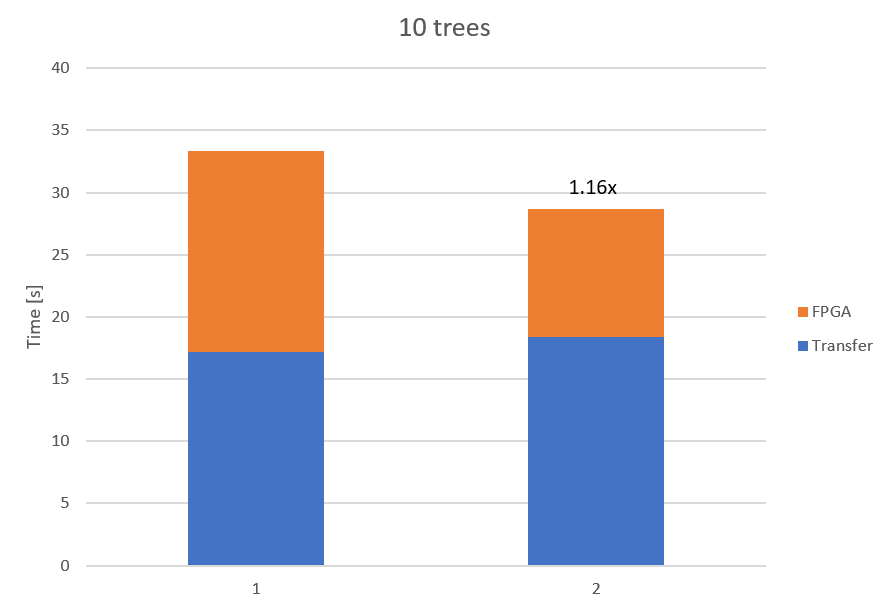
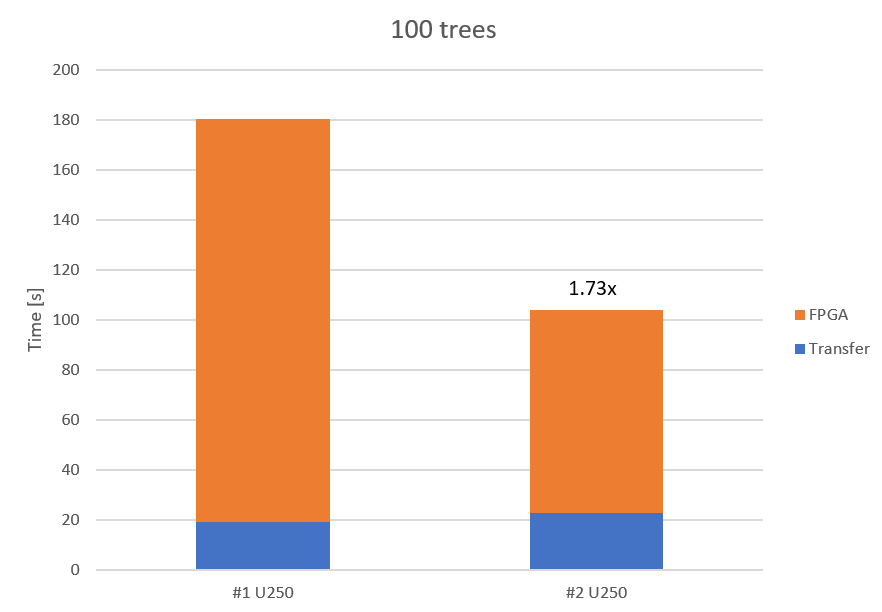
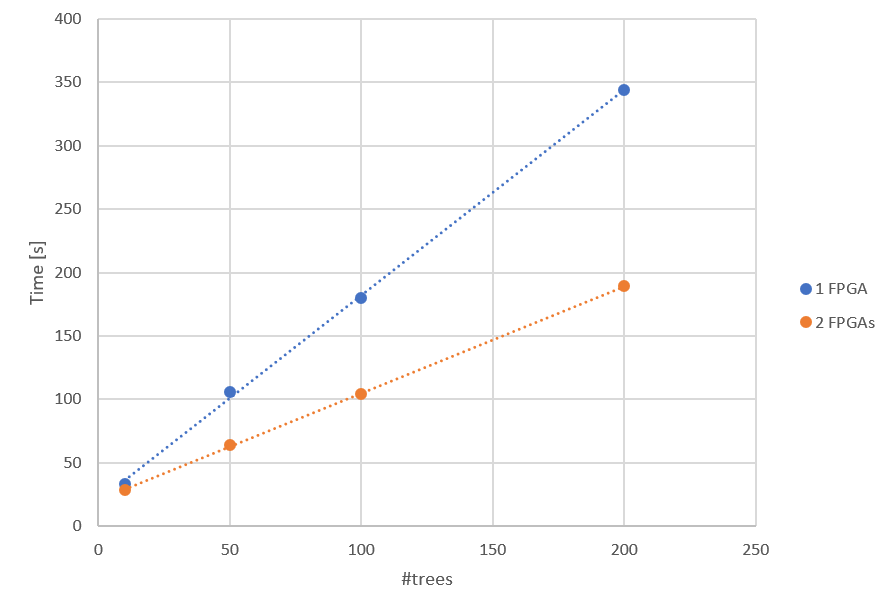
The following diagrams show the difference between the native CPU and the accelerated FPGA solution. They also indicate that the advantage of scaling up to multiple accelerators gets bigger the bigger the problem size is.


