A fantastically elegant interface for MySQL and Node.js/Express management.
- Product Owner: Taylor Lehman
- Scrum Master: Alex Hutchison
- Development Team Members: Laura Knight, Andrew Nickell, Taylor Lehman, Alex Hutchison
npm install nodeadmin
var express = require('express');
var app = express();

var nodeadmin = require('nodeadmin');
app.use(nodeadmin(app));
Passing your instantiated Express app into NodeAdmin is required for the middleware to function properly.
Note: NodeAdmin currently does not support Windows.
To begin using NodeAdmin, simply follow the instructions below.
Login | Navbar | Overview | Database | System | Settings
Navigate to yourdomain/nodeadmin and log in using your MySQL Server credentials. NodeAdmin will attempt to connect to your MySQL server and validate the information you provided. Once verified, you will be redirected to the Overview page.
The navbar located at the top of the page contains links to all the main views within NodeAdmin and a button to logout is available throughout the app. The navbar includes links to Overview, DB, System, Direct Query, and Settings. These pages are described below.
This page displays a dashboard of relevant server information including CPU usage, a real-time memory pressure graph, and a profile of the server.
The database views and its sub-views allow you to interact with your MySQL database. The four main views are described below.
Home | Tables | Create Table | Records
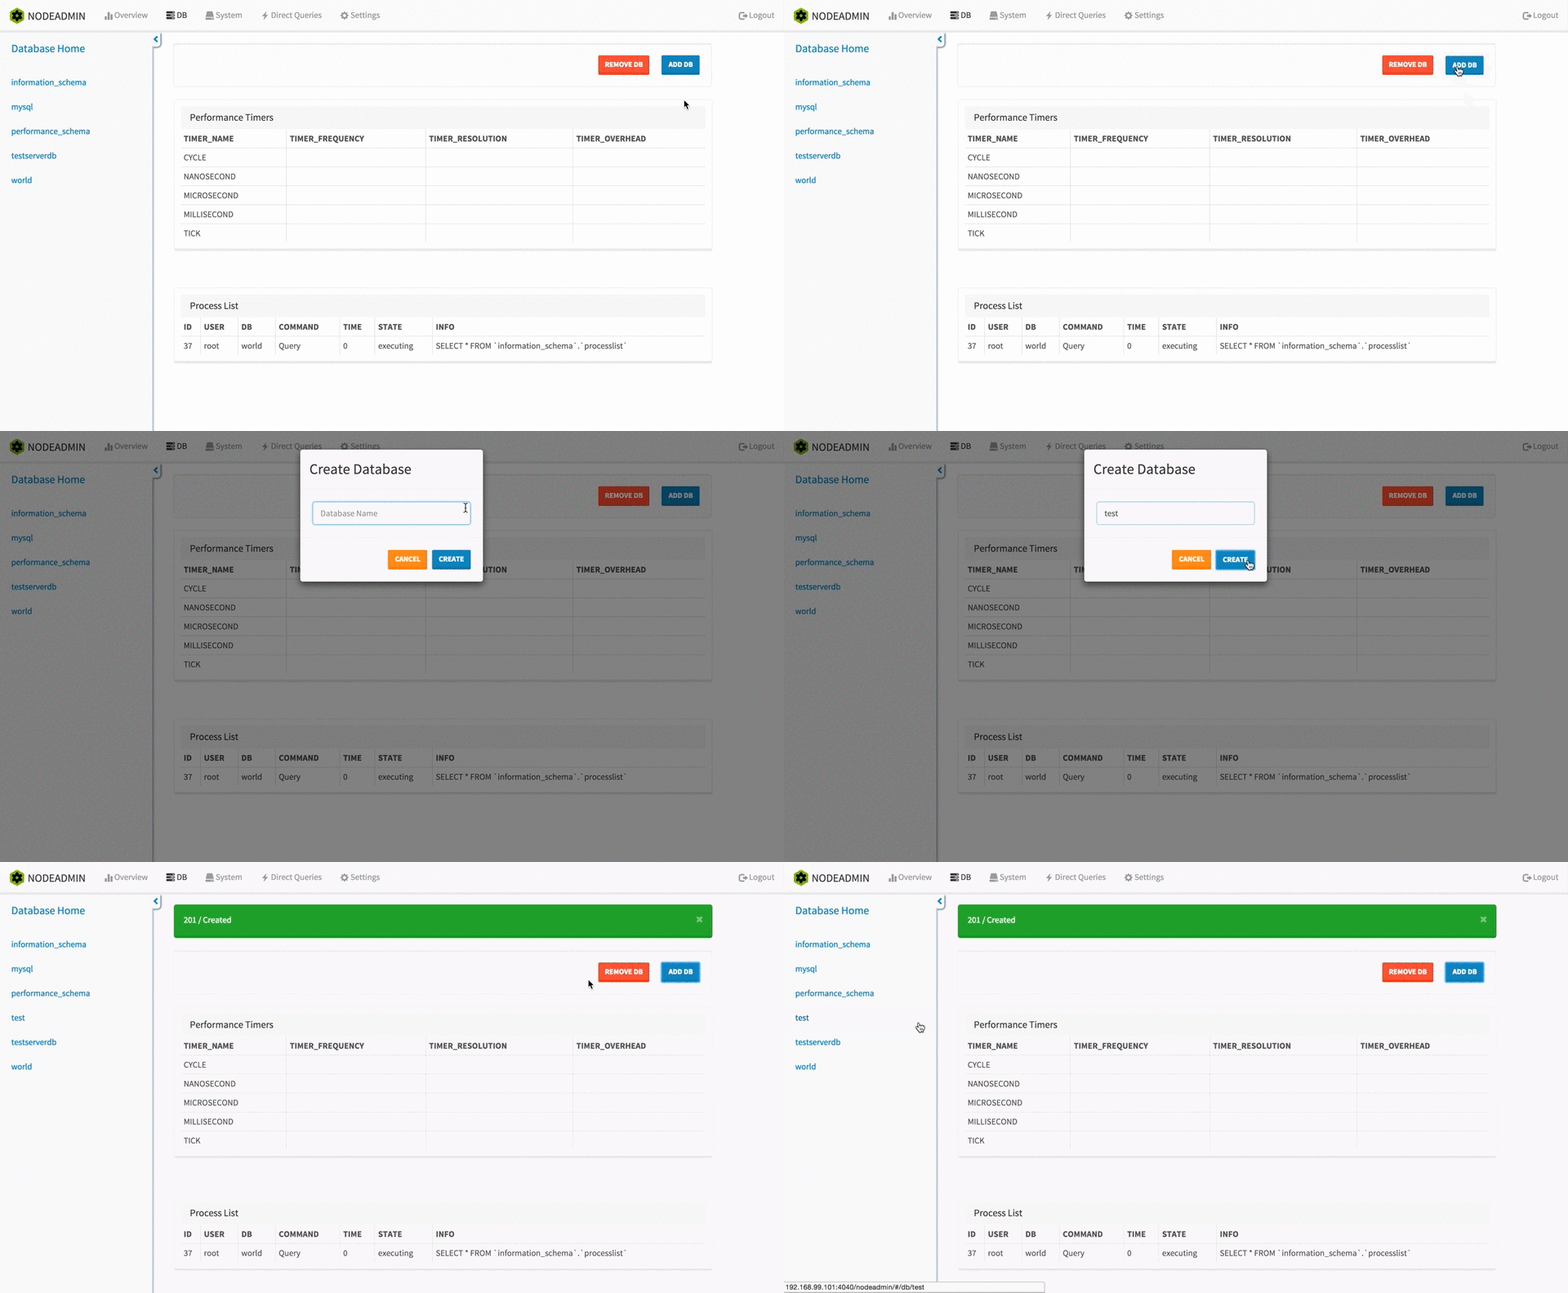
This is the first view you will encounter after clicking the DB link in the navbar. On the left side of the page, there is a collapsable navigation menu that allows you to select a database to work with.
At the top of the page there is an action bar that contains two buttons. One allows you to add a new database and another to remove an existing database. The 'add DB' button brings up a modal that prompts you for the name of the database that you would like to create. Once you hit create, the new database will be created and will show up on the left navigation menu. The 'remove DB' button brings up a modal with a list of all databases currently contained in your MySQL server. Select the database you would like to remove and hit delete. This will remove the database both from your MySQL server and the left navigation menu. Below the action bar there is a table containing your servers performance timers. Check out the MySQL Documentation for more information about performance timers.
Lastly, there is a table containing the list of active processes on your database in real-time. From this view you are able to see the ID of the process, the user executing the process, the database in which the process was executed, the time (in seconds) that the process took (or is currently taking), the state of the process and any other info (e.g. the SQL query that was performed).
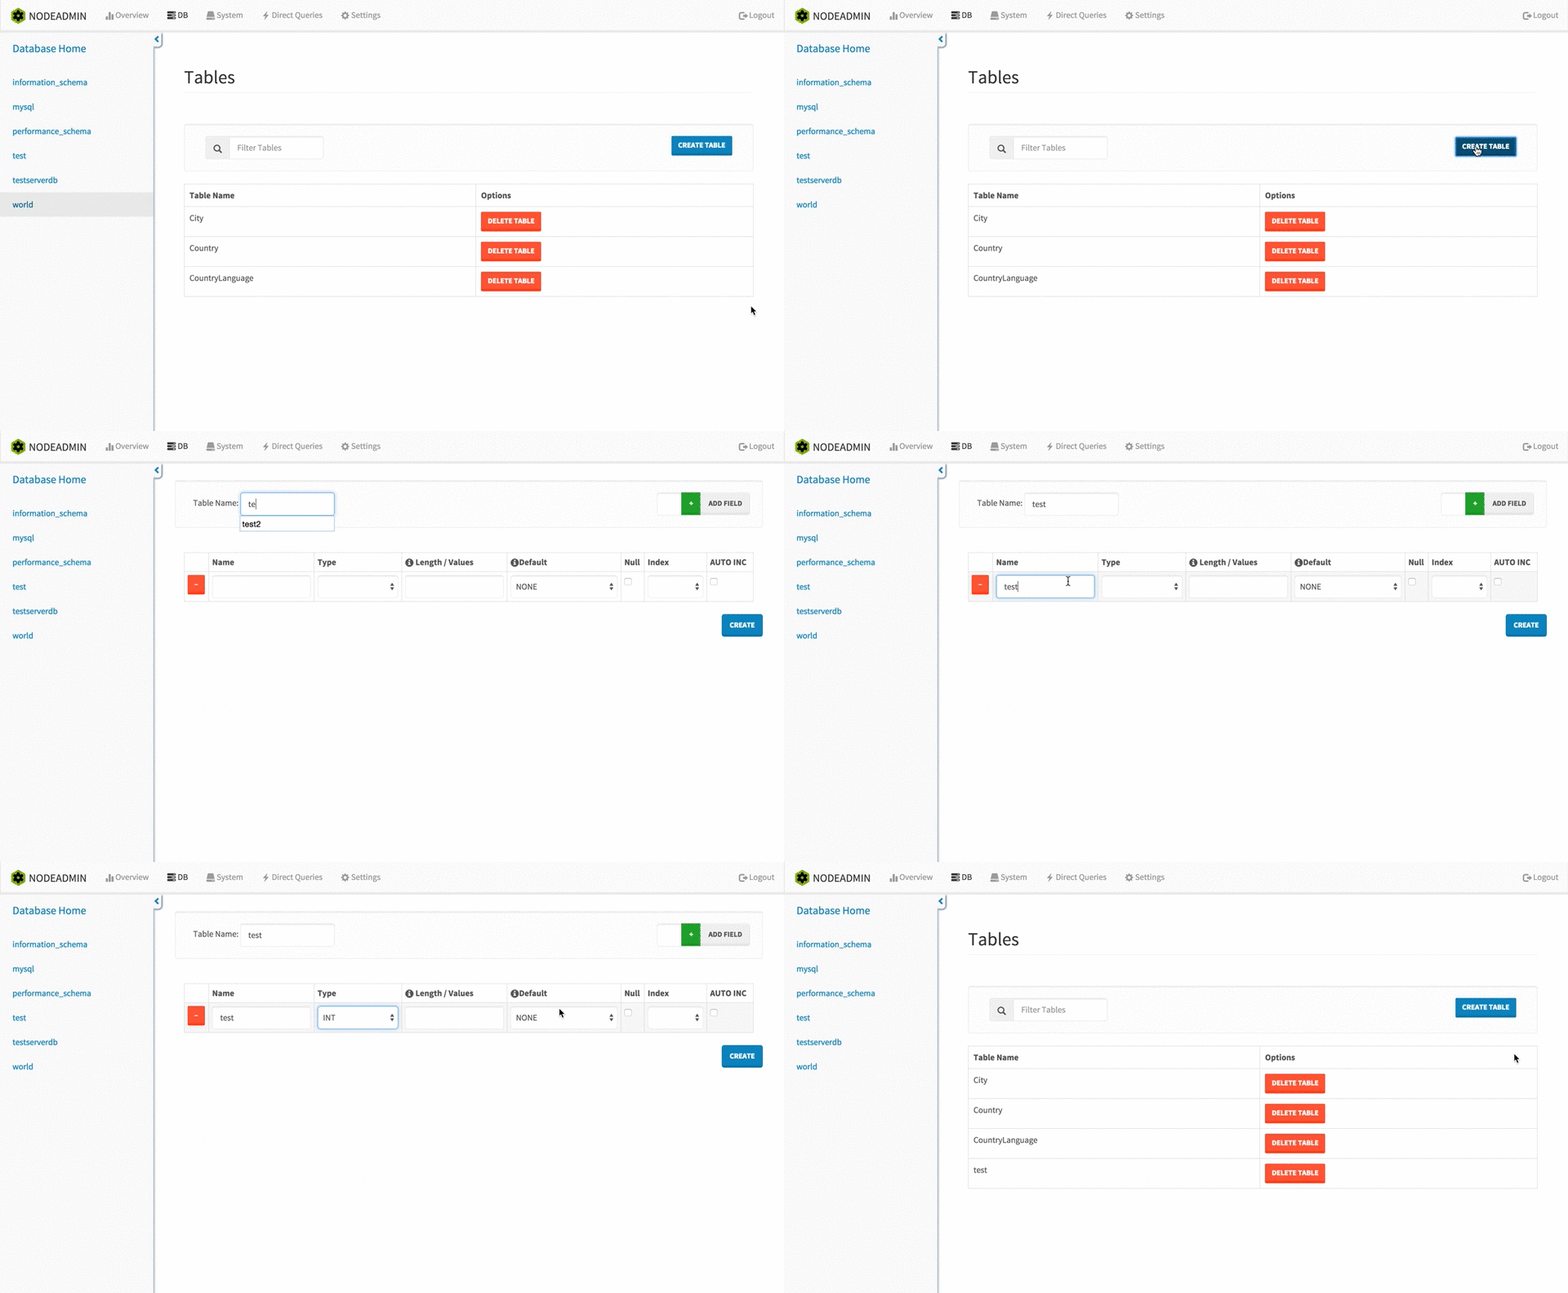
By clicking on one of the databases on the left navigation menu, the Tables view will render and a list of all tables in that database will be displayed.
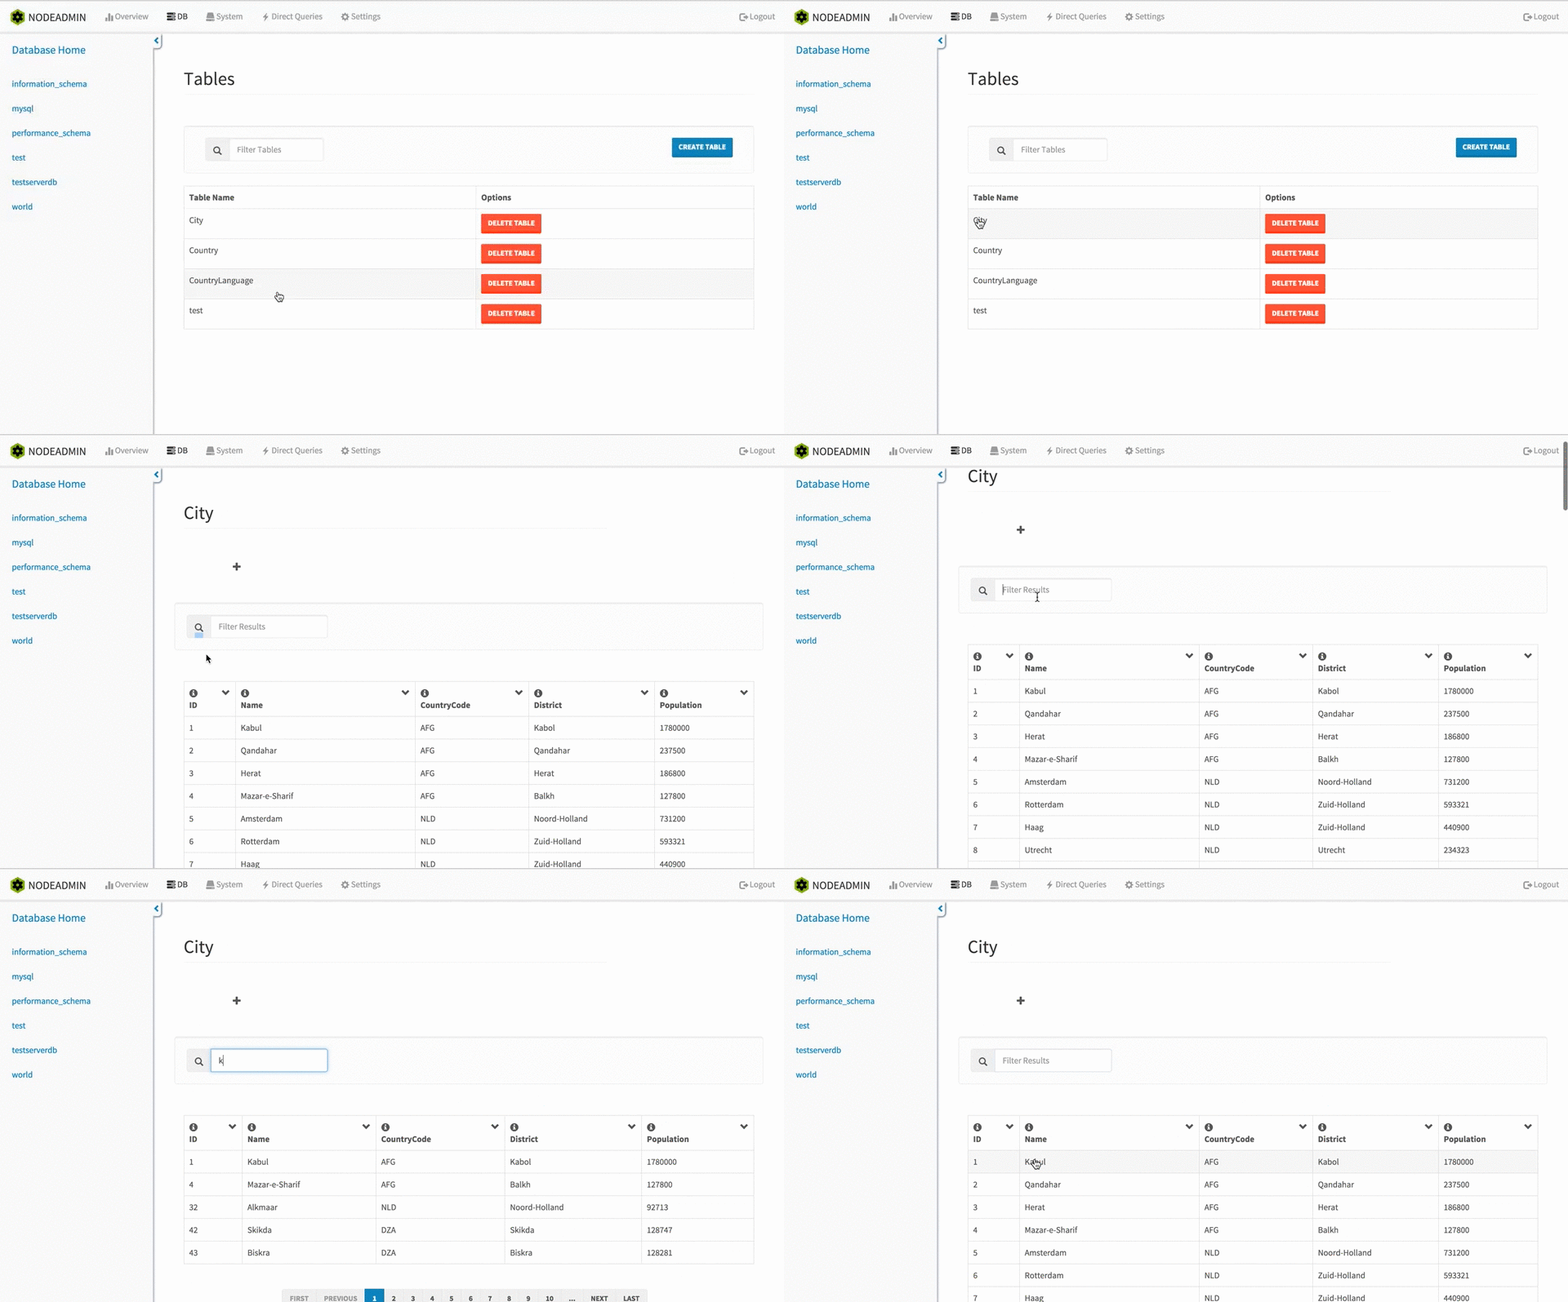
There are four possible actions to take on this page. First, there is a search field on the left that will filter the list of tables as input is entered. Next to the search field, is the create table button which will redirect to the create table view. This view is described in the Create Table view section below. Below the action bar, the table containing the list of tables in the database has two columns. Click on the table name to go to the records view for that particular table. This view is described below in the Records view section. Finally, next to each table name there is a delete table button. Clicking on this button brings up a modal, with a prompt to either delete the table or cancel this action.
This view allows for the creation of a table in the currently selected database. The action bar at the top of the page has two fields. Enter the name of the table to be created in the input box on the left. This field is required. The input box on the right side of the action bar is for adding fields to the table. Click 'add field' to add one field at a time, or to add several fields at once, click the green plus button to increase the amount of fields to be added, then click 'add field'. Each field has a name, type, length/values, default value, null, index, and auto increment column. For more information on these options, reference the MySQL documentation for creating tables here.
Once all fields are filled out, clicking the 'create' button will create the table (or give an error if the table could not be created) and then redirect to the previous table's view.
After clicking a table name in the Tables view, the Records view for that table is displayed. The Records view displays all records for a given table, 100 results per page.
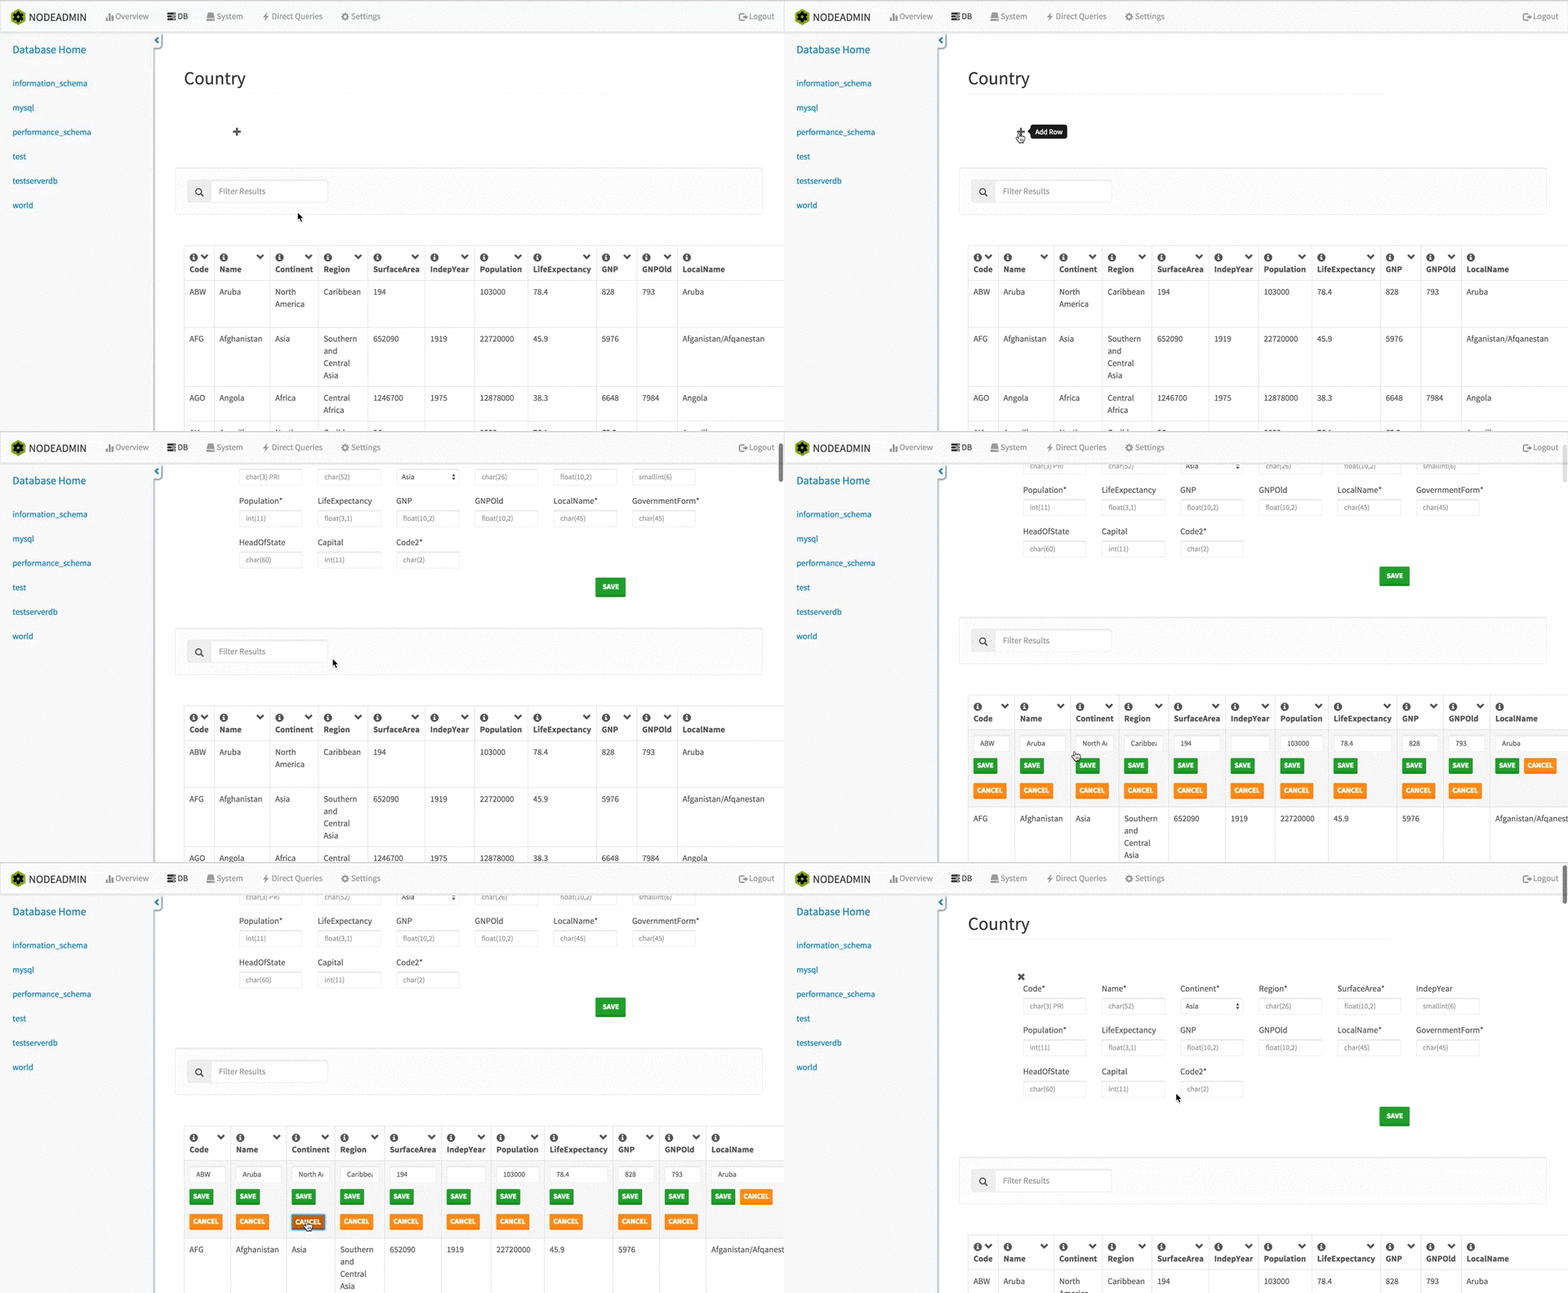
The plus icon at the top of the page, when clicked, will display a form for adding a single row to the table. The form's inputs are dynamically generated to match the table currently being viewed. Each input has automatic foreign key detection, along with enum, auto-increment and date support. Fields marked with an asterisk are required. The placeholder text in each input box denote the MySQL data type the table is expecting and any other pertinent information (eg if the field is a primary key). For more information on MySQL data types, refer to the MySQL documentation on data types here. Once all fields are filled out, clicking the save button will add the record to the table, or give an error message. Below the add record section, there is an action bar containing a search bar that searches the results of that page.
Below the action bar is a table containing the records for the currently selected table. The header contains the column name, an information tool tip describing the data type and any other information, similar to the placeholder text of the add record section, and a toggle sort button. Clicking the toggle sort button once will sort the column in a descending order, clicking the button again will sort the column in an ascending order. Double clicking any row will trigger the edit mode for that row. Edit any or all columns in the row and hit the save button to update the row. Hit the cancel button to discard any changes. Pagination buttons are located at the bottom of the page with first/last, previous/next and page number buttons.
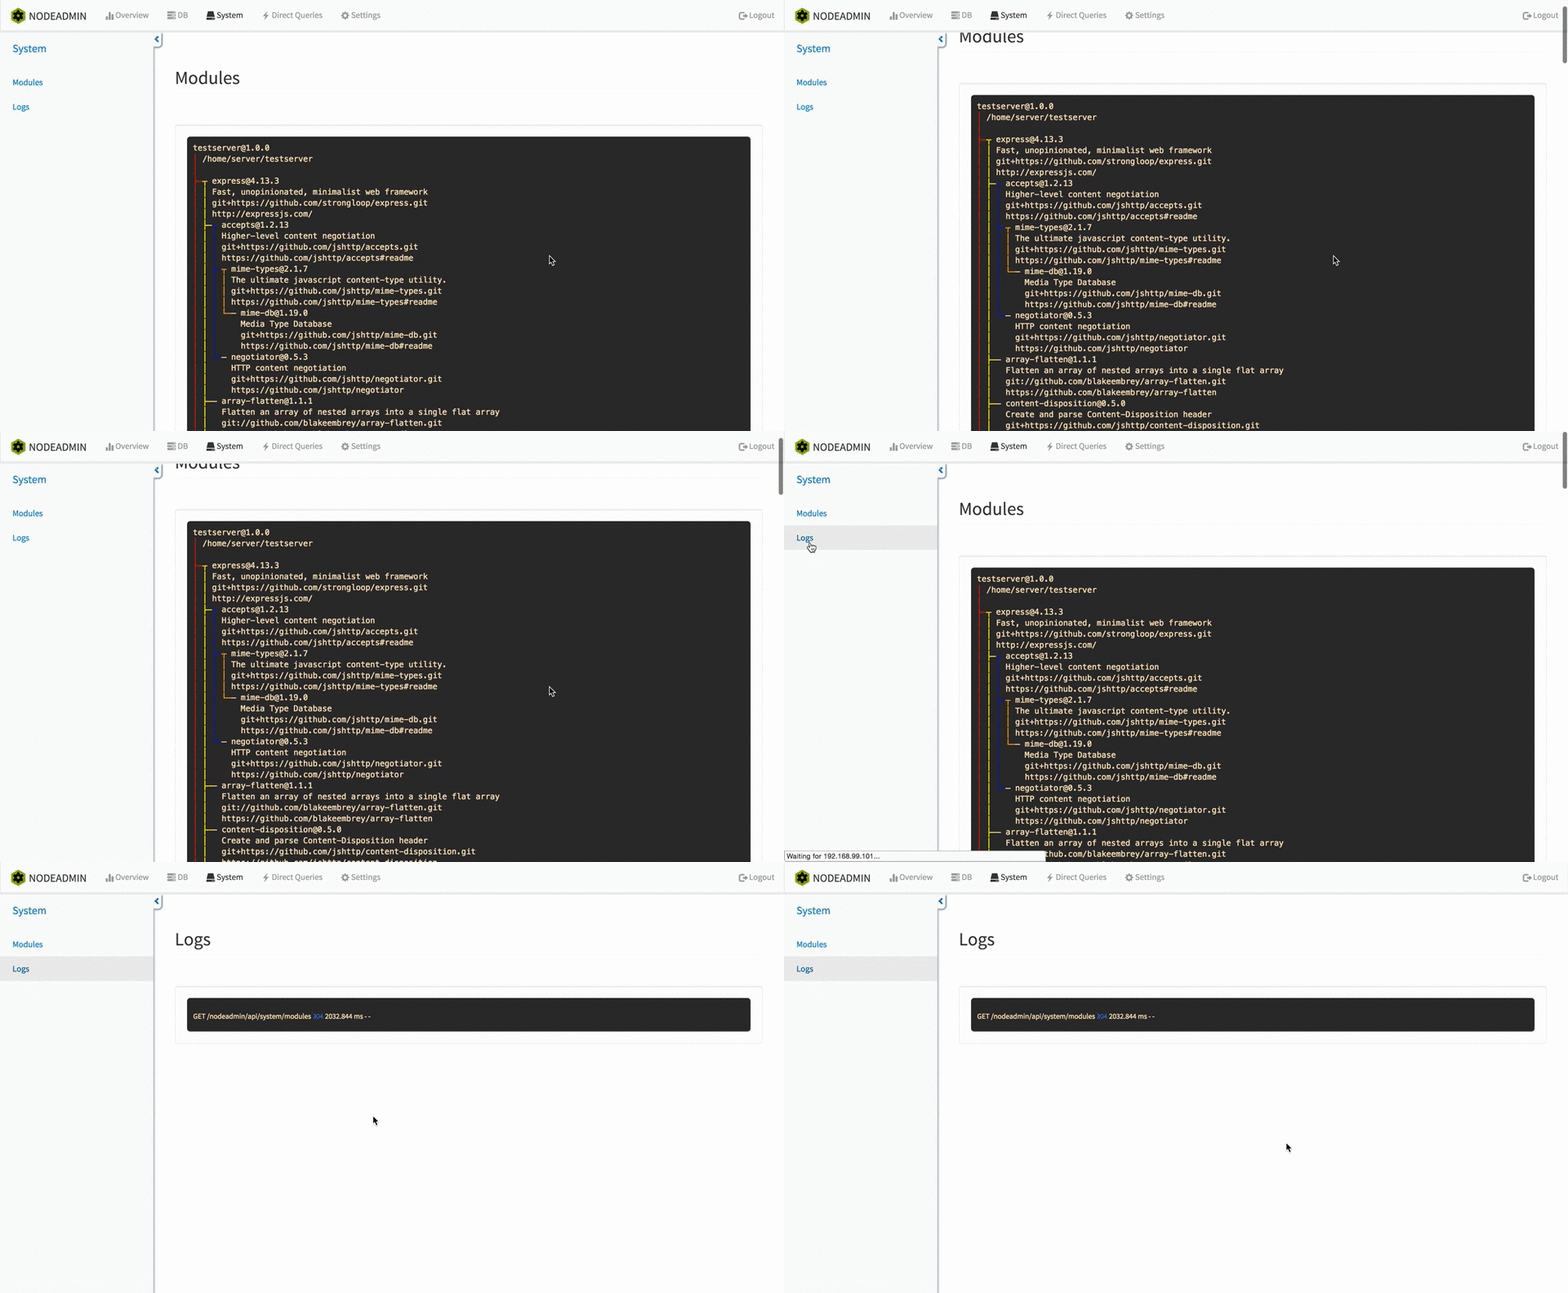
The System view has two main components. The first is the Modules view. This section displays all npm dependencies for this server in a color-coordinated tree structure, giving an easy-to-digest overview of all packages currently installed. The next component in the System view is the Logs view. This displays all network requests to the server in real-time. The HTTP method, resource requested, status code, and the time it took to serve the resource are displayed for each request.
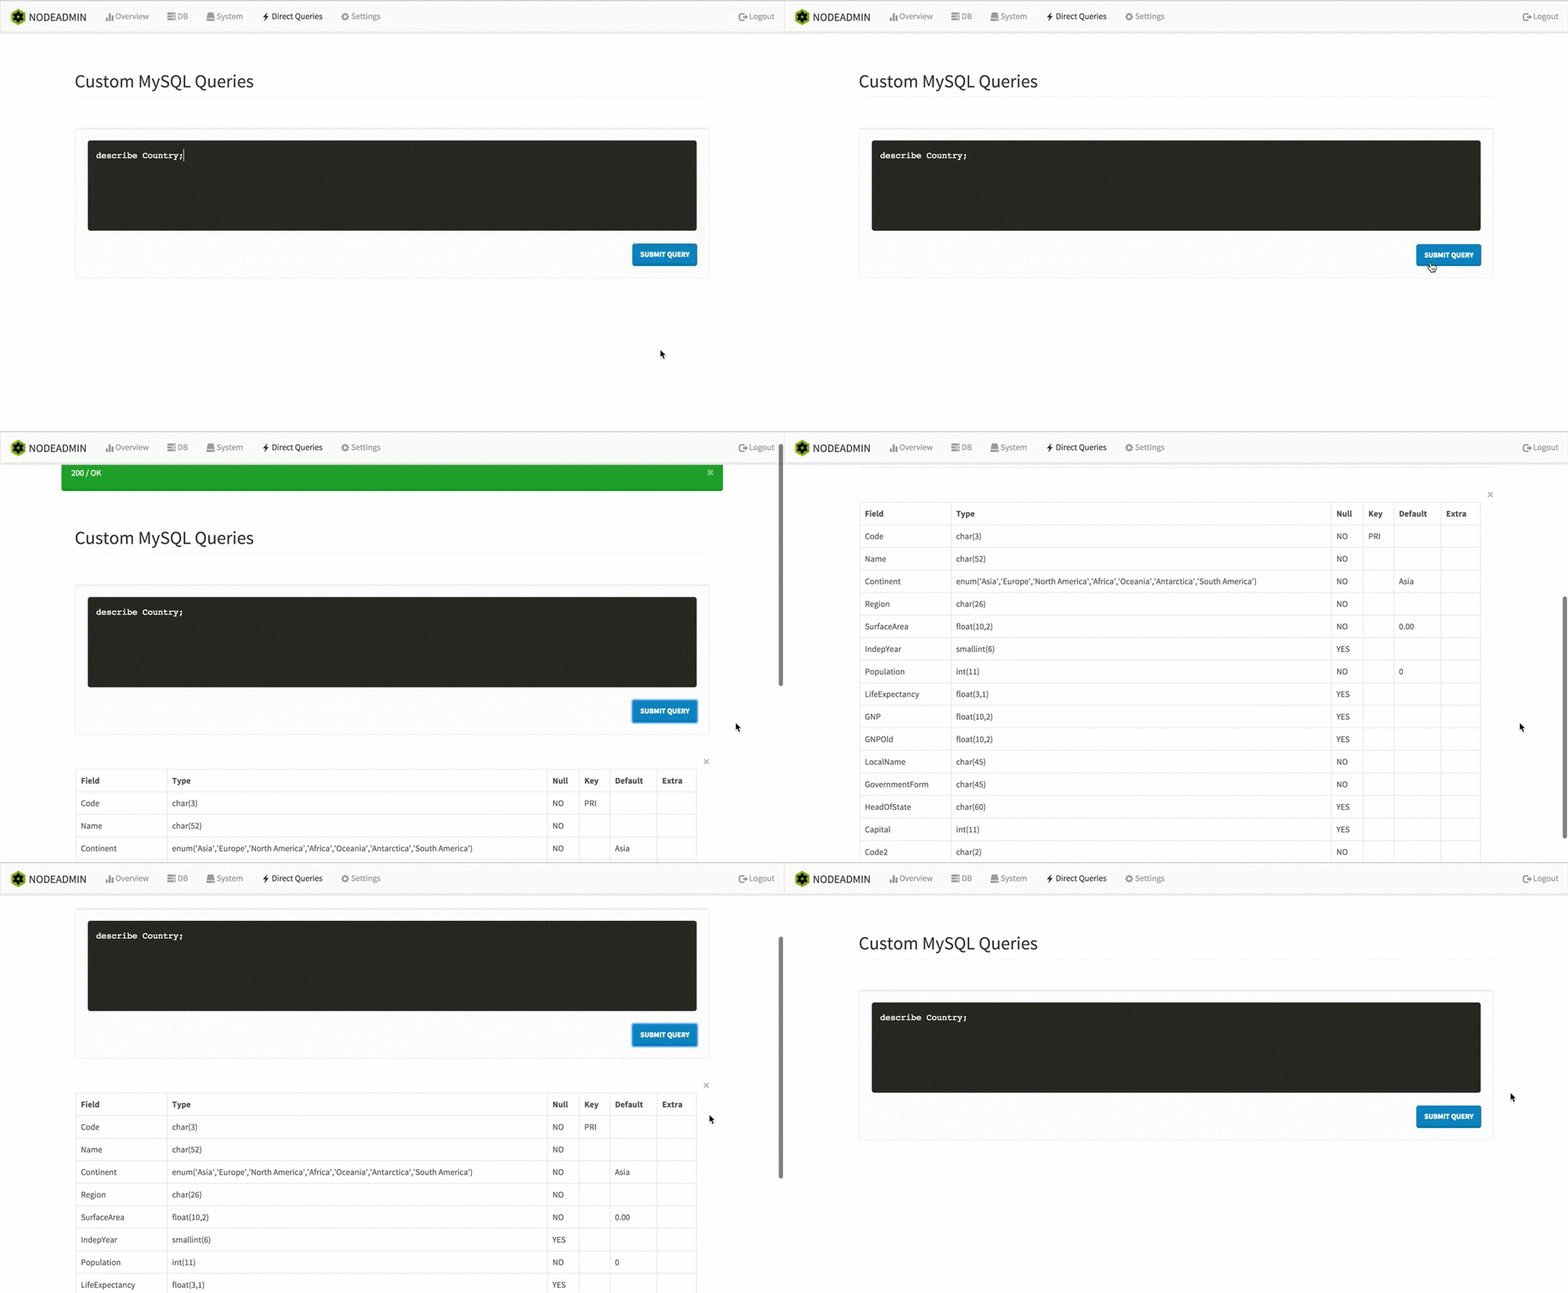
Direct Queries provides the ability to execute raw SQL queries directly from NodeAdmin. Type in the desired query and click 'submit query'. If the query was successful, a table containing the results of the query will be displayed the query window. If the query was unsuccessful, an error message will pop up detailing why the query was unsuccessful.
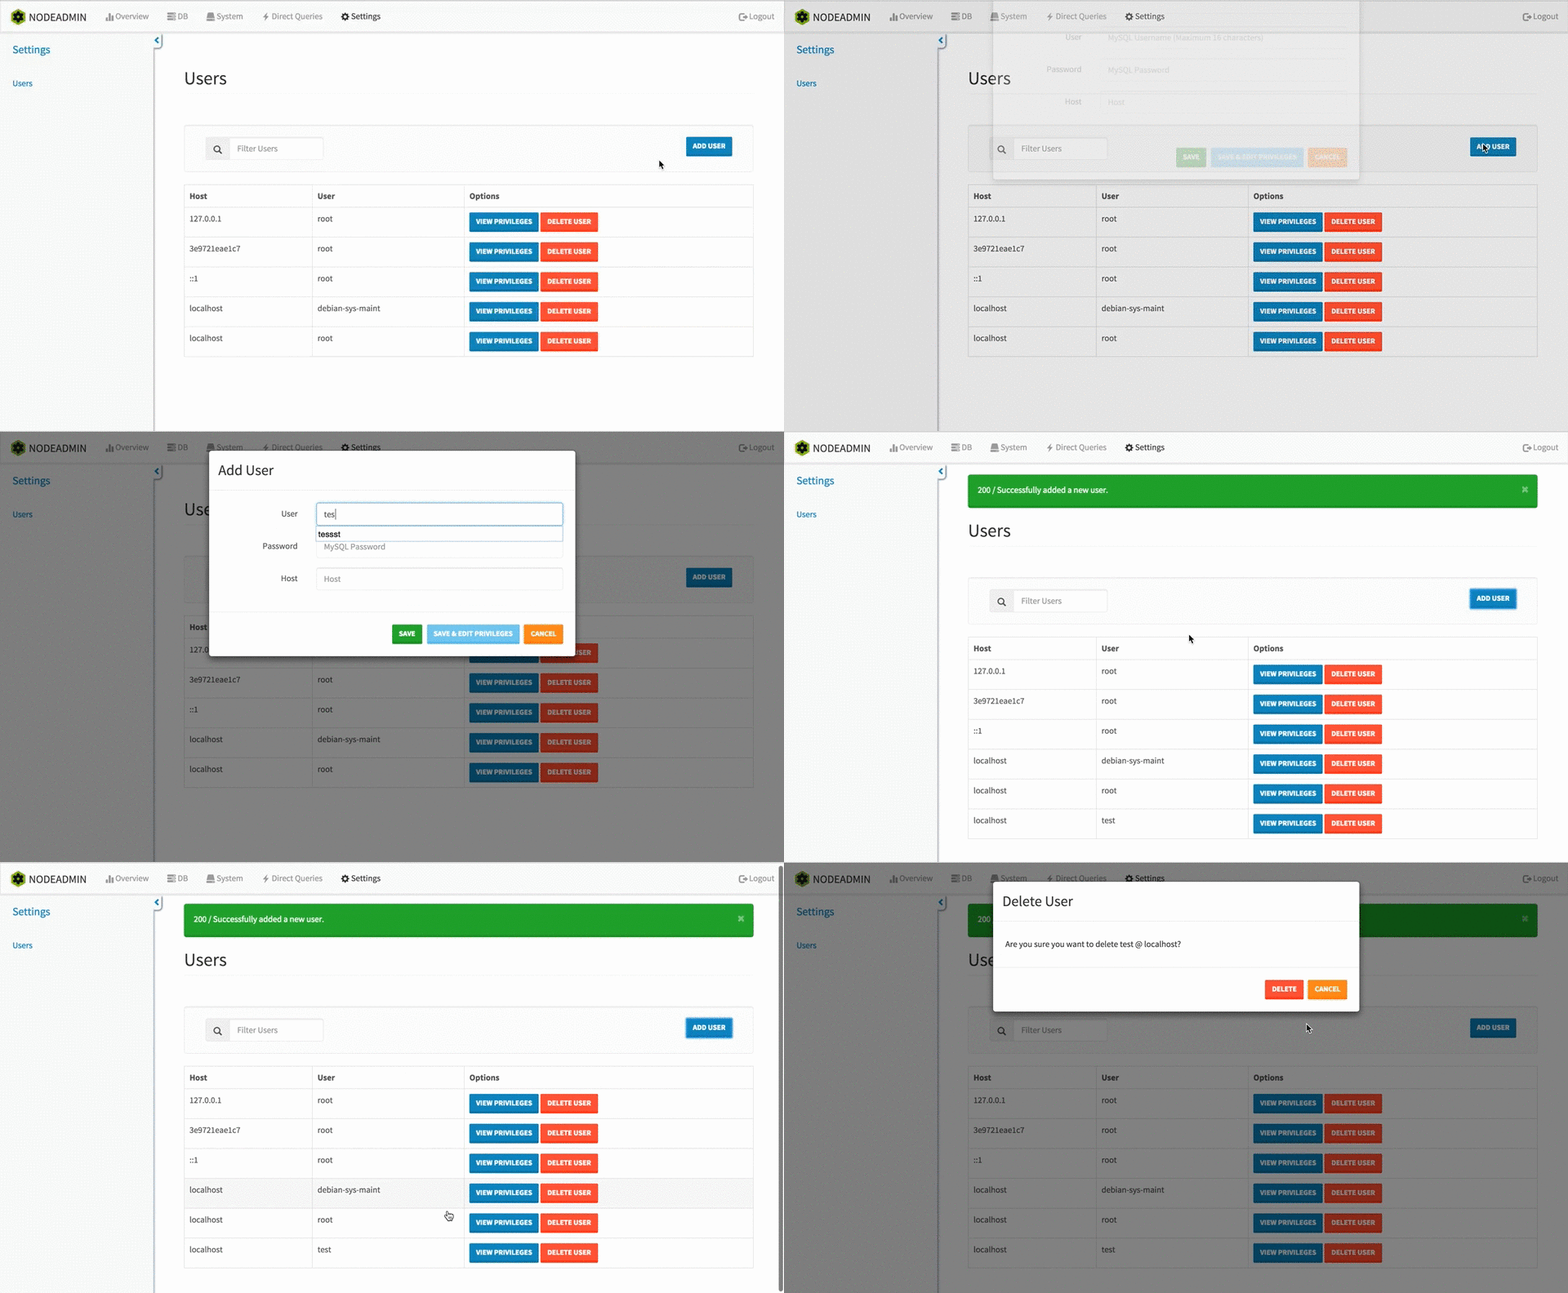
The main function of the Settings view is for the management of MySQL users. At the top of the view, the action bar contains a search field for filtering users, and an 'add user' button. The 'add user' button brings up a modal with inputs for a user name, password, and host name. At the bottom of the modal, there are three buttons: save, save and edit privileges, and cancel. Hitting the 'save' button creates a new user with the credentials provided above and grants that user all privileges. Clicking the 'save and edit privileges' button creates the user with the credentials provided above, granting that user all privileges, and then redirects to the edit privileges page for the newly created user. The Edit Privileges view is described below in the Edit Privileges View section.
Under the action bar is a table containing all users for the MySQL server, the host the user belongs to, and an action column containing a 'view privileges' and 'delete user' button. The 'view privileges' button brings up a modal which lists the privileges for that user and the option to go to the edit privileges page or close the modal. The 'delete user' button brings up a modal with a prompt to either delete the user or cancel the action.
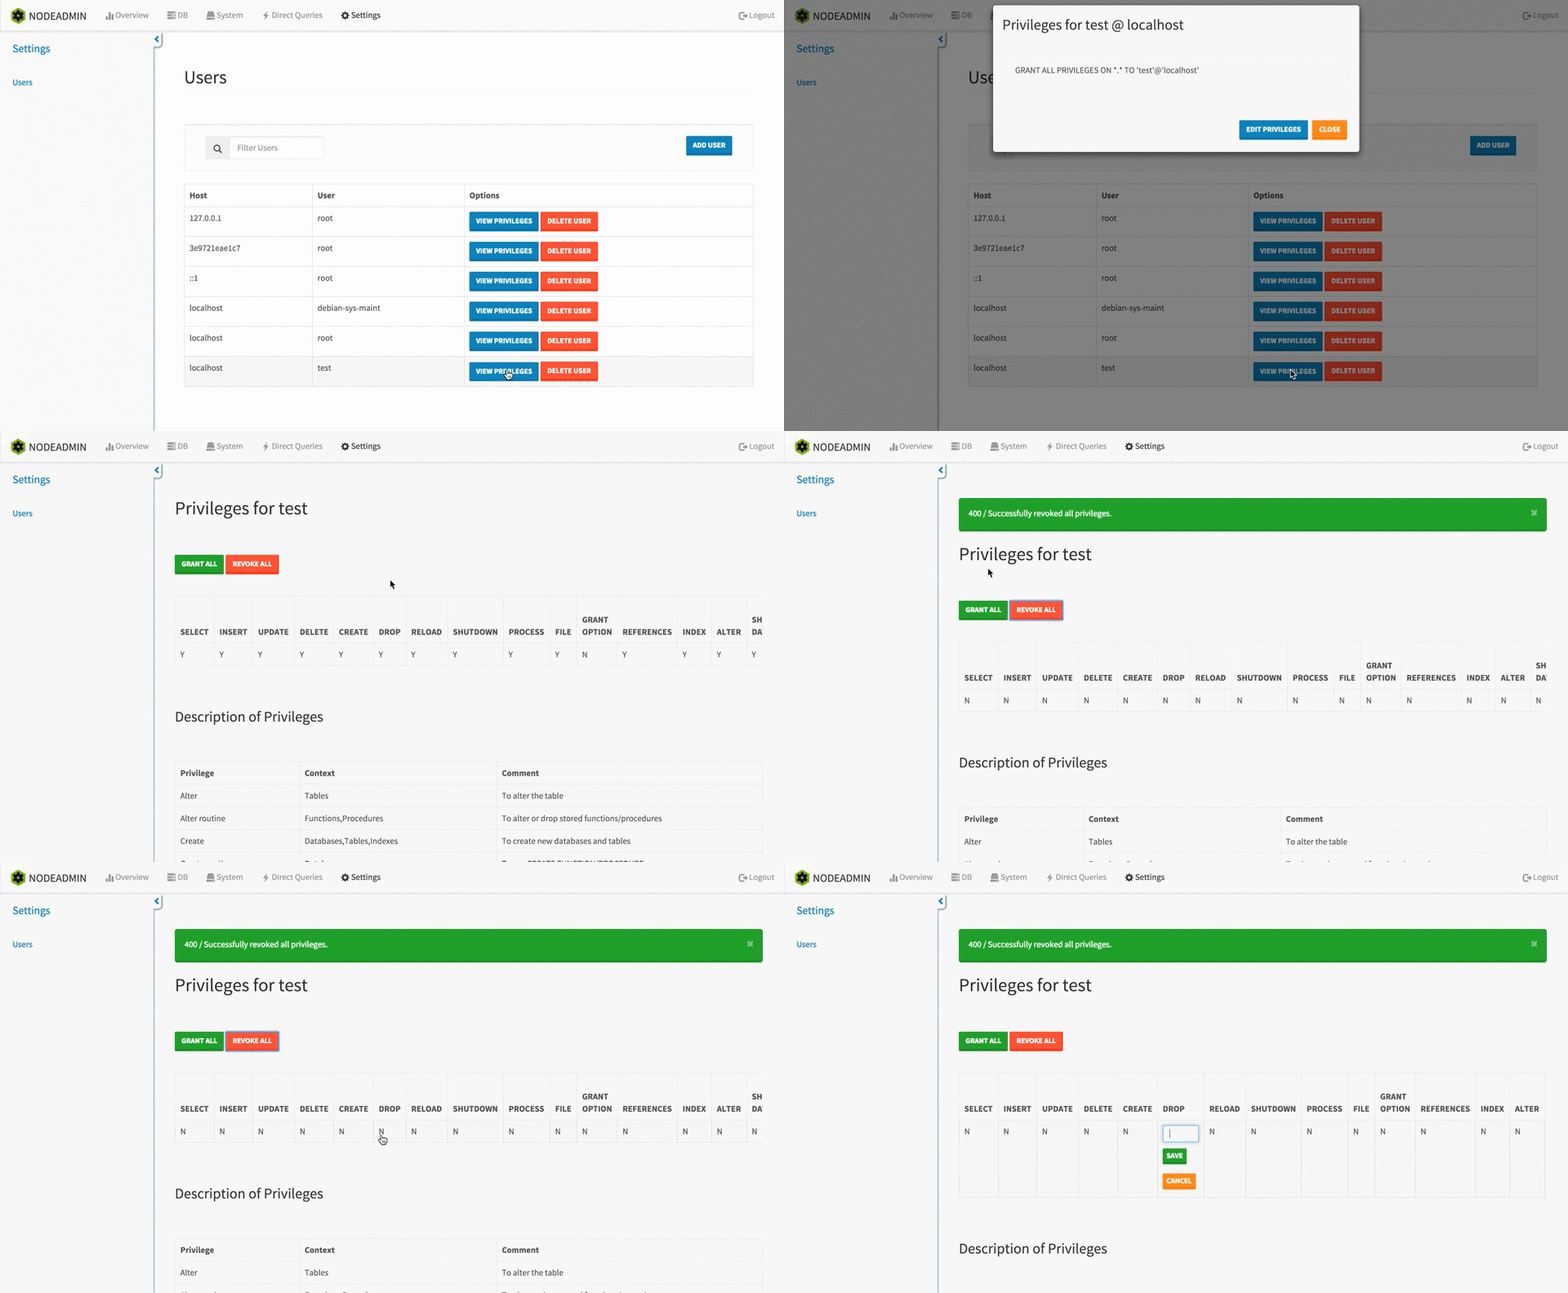
This view provides a interface for editing the privileges for a specific user. There are several options, and it is recommended to understand all options before proceeding. A table describing the different privileges a user can have has been provided at the bottom of the page. There are two buttons near the top of the Edit Privileges view that allow for the blanket granting or revoking of all privileges. Again, it is recommended that you have a good understanding of how MySQL users work. Check out the MySQL documentation here for more information.
Editing specific privileges for a user is accomplished by double-clicking a table cell in the privileges table. Doing this triggers the edit mode for that cell. A 'Y' or 'N' value can be entered, any other input is invalid and will return an error. Once the cell has been edited, click the save button to save the changes, or hit the cancel button to discard the changes.
Set environment variables MYSQL_HOST, MYSQL_PORT, MYSQL_USER and MYSQL_PASSWORD, and then run npm test.
For example, if you have MySQL running on localhost:3306 with a password set for the root user, run:
$ MYSQL_HOST=localhost MYSQL_PORT=3306 MYSQL_DATABASE=node_mysql_test MYSQL_USER=root MYSQL_PASSWORD=yourpassword npm test
Note: All tests will only pass if the MySQL user has all grants and CRUD access on the account.
View the project roadmap here.
See CONTRIBUTING.md for contribution guidelines.
