A small electron application for raspberry pi serialport manipulation.


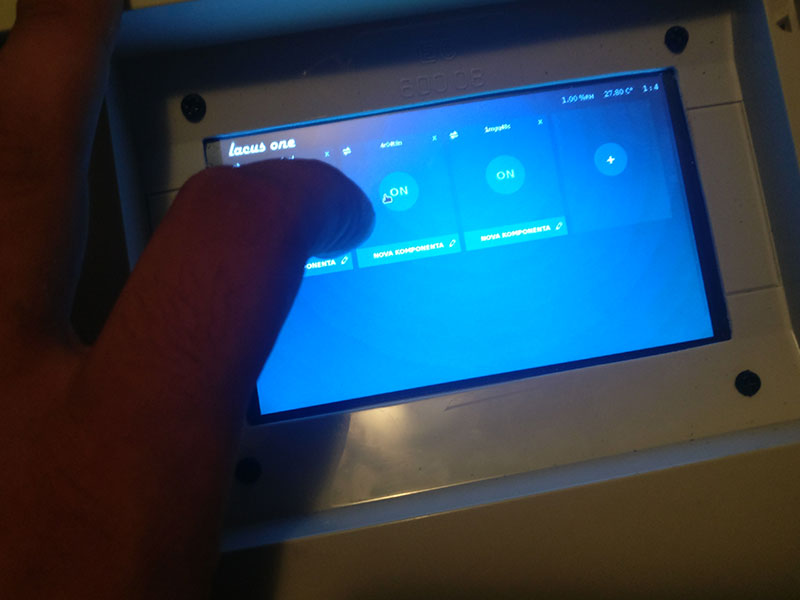
Tap on plus to add component


Tapping on edit icon opens flow detail view

Tapping on plus icon, opens component selection view, currently there are 4 relays active, temperature module, humidity module, time range module, and two gates, and & or.

Here you can see how example flow configuration works, Gate components take other components as children, and can be infinitely nested. On this example, if the clock shows between 03:00 and 09:00, and humidity is less than 77, relay2 will switch on. By composing components, almost any desired behaviour can be achieved.

A newly added component always ends at the end of the stack. By tapping the reorder icon in the top right corner of component, you can change the components position or add it inside a gate.

You can turn the flow off or on by tapping on the switch. + (: My fat finger for scale

First of all, this is work in progress, so any advice is welcome. The app is built on electron and it uses React and Redux to handle the UI.
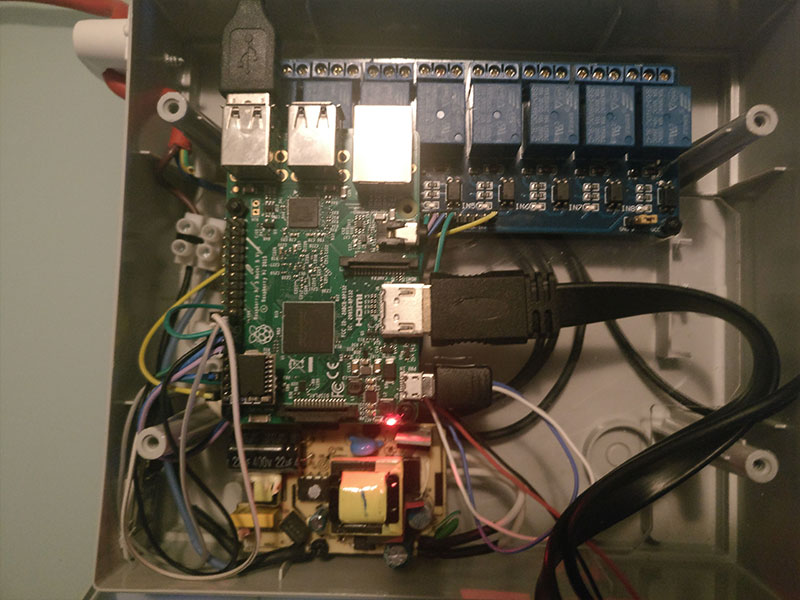
For serialport manipulation you can use anything. I used serialport.js, johnny-five.js and a standalone rpi-dht-sensor because johnny-five supports only digital input.
To make this work, i suggest you first try it locally. Then connect to your RPI via ssh and try running it there.
Clone this repo, run "npm install" in /app folder and open up package.json Here are the available scripts:
"start": "udevadm trigger && electron main.js", "startwin": "electron main.js", "dev": "webpack-dev-server -d --progress --inline --colors --display-error-details --content-base .", "build": "webpack --progress --colors --display-error-details --content-base .", "rebuild": "electron-rebuild -f -w serialport"
On raspberry run start, on your computer run startwin. Dont forget to run the dev server with hot reload while you are developing, and build script before you deploy to your raspberry.
If you are having problems with serialport, try the rebuild command.
The api for adding your own components could have been prettier, and i will refactor it eventually. For now, you can follow these steps.
If your component has some IO like an ajax request or a GPIO pin, add it in the app/server/devices folder. For now, there is a relay device and a tmphig (temperature and humidity) sensor.
The only mandatory parameter here is the "uid" property on your device object. As this software uses johnny five library, we are initializing our devices in the app/server/devices.js file.
Here, all our relays and our temphig sensor are added to the apps devices.
Apart from that, every component has two parts, the frontend and the backend. To make resolving our flow possible, every component takes a boolean as an input, and returns a boolean as an output, for the next component in the flow to take in.
For example, when your flow is "ON" the "true" boolean is propagated to the first component in that flow. The timerange component returns "false" if it recieves "false". If it recieves "true", then it checks if the current time is in the given interval, and returns the boolean according to that information.
Apart from that, you have (input, io, appState, ioSubtypes, devices) available to make that decision.
ioSubtypes = { and: require('./io/and'), or: require('./io/or'), relay: require('./io/relay'), timerange: require('./io/timerange'), temperature: require('./io/temperature'), humidity: require('./io/humidity'), };
Then, simply add your component to the ioSubtypes const in the app/server/io.js
For the frontend, add the component in the ioLib config in the app/conf.js. Depending on the type of the component, a different UI widget is selected. You can add a new one or choose an existing one from app/client/components/io-bodies/
Try adding an new gate type for practice.
- change async IPC communication to use redux saga
- Add http routes with redux saga
- Finish wifi module
- Refactor the new component api
Better documentation coming soon
MIT License
Copyright (c) [year] [fullname]
Permission is hereby granted, free of charge, to any person obtaining a copy of this software and associated documentation files (the "Software"), to deal in the Software without restriction, including without limitation the rights to use, copy, modify, merge, publish, distribute, sublicense, and/or sell copies of the Software, and to permit persons to whom the Software is furnished to do so, subject to the following conditions:
The above copyright notice and this permission notice shall be included in all copies or substantial portions of the Software.
THE SOFTWARE IS PROVIDED "AS IS", WITHOUT WARRANTY OF ANY KIND, EXPRESS OR IMPLIED, INCLUDING BUT NOT LIMITED TO THE WARRANTIES OF MERCHANTABILITY, FITNESS FOR A PARTICULAR PURPOSE AND NONINFRINGEMENT. IN NO EVENT SHALL THE AUTHORS OR COPYRIGHT HOLDERS BE LIABLE FOR ANY CLAIM, DAMAGES OR OTHER LIABILITY, WHETHER IN AN ACTION OF CONTRACT, TORT OR OTHERWISE, ARISING FROM, OUT OF OR IN CONNECTION WITH THE SOFTWARE OR THE USE OR OTHER DEALINGS IN THE SOFTWARE.