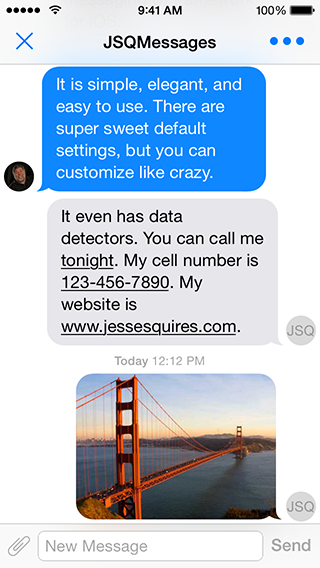
This is a complete rewrite of the awesome project JSQMessagesViewController in Swift. See the website for the list of Objectice-C features which should be include in the Swift version of course.
@import JSQMessagesViewController;@import JSQMessagesViewController-
Demo Project
- There's a demo project named:
JSQMessagesViewControllerTest.
- There's a demo project named:
-
Message Model
- Your message model objects should conform to the
JSQMessageDataprotocol. - However, you may use the provided
JSQMessageclass.
- Your message model objects should conform to the
-
Media Attachment Model
- Your media attachment model objects should conform to the
JSQMessageMediaDataprotocol. - However, you may use the provided classes:
JSQPhotoMediaItem,JSQLocationMediaItem,JSQVideoMediaItem. - Creating your own custom media items is easy! Simply follow the pattern used by the built-in media types.
- Also see
JSQMessagesMediaViewBubbleImageMaskerfor masking your custom media views as message bubbles.
- Your media attachment model objects should conform to the
-
Avatar Model
- Your avatar model objects should conform to the
JSQMessageAvatarImageDataSourceprotocol. - However, you may use the provided
JSQMessagesAvatarImageclass. - Also see
JSQMessagesAvatarImageFactoryfor easily generating custom avatars.
- Your avatar model objects should conform to the
-
Message Bubble Model
- Your message bubble model objects should conform to the
JSQMessageBubbleImageDataSourceprotocol. - However, you may use the provided
JSQMessagesBubbleImageclass. - Also see
JSQMessagesBubbleImageFactoryandUIImage+JSQMessages.hfor easily generating custom bubbles.
- Your message bubble model objects should conform to the
-
View Controller
- Subclass
JSQMessagesViewController. - Implement the required methods in the
JSQMessagesCollectionViewDataSourceprotocol. - Implement the required methods in the
JSQMessagesCollectionViewDelegateFlowLayoutprotocol. - Set your
senderIdandsenderDisplayName. These properties correspond to the methods found inJSQMessageDataand determine which messages are incoming or outgoing.
- Subclass
-
Customizing
- You can use the demo project as a guide.
- (void)viewDidAppear:(BOOL)animated
{
    [super viewDidAppear:animated];
    self.collectionView.collectionViewLayout.springinessEnabled = YES;
}
func viewDidAppear(animated: Bool) {
super.viewDidAppear(animated)
self.collectionView.collectionViewLayout.springinessEnabled = YES
}- (void)viewDidLoad
{
[super viewDidLoad];
self.collectionView.collectionViewLayout.incomingAvatarViewSize = CGSizeZero;
self.collectionView.collectionViewLayout.outgoingAvatarViewSize = CGSizeZero;
}
- (id<JSQMessageAvatarImageDataSource>)collectionView:(JSQMessagesCollectionView *)collectionView avatarImageDataForItemAtIndexPath:(NSIndexPath *)indexPath
{
return nil;
}- (UICollectionViewCell *)collectionView:(JSQMessagesCollectionView *)collectionView cellForItemAtIndexPath:(NSIndexPath *)indexPath
{
JSQMessagesCollectionViewCell *cell = (JSQMessagesCollectionViewCell *)[super collectionView:collectionView cellForItemAtIndexPath:indexPath];
// Customize the shit out of this cell
// See the docs for JSQMessagesCollectionViewCell
return cell;
}- (void)viewDidLoad
{
[super viewDidLoad];
// This button will call the `didPressAccessoryButton:` selector on your JSQMessagesViewController subclass
self.inputToolbar.contentView.leftBarButtonItem = /* custom button or nil to remove */
// This button will call the `didPressSendButton:` selector on your JSQMessagesViewController subclass
self.inputToolbar.contentView.rightBarButtonItem = /* custom button or nil to remove */
// Swap buttons, move send button to the LEFT side and the attachment button to the RIGHT
// For RTL language support
self.inputToolbar.contentView.leftBarButtonItem = [JSQMessagesToolbarButtonFactory defaultSendButtonItem];
self.inputToolbar.contentView.rightBarButtonItem = [JSQMessagesToolbarButtonFactory defaultAccessoryButtonItem];
// The library will call the correct selector for each button, based on this value
self.inputToolbar.sendButtonOnRight = NO;
}Read the fucking docs, available here via @CocoaDocs.
Please follow these fucking sweet contribution guidelines.
Created and maintained by @Sylvain Fay-Châtelard from the awesome JSQMessagesViewController project.
This is a rewrite in Swift for further project.
JSQMessagesViewController is released under an MIT License. See LICENSE for details.
Copyright © 2013-present, Jesse Squires, Sylvain Fay-Châtelard.
Please provide attribution, it is greatly appreciated.


