-
Notifications
You must be signed in to change notification settings - Fork 7
Formula Tool Preview
This post continues looking into the UI side of the Alteryx HTML/JS SDK. Specifically, this looks at how to create preview values using some of the methods found in the Formula Tool. As with the last post, it is based on examining the workings in version 11.0, but I believe nothing has changed in 11.3 and 11.5. It is however based on the v1 API not the new Beta v2 API in 11.5.
Like most of the JS SDK, none of this is documented yet and is all subject to change. I expect a lot of it is relatively fixed but as before - use at your own risk!
For the examples, I am often using the console.log function. Alteryx captures these messages and writes them out to the Messages pane.
The key to all of this is the JsEvent function on the Alteryx object (defined within the global window scope):
export function JsEvent(jsonObject: string): voidThe parameter this function takes is a JSON serialized object. The object must have an Event property. Its value tells the .Net side of the designer what to do. This call is an asynchronous function. It will immediately return, and upon completion, it will call a function specified in a callback property on this object. The other properties of the object depend on the value of the Event property.
As a simple example - the code below will call the Alteryx password encryptor to encrypt qwerty and return the result to the console:
Alteryx.JsEvent(JSON.stringify({
    Event: "Encrypt",
    text: "qwerty",
    callback: "console.log"
}))
Below is a non-exhaustive list of events (the ones I know of):
-
Encrypt: Encrypt a password string (
textproperty) -
Decrypt: Decrypt an encrypted password string (
textproperty) -
FileBrowse: Open a File browser window to get the user to select a file Note the callback property must be
Callbackfor this event - FolderBrowse: Open a Folder browse and get the user to select folder Not sure this works yet
- GetInputData: Get the input data from a connection (covered below)
- GenerateFormulaExpressions: Gets the functions and operators for expressions (covered below)
- GetFormulaConstants: Gets the constants available for expressions (covered below)
- GetFormulaRecentAndSavedExpressions: Gets the set of recent and saved expressions (covered below)
- SaveFormulaRecentExpression: Adds a recent expression to the collection (covered below)
- SaveExpression: Saves an expression (covered below)
- DeleteSavedExpression: Deletes a saved expression (covered below)
- RenameSavedExpression: Renames a saved expression (covered below)
- TestExpression: Test an expression with the formula tool and get syntax object and error messages (covered below)
- FormulaPreview: Compute the preview value for an expression (covered below)
Let's start by taking a look over the Formula tool UI:

There is a fair amount of functionality going on this small UI. It is a tabular design with five columns:
- Column 1: provides grips to allow reordering of steps
- Column 2: has an
˅expand /˄contract for each step, a+to add a new step and then within the detail of a step some controls - Column 3: shows the name of the field for the step
- Column 4: gives a value preview of the expression or if the formula has error the message from the parser
- Column 5: has a delete button to remove a step
I'm not going to look at how the outer container works; I am only really interested in the functioning of the detail view for a single step of the tool. FWIW, the outer container is an Accordion control and can probably be reused if you want. Looking at the editor for a single step within the UI, it consists of three rows:
- Row 1: Expand / Contract, Field Name, Preview Value, Delete Step
- Row 2: Tool buttons, Formula editor
- Row 3: Data Type specifier

This row gives you a top level overview of the step. In previous versions of Alteryx (before 11.0), this would have shown the expression of the formula, but since the introduction of the HTML UI, it now shows a preview of the result.
The first part is an expand/contract control for hiding or showing the rest of the details of this step. Whether expanded or contacted most of this row doesn't change. The only exception is the delete control, which is only visible when the detail is shown.
The second part is a field selector. This doesn't use the PlugIn-Widget field selector but is implemented as a custom drop down - probably due to the multi-step nature of the formula tool and needing to including fields created in previous steps.
The next section will hold the value preview of the entered expression. If it is invalid, then it will show the error from the parsing process there. I will describe creating the preview value below.
Finally, there is a delete button - only shown if the step's detail is visible.

This section of the formula editor consists of two parts: a set of buttons on the left and the expression editor. The expression editor is based on top of the CodeMirror editor. It has been set up with custom highlighting rules to cope with the expression syntax. I will cover the event sequence to create the preview value below.
Looking at the buttons on the left, running from top to bottom they are:
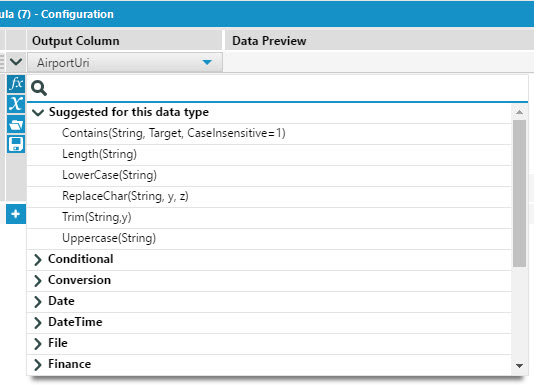
- Function List
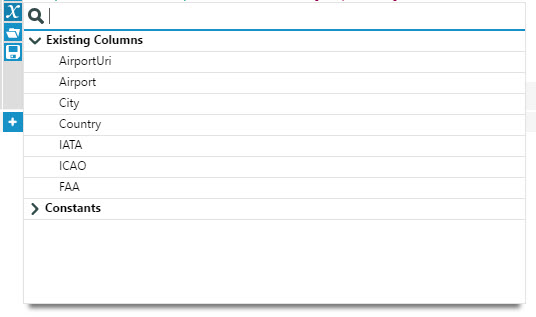
- Field List
- Recent and Saved Expressions
- Save Expression
All four of these are interesting in that they involve callbacks into the C# world either to populate or to save the values. Let's start by looking at the Function List.

As Alteryx supports extensions of the function library this list is dynamic. This list is populated by JsEvent call to the GenerateFormulaExpressions event:
Alteryx.JsEvent(JSON.stringify({Event: "GenerateFormulaExpressions", callback: "console.log"}))This event doesn't take any arguments and it will callback to the specified function with an object with three properties: FUNCTIONS, OPERATORS and CONDITIONALS. Each of these properties contains an array of function definitions. For example:


For the columns and constants, a combination of methods is used. First, the existing columns come from the meta data of the incoming connection. This available by the manager object covered in the previous post. If you are on a second or later step then new fields can be added - this is handled by the UI's code itself. Finally, the constants are accessed via a JsEvent call on the GetFormulaConstants event:
Alteryx.JsEvent(JSON.stringify({Event: "GetFormulaConstants", callback: "console.log"}))This event will call back with an object containing two properties (formulaConstants and questionConstants) each with an array of meta data.
The last two buttons handle Saved and Recent Expressions. The first event used GetFormulaRecentAndSavedExpressions acts in a similar way to the two above to get a list of Recent and Saved expression. The other events have a little more behind them to enable writing back into the .Net world. Let's look at the simplest: SaveFormulaRecentExpression. There is no callback needed on this method, but it does have a custom property:
Alteryx.JsEvent(JSON.stringify({Event: "SaveFormulaRecentExpression", expressionText: "1+1"}))The other events used by these buttons are listed below with their parameters:
- SaveExpression: Saves an expression (name: string, expression: string)
- DeleteSavedExpression: Deletes a saved expression (expressionName: string)
- RenameSavedExpression: Renames a saved expression (oldName:string, newName: string)
One trick I see on these events used by Alteryx is to get the callback to trigger a refresh of the cached values without actually processing the returned value.
While I doubt these particular flows will be useful (unless you want to implement a bespoke Filter tool UI), they give a good overview of how the JsEvent function and callbacks work.

This is a simple field type selector. It is implemented using a DropDown plugin widget and a NumericSpinner plugin widget. All the enabling and disabling is wired up using React with a lot of bespoke hooks - so, unfortunately, it is not trivial to reuse.
Now onto the heart of the Formula tool - the expression editor. For a long while, it had been the most requested feature to add IntelliSense and syntax highlighting to this tool. Both of these are built into the CodeMirror editor, with Alteryx having implemented a bespoke mode and linter for it to understand the syntax. I haven't tried to see if I can get the editor out of the formula tool, but at least, in theory, I would assume it was possible.
The value preview is the piece I was most interested in understanding as reproducing this in custom tools would be a nice feature. The diagram below shows the call sequence:

The tool sends two JsEvent to get evaluated. The first FormulaPreview takes all the steps entered into the formula tool as an array. These are evaluated within the C#/C++ side of the designer, and then an array of results is called back. The code below shows a simple call for a set of two expressions:
Alteryx.JsEvent(JSON.stringify({
  Event: 'FormulaPreview',
  connectionName: '',
  anchorIndex: 0,
  callback: 'console.log',
  expressions: [
    {name: 'Test', type: 'Int32', expression: '3 + 2'},
    {name: 'Another', type: 'Bool', expression: '1+2=3'}
  ]
}))
// Results in ["5", "True"]
This event and callback allow you to evaluate a set of expressions. If one of them is invalid, it will return [Null] as a value, and you will need to use the TestExpression event result from the parsing:
Alteryx.JsEvent(JSON.stringify({
  Event: 'TestExpression',
  callback: 'console.log',
  expression: '1+2=3',
  customFields: []}))
When called this will return an object like:
{
  error: {
    charPosition: -1,
    errorMessage: ""
  },
  syntaxObj: "[1,1,"number",2,"op",3,"number",4,"op",5,"number"]"
}
The error.errorMessage will be displayed to the user in the value preview if it is not empty. The syntaxObj is used to set the highlighting within the code editor.
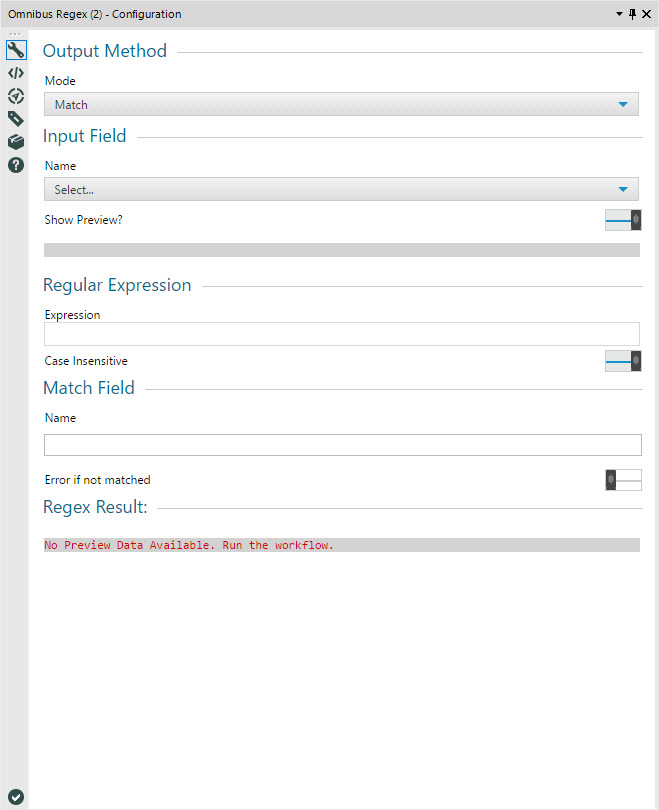
So having been through the inner guts and workings of the formula tool, can we use these calls to create our own UIs. As an experiment, I wanted to create an HTML based UI for the RegEx tool. The goals were to have syntax highlighting and a result preview. As with the update that Alteryx did to the Formula tool, it will use the same C++ class for the execution as before. As long as the XML configuration and the end point element match then this will work. In this post, I am only looking at the UI and preview side - the code is all on GitHub if you want to examine the backend parts as well. The current UI for Omnibus Regex looks like:

There are a couple of fantastic sites I use to help when writing regular expressions: Regex101 and Regexr. Ideally, would be great to have all the functionality of one of these sites. However, as a starting point, I will settle for using CodeMirror and adding syntax highlighting.
It is worth noting that the CodeEditor widget is so specialized for expression editing, it is much easier starting with the vanilla CodeMirror API. As we will be using the Alteryx CSS files, it should still end up looking pretty correct!
For the syntax highlighting I used code by Douglas Duteil creating a regex mode for CodeMirror. To use these within an Alteryx tool, it is as simple as downloading the JavaScript and CSS for CodeMirror and this mode and then including in your head section:
    <link rel="stylesheet" href="codemirror.css">
    <link rel="stylesheet" href="codemirror-regex.css">
    <script src="codemirror.js"></script>
    <script src="codemirror-regex.js"></script>
The expression editor is just a standard text box hooked into CodeMirror in regex mode:
const codeMirrorEditor = CodeMirror.fromTextArea(document.getElementById('regularExpression'), {
  mode: 'regex'
})
The change event of the editor is then hooked into an AlteryxDataItems.SimpleString holding the expression (this is all hooked up within the AfterLoad method):
  const regExExpressionItem = manager.GetDataItem('RegExExpressionTemp')
  codeMirrorEditor.getDoc().setValue(regExExpressionItem.value)
  codeMirrorEditor.on('
    change',
    () => regExExpressionItem.setValue(codeMirrorEditor.getDoc().getValue()))
Most of the rest of the UI is a set of PlugIn Widgets linked to the data items. I will cover using plug in widgets in more detail in another post:
- Mode is
DropDownwidget. It's linked to aAlteryxDataItems.StringSelectorwith the set of supported modes (all but Parse at present). - Input is another
DropDownwidget. This time it is running inFieldSelectormode linked to the input connection. - There are two
CheckBoxwidgets one for showing the preview and one for case insensitivity.
Each of the modes has its own set of additional inputs. Again these are just plugin widgets - just TextBoxs, CheckBoxs and DropDowns. Each mode is contained within a FieldSet and when the Mode drop-down is changed the needed FieldSet is shown. This is done by hooking onto the UserDataChanged event of the DataItem:
  const methodItem = manager.GetDataItem('MethodTemp')
  methodItem.BindUserDataChanged((v) => {
    document.getElementById('MatchFieldSet').style.display = (v === 'Match' ? 'block' : 'none')
    document.getElementById('ReplaceFieldSet').style.display = (v === 'Replace' ? 'block' : 'none')
    document.getElementById('ColumnFieldSet').style.display = (v === 'ParseSimpleColumns' ? 'block' : 'none')
  })
Hooking onto this event and the associated DataChanged event is how all of the wirings in OmniBus Regex UI is implemented. All of the binding is done within the AfterLoad method on the Alteryx.Gui object. The BeforeLoad object is used to reshape the data items from their native layout (from the built RegEx tool) into the structure I need.
Now to add a value preview to this tool need one additional JsEvent call. This one is to the GetInputData event. This returns an object containing an array of values and a list of fields:
Alteryx.JsEvent(JSON.stringify({
      Event: 'GetInputData',
      callback: 'console.log',
      anchorIndex: 0,
      connectionName: '', // Connection Name
      numRecs: 1,
      offset: 0}))
The first time you call this (if the workflow hasn't been run), you get an error:
{errorCode: 1, errorMsg: "Run the workflow to generate preview data."}After re-running get a structure like:
{
    fields: [{
        strName: "Field",
        strType: "String",
        nSize: "5",
        strSource: "TextInput:",
        strDescription: ""
    }, {
        strName: "Another",
        strType: "String",
        nSize: "5",
        strSource: "TextInput:",
        strDescription: ""
    }],
    numRecs: 1,
    data: [
        ["Hello", "World"]
    ]
}
Each record's values are stored as a row in the data property with the fields described in the fields property. Using this, it is easy to get a preview value and display it to the user within a pre element. It needs to be updated on a change of field in the drop down. Again, this can be hooked up via the UserDataChanged event on the DataItem within the AfterLoad method. The initial JsEvent call to get the data is also done here:
  const previewData = {}
  window.previewCallback = d => {
    d.fields.forEach((n,i) => previewData[n.strName] = d.data[0][i])
    getFieldPreview(fieldItem.value)
  }
  Alteryx.JsEvent(JSON.stringify({
      Event: 'GetInputData',
      callback: 'previewCallback',
      anchorIndex: 0,
      connectionName: '',
      numRecs: 1,
      offset: 0}))

  const fieldItem = manager.GetDataItem('Field')
  const getFieldPreview = v => {
    document.getElementById('preview').textContent = (v ? previewData[v] : ' ')
  }
  fieldItem.BindUserDataChanged(getFieldPreview)
Please note - the current implementation of OmniBus Regex uses a helper module, but the code above reproduces the sequence called.

This add a value preview to the field selector but also want to add a result preview to test the regular expression. My initial version of this used the two callbacks described for formula tool, but in the end, I found it was easier, in this case, to reproduce within JavaScript. Each mode needs its own preview code. The function below shows the current implementation:
  function reevaluate (fieldName, method, regex, caseInsensitive, replace) {
    let fail = false
    const flags = caseInsensitive ? 'gi' : 'g'

    try {
      if (!previewData || !previewData[fieldName]) {
        fail = true
        previewElement.textContent = 'No Preview Data Available. Run the workflow.'
      } else if (method === 'Match') {
        previewElement.textContent = new RegExp(regex, flags).test(previewData[fieldName]) + ' '
      } else if (method === `Replace`) {
        previewElement.textContent = previewData[fieldName].replace(new RegExp(regex, flags), replace) + ' '
      } else if (method === 'ParseSimple') {
        const matches = previewData[fieldName].match(new RegExp(regex, flags))
        previewElement.textContent = matches.length ? matches.join('\r\n') : 'null'
      } else if (method === 'ParseSimpleCol') {
        const matches = previewData[fieldName].match(new RegExp(regex, flags))
        previewElement.textContent = matches.length ? matches.join('\r\n') : 'null'
      } else {
        fail = true
        previewElement.textContent = `${method} preview not supported yet`
      }
    } catch (err) {
      previewElement.textContent = err.message
    }

    previewElement.style.color = fail ? '#cc0000' : '#333'
  }
On the change of any of the configuration parameters, this method must be rerun, so we end up with a block like:
  methodItem.BindUserDataChanged(methodChanged)
  caseInsensitiveItem.BindUserDataChanged(callReevaluate)
  regExExpressionItem.BindDataChanged(callReevaluate)
  replaceItem.BindUserDataChanged(callReevaluate)
  rootName.BindUserDataChanged(callReevaluate)
If you want to dig in further to the OmniBus Regex tool, the source code is on GitHub and the YXI installer is here.
Having looked over the options here, the next step is to integrate this into the HelloFromJS tool. In the next post I will expand this tool to allow custom expressions and show a preview.
Developing Functions
Grouped Record ID