P3 Matrix RGB LED 64x32 HUB75E #746
Comments
|
This seems to be the same as my issue #745 - it's exactly the same panel and I'm seeing the same issue as you. |
|
Thank you, I wrote to the seller, I will send the second panel with a different chip. |
|
Hi, After lots of messing around I found out that by default FM6126 settings are the outputs are all disabled, I've been messing around with the attached script to try and work out what the various registers do, it's set to use the pinout used by the adafruit matrix hat without the RTC so see if it works for you, Just run it before the demos to configure the 2 configuration registers For info what i've found so far is register 12 controls brightness/gain settings and appears to be made up of three 6bit values, as follows aaaaaabbbbbbcccccc a= darkness? mainly seems to add red to the background when the leds are off, b=main brightness c=finer brightness control (i'm not sure if b & c are actually as 12 bit value but with b set to all 1's the value in c doesn't seem to make much difference) register 13 i'm not sure what it's doing yet, just that 1 specific bit within seems to be an overall enable function. set all the values at the top to the same value for each of register 12/13 to get the same settings across the panel, the current code loads different settings into each 32 columns. clocking in the register is simply clocking in the value (i've 2 panels so 128bits of data) and for the last 12/13 bits depending on the register setting the latch to high. the final drop of latch to low clocks in the configuration. this is done by sending the same value to r1/r2/g1/g2/b1/b2 at the same time to load the config into all the FM6126 chips Hopefully this will help you get these panels working for you. PS, The code is not going to win any competitions for quality, this is my first attempt to learn a bit of python along with trying to work out how to use these panels. |
|
Hi @shades66...I am the author of PxMatrix (https://github.com/2dom/PxMatrix) and users have an issue that is probably related. I messed about with theses panels myself however did not try to write the configuration registers yet. With the configuration you supplied above can you run the startdard library without any problems/changes? The Chinese pdf mentions something about three clock edges to pipe data into the registers - is that still necessary for display data? |
|
I dug up an old rbpi from work, installed raspbian and hooked up the panel. I changed the above script to support single panel and the default wiring mode and it worked. (yay) I need to re-run the script on power cycle, so not sure if I can easily load this, then connect to pxmatrix and test. If I find some time (not sure when), I will see if I can reproduce the above script in pxmatrix init code. (Also noticed that the brightness setting on the demo apps do not work anymore.) |
|
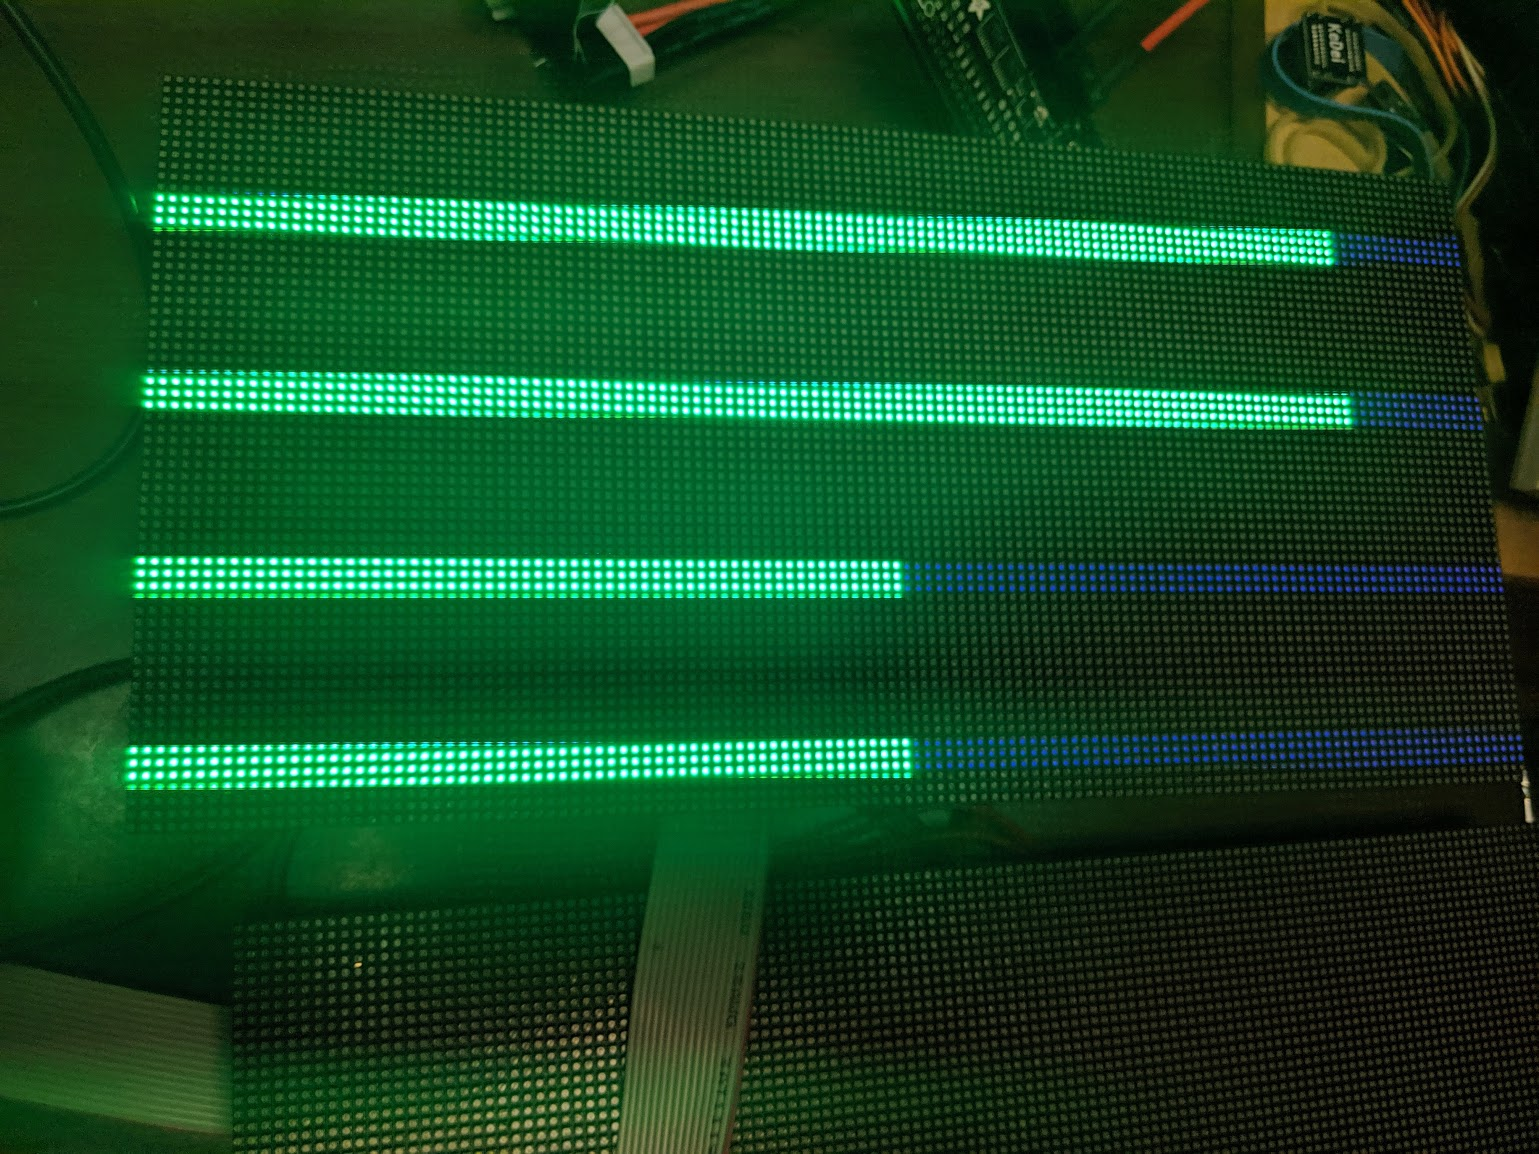
I managed to get my panels "working" too using this script, but unfortunately it's not quite 100%... 50%, to be exact - my panel is lighting up brightly on the left hand side (away from the input connector) and really dimly on the right (Image). I played around with multiplexing options and rows/cols but no luck. Anyone seen this? It's doing it on both my panels, whether they're connected separately or together. |
|
That is easy enough to fix, the script sets this explicitly. Change: to Those 'b' bits are brightness (see description above). Video of it working: https://filebin.pw/sJD/ |
|
Hey, sorry I should of set it all to ones when I posted the script. It was just left with the last settings I was playing with trying to work out how the last 6 bits change the brightness. I see @2dom has added the script to PxMatrix so going to give that a go too at the weekend. |
|
Thanks to this thread, after hours trying to figure out what I had done wrong, I FINALLY realized that I too had ordered these P3 64x32 panels with HUB75E. The above script worked for me as well! (Thank you shades66!). I'm hoping to develop some software using this library to control my panels - I'll keep an eye on this thread and update if I find a nice way to integrate this little script into my project! Massive thanks to all of you in this thread. You can't possibly understand my relief after all this troubleshooting! |
|
Had the same problem with those same p3 modules. And I modified it so it can activate 4 p3 pannels instead of 2. You can get even more in a chain by multiplying max at line 56 (2 = 4 panels) |
|
Oups couldn't upload the script for some reason, let me know if anyone needs it |
Please send :) |
|
Here it is (github doesn't want python files, had to add .txt extension) |
|
Hi all, I exactly have the same problem, and I also connected my system like in the picture https://imgur.com/a/GWmf2iA as shown by @vmisiek. So my Raspberry PI3B+ is directly connected to the Panel's HUB75 input (without using Adafruit hat), and the Panel's HUB75 output is not connected. I bought my panels like many of you in SRYLED Display Store and it has FM6126A chips. The problem is that I'm not sure I correctly applied the patch (I'm only "playing" with rpi-rgb-led-matrix" for 2 days). pi@raspberrypi:~ $ sudo python3 resetmatrix.py
0111111111111111 0111111111111111 0111111111111111 0111111111111111 0111111111111111 0111111111111111 0111111111111111 0111111111111111 0111111111111111 0111111111111111 0111111111111111 0111111111111111 0111111111111111 0111111111111111 0111111111111111 01111*11111111111
0111111111111111 0111111111111111 0111111111111111 0111111111111111 0111111111111111 0111111111111111 0111111111111111 0111111111111111 0111111111111111 0111111111111111 0111111111111111 0111111111111111 0111111111111111 0111111111111111 0111111111111111 0111*111111111111When I launched the following command, the panel sadly stayed black, without any led powered on :( pi@raspberrypi:~/rpi-rgb-led-matrix/examples-api-use $ sudo ./demo --led-rows=32 --led-cols=64 --led-chain=1 -D0
[sudo] Mot de passe de pi :
Size: 64x32. Hardware gpio mapping: regular
Press <CTRL-C> to exit and reset LEDsI'm quite sure I didn't correctly applied the patch ! Sorry for the total newbie question, but does anyone could tell me how I should proceed ? Thanks in advance, and sorry again for the level of the question ! |
|
At this point I’d like to weigh in, I’ve had massive success with these panels off ebay: Just tried to run these in a chain of 4 panels but for some reason the last two panels always remain off, still scratching my head. Thanks for everyones hard work on here, what a great community. |
Hi @Shemham, could you tell me how you applied the resetmatrix.py patch please (what is the command ??) : |
Yes that's exactly how I applied it, |
|
@schnibel for my own setup, all I had to do was run |
|
@Shemham have you tried the modified script that @lucasParis wrote?
|
If I run @lucasParis's code as it is (I believe he's already modified it to support 4 panels) then I only get the below output.
|

|
Ok making inroads, I had to use the original code from @shades66 with the fix from @DaveDavenport then update lines 56 to include
|

|
The dimness and the glitches might simply be a power issue, or signal
degregation, try with different gpio slowdown values.
|
|
Thanks @Shemham and @patrickhirsh , it works... actually I used @DaveDavenport patch instead of @lucasParis patch... it's the only thing I changed... |
|
Quick update, I now have all 4 panels working together, no glitches or dimming, @depili turns out it was a bad cable, once I replaced the cable linking boards 1&2 to 3&4 it works perfect, thanks for everyone's help. couldn't have done it without you. Video attached is rubbish quality thanks to my mobile camera but the real image is much deeper and no screen tearing. |
|
Great @Shemham ! |
|
I wanted to leave an additional update; I had bought two of these 64 x 64 panels from eBay. I had tried everything to get them to work, (they're the ones with the A, B, C, D & E lines), However I was getting nothing but half a display from them, but only intermittently, often they were just blank, it wasn’t until I realised they're using the same FM6126A chips above that it occurred to me to give the resetmatrix.py fix a try. And it works! Once again @shades66 thank you, you absolute legend! |
|
So I'm still having issues, it seems the first time I ran resetmatrix.py was a fluke, ever since I've had several areas of my 64x64 matrix different shades, see attached image, if I link 2 panels then run
|

|
Hi,. In the script try updating the line if(x==(128-12)): To if(x==(max-12)): And see if that works |
|
I fixed the code on my blog. Sure you can move or copy it wherever you
want.
-Bob
…On Mon, Apr 22, 2019 at 10:24 AM Marc MERLIN ***@***.***> wrote:
Thanks @bobdavis321 <https://github.com/bobdavis321> . Since this is
arduino related, do you mind if we move to pixelmatix/SmartMatrix#78
<pixelmatix/SmartMatrix#78> ? I did put maxleds
to 256 which should have worked either way given that my panel was 64x32.
https://github.com/marcmerlin/SmartMatrix/blob/FM6126A/examples/FM6126A_reset/FM6126A_reset.ino
—
You are receiving this because you were mentioned.
Reply to this email directly, view it on GitHub
<#746 (comment)>,
or mute the thread
<https://github.com/notifications/unsubscribe-auth/AI4VLAV3OQKARJEVTMRKWNDPRXDC3ANCNFSM4GOIFTTQ>
.
|
|
So, reset_matrix works, but on wider panels (here 128x64 ABCDE), I have to run it multiple times until the entire panel on all colors, gets turned on. Sometimes I get one color all the way through and not the other ones |
|
I'm also having issues getting this to work with the active3 board. When I activate port #2, port #1 stops working. Attached the script, all I did was change the port numbers for RGB1/2, but I guess the clock and reset signals are being sent to all panels, so port #1 gets broken while port #2 gets fixed. I've just opened a proper bug to track FM6126A and see if @hzeller may have an idea: #807 |
|
I'll continue on the new bug, but I made a script that works on all ports of the active-3 board |
|
Hi, I will not go into how many weeks I have spent trying to get my panel to work. Do I load Reset Code into Teesny run it with panel connected then compile and load my sketch or do I merge it into an existing sketch ? Does anyone have an example of completed Teensy code? I have same panel as vmisiek, P3 64x32 HUB75E with FM6126C Shift Reg and 74HC245C Octal Bus Trans. Connected to it I have the Teensy 3.2 and SmartMatrix v4 board. However I did get the panel working using a Mega and RGBmatrixPanel library, but only the left 75% worked. Thanks for any help. |
|
I haev it working, I used the DFRobot library and the recommended connections. All worked first time! I did have to use Bob's reset code which worked well and now inserted into the example code. Thanks for reading my previous message. I can now write what I wanted to do weeks ago! Should anyone have same issue look to DFRobot. |
|
@Galaxy-Man which DFRobot library is that? |
|
Thanks for the reply Marc, I eventually sussed that was the case.
Thanks
|
|
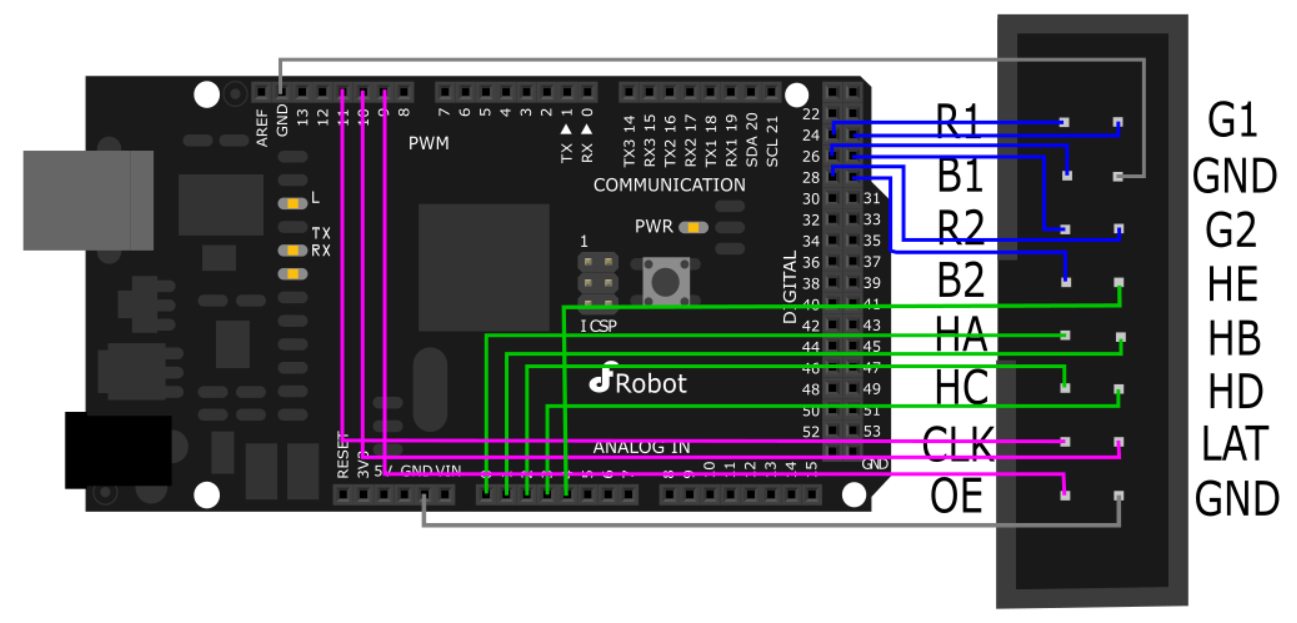
I'd be grateful if you provided some guidance on what would need to be changed in the reset script for a single 64x32 panel that relies on FM6126A. I attach the modified version that I'm trying to apply, which doesn't work (black screen). I use a Raspberry Pi Zero, connected as per diagram here: The rPi runs Raspbian Lite, audio has been deactivated (not listed in lsmod). Deactivated SPI, I2C and 1-wire from raspi-config. Removed bluez. I've checked if the connections are right, hopefully I haven't screwed up there! Update (22/6/2019): I've now replaced the color-coded DuPont jumper wires with the Adafruit RGB Matrix Bonnet, I set max_led=128, and the script worked fine! Thus, I can only assume that I misinterpreted the wiring diagram (pin numbering on the connector) as I did double check all the connections. |
@Galaxy-Man marcmerlin sent me the following link that you may find useful: |
|
Hi Im using the DFRobot_RGBMatrix library |
|
Merge Bob's Reset Code with this |
|
DFRobot library found here |
|
Hi, I am trying to use STM32 to drive the 64x64 RGB LED matrix using FM6124 chips, but I failed to turn on a “stable” pixel using GPIO simulation. I follow the procedure below: All row selection lines (A,B,C,D,E) are low, OE high, LAT low, CLOCK low; What’s more, if the number of row I select is larger than 8, these two lines will be flicking… Sorry to disturb you, hope can get some help here. Thanks. |
Does that mean FM6124 also has a hidden register? I saw this piece of code from PxMatrix. inline void PxMATRIX::writeRegister(uint16_t reg_value, uint8_t reg_position)
{
if (_driver_chip == FM6124 || _driver_chip == FM6126A){
if (_driver_chip == FM6124) {
Serial.println("\nFM6124 - REG: " + String(reg_position));
} else {
Serial.println("\nFM6126A - REG: " + String(reg_position));
}
...
} |
|
So I have added the init code now, which you can use with I have only tested with a single panel that I got from @esden and was using the initialization sequence provided here in the python script further above. Please let me know if it now works for you with this option. |
|
Hi, |
|
Just for the record:
How did you even know about those configuration registers? |
How exactly did you do that? I tried to rewrite the script, yet my display still stays dark |
|
I was manually turning the script, then the demo program.
…On Sun, May 19, 2024, 6:35 AM SThiviyan ***@***.***> wrote:
I dug up an old rbpi from work, installed raspbian and hooked up the panel.
I changed the above script to support single panel and the default wiring
mode and it worked. (yay)
I need to re-run the script on power cycle, so not sure if I can easily
load this, then connect to pxmatrix and test. If I find some time (not sure
when), I will see if I can reproduce the above script in pxmatrix init code.
(Also noticed that the brightness setting on the demo apps do not work
anymore.)
How exactly did you do that? I tried to rewrite the script, yet my display
still stays dark
—
Reply to this email directly, view it on GitHub
<#746 (comment)>,
or unsubscribe
<https://github.com/notifications/unsubscribe-auth/AI4VLAXWDMXC6BFW5KAYGKLZDB575AVCNFSM4GOIFTT2U5DIOJSWCZC7NNSXTN2JONZXKZKDN5WW2ZLOOQ5TEMJRHEYTQNJVHA3A>
.
You are receiving this because you were mentioned.Message ID:
***@***.***>
|
Hello
I bought such a panel P3 64x32 HUB75E, I connected it so in the picture https://imgur.com/a/GWmf2iA and I have a problem with the display I tried also to connect the pin E but without improvement https://imgur.com/a/MgHxff2 please help , the panel is on FM6126A chips. https://www.aliexpress.com/item/P3-RGB-pixel-panel-HD-display-64x32-dot-matrix-p3-smd-rgb-led-module/32728985432.html?spm=a2g0s.9042311.0.0.41ff4c4dVj3G0P
The text was updated successfully, but these errors were encountered: