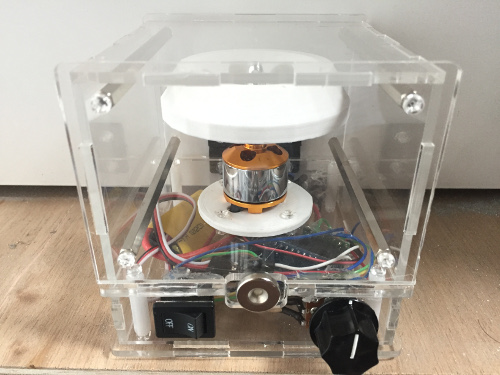
Opensource (CC BY-NC-SA 2.5) centrifuge with cover sensor and lock. Derived from F.Lab's one.
- Frequently asked questions
- Changelog
- Please note before making
- Bill of material
- Wirings
- Source code
- Assembly instructions
-
How much?
I made at $20 from junks. If you buy everythings new in Japan, total parts price is $75 now.
-
How fast?
Max 12,000RPM in my case by connecting 12V adapter to cheapest ($10) 1000KV (that means +1000RPM per 1V) motor. You can make it faster if you use higher voltage, faster motor or enough ampere. Do not exceed absolute maximum voltages of motor, ESC and microcontroller.
- 2017 Aug 7 : Changes from F.Lab's one
- Enclosure is changed from 3d printing to acrylic lasercut. because I think printing takes too long time and easier to get fail.
- Added magnet to cover and reed switch to base. so that it can stop rorating when cover is opened.
- 2017 Aug 8 : Add safety lock
- I don't know how to brake motor and it takes seconds to stop rorating. That means it's still not safe perfectly. Small servo motor should be added to lock the cover while rotating.
- Any hinge around you can be used but yours will not be same as mine. Don't forget to change holes on both cover_back and base_back to yours.
- Similar minor changes will be required for other parts like motor, variable resistor and switch. If you use bigger Arduino, basement should be wider.
- I used acrylic board, polycarbonate screws and nuts. If you want to proof it against rotor break, polycarbonate board, steel screws and nylon nuts are recommended.
-
Lasercut 3mm acrylic or polycarbonate parts with this.
-
3d printed rotor and motor base with any material.
-
Some heat shrinkable tubes with different diameters are useful to protect solderings.
-
Small microcontroller like Arduino Nano ($22), Arduino Pro Mini ($10) or anything you like. If you can make Arduino with Arduino or AVRISP mkII, single ATmega328 ($2.2) is enough. In any case, these pins are required.
-
Parts for enclosure
- 29 M3 10mm screws
- 8 M3 nuts
- 4 M3 25mm spacer (both female) for base
- 3 M3 100mm spacer (both female) for cover
- To hold door lock servo, I used
- 2 M2 8mm screws
- 2 M2 nuts
-
Are you living in Japan as me? Good. No need to change lasercut design if you use them.
- Brushless motor and ESC kit
- Small servo to lock door
- Variable resistor
- Nob for resistor
- Single circuit locker switch
- Neodymium magnet
- Reed switch
- Hinge
- 4 rubber foot if you want
- DC jack
- 12V AC adapter
- 5A looks well. 1A wasn't enough. If you need maximum RPM, check how much ampere your ESC needs.
-
If not, it would be cheaper to find items similar to above list around you and move holes a little for each of them.
- Need to make latest model from scratch taking photos or movies to document here. Anyone want to do that?


