-
Notifications
You must be signed in to change notification settings - Fork 2
Sensor Calibration
Please understand that not all ESCs have voltage sensing or current sensing. If one of these sensors is missing, it might read 0, it might also read crazy noisy values.
You need to do these calibrations in order to use the current limiting feature, and low-battery limiting feature.
Prerequisites:
- Hydra firmware is installed
- you understand how to use CLI mode
- you have saved a copy of your original configuration values
- you already figured out which phase is the common-shared phase
- a motor (or another load) is connected between the common-shared phase and one of the other two phases
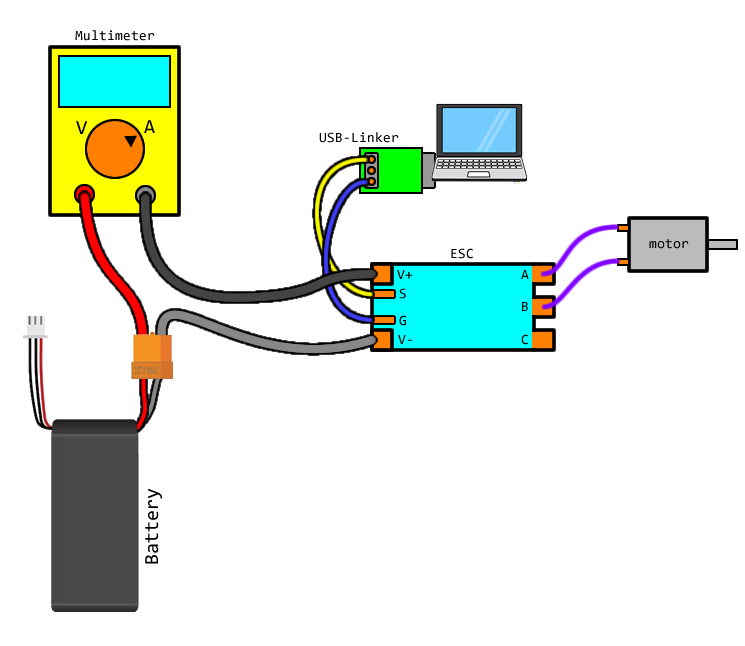
- you have a multimeter, and understand how to measure voltage and current
Later, you will be able use these sensors for current limiting and low-battery limit
When you are in the CLI, start by entering the command hwtest. You will then be prompted to use a key to select the type of test.
- key
vwill help you do voltage sensor calibration - key
cwill help you do current sensor calibration
During the tests, these keys are used to adjust items
| key stroke | action |
|---|---|
, |
adjust c-offset ⇓ by 1 |
. |
adjust c-offset ⇑ by 1 |
< |
adjust c-offset ⇓ by 10 |
> |
adjust c-offset ⇑ by 10 |
; |
adjust c-scale ⇓ by 1 |
' |
adjust c-scale ⇑ by 1 |
: |
adjust c-scale ⇓ by 10 |
" |
adjust c-scale ⇑ by 10 |
[ |
adjust v-div ⇓ by 1 |
] |
adjust v-div ⇑ by 1 |
{ |
adjust v-div ⇓ by 10 |
} |
adjust v-div ⇑ by 10 |
- |
adjust phase-map ⇓ by 1 |
= |
adjust phase-map ⇑ by 1 |
1 - 9
|
turn ON test load with selected power level |
0 |
turn OFF test load |
ESC or x or BACKSPACE or DELETE
|
stop and quit |
Measure the voltage you are using to power the ESC with a multimeter.
On you screen, you will start seeing data that looks like [32400] raw-v 1234 , calc-v 13324 , v-div 110
The number in the [...] is just a millisecond timestamp, ignore it.
The raw-v value is the ADC raw reading, ignore it.
The calc-v value is what is most important. If you are powering the ESC with 12 volts, then this number should read 12000. The unit is millivolts.
The v-div value is what we need to adjust.
With your keyboard, pressing keys into the serial terminal will adjust the v-div value. Adjust it until the calc-v value is as close to what it is supposed to be as possible. Remember the v-div value as you do this.
Once you've stopped, the final v-div value will be displayed, this is the number that should be set as voltdiv in the configuration.
Wire up your multimeter to measure the electrical current. Please select the correct measurement range, and connect the probes properly. Typically, a multimeter has a different connector for measuring high currents.

There are other ways of doing this wiring, such as using a power supply with a current read-out, or using a battery watt-meter in between the battery and ESC.
During the test, you can turn on or turn off the common-shared phase. The other two phases are always grounded. This allows you to attach a test load to the ESC. This could be a low-resistance-high-power resistor, or a constant-current dummy load, or a motor. Just don't blow up the ESC.
On you screen, you will start seeing data that looks like [32400] raw-c 1234 , calc-c 13324 , c-offset 0 , c-scale 20
The number in the [...] is just a millisecond timestamp, ignore it.
The raw-c value is the ADC raw reading, ignore it.
The calc-c value is what is most important. If there is 2A of current being drawn (read the as you do this), then this number should read 2000. The unit is milliamps.
The c-offset value and c-scale value are the calibration parameters that we need to adjust.
With your keyboard, pressing keys into the serial terminal will adjust the calibration parameters. Adjust them until the calc-c value is as close to what it is supposed to be as possible (read your meter as you do this).
Before applying the load, adjust the c-offset such that the calc-c value is close to zero when there is no load, then move on to applying the load and adjusting c-scale.
Once you've stopped, the final calibration parameters will be displayed, these are the number that should be set as curroffset and currscale in the configuration.