intro_video.mp4
# Install NoteChat Extension
pip install jupyterlab-notechat

# Define LLM secret keys in the extension settings or in the environment variables
# Linux
export OPENAI_API_KEY=your_key
# Windows
$env:OPENAI_API_KEY = "your_key"It is someway similar to Github Copilot or Cursor under jupyterlab environment. But it does not have fast code generation capabilities. It is more like a chatbot that can be used interactively in jupyterlab.
The original intention of the NoteChat tool is to allow users to have more precise and controllable conversations, including but not limited to:
- include all possible notebook elements the conversation context, such as cell execution outputs, code and markdown inputs, external files, etc.
- precisely specifying cell or file references by unique, relative or range cell IDs
- python kernel can directly refer notebook cell code/outputs and AI-generated texts reciprocally
- execute python code and AI-generated texts in sequence
- manipulate AI-generated text manually as context
- ...
So that users can better utilize the strengths of LLMs, including:
- common conversations (although the user experience is not as good as dialogue flow)
- writing structured essay or long reports
- data and text analysis with LLM models
- assisting programming
- acquiring LLM knowledge to notebook
- ...
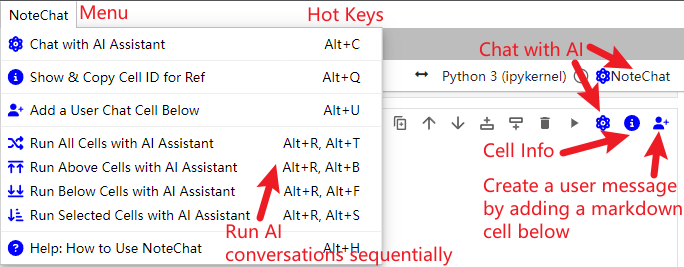
Directly create a new cell to input your question, or use the Add a User Chat Cell command, or click the corresponding menu or cell button  to add a markdown cell starting with user, which can more clearly indicate that this is a dialogue message created by the user.
Add custom parameter assignments in the form of @parameter xxx on the first line of the cell, but do not use escaped newline characters in it. The main parameters and examples are as follows:
@refsSpecify other cells that the current cell and AI conversation refer to, making the context more precise. For example, during the writing of a long report, each chapter only needs to see the initial outline, without needing to see the content of other sections. In the following examples, except for specified range references and the "alone" mode, the references are generally overlaid in a union. For example:@refs -8, +2, 2 be73e0fc-6e1c-4d49-a288-94e3f7ec8215: Will reference the 8th cell before the current message, the 2nd cell after it, the 2nd cell counting from zero, and the cell with unique ID "be...15". The separators can be ,, | ; ;. If the specified IDs do not contain range references of colon : or ~ type, the default number of context specified in settings will also be added.@refs alone -8, +2: If words likealone,single, andsoleare specified, it means ignoring the default additional range references and only using the single or range references specified in the current cell.If only "alone" is present, it means only looking at the current cell.@refs -10:0: Reference the contents of the 8 cells before the current message. [] brackets around the range can be added optionally such as@refs [-10:0]for better readability.@refs :+2 'xxxxxx': Reference all content from the beginning of the document up to the second cell below the current cell, as well as the cell with unique ID 'xxxxxx'.@refs 2:8: If the range does not have any + or -, it represents the 2nd to the 8th cells in the absolute ID order of the document.
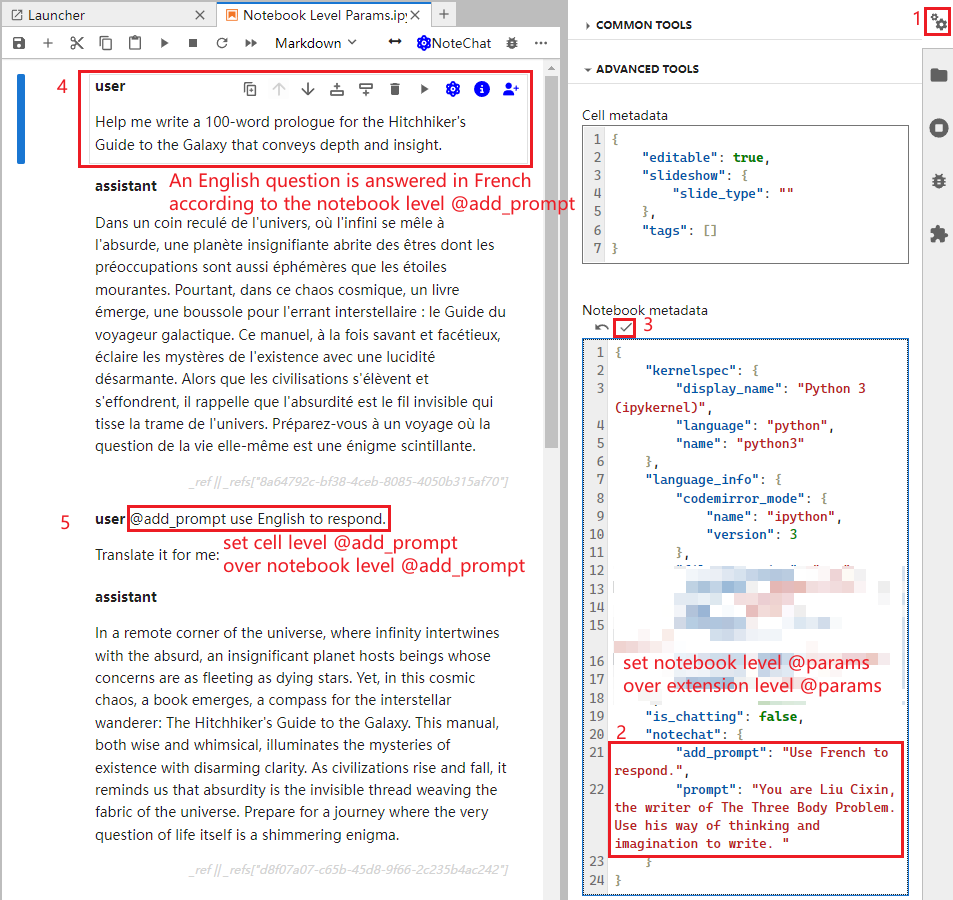
@files file_path/file_nameCan perform full-text references across multiple files. Please avoid characters like spaces that can easily cause confusion. The@character has been specially processed and can be included in the path. Currently supported types include text types like txt/md/py/js/ts/sh/bat/json/xml/log/config/ini/yaml/yml, spreadsheet types like csv/xlsx/xls, document types like pdf/docx/pptx/html/htm. Among these, except for ipynb files which can include images, other file parsing does not yet include images.@num_prev_cells 8In the current cell's conversation, override the system's default forward reference range to 8.@prompt xyzUse xyz to replace the system's default prompt; please do not use newline characters.@add_prompt xyzAdd xyz to the system's default prompt to form a new prompt.@model o1-previewSpecify the LLM model as gpt-4o-mini to conveniently test initial ideas at low cost. Please check the OpenAI official website for model information. The default is@model gpt-4o, and also supports @model moonshot-v1-32k (also supports 8k, 128k).@use_vison falseDo not use the image vision model; the default is true. You can directly paste screenshots or images into markdown cells, but image URLs are not currently supported.@max_input/@max_output 888Set the maximum token number of input and output. If it exceeds max_input here, it will be truncated according to the original order of absolute IDs, but the prompt and current cell are preferentially retained. Currently, the token count of images is not yet supported.@temperature 0.5Set the randomness of the LLM model directly between 0~1.@timeout 600Set the maximum response time of the model.Single notebook-level parameter settingsTo ensure reproducibility, you can add"notechat":{"param":value}in the Notebook metadata via the Property Inspector (gear icon) in the top right corner of the notebook under ADVANCED TOOLS to override parameters, such as setting the notebook-level prompt. Note that the param here does not need to add @. The override priority is user > assistant > notebook > settings.
Supports running python code cells and LLM-supported user and assistant dialogue flows in sequence from top to bottom**: Convenient for long-process work, such as automatically updating reports with data and LLM summary analysis.
The source text of markdown cells and code cells can be directly referenced in the current kernel program in the form of _refs["unique id"], facilitating users to perform text input and output interactions between python kernel and LLM messages.
First, use the shortcut key ALT+Q or the Show & Copy Cell ID for Ref button in the toolbar in the external notebook to obtain the target cell ID. Then, load the external notebook using a JSON component and retrieve the relevant content of the target cell.
import json
notebook_path = 'examples/README-Example.ipynb'
target_cell_id = '7ee61417-0c9b-495d-9015-ad17c5320358'
with open(notebook_path, 'r', encoding='utf-8') as notebook_file:
    notebook_content = json.load(notebook_file)
for cell in notebook_content['cells']:
    if cell.get('id') == target_cell_id:
        # Retrieve the source code
        target_source = cell.get('source', [])
        # Retrieve the outputs
        target_outputs = cell.get('outputs', [])
        break
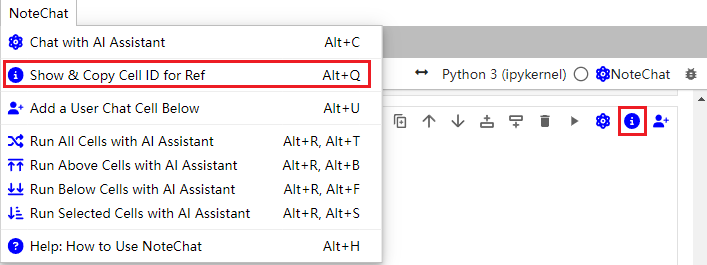
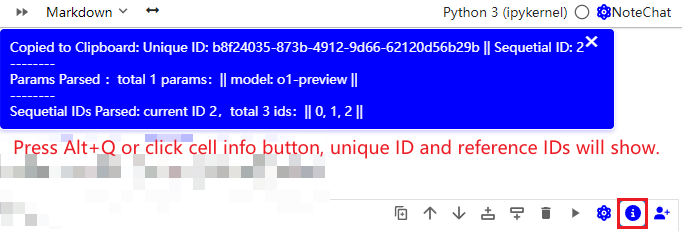
print(target_source, target_outputs)Obtain the unique id of the current cell in the form of a string xxxxxx and the absolute id counting from 0, the ids that the current cell wants to reference, personalized parameters of @param, and other information. When clicked, the unique id reference of the current cell will be copied to the clipboard for user reference. For cross-notebook use, please directly use a Python program to read the .ipynb file as JSON data to find the cell information corresponding to the unique id.
Currently, there are no good tools to handle HTML. It is recommended to use pandas to process data and try to convert it into markdown table format using df.to_markdown(), which LLM can better recognize and process.
Chat with an AI Assistant in the Notebook using OpenAI API
This extension is composed of a Python package named jupyterlab-notechat
for the server extension and a NPM package named jupyterlab-notechat
for the frontend extension.
- JupyterLab >= 4.0.0
- jupyter_server>=2.0.1,<3
- httpx>=0.25.2
- tiktoken>=0.5.0
- PyMuPDF>=1.18.0
- pandas>=1.2.0
- openpyxl>=3.0.10
- xlrd>=1.2.0
- beautifulsoup4>=4.9.0
- html5lib>=1.1
- python-docx>=0.8.10
- python-pptx>=0.6.18
- concurrent-log-handler>=0.9.20
To install the extension, execute:
pip install jupyterlab-notechatTo remove the extension, execute:
pip uninstall jupyterlab-notechatIf you are seeing the frontend extension, but it is not working, check that the server extension is enabled:
jupyter server extension listIf the server extension is installed and enabled, but you are not seeing the frontend extension, check the frontend extension is installed:
jupyter labextension listNote: You will need NodeJS to build the extension package.
The jlpm command is JupyterLab's pinned version of
yarn that is installed with JupyterLab. You may use
yarn or npm in lieu of jlpm below.
# Clone the repo to your local environment
# Change directory to the jupyterlab-notechat directory
# Install package in development mode
pip install -e ".[test]"
# Link your development version of the extension with JupyterLab
jupyter labextension develop . --overwrite
# Server extension must be manually installed in develop mode
jupyter server extension enable jupyterlab-notechat
# Rebuild extension Typescript source after making changes
jlpm build
You can watch the source directory and run JupyterLab at the same time in different terminals to watch for changes in the extension's source and automatically rebuild the extension.
# Watch the source directory in one terminal, automatically rebuilding when needed
jlpm watch
# Run JupyterLab in another terminal
jupyter lab
With the watch command running, every saved change will immediately be built locally and available in your running JupyterLab. Refresh JupyterLab to load the change in your browser (you may need to wait several seconds for the extension to be rebuilt).
By default, the jlpm build command generates the source maps for this extension to make it easier to debug using the browser dev tools. To also generate source maps for the JupyterLab core extensions, you can run the following command:
jupyter lab build --minimize=False# Server extension must be manually disabled in develop mode
jupyter server extension disable jupyterlab-notechat
pip uninstall jupyterlab-notechatIn development mode, you will also need to remove the symlink created by jupyter labextension develop
command. To find its location, you can run jupyter labextension list to figure out where the labextensions
folder is located. Then you can remove the symlink named jupyterlab-notechat within that folder.
This extension is using Pytest for Python code testing.
Install test dependencies (needed only once):
pip install -e ".[test]"
# Each time you install the Python package, you need to restore the front-end extension link
jupyter labextension develop . --overwrite
To execute them, run:
pytest -vv -r ap --cov jupyterlab-notechatThis extension is using Jest for JavaScript code testing.
To execute them, execute:
jlpm
jlpm testThis extension uses Playwright for the integration tests (aka user level tests). More precisely, the JupyterLab helper Galata is used to handle testing the extension in JupyterLab.
More information are provided within the ui-tests README.
See RELEASE


