-
Notifications
You must be signed in to change notification settings - Fork 36
En: 6. Problem solving
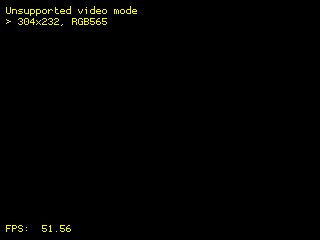
Some RetroArch cores show the following error screen when working in resolutions not supported by the system:

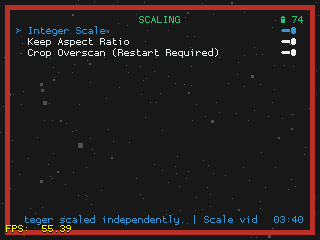
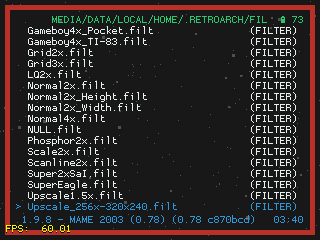
These cases many times are solved by activating a filter and playing with the video scaling options. One of the filters that usually works well is: Upscale_256x-320x240. The complete procedure to make these changes would be:
-
Open RetroArch menu (
Select + X). -
Go to
Main Menu > Settings > Video > Scalingand checkInteger ScaleandKeep Aspect Ratiooptions.
-
Go to
Main Menu > Settings > Video > Video Filterand selectUpscale_256x-320x240.filtfilter (last on the list):
Finally, to not make this change every time you open the game, go to Main Menu > Quick Menu > Overrides and select Save Game Overrides.
Another filter that usually works well in these situations is LQ2x.
If the application or emulator that we were running hangs, it can be forced to close by pressing the key combination Power + Select. It is important to press the keys in that order, that is, press a little before Power and without releasing it then press Select. If this key combination does not work either, hold down the Power key for a few seconds to cause a controlled shutdown of the console.
In summary, the methods to close an application or emulator are:
- First try normal closing (
Power + Selectfor example in RetroArch). - If the above does not work,
Power + Select. - If the above does not work, hold down
Powera few seconds until the system shuts down.
Avoid pressing Reset as it has been found quite often to cause SD corruption.
Another situation that leads to SD corruption in some users is overclocking. Thus, whenever it is going to try, it is recommended to make a backup of the savestates and configurations that we do not want to lose with Py Backup.
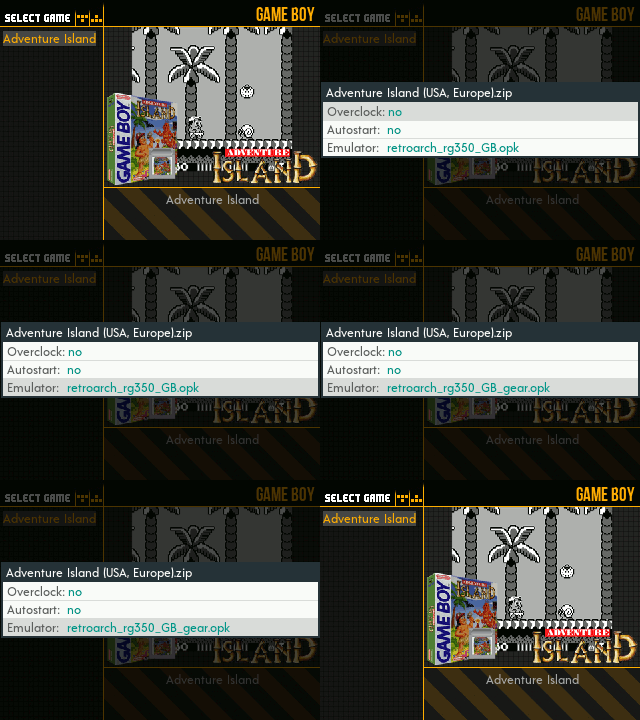
In the SimpleMenu configuration, many of the systems offer several emulator options, that is, you can choose between several emulators or RetroArch cores. Also the preferred emulator or core can be saved for each game.
In simple systems, such as 8-bit machines, only RetroArch has been configured, considering it the best option. But in more complex systems, such as arcade, the offer of emulators is wide. For example, in MAME, the following options are available:
- RetroArch MAME2003 core
- RetroArch MAME2003+ core
- FBA
- xMAME romset 84
- xMAME romset 69
- xMAME romset 52
The emulation options appear in this order in the list, the first being the default option if you do not manually specify an emulator for a specific game. Therefore, if left unchanged, the default option for running MAME games will be the MAME2003 RetroArch core.
If a specific game does not work with the default emulator, press Select in the SimpleMenu games list. A selector will appear with three options, the third one being the emulator to use. We will move to this third option and change the emulator by pressing left/right. To save the change we will press B. When opening the game by pressing A the emulator or RA core that we have chosen will be launched. If the new emulator is not working properly, try another option until you get good performance.

Another situation in which we should change the emulator option is when the game runs slow. In addition to the choppy sound, the best way to measure if the game is moving fast enough is to activate the frames per second or FPS counter. In RetroArch we can activate the option for a particular game in the menu Main Menu > Settings > On-Screen Display > On-Screen Notifications > Notification Visibility > Display Framerate, but if we want to activate it in general, we must first close the content that we are executing. This would be the procedure described in detail.
- Launch any game that runs with RetroArch (for example, all Handheld systems are configured with RetroArch by default).
- Open RetroArch meny pressing
Select + X. - Select
Close Contentmenu. - Follow the path:
Main Menu > Settings > On-Screen Display > On-Screen Notifications > Notification Visibility. - Enable
Display Framerate. - Go back to the Main Menu by pressing
Brepeatedly. - Open
Configuration Filemenu. - Invoke
Save Current Configurationcommand. - Go back to the Main Menu by pressing
Bonce. - Invoke
Quit RetroArchcommand.
To deactivate it, we will proceed in the same way but deactivating the option in step 5.
In xMAME the FPS option is activated/deactivated at any time by pressing Start + R1. In FBA the shortcut is L1 + R1 + Y.
A special case is that of the CPS system. In this image, it has been chosen to combine CPS1 and CPS2 in the same system (there is no RetroArch core for CPS3 and in general it is a system for which the machines that can use this image do not have enough power). It has been preferred to do this way due to the reduced number of games on both systems and because of the facilities that SimpleMenu offers to select the core that we want to use for each game. Thus, in this system (or rather in the union of CPS1 and CPS2 systems), it will be essential to make the adjustment in the CPS2 games. The core of CPS1 is the default and therefore it will only be necessary to adjust those of CPS2. The complete list of CPS2 games is as follows (the name of the ROM .zip file is indicated, not the actual name of the game). Thanks to @ridsama for putting together the list:
1944, 19xx, armwar, avsp, batcir, choko, csclub, cybots, ddsom, ddtod, dimahoo, dstlk, ecofghtr, gigawing, hsf2, megaman2, mmatrix, mpang, mshvsf, msh, mvsc, nwarr, progear, pzloop2, ringdest, sfa2, sfa3, sfa, sfz2al, sgemf, spf2t, ssf2t, ssf2, vhunt2, vsav2, vsav, xmcota, xmvsf
Most likely, the kernel installation procedure described here has not been performed. If the console is booted without the kernel installed, the green power LED lights dimly. In this situation, the console cannot be turned off (unless we disconnect the battery or wait for it to discharge completely). It has been verified that in some cards, even if we remove the card, install the kernel, reinsert it and press RESET, it will still not boot. In these situations, the only way that has been found to get out of the vicious circle (apart from the idea mentioned before disconnecting the battery or waiting for it to discharge completely) is to insert another card that does not give this problem, press RESET and after system boot on this card, shutdown normally. If now we insert the first newly flashed card where the kernel installation procedure has been performed, this time (with a cold boot of the machine) it will boot normally.
A situation that is happening more and more frequently is that the RG350P comes mounted with the high resolution screen (Anbernic probably can't find the low resolution panel on the market anymore). In this case, the console behaves as if it were the RG350M, so this is the model to select in the kernel selection script. If the theoretically correct model (RG350/P) is selected, the console will boot but the screen will be black. In this case, hold down the Power key to shut down the console, remove the INT card, plug it into the PC and go through the kernel selection procedure again, selecting RG350M this time.
We refer to the situation where we try to power off the console using the GMenu2X Power off launcher or the SimpleMenu Shutdown command. When the problem occurs, just when the console should be turned off, it starts a new boot, making it impossible to turn it off completely. So far two situations have been found that can cause this problem (apart from the case of the PG2v1 which has its own scenario). One case is after a spontaneous reboot of the system after going in and out of sleep mode several times in succession. The other is after using the HDMI output and disconnecting it (see discussion #131). The solution is to use the Reset. To avoid corruptions of the system card, it is recommended to press Reset just when the system finishes shutting down (we can be guided by when the screen goes black). An example of the phenomenon and its solution can be seen in the following video:
This is a special case of the previous one. Only occurs with PlayGo / PocketGo2 v1 consoles. In this case the trigger is the disconnection or complete discharge of the battery. User @esmith13 in the scope of issue #7 describes a workaround as follows:
Download the stock firmware for the PG2v1 from here: https://github.com/retrogamehandheld/PocketGo2/wiki/Firmware-and-software-updates
Write it to a spare mSD card and boot your device with it once then shutdown properly (it will stay off as expected).
Swap back to your ADAM image mSD card and resume normal use.
You should be good as long as you don't completely re-flash your ADAM Image mSD card from scratch, pull out your battery, or allow your battery to drain completely. If any of those does happen, just boot from the stock image once to fix the issue again.
Rinse and repeat.
Actually, in this situation, the system is completely up and running. The problem is usually related to SimpleMenu when it is the default launcher if it have trouble restoring the last state. This can happen if the files that SimpleMenu addresses through its configuration files have been manually modified. It can also happen if these files itself have been modified (those found in /media/data/local/home/.simplemenu/section_groups). The solution is usually to delete the status file so that it can be regenerated. This file is last_state.sav and it is located inside the home directory of SimpleMenu, i.e. /media/data/local/home/.simplemenu.
Since version 1.3.1 of the image, there is a way to solve the problem from the console. The steps to find the solution are as follows:
- Hold Power during 2 seconds to poweroff system.
- Power on while pressing
Bduring complete boot. - Open Commander.
- Delete
last_state.savin.simplemenudirectory. - Close Commander.
- Open SimpleMenu.
- Restore lost settings.
- We are done.
In the following video we can see the whole process:

