-
Notifications
You must be signed in to change notification settings - Fork 402
AI Smart Assistance
Note: This feature is available in Enterprise, AWS, Team editions only.
- Understanding the AI integration in CloudBeaver
- AI settings and customization
- Best practices for question formulation
CloudBeaver offers the ability to construct SQL queries using natural language through AI smart completion feature. This capability is achieved through integrations with OpenAI's GPT language model, Azure OpenAI, Google Gemini and Ollama.
Note: CloudBeaver is not affiliated with OpenAI. Integration is achieved through the public API.
- To utilize this feature, register with OpenAI and obtain a secret key.
With the AI smart completion feature, you can type queries in natural language and CloudBeaver will convert them into SQL statements. This tool simplifies writing complex queries by interpreting your input and automatically generating the correct SQL code.
To activate the AI features in CloudBeaver, configure the API token:
-
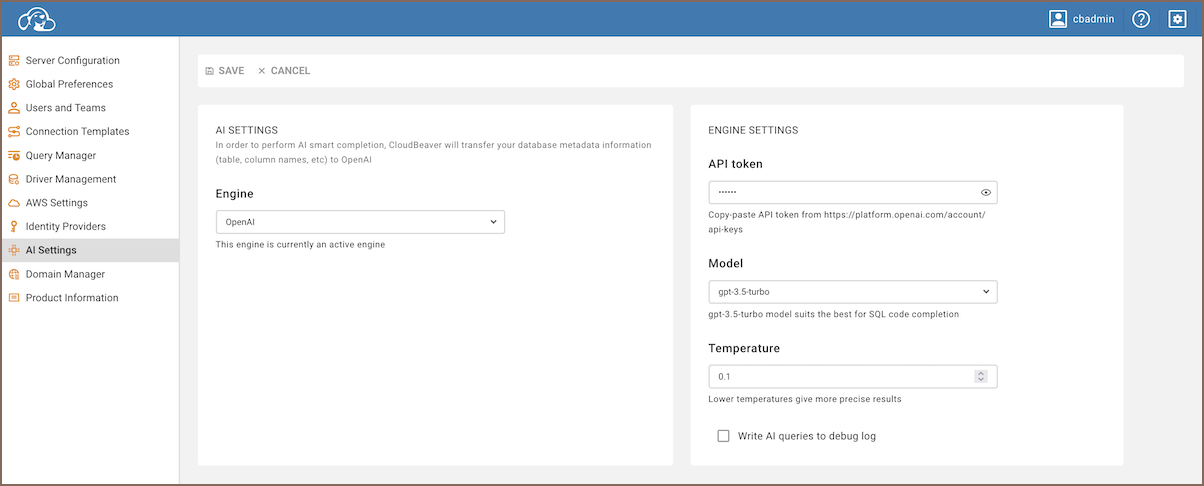
Navigate to Settings -> Administration -> Server Configuration
-
Ensure the AI option is activated.
-
Navigate to AI Settings tab -> Choose an engine
-
Insert credentials.
-
Save the changes.
For instructions on utilizing the AI features, visit the AI Smart completion usage section.

We prioritize data safety and user privacy. In this section, we outline how data is managed and the measures taken to protect user privacy when using the AI features.
To enable AI features capabilities, metadata such as table and column names from the current database schema are transmitted to third-party AI services. This step is crucial for accurately translating user requests into SQL queries.
- No table data: Only metadata like table and column names are shared with OpenAI. Actual table data is not transmitted.
- Log transparency: The entire request can be logged for your review. To enable this, navigate to AI Settings tab and check the Write GPT queries to debug log option.
- Azure OpenAI privacy: If you use Azure OpenAI, be aware that it operates under its own privacy policy. It's recommended to review their terms before using.
- Google Gemini privacy: When utilizing Google Gemini, it is important to understand the specific data privacy measures.
To utilize the AI-enhanced functionalities within CloudBeaver, certain configurations and setup processes are required. This section offers a comprehensive guide on initial setup and customization options to tailor the AI integration according to specific preferences.
-
Sign up on the OpenAI platform.
-
Navigate to the API Keys section and generate a new secret key.
-
Insert this key into CloudBeaver's Engine Settings.
Here is a list of the currently supported models:
- gpt-3.5-turbo (recommended for SQL).
- gpt-3.5-turbo-instruct.
- gpt-4.
- gpt-4-turbo.
- gpt-4o.
- gpt-4o-mini.
-
Sign up on the Azure platform.
-
Navigate to the Azure Portal and create a new AI service under the AI + Machine Learning section.
-
Generate and copy the credentials for the newly created service.
-
Insert these credentials into CloudBeaver's Engine Settings.
-
Sign up on the Google Cloud Platform.
-
Navigate to the Google Cloud Console and create a new project.
-
Enable the Gemini API for your project by searching for the Gemini API in the marketplace and clicking Enable.
-
Create credentials for your project by navigating to the Credentials page under APIs & Services. Choose Create credentials and select the appropriate type for your Gemini integration.
-
Insert these credentials into CloudBeaver's Engine Settings.
Ensure that Ollama is already installed and running on a server. You will need the host address where Ollama is installed to proceed.
- Specify the host address of your Ollama server in the Hostname field, ensuring it follows the
format
http://host:port. - Insert the Model, Context Size, and Temperature you need for your integration.
For specific requirements or troubleshooting, you might want to adjust some of the following settings:
- Navigate to Settings -> Administration -> AI Settings -> Engine settings to access these settings.
| Setting | Description |
|---|---|
| API token | Input your secret key from the OpenAI platform. |
| Model | Choose the AI model (recommended: gpt-3.5-turbo for SQL). |
| Temperature | Control AI's creativity from 0.0 (more precise) to 0.9 (more diverse). Note that higher temperature can lead to less predictable results. |
| Write GPT queries to debug log | Logs your AI requests. |
There is also an option to switch the Engine from OpenAI to Azure OpenAI, Gemini and Ollama. These services provide a set of distinct settings:
| Setting | Description |
|---|---|
| Endpoint | Configure a custom endpoint URL for Azure OpenAPI interactions. |
| API version | Select the version of the API you wish to use. |
| Deployment | Specify the deployment name chosen during model deployment. |
| Context size | Choose the context size between 2048 and 32768. A larger number allows the AI to use more data for better answers but may slow down response time. Choose based on your balance of accuracy and speed. |
To interact with databases using the AI Smart completion feature:
-
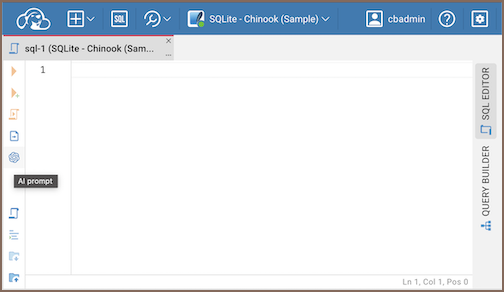
Launch the SQL Editor.
-
Click on the AI smart completion icon
 located in the left toolbar of the SQL Editor.

-
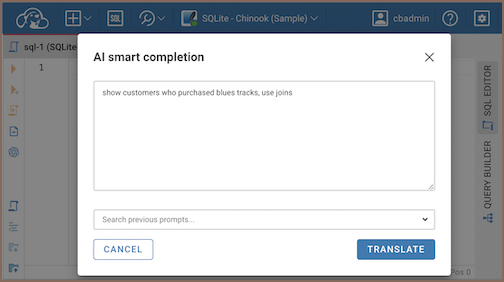
Input your natural language request in the AI smart completion window.
-
Click Translate to obtain the SQL query.

Prompts history allows you to review previous prompts in the scope of the session for the chosen tab.
To hide the AI smart completion icon in the SQL Editor:
- Navigate to Administration page -> Server Configuration tab -> Services section.
- Deselect AI option.
When using AI to generate SQL queries, it's essential to provide clear and specific input. Here's how to optimize your questions:
- Language: While AI supports multiple languages, it's recommended to use English for best results.
- Database knowledge: Familiarity with your database structure enhances the accuracy of generated queries.
- Explicit details: If you know certain tables or columns that should be part of the query, include them in your request for better accuracy.
For instance, if you're using the CloudBeaver sample SQLite database, you might phrase your request as:
Example 1: "List all customers from Italy"
Resulting SQL:
SELECT *
FROM customers
WHERE country = 'Italy';
Example 2: "montre les clients de France"
SELECT *
FROM customer
WHERE country = 'France';
Example 3: "show customers who purchased blues tracks, use joins"
SELECT c.FirstName, c.LastName, t.Name, g.Name
FROM Customer c
         JOIN Invoice i ON c.CustomerId = i.CustomerId
         JOIN InvoiceLine il ON i.InvoiceId = il.InvoiceId
         JOIN Track t ON il.TrackId = t.TrackId
         JOIN Genre g ON t.GenreId = g.GenreId
WHERE g.Name = 'Blues'
ORDER BY c.LastName, c.FirstName;
Example 4: "get names of customers who purchased blues tracks, use joins"
SELECT DISTINCT c.FirstName, c.LastName
FROM Customer c
         JOIN Invoice i ON c.CustomerId = i.CustomerId
         JOIN InvoiceLine il ON i.InvoiceId = il.InvoiceId
         JOIN Track t ON il.TrackId = t.TrackId
         JOIN Genre g ON t.GenreId = g.GenreId
WHERE g.Name = 'Blues';- Application overview
- Demo Server
- Administration
- Server configuration
- Create Connection
- Connection Templates Management
- Access Management
-
Authentication methods
-
Local Access Authentication

- Anonymous Access Configuration
- Reverse proxy header authentication
- LDAP
-
Single Sign On

-
SAML

-
OpenID

-
AWS OpenID

-
AWS SAML

-
AWS IAM

-
AWS OpenId via Okta

-
Snowflake SSO

-
Okta OpenId

-
Cognito OpenId

-
JWT authentication

-
Kerberos authentication

-
NTLM

-
Microsoft Entra ID authentication

-
Google authentication

-
Local Access Authentication
- User credentials storage
-
Cloud Explorer

-
Cloud storage

-
Query Manager

-
Drivers Management

- Supported databases
- Accessibility
- Keyboard shortcuts
- Features
- Server configuration
- CloudBeaver and Nginx
-
Domain manager

- Configuring HTTPS for Jetty server
- Product configuration parameters
- Command line parameters
- Local Preferences
- API
-
CloudBeaver Community
-
CloudBeaver AWS
-
CloudBeaver Enterprise
-
Deployment options
-
Development