-
Notifications
You must be signed in to change notification settings - Fork 3
AGW Deployment using Vagrant
caprivm ([email protected])
This page shows how to install the AGW using the Quick Start environment provided by the Magma documentation. The purpose is to deploy a testing AGW that integrates with an orchestrator to evaluate its performance. The installation contemplates Vagrant and Virtualbox as prerequisites, so it is important to have the necessary space for their deployment. The hardware used for the installation is:
| Feature | Value |
|---|---|
| OS Used | Ubuntu 18.04 LTS |
| vCPU | 4 |
| RAM (GB) | 16 |
| Disk (GB) | 100 |
| Home User | ubuntu |
| Magma Tag | v1.6 |
The contents of the page are:
- Description
- Prerequisites
- Install test AGW using Vagrant
- Connect to the AGW
- Deploy S1-AP Tests
- Troubleshooting
Before starting this guide, you should have installed the following tools. You can check the adjacent links if you haven't already:
It is recommended to do everything as root user. Install Virtualbox and Vagrant:
# Install Virtualbox
# sudo su -
sudo apt update && sudo apt -y upgrade && cd
wget -q https://www.virtualbox.org/download/oracle_vbox_2016.asc -O- | sudo apt-key add -
wget -q https://www.virtualbox.org/download/oracle_vbox.asc -O- | sudo apt-key add -
echo "deb [arch=amd64] http://download.virtualbox.org/virtualbox/debian $(lsb_release -cs) contrib" | sudo tee -a /etc/apt/sources.list.d/virtualbox.list
sudo apt update
sudo apt-get install -y virtualbox-6.1

# Install Vagrant
cd && wget https://releases.hashicorp.com/vagrant/2.2.16/vagrant_2.2.16_x86_64.deb
sudo dpkg -i vagrant_2.2.16_x86_64.deb
vagrant --version
vagrant plugin install vagrant-vbguest
Install Python on root user using this guide to install it with pyenv. Don't forget to run:
# After install Python on root user, execute:
source ~/.bashrc && source ~/.profile
cd && pip3 install ansible fabric3 jsonpickle requests PyYAMLIn this case, consider the next environment variables before continue the procedure:
export MAGMA_ROOT=~/magma-packages
export MAGMA_TAG=masterDownload the Magma repository and use the branch that best suits you. In this case, version $MAGMA_TAG will be used:
# Execute without root user
cd && git clone https://github.com/magma/magma.git $MAGMA_ROOT
cd $MAGMA_ROOT
git checkout $MAGMA_TAG
git branch  # To validate
#   master
# * v1.6
Access the repository and use Vagrant for deployment. Remember to use the root user:
cd $MAGMA_ROOT/lte/gateway/
sudo su
# In this step you must to be in $MAGMA_ROOT/lte/gateway/ folder
vagrant up magma --provisionThe default user created for the Orchestrator VM is vagrant and its password is also vagrant. However, you can run the following command to connect:
cd $MAGMA_ROOT/lte/gateway/
sudo su
vagrant ssh magma
At this point you should be connected to the AGW and see something like vagrant@magma-dev:~$ in the CLI.
To deploy the AGW services run the following commands in the vagrant machine:
cd ~/magma/lte/gateway/
make run
Wait for about 10-15 minutes (depending on s and VM processing capacity). Once finished, start the AGW services and validate its status:
sudo service magma@magmad start
sudo service magma@* statusGo to the Connect AGW With Orchestrator page to connect the AGW with the orchestrator.
On the official Magma documentation page, there is a link dedicated to S1AP integration tests. These tests allow you to validate the functionality of the end-to-end tool. In order to run the tests consider the following steps:
# Execute in root user
cd $MAGMA_ROOT/lte/gateway/
sudo su
vagrant up magma_test
vagrant up magma_trfserver
Once the test machines are uploaded, enter the magma_test VM (vagrant ssh magma_test) to compile the tests and prepare the environment:
# Only in magma_test VM
cd ~/magma/lte/gateway/python && make
cd integ_tests && make
cd ~ && disable-tcp-checksumming
Now the magma_trfserver VM is entered (vagrant ssh magma_trfserver) and the following commands are executed. The last command executed leaves a service running so, to follow the procedure, open another tab and leave this server running.
# Only in magma_trfserver VM
disable-tcp-checksumming && trfgen-server
Disable tcp-checksumming in AGW VM:
# Only in magma VM
cd && disable-tcp-checksummingIn magma-test machine, go to the folder ~/magma/lte/gateway/python/integ_tests and run either individual tests or the full suite of tests:
-
Individual test(s):
make integ_test TEST=<_test(s)_to_run_> -
All tests:
make integ_tests
Go back to the magma_test VM and run the tests:
# Only in magma_test VM
cd ~/magma/lte/gateway/python/integ_tests
make integ_testThis capture consists of the simultaneous execution of the following commands. With the trfgen-server running in magma-trfserver, execute the next command. Be sure that you have installed tcpdump package:
# Only in magma-dev VM
sudo tcpdump -i any -w <name_capture_file>.pcap
Next, access into magma-test machine and execute:
# Only in magma-test VM
cd ~/magma/lte/gateway/python/integ_tests && make
In this point, you must be wait for the integ_tests finish. Then, access to magma-dev machine and stop the tcpdump capture typing CTRL+C in the command line. If you run ls -alh in home directory of magma-dev machine, you can see the file capture_file.pcap who contain all information about the make tests.
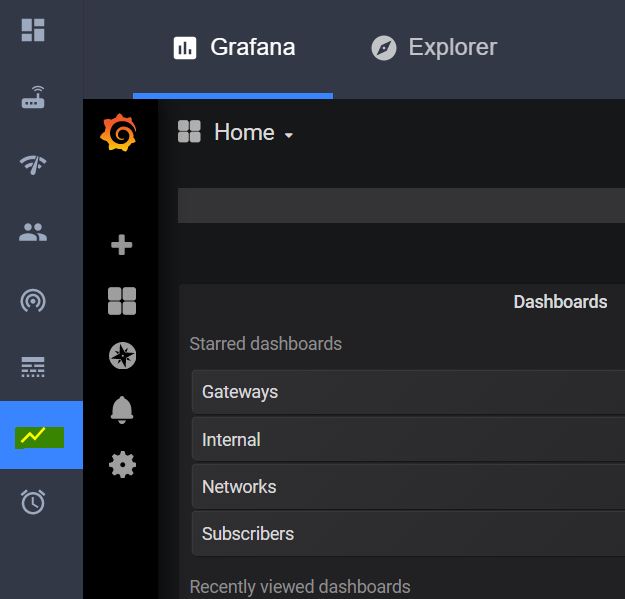
Now, from the NMS interface, you can see some metrics generated from the tests you ran earlier. The following figures show just an example of navigation after or during the execution of tests. First, go to the metrics tab:
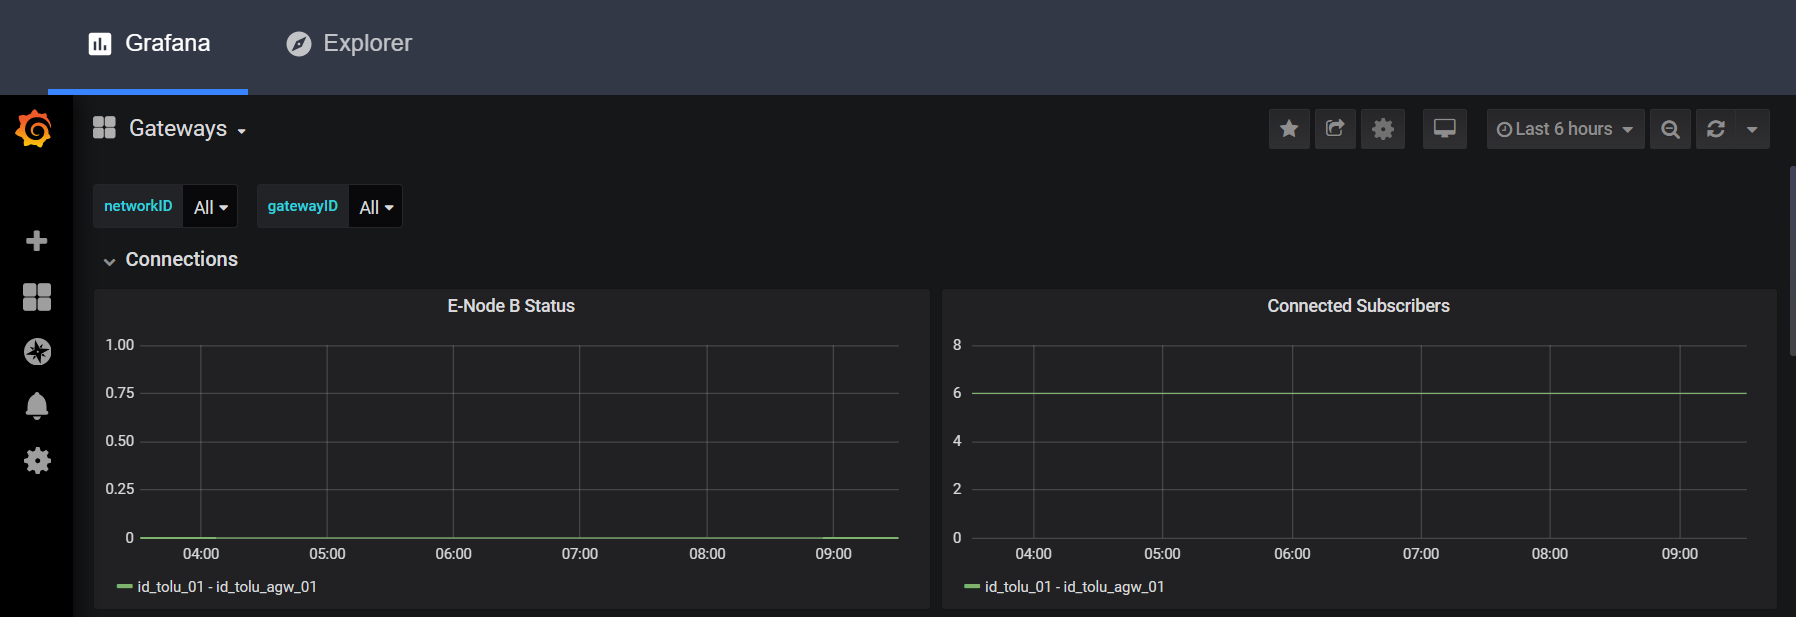
Now, go to any Grafana dashboard to monitor events:
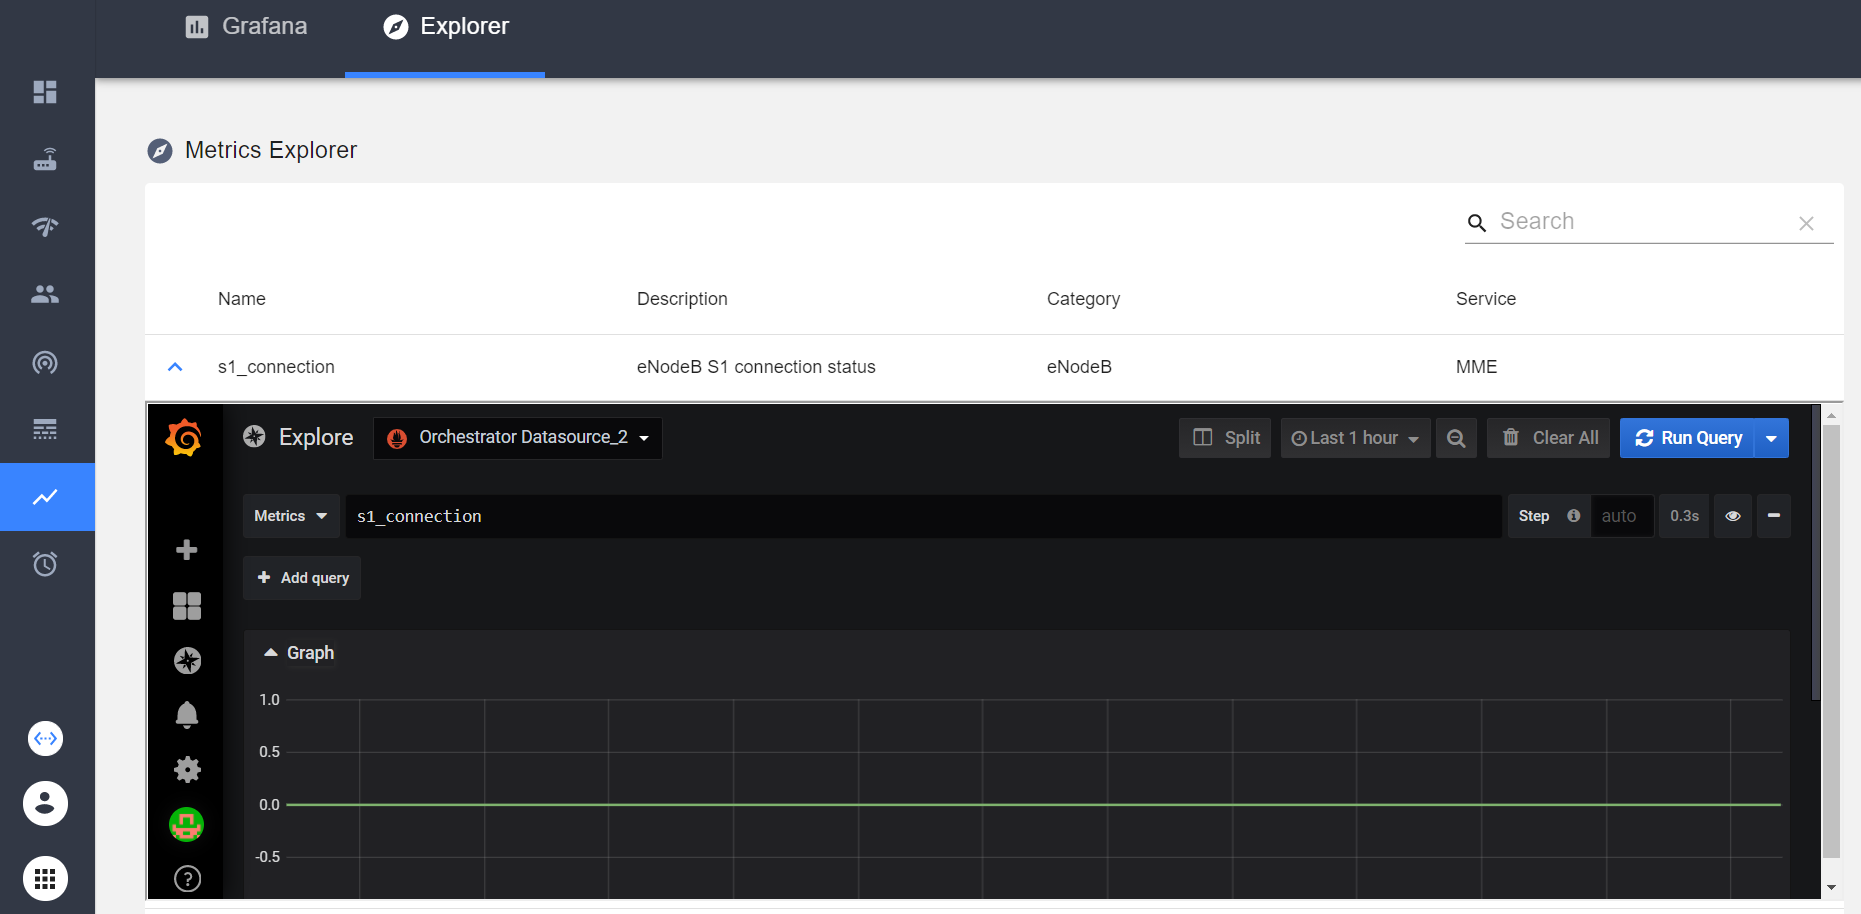
Latest, go to Explorer tab to see particular evetns:
These are some errors that have been detected with this type of installation.
If you ever create a VM incorrectly or have problems with the VM, you can perform a cleanup using the following commands:
cd $MAGMA_ROOT/lte/gateway
vagrant halt magma      # Shutdown the machine
vagrant destroy magma   # Delete the machine
vagrant box remove magmacore/magma_dev      # Remove the vbox image from vagrant repo
vagrant up magma --provision # Provision again the machine with updates or changesIt is possible that the machine may not be fully provisioned and the following error occurs. If not, ommit this section:
[WARNING]: Unhandled error in Python interpreter discovery for host magma:

Failed to connect to the host via ssh: ssh: connect to host 192.168.60.142 port

22: Connection timed out

fatal: [magma]: UNREACHABLE! => {"changed": false, "msg": "Data could not be sent to remote host \"192.168.60.142\". Make sure this host can be reached over ssh: ssh: connect to host 192.168.60.142 port 22: Connection timed out\r\n", "unreachable": true}
Based on the official Magma documentation it's known that Our development VM's are in the 192.168.60.0/24, 192.168.128.0/24 and 192.168.129.0/24 address spaces, so make sure that you don't have anything running which hijacks those (e.g. VPN). It is possible that these addresses may not be created with the Virtualbox installation, so it is necessary to first validate which addresses were created:
ifconfig
# Search for vboxnet networks:
# ...
# vboxnet0: flags=4163<UP,BROADCAST,RUNNING,MULTICAST>  mtu 1500
#         inet 192.168.56.1  netmask 255.255.255.0  broadcast 192.168.56.255
#         inet6 fe80::800:27ff:fe00:0  prefixlen 64  scopeid 0x20<link>
#         ether 0a:00:27:00:00:00  txqueuelen 1000  (Ethernet)
#         RX packets 0  bytes 0 (0.0 B)
#         RX errors 0  dropped 0  overruns 0  frame 0
#         TX packets 511  bytes 45855 (45.8 KB)
#         TX errors 0  dropped 0 overruns 0  carrier 0  collisions 0

# vboxnet1: flags=4163<UP,BROADCAST,RUNNING,MULTICAST>  mtu 1500
#         inet 192.168.57.1  netmask 255.255.255.0  broadcast 192.168.57.255
#         inet6 fe80::800:27ff:fe00:1  prefixlen 64  scopeid 0x20<link>
#         ether 0a:00:27:00:00:01  txqueuelen 1000  (Ethernet)
#         RX packets 0  bytes 0 (0.0 B)
#         RX errors 0  dropped 0  overruns 0  frame 0
#         TX packets 401  bytes 38053 (38.0 KB)
#         TX errors 0  dropped 0 overruns 0  carrier 0  collisions 0

# vboxnet2: flags=4163<UP,BROADCAST,RUNNING,MULTICAST>  mtu 1500
#         inet 192.168.129.1  netmask 255.255.255.0  broadcast 192.168.129.255
#         inet6 fe80::800:27ff:fe00:2  prefixlen 64  scopeid 0x20<link>
#         ether 0a:00:27:00:00:02  txqueuelen 1000  (Ethernet)
#         RX packets 0  bytes 0 (0.0 B)
#         RX errors 0  dropped 0  overruns 0  frame 0
#         TX packets 369  bytes 33448 (33.4 KB)
#         TX errors 0  dropped 0 overruns 0  carrier 0  collisions 0
# ...
Notice that the network where Magma was deployed is 192.168.56.0/24 instead of 192.168.60.0/24 as the documentation says. Similarly, the 192.168.128.0/24 network does not exist and in its place is the 192.168.56.0/24 network. Then you won't be able to get to the VM if you don't execute a change. Edit the VagrantFile file and change the addresses according to the networks created:
sudo vi $MAGMA_ROOT/lte/gateway/Vagrantfile
# Execute the next command in file to make changes based on your network configuration
:%s/192.168.60./<your_network_configuration>/g
# If use the configuration above
:%s/192.168.60./192.168.56./g
Now change the display options when using Ansible:
sudo vi $MAGMA_ROOT/lte/gateway/deploy/hosts
# Execute the next command in file to make changes based on your network configuration
:%s/192.168.60./<your_network_configuration>/g
# If use the configuration above
:%s/192.168.60./192.168.56./g
Lastly, change Ansible's default configuration options:
sudo vi $MAGMA_ROOT/lte/gateway/ansible.cfg
# Add the next lines to [defaults]
ansible_python_interpreter = /usr/bin/python3
host_key_checking = false
# Add the next lines to [ssh_connection]
scp_if_ssh = True
If you previously ran the vagrant up magma command, it is not necessary to erase the machine from the system. You only need to re-provision it, for this consider the following lines:
vagrant up magma --provision

