Please note: this repository is no longer actively maintained.
You can view the final presentation slides here.
Imagine that you’re hosting a birthday party for a loved one. Everyone’s having a great time, music’s playing, and the party is noisy. Suddenly, it’s time for birthday cake! It’s too loud to use Alexa, and rather than hunting for your phone or a remote control, what if you could simply raise an open hand while in mid-conversation, your smart home device would recognize that gesture, and turn off the music? And with the same gesture, you could dim the lights — just in time to see the birthday candles light up the face of the birthday boy or girl. Wouldn’t that be amazing?
I’ve been curious about gesture detection for a long time. I remember when the first Microsoft Kinect came out — I had an absolute blast playing games and controlling the screen with just a wave of the hand. As time went on and devices like Google Home and Amazon Alexa were released, it seemed that gesture detection fell of the radar in favor of voice. Still, I wondered whether it was likely to experience a renaissance, now that video devices like the Facebook Portal and Amazon Echo Show are coming out. With this in mind, I wanted to see if it was possible to build a neural network that could recognize my gestures in real time — and operate my smart home devices!
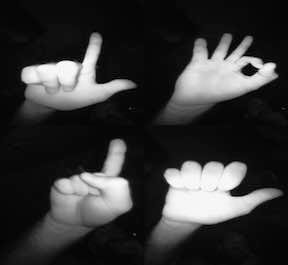
I was excited about this idea and moved quickly to implement it, like I’d been shot out of a cannon. I started working with a hand gesture recognition database on Kaggle.com, and exploring the data. It consists of 20,000 labeled hand gestures, like the ones found below.
Once I read the images in, the first problem I ran into was that my images were black & white. This means the NumPy arrays have only one channel, instead of three (i.e., the shape of each array is (224, 224, 1)). As a result, I was unable to use these images with the VGG-16 pre-trained model, as that model requires an RGB, 3-channel image. This was solved by using np.stack on the list of images, X_data:
X_data = np.array(X_data, dtype = 'float32')
X_data = np.stack((X_data,) * 3, axis=-1)
Once I got through that hurdle, I set about building a model, using a train-test split that completely held out photos from 2 of the 10 individuals in them. After re-running the model built on the VGG-16 architecture, my model achieved an F1 score of 0.74 overall. This was quite good, given that random guessing over 10 classes would result in only 10% accuracy, on average.
However, training a model to recognize images from a homogenous dataset is one thing. Training it to recognize images that it hasn’t seen before in real time is another. I tried adjusting the lighting of my photos, and using a dark background — mimicking the photos the model had trained on.
I also tried image augmentation — flips, skews, rotations, and more. Although these images did better than before, I was still having unpredictable — and in my mind unacceptable — results. I had the nagging feeling that I needed to rethink the problem, and come up with a creative way to make this project work.
Takeaway: Train your model on images that are as close as possible to the images it is likely to see in the real world.
I decided to pivot and try something new. It seemed to me that there was a clear disconnect between the odd look of the training data and images that my model was likely to see in real life. I decided I’d try building my own dataset.
I had been working with OpenCV, an open source computer vision library, and I needed an engineer a solution that would grab an image from the screen, then resize and transform the image into a NumPy array that my model could understand. The methods I used to transform my data are as follows:
from keras import load_model
model = load_model(path) # open saved model/weights from .h5 file

def predict_image(image):
    image = np.array(image, dtype='float32')
    image /= 255
    pred_array = model.predict(image)

    # model.predict() returns an array of probabilities -
    # np.argmax grabs the index of the highest probability.
    result = gesture_names[np.argmax(pred_array)]

    # A bit of magic here - the score is a float, but I wanted to
    # display just 2 digits beyond the decimal point.
    score = float("%0.2f" % (max(pred_array[0]) * 100))
    print(f'Result: {result}, Score: {score}')
    return result, score
In a nutshell, once you get the camera up and running you can grab the frame, transform it, and get a prediction from your model:
#starts the webcam, uses it as video source
camera = cv2.VideoCapture(0) #uses webcam for video

while camera.isOpened():
    #ret returns True if camera is running, frame grabs each frame of the video feed
    ret, frame = camera.read()

    k = cv2.waitKey(10)
    if k == 32: # if spacebar pressed
        frame = np.stack((frame,)*3, axis=-1)
        frame = cv2.resize(frame, (224, 224))
        frame = frame.reshape(1, 224, 224, 3)
        prediction, score = predict_image(frame)
Getting the pipeline connected between the webcam and my model was a big success. I started to think about what would be the ideal image to feed in to my model. One clear obstacle was that it’s difficult to separate the area of interest (in our case, a hand) from the background.
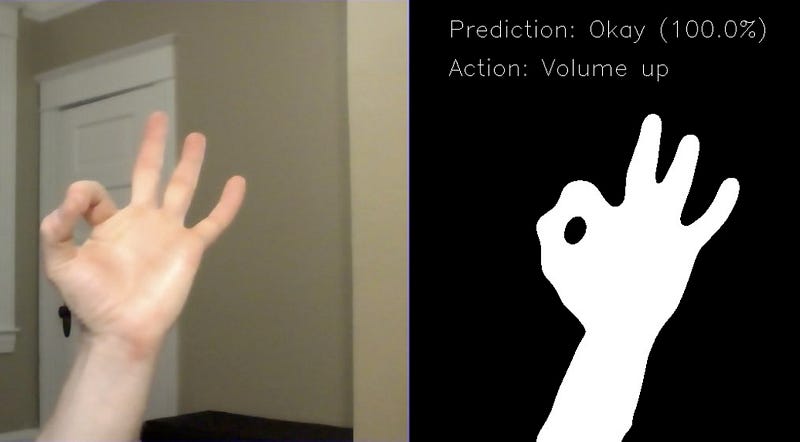
The approach that I took was one that is familiar to anyone who has played around with Photoshop at all — background subtraction. It’s a beautiful thing! In essence, if you take a photo of a scene before your hand is in it, you can create a “mask” that will remove everything in the new image except your hand.

Once I had subtracted the background from my images, I then used binary thresholding to make the target gesture totally white, and the background totally black. I chose this approach for two reasons: it made the outline of the hand crisp and clear, and it made the model easier to generalize across users with different skin colors. This created the telltale “silhouette”-like photos that I ultimately trained my model on.
Now that I could accurately detect my hand in images, I decided to try something new. My old model didn’t generalize well, and my ultimate goal was to build a model that could recognize my gestures in real time — so I decided to build my own dataset!
I chose to focus on 5 gestures:
I strategically chose 4 gestures that were also included in the Kaggle data set, so I could cross-validate my model against those images later. I also added the peace sign, although that gesture did not have an analogue in the Kaggle data set.
From here, I built the dataset by setting up my webcam, and creating a click binding in OpenCV to capture and save images with unique filenames. I tried to vary the position and size of the gestures in the frame, so that my model would be more robust. In no time, I had built a dataset with 550 silhouette images each. Yes, you read that right — I captured over 2700 images.
I then built a convolutional neural network using Keras & TensorFlow. I started with the excellent VGG-16 pre-trained model, and added 4 dense layers along with a dropout layer on top.
I then took the unusual step of choosing to cross-validate my model on the original Kaggle dataset I had tried earlier. This was key — if my new model couldn’t generalize to images of other people’s hands that it hadn’t trained on before, than it was no better than my original model.
In order to do this, I applied the same transformations to each Kaggle image that I had applied to my training data — background subtraction and binary thresholding. This gave them a similar “look” that my model was familiar with.

The model’s performance exceeded my expectations. It classified nearly every gesture in the test set correctly, ending up with a 98% F1 score, as well as 98% precision and accuracy scores. This was great news!
As any well-seasoned researcher knows, though, a model that performs well in the lab but not in real life isn’t worth much. Having experienced the same failure with my initial model, I was cautiously optimistic that this model would perform well on gestures in real time.
Before testing my model, I wanted to add another twist. I’ve always been a bit of a smart home enthusiast, and my vision had always been to control my Sonos and Philips Hue lights using just my gestures. To easily access the Philips Hue and Sonos APIs, I used the phue and SoCo libraries, respectively. They were both extremely simple to use, as seen below:
# Philips Hue Settings
bridge_ip = '192.168.0.103'
b = Bridge(bridge_ip)

on_command =  {'transitiontime' : 0, 'on' : True, 'bri' : 254}
off_command =  {'transitiontime' : 0, 'on' : False, 'bri' : 254}

# Turn lights on
b.set_light(6, on_command)

#Turn lights off
b.set_light(6, off_command)
Using SoCo to control Sonos via the web API was arguably even easier:
sonos_ip = '192.168.0.104'
sonos = SoCo(sonos_ip)

# Play
sonos.play()

#Pause
sonos.pause()
I then created bindings for different gestures to do different things with my smart home devices:
if smart_home:
    if prediction == 'Palm':
        try:
            action = "Lights on, music on"
            sonos.play()
        # turn off smart home actions if devices are not responding
        except ConnectionError:
            smart_home = False
    # etc. etc.
When I finally tested my model in real time, I was extremely pleased with the results. My model was accurately predicting my gestures the vast majority of the time, and I was able to use those gestures to control the lights and music. See the video below for a demo:
I hope you enjoyed the results! Thanks for reading. Give me a clap on Medium if you enjoyed the post. You can also find me on Twitter here or on LinkedIn here. Recently, I’ve been writing content for Databricks explaining complex topics in simple terms, like this page that explains, What is a data lake? Finally, I contribute regularly to the Databricks blog. Onward and upward!


