Startup Guide for New Users ‐ Draft
| Introduction to the Apache Daffodil Extension for Visual Studio Code |
 |
|
The Mission: Make Daffodil Coding & Debugging Easier The Command Line Interface with existing Daffodil debugging capability is non-intuitive and difficult to master |
 |
|
The Solution: Integrate Daffodil with Visual Studio
|
 |
The How:
|
 |
The Caveats:
|
|
Don’t worry if you’re new to IDE use and don’t know what any of this means. We’ll cover it in detail later.
|
IDE Basics Integrated Development Environment A single program that integrates all the steps of software development
|
 |
|
IDE Basics Integrated Development Environment A single program that integrates all the steps of software development
|
 |
|
IDE Basics Integrated Development Environment A single program that integrates all the steps of software development
|
 |
|
IDE Basics Integrated Development Environment A single program that integrates all the steps of software development
|
 |
|
IDE Basics Integrated Development Environment A single program that integrates all the steps of software development
|
 |
Install Visual Studio Code
|
Click Image for Download Page: 
|
Installing the Daffodil Extension
|
 |

Installing the Daffodil Extension
|
 |
Installing the Daffodil Extension
|
 |
Installing the Daffodil Extension
|
 |
Installing the Daffodil Extension
|
 |
|
Configuring for First Use Create a working directory
Free sample schemas here |
 This example uses a Daffdile logo saved as a PNG file This example uses a Daffdile logo saved as a PNG file
|
|
Configuring for First Use Open the working directory
|
 |
Note that if you wind up working on multiple DFDL projects in different folders, you will need to configure each folder with it's own launch.json file
|
Configuring for First Use Configuring Launch.json file
|
 |
|
 |
Note that the debugger should run with the default settings. You may simply scroll down to the bottom of the configuration wizard and click the SAVE button, then close the wizard.
If you run into a problem, the most likely problem is that you have not yet opened a working folder/directory. The second most likely culprit is a port conflict and you can simply reopen the configuration wizard and change the port settings and save the new configuration.
|
Configuring for First Use Launch Config Wizard
1. Enter a name for the new configuration |
 |
|
Configuring for First Use Launch Config Wizard |
|
|
Main Schema File/Input Data File The input files can be hard coded into the configuration by clicking the Browse button and navigating to the file and clicking on it |
 |
Leave the ${command:AskForSchemaName}/${command:AskForDataName} values and you will be prompted for the file names each time you execute a parse. This oiption can be usefull if you will be testing with a variety of input files, rather than running the same files repeatedly
|
Configuring for First Use Launch Config Wizard |
|
|
Root Element For simple schemas, this field may be left set to undefined
|
 |
|
Configuring for First Use Launch Config Wizard |
|
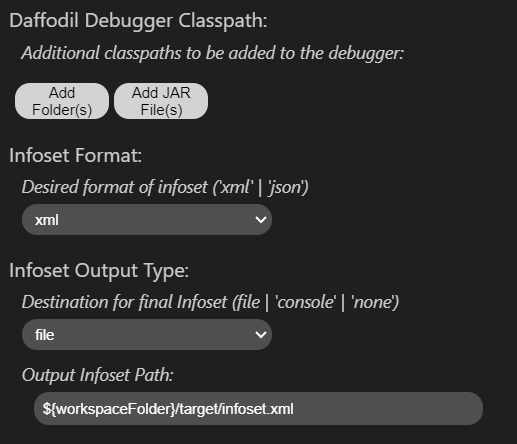
Debugger Settings
|
 |
|
Configuring for First Use Launch Config Wizard |
|
Classpath
|
 |