Li Shen, Ph.D. CS
Icahn School of Medicine at Mount Sinai
New York, New York, USA
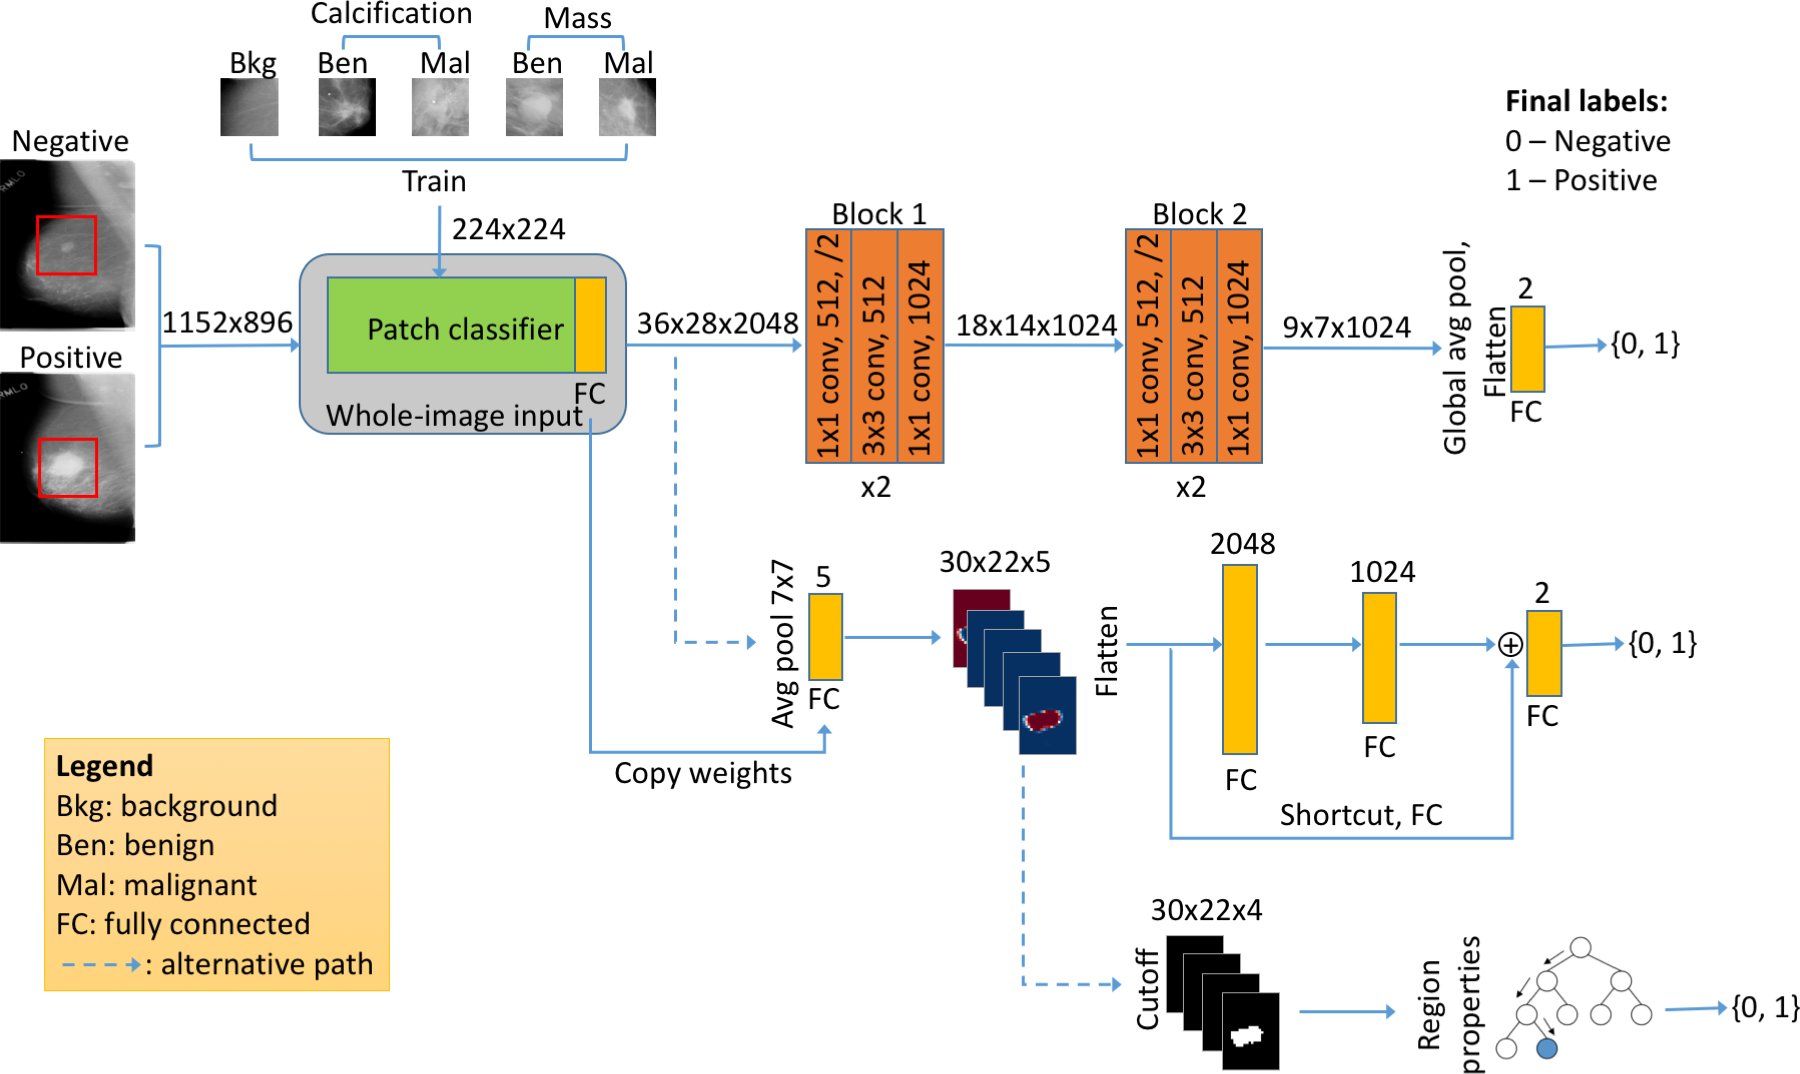
This is the companion site for our paper - "End-to-end Training for Whole Image Breast Cancer Diagnosis using An All Convolutional Design" at arXiv. Access the paper here. This work was presented at the NIPS17 workshop on machine learning for health. Access the 4-page short paper here. Download the poster.
For our entry in the DREAM2016 Digital Mammography challenge, see this write-up. This work is much improved from our method used in the challenge.
A few best whole image models are available for downloading at this Google Drive folder. YaroslavNet is the DM challenge top-performing team's method. Here is a table for individual downloads:
| Database | Patch Classifier | Top Layers (two blocks) | Single AUC | Augmented AUC | Link |
|---|---|---|---|---|---|
| DDSM | Resnet50 | [512-512-1024]x2 | 0.86 | 0.88 | download |
| DDSM | VGG16 | 512x1 | 0.83 | 0.86 | download |
| DDSM | VGG16 | [512-512-1024]x2 | 0.85 | 0.88 | download |
| DDSM | YaroslavNet | heatmap + max pooling + FC16-8 + shortcut | 0.83 | 0.86 | download |
| INbreast | VGG16 | 512x1 | 0.92 | 0.94 | download |
| INbreast | VGG16 | [512-512-1024]x2 | 0.95 | 0.96 | download |
- Inference level augmentation is obtained by horizontal and vertical flips to generate 4 predictions.
- The listed scores are single model AUC and prediction averaged AUC.
- 3 Model averaging on DDSM gives AUC of 0.91
- 2 Model averaging on INbreast gives AUC of 0.96.
Several patch classifier models (i.e. patch state) are also available for downloading at this Google Drive folder. Here is a table for individual download:
| Model | Train Set | Accuracy | Link |
|---|---|---|---|
| Resnet50 | S10 | 0.89 | download |
| VGG16 | S10 | 0.84 | download |
| VGG19 | S10 | 0.79 | download |
| YaroslavNet (Final) | S10 | 0.89 | download |
| Resnet50 | S30 | 0.91 | download |
| VGG16 | S30 | 0.86 | download |
| VGG19 | S30 | 0.89 | download |
With patch classifier models, you can convert them into any whole image classifier by adding convolutional, FC and heatmap layers on top and see for yourself.
- The .py files under the root directory are Python modules to be imported.
- You shall set the
PYTHONPATHvariable like this:export PYTHONPATH=$PYTHONPATH:your_path_to_repos/end2end-all-convso that the Python modules can be imported. - The code for patch sampling, patch classifier and whole image training are under the ddsm_train folder.
- sample_patches_combined.py is used to sample patches from images and masks.
- patch_clf_train.py is used to train a patch classifier.
- image_clf_train.py is used to train a whole image classifier, either on top of a patch classifier or from another already trained whole image classifier (i.e. finetuning).
- There are multiple shell scripts under the ddsm_train folder to serve as examples.
In order to transfer a model to your own data, follow these easy steps.
The rescale factor is used to rescale the pixel intensities so that the max value is 255. For PNG format, the max value is 65535, so the rescale factor is 255/65535 = 0.003891. If your images are already in the 255 scale, set rescale factor to 1.
This is simply the mean pixel intensity of your train set images.
This is currently fixed at 1152x896 for the models in this study. However, you can change the image size when converting from a patch classifier to a whole image classifier.
Now you can finetune a model on your own data for cancer predictions! You may check out this shell script. Alternatively, copy & paste from here:
TRAIN_DIR="INbreast/train"
VAL_DIR="INbreast/val"
TEST_DIR="INbreast/test"
RESUME_FROM="ddsm_vgg16_s10_[512-512-1024]x2_hybrid.h5"
BEST_MODEL="INbreast/transferred_inbreast_best_model.h5"
FINAL_MODEL="NOSAVE"
export NUM_CPU_CORES=4

python image_clf_train.py \
    --no-patch-model-state \
    --resume-from $RESUME_FROM \
    --img-size 1152 896 \
    --no-img-scale \
    --rescale-factor 0.003891 \
    --featurewise-center \
    --featurewise-mean 44.33 \
    --no-equalize-hist \
    --batch-size 4 \
    --train-bs-multiplier 0.5 \
    --augmentation \
    --class-list neg pos \
    --nb-epoch 0 \
    --all-layer-epochs 50 \
    --load-val-ram \
    --load-train-ram \
    --optimizer adam \
    --weight-decay 0.001 \
    --hidden-dropout 0.0 \
    --weight-decay2 0.01 \
    --hidden-dropout2 0.0 \
    --init-learningrate 0.0001 \
    --all-layer-multiplier 0.01 \
    --es-patience 10 \
    --auto-batch-balance \
    --best-model $BEST_MODEL \
    --final-model $FINAL_MODEL \
    $TRAIN_DIR $VAL_DIR $TEST_DIR
Some explanations of the arguments:
- The batch size for training is the product of
--batch-sizeand--train-bs-multiplier. Because training uses roughtly twice (both forward and back props) the GPU memory of testing,--train-bs-multiplieris set to 0.5 here. - For model finetuning, only the second stage of the two-stage training is used here. So
--nb-epochis set to 0. --load-val-ramand--load-train-ramwill load the image data from the validation and train sets into memory. You may want to turn off these options if you don't have sufficient memory. When turned off, out-of-core training will be used.--weight-decayand--hidden-dropoutare for stage 1.--weight-decay2and--hidden-dropout2are for stage 2.- The learning rate for stage 1 is
--init-learningrate. The learning rate for stage 2 is the product of--init-learningrateand--all-layer-multiplier.
The research in this study is carried out on a Linux workstation with 8 CPU cores and a single NVIDIA Quadro M4000 GPU with 8GB memory. The deep learning framework is Keras 2 with Tensorflow as the backend.
