
Golden-DevOps is a fully open-source project that uses all core DevOps tools and practices. It is a complete example of the repository with the implementation of automation, scalability, containerization, availability, and DevOps philosophy extended to match all of 4 GitOps Principles and use Pull-Based GitOps deployment model which is generally considered as the best modern deployment strategy.
From the perspective of the application logic, it's the simplest React-Nginx app with one static page. Using code from this repo and with the help of instructions and tips in this README, you can very easily deploy this app in AWS EKS through Terraform.
The purpose of this repo is to showcase how to set up an app and everything related to it in the most modern way with the usage of DevOps/GitOps tools and best practices, so at the end you will have working 3 separate and practically identical environment (Development, Staging/QA, Production) and each o them will have two domains, one with TLS secured React page and the second one for TLS secured ArgoCD Dashboard.
After the right setup (mostly changing the values for your particular case - more here) it's only a matter of a single click to set up absolutely everything (above described infrastructure with 3 environments and a bunch of repository, development stuff that got a lot of automation in it) and also single click to clear the entire infrastructure (except few very simple stuff that was created manually like e.g. Route 53 record).
General infrastructure diagram (more about infrastructure):

Important
Currently, I am the only one creator and maintainer of the code and ideas for this repo, and I would be so thankful for any feedback and GitHub stars, regards!
- Full scability - This project has implemented the Horizontal Pod Autoscaler (HPA) that ensures the right amount of pod based on the current traffic load. Furthermore, there is Karpeneter that in case of an overwhelm on the EC2 instances can spin up the new ones in the right size depending on the needs. This project is fully scalable but of course, you are able to control the minimum and maximum number of EC2 instances that you want or are able to run. In eks/main.tf file you can set the "min_size", "max_size", "desired_size" and other configuration of your EC2 instances (EKS managed nodes).
- High availability - This project places EC2 instances across different VPC Subnets which ensures that in case of a failure of the Availability Zone our app will be still running. Furthermore, full scalability also ensures that our app has no downtime because of the traffic overload.
- Automated and rapid updates with zero downtime - This project is created along with DevOps practices. In a nutshell application lifecycle (more here) looks like that: developer merge a PR with changes and the workflow responsible for CD builds a new container with the newest applied changes and push it to Docker Hub Registry, and after that changes the used tag in K8s deployments for each environment so in their configuration is used the newest container's tag with applied changes. Then Argo CD running within each cluster automatical notices that change and deploy the new container gradually - in each pod but not on all of them at the same time, so there is practically no downtime because the traffic is continually routed to either the pod with changes or old pod that waits for its turn. This gives us extremely easy and potentially very frequent updates for our app (for both the Development and Operations teams) whenever we want.
- Ease of replication and short Mean Time to Recovery (MTTR) - This project has defined the entire infrastructure in Terraform files that don't replicate themselves (to manage multiple env Terraform Workspaces is used). This gives us the ability to very easily and rapidly deploy some new environment or spin up the environment that was already created but for some reason failed. We don't have to create anything manually in some cloud provider's console and we don't have to make any new files/directories to spin up a new environment from scratch.
- Great development experience - This project has a load of features that significantly help the development team by e.g. making the setup process very effortless and rapid, automating repetitive and complicated tasks, helping with configuring IDE. More about development experience (here). Furthermore, a lot of other tasks are completely automated to reduce the work of the developers. See below point.
- Easy team collaboration - This project has implemented a load of features that enhance team collaboration on the repository and allow us to easily implement new updates with potentially very high frequency by making the entire development workflow very efficient. First of all this repository uses GitHub Flow branch-based workflow which promotes simplicity, collaboration, communication, reviews, and continuous integration for fast, incremental updates. Furthermore, this project has created Kanban Board as a GitHub Project with 4 columns - Considering, TODO, In Progress, and Done. Moreover, you can define individuals or teams that are responsible for particular code in a repository by CODEOWNERS file. Basically, the entire purpose of .github directory is to enhance the experience while using this repo and facilitate team cooperation.
- Other automations - This project uses a lot of GHA workflow to automate numerous tasks. Examples of automated tasks are - publishing new releases, marking/deleting old PR and Issues, version updates of GHA workflows' actions, Terraform modules and providers, dependencies in package.json and package-lock.json, and obviously lifecycles of source code, Terraform files, and Helm Chart. To insight more about what things are automated through GHA workflows see .github/workflows.
- Easy rollbacks - This project has implemented Argo CD and stores everything as a code within Git repo. This gives us very easy rollbacks because it's only a matter of undoing a particular commit by
git revertorgit removeand the previous state of everything will be restored, no matter if is it a thing related to Terraform file(s), source code or anything else. For example when you undo a commit that was doing a change in Terraform files then GHA workflows responsible for Terraform CI/CD will apply the changes. Another example is that you want to go back to the previous version of your main application (actually the previous container's tag), then you just have to undo a commit(s) that was pushed automatically by delivery.yml and Argo CD will automatically notice that tags of the main application container changed and apply the changes. So a real state of everything related to the application will reflect the exact state of current files stored within the repo. - Low latency - This project uses static content served by Nginx which is later cached by AWS CDN - Amazon CloudFront, so the latency of the application should be minimal (also because the source code in this project is very simple, in order to only showcase how to create React app).
- Security - This project uses HTTPS for bot connection between clients and AWS ALB and between AWS ALB and containers. The certificates for the encryption between AWS ALB and the containers are automatically managed by the K8s cert-manager. Furthermore, every sensitive data is stored as GitHub Secret which ensures safety for data like passwords and sensitive URLs. Moreover, there is a lot of security-related automation within GHA workflows, like e.g. blocking the PR if critical vulnerabilities are found, uploading security results after each newly deployed change, etc.
- Ease of extensibility - This project showcases how to create and maintain modern application and everything around it, instead of creating complex and comprehensive application logic. The source code of the project itself is very simple, and everything is pretty easy to modify and maintain because of parameterization in core elements.
- Great resource utilization - This project is fully scalable (in terms of both the nodes and containers) to meet the exact needed demand. Moreover, the desired, minimal, maximal number of nodes is based on the calculator that shows the most efficient configurations (you can also set the EC2 instance types that can be possibly used).
- And a lot more...
Tip
The source code, Helm chart, Terraform-managed infrastructures files, and all other files related to the project are stored in a single GitHub repo (but stored in a clean structured directory hierarchy) in order to keep all stuff in a single place for easier exploring and insight on all software, but for a real-world usage there is obviously no problem to separate some part of the content of this repo into separate repositories, it's even recommended, especially for larger teams or more complex application.
This project has a load of features that significantly help the development team. First of all, when a developer wants to start the work with that project it's only a matter of cloning a repo and executing a single command (docker compose up) to spin up everything required to run a development environment to work properly. Guide about development setup here.
Furthermore, there is a .vscode directory that configures settings, debugging, and recommended useful extensions if you use VCS. After you make the setup you can modify the source code in src or public and changes will be automatically applied without need to restart, rebuild the container or anything like that.
After you decide that you want to apply the changes to the remote repo then create a PR. Everything related to CI will be automatically by GitHub Actions workflow made so any o both developer and operations teams don't have to worry about manually ensuring that the quality of the changes is acceptable. After your PR is reviewed and merged the GitHub Actions workflow will automatically do everything related to CD (and the only manual thing will be the review before deploying to production).
Moreover, a lot of other tasks are completely automated to reduce the work of the developers. Examples of automated tasks are - publishing new releases, marking/deleting old PR and Issues, version updates of GHA workflows' actions, Terraform modules and providers, dependencies in package.json and package-lock.json, and obviously lifecycles of source code, Terraform files, and Helm Chart.
Click to see the project structure:
Golden-DevOps/
├── .git
│   └── ...
├── .github
│   ├── ISSUE_TEMPLATE
│   │   ├── bug_report.yml
│   │   ├── feature_request.yml
│   │   └── typo.yml
│   ├── linters
│   │   └── .hadolint.yaml
│   ├── workflows
│   │   ├── delivery.yml
│   │   ├── github-release.yml
│   │   ├── helm-test.yml
│   │   ├── infra-cleanup.yml
│   │   ├── integration.yml
│   │   ├── playground.yml
│   │   ├── reusable-change-tag.yml
│   │   ├── reusable-infra-cleanup.yml
│   │   ├── reusable-terraform.yml
│   │   ├── stale.yml
│   │   ├── terraform-cd.yml
│   │   └── terraform-ci.yml
│   ├── CHANGELOG.md
│   ├── CODEOWNERS
│   ├── CODE_OF_CONDUCT.md
│   ├── CONTRIBUTING.md
│   ├── FUNDING.yml
│   ├── PULL_REQUEST_TEMPLATE.md
│   ├── README.md
│   ├── SECURITY.md
│   └── dependabot.yml
├── .nginx
│   └── nginx.conf
├── .vscode
│   ├── extensions.json
│   ├── launch.json
│   └── settings.json
├── aws
│   ├── gh-action-role.json
│   └── gh-actions-inline-policy.json
├── healthchecks
│   └── postgres-healthcheck
├── helm-charts
│   └── main-chart
│       ├── templates
│       │   ├── tests
│       │   │   └── test-connection.yaml
│       │   ├── NOTES.txt
│       │   ├── apiservice.yaml
│       │   ├── clusterrole.yaml
│       │   ├── clusterrolebinding.yaml
│       │   ├── configmap.yaml
│       │   ├── deployment.yaml
│       │   ├── hpa.yaml
│       │   ├── metrics-server-deployment.yaml
│       │   ├── metrics-server-service.yaml
│       │   ├── namespace.yaml
│       │   ├── rolebinding.yaml
│       │   ├── secret.yaml
│       │   ├── service.yaml
│       │   └── serviceaccount.yaml
│       ├── .helmignore
│       ├── Chart.yaml
│       ├── values-dev.yaml
│       ├── values-prod.yaml
│       ├── values-staging.yaml
│       └── values.yaml
├── images
│   ├── compose.png
│   └── local-preview.png
├── public
│   ├── favicon.ico
│   ├── index.html
│   ├── logo192.png
│   ├── logo512.png
│   ├── manifest.json
│   └── robots.txt
├── src
│   ├── App.css
│   ├── App.js
│   ├── App.test.js
│   ├── index.css
│   ├── index.js
│   ├── logo.svg
│   ├── reportWebVitals.js
│   └── setupTests.js
├── terraform-infrastructure
│   ├── argocd
│   │   ├── manifests
│   │   │   ├── app-repos.yaml
│   │   │   ├── app-set.tpl
│   │   │   ├── ingress.tpl
│   │   │   ├── install.yaml
│   │   │   ├── namespace.yaml
│   │   │   └── service-grpc.yaml
│   │   ├── .terraform.lock.hcl
│   │   ├── backend.tf
│   │   ├── data.tf
│   │   ├── kubectl-provider.tf
│   │   ├── main.tf
│   │   ├── providers.tf
│   │   ├── terraform-dev.tfvars
│   │   ├── terraform-prod.tfvars
│   │   ├── terraform-staging.tfvars
│   │   ├── variables.tf
│   │   └── versions.tf
│   ├── eks
│   │   ├── .terraform.lock.hcl
│   │   ├── backend.tf
│   │   ├── data.tf
│   │   ├── karpenter-controller.txt
│   │   ├── lb-controller.tf
│   │   ├── main.tf
│   │   ├── outputs.tf
│   │   ├── providers.tf
│   │   ├── terraform-dev.tfvars
│   │   ├── terraform-prod.tfvars
│   │   ├── terraform-staging.tfvars
│   │   ├── variables.tf
│   │   └── versions.tf
│   └── vpc
│       ├── .terraform.lock.hcl
│       ├── backend.tf
│       ├── main.tf
│       ├── outputs.tf
│       ├── providers.tf
│       ├── terraform-dev.tfvars
│       ├── terraform-prod.tfvars
│       ├── terraform-staging.tfvars
│       ├── variables.tf
│       └── versions.tf
├── .dockerignore
├── .gitattributes
├── .gitignore
├── Dockerfile
├── LICENSE
├── docker-compose.dev.yml
├── docker-compose.test.yml
├── package-lock.json
└── package.json


You don't need to have everything from described below "Full usage" point to use the repo for some of the basic purposes like e.g. having automated pipeline(s) or having a development environment for React-Nginx app. Below there is described what is required for which kind of usage of this repo:
(Be able to use every functionality from this project)
- Git, Node.js, Docker and Docker Compose (highly recommended to have Docker Desktop) installed on the local computer.
- GitHub Account, AWS Account, Docker Hub Account, Snyk Account (with your integrated repo), Slack Account and Slack App with at least 2 Webhook URLs to channels (guide on how to use Slack GHA step here).
- Right configured AWS directory (~/.aws) on your local computer. You can use
aws configurecommand to set the default AWS profile's Access Key ID and Access Key Name (data will be saved in file ~/.aws/credentials), and default AWS region (use the same as you use in other files) and format of the output (data will be saved in file ~/.aws/config). Then open ~/.aws/credentials file and create a new AWS profile, that will be used for accessing the EKS cluster from your local computer (in this repo this AWS profile is called "jakubszuber-admin"). This new AWS profile could have the same Access Key's ID and Name as your default profile but it doesn't have to.
(GHA that will automate the lifecycle of the source code, Terraform files, Helm Chart, and other less important tasks)
- GitHub Account, AWS Account, Docker Hub Account, Snyk Account (with your integrated repo), Slack Account and Slack App with at least 2 Webhook URLs to channels (guide on how to use Slack GHA step here).
(Deploy 3 environments with main website and Argo CD Dashboard for each one)
(Second point if you want to have access to EKS cluster from your local computer)
- GitHub Account, AWS Account, Docker Hub Account, Snyk Account (with your integrated repo), Slack Account and Slack App with at least 2 Webhook URLs to channels (guide on how to use Slack GHA step here.
- Right configured AWS directory (~/.aws) on your local computer. You can use
aws configurecommand to set the default AWS profile's Access Key ID and Access Key Name (data will be saved in file ~/.aws/credentials), and default AWS region (use the same as you use in other files) and format of the output (data will be saved in file ~/.aws/config). Then open ~/.aws/credentials file and create a new AWS profile, that will be used for accessing the EKS cluster from your local computer (in this repo this AWS profile is called "jakubszuber-admin"). This new AWS profile could have the same Access Key's ID and Name as your default profile but it doesn't have to.
(Be able to use a single command to be able to develop React-Nginx app Docker container):
- Git, Node.js, Docker and Docker Compose (highly recommended to have Docker Desktop) installed on the local computer.
(Have configured GitHub files that help to use repo):
- GitHub Account.
- Git installed on the local computer.
If you want to use all of the repository functionalities then there are some of the variables that will be specific for your case. Files and directories that require the most changes are listed at the end of this section (those are not the only places where you have to change values).
This repo is a real-world working example so it contains values specific only to this repo, so for your usage, you have to change below values (or some of them if you don't use the entire repo):
- S3 bucket's name (in this repo "golden-devops-bucket")
- DynamoDB table's name (in this repo "golden-devops-dynamodb")
- Domain name (in this repo "goldendevops.com")
- AWS Region (in this repo "us-east-1")
- AWS Profile used to access the EKS cluster from your local computer (in this repo "jakubszuber-admin")
- Whole IAM Role (in this repo gh-action-role.json)
- Whole IAM Policy (in this repo gh-actions-inline-policy.json)
- Whole Helm values.yaml file (in this repo values.yaml)
- Whole argocd/manifests directory (in this repo argocd/manifests)
- Minimal, maximal, and desired number of nodes specified in eks/main.tf (in this repo eks/main.tf)
- Privacy of the VPC Subnets specified in vpc/main.tf (in this repo vpc/main.tf)
- Name of Helm Chart specified in Chart.yaml (in this repo "golden-devops-chart")
- Docker container name and its tag (in this repo "jakubszuber/react-nginx-image" and "stable-DATE-SHORT-SHA")
- All of the links for the GitHub repo (in this repo "https://github.com/JakubSzuber/Golden-DevOps")
- GitHub user used within files of .github dir (in this repo "JakubSzuber")
- GitHub secrets (the same, duplicated for both Actions and Dependabot secrets). Names of the secrets should be the same as: DOCKERHUB_TOKEN, DOCKERHUB_USERNAME, SLACK_WEBHOOK_URL, SLACK_WEBHOOK_URL2, SNYK_TOKEN
- And obviously this whole README.md is unique for this repository.
The files/dirs that contain a lot of those "your-specific" values are:
- All of terraform-infrastructure/<MODULE>/main.tf files
- All of terraform-infrastructure/<MODULE>/data.tf files
- Chart.yaml and all of 4 Helm values files within helm-charts/main-chart directory
- Entire argocd/manifests directory
- Entire aws directory
- Entire .github directory directory
Tip
If you encounter any problems using this repo to create your own infrastructure, try deleting everything and starting over. When creating several complex infrastructures sometimes there may be a temporary problem that may be caused by e.g. AWS. However, if that doesn't help feel free to use the issue or discussions section.
First of all you need a internet domain. If you don't have one then register one manually e.g. in the AWS console from Route 53 interface and create a hosted zone for in Route 53 (if you register a domain through Route 53 then the hosted zone is automatically created for that domain).
Then create an TLS cert issued for domains yourdomain.com, *.yourdomain.com, and *.argo.yourdomain.com (you can do this e.g. in the AWS console from ACM 53 interface). After that create CNAME record for each domain (in the AWS console from ACM 53 interface there is a button "Create records in Route 53") in order to allow AWS to validate your domains.
Next step is creation of an S3 Bucket for the Remote State. It should have enabled versioning, default encryption, and object lock setting (under "Advanced settings"). Then create a DynamoDB table with a partition key "LockID" type string.
Another step is the creation of "Development", "Staging" and "Production" GitHub environments and then adding a protection role for "Production" so this environment will require reviewers (add some reviews that will be able to allow for deployments for the production environment).
One of the last steps is creation of AWS IAM Identity provider that will allow us to use OpenID Connect between GitHub Actions and AWS. To setup it go to Amazon IAM interface and create IAM Identity provider with Provider type "OpenID Connect", Provider URL "https://token.action.githubcontent.com", Audience "sts.amazonaws.com".
Then create an IAM Role with a Trusted entity type "Custom trust policy" and content similar to this (remember to change the IAM user number and name of the GitHub user and repo), then (for that IAM Role) create IAM Policy with Trusted entity type "Custom trust policy" with content similar to this (limit the actions and resources to the minimal scope possible for your case).
Generate your own "cert.pem" and "key.pem" by command openssl req -x509 -newkey rsa:4096 -keyout key.pem -out cert.pem -days 750 -nodes.
Then you can print them by cat cert.pem | base64 -w 0 and cat key.pem | base64 -w 0 so you are able to copy them from the terminal and insert as values to secret.yaml file that is in Helm chart.
Currently this method of using self-signed certificates is temporary and it would be better to use some other TLS certificate approach but if you are ok with then remember to not expose the values of "cert.pem" and "key.pem" in GitHub repo (this repo is showcase example and self-signed certificates will be removed in progress for this repo). Making the better and more secure approach with using K8s cert-manager is in progress for that repo!
To initialize the whole infrastructure (3 environments) you just have to go to Actions section in your repo, find on the left bar the workflow called "Terraform CD", click on it and click "Run worfklow" button in order to manually execute this workflow. First will be deployed development environment, then staging, then production (you have to manually approve the deployment to production in interface of this wokrflow run). Deployment proccess for each environment should take 15 minutes on average.
After successfull run of the worklfow you have to create A type aliases records for the right domains and AWS ALB. If you use Amazon Route 53 go to its interface and add 6 A type alias records with the right Ingress Load Balancer URL (each pair of aliases for the specific environment should have the right specific Load Balancer URL assigned).
For example there is one of 3 pairs: "dev.yourdomain.com" and traffic routed to AWS ALB "dualstack.k8s-alb-111-222.us-east-1.elb.amazonaws.com." and "dev.argo.yourdomain.com" and traffic routed to the same AWS ALB. Do similar thing for staging and production (production will have pair of domains without env-specific subdomain - "yourdomain.com" and "argo.yourdomain.com").
Note
To find the right AWS ALB for the right pair of domains you can either enter the EC2->Load balancers or VPC interface to insight the infomation about in which VPC the specific AWS ALB is placed (name of the VPC will tell you which environment is that).

Now you should be able to enter the main websites and Argo CD Dashboards (login page) for each environment. It doesn't matter if you use http:// or https:// because you will still be redirected to https. If you the error then probably you have to wait for the new domain's records to propagate. If you have a VPN then turning it on, especially on USA, can significantly reduce waiting time (I personally use and recommend Chrome extension Urban VPN).
Websites should be similar to the below ones (but with different domains).
Now you can connect to every EKS cluster from your local computer (below example process for connection to one of the clusters - to connect to another cluster start the process from the 4th step).
-
First of all make sure you have the right configured ~/.aws directory on your local computer so you have configured the AWS profile that is used to access Argo CD (in this repo "jakubszuber-admin").
-
Then create environment variable with AWS profile's name.
Windows:
set AWS_DEFAULT_PROFILE=jakubszuber-adminLinux/macOS:
export AWS_DEFAULT_PROFILE=jakubszuber-admin- Make sure that the right AWS profile is set:
aws sts get-caller-identity- Update the kubeconfig to get access to your newly created EKS cluster.
aws eks update-kubeconfig --name <name of one of the clusters> --region <used aws region> --profile jakubszuber-admin- Display and copy the Argo CD default password from the argocd-initial-admin-secret:
kubectl get secrets -n argocd
kubectl get secret argocd-initial-admin-secret -n argocd --template={{.data.password}} | base64 -d
Now you can log in as "admin" to https://argo.<yourdomain>.com or https://<environment>.argo.<yourdomain>.com depends on the cluster and see similar Argo CD Dashboard:

To dev work after cloning the repo use docker compose -f docker-compose.dev.yml up -d --build for the initial setup and fixing temporary errors, after executing this
command you can just start coding (the changes will be applied after each save) and you will see the website on localhost:80 or localhost:3000.
In order to debug code in VSC make sure that you have .vscode/launch.json from that project.
Note that the initial start, compiling and automatic reload of the website's content can take a little more time than usual. If you encounter any problems with dev
work try to restart the container, your whole Docker and eventually WSL2.
Click to see the demo
startup.mov
On the initial run you should see a similar website on either localhost:80 or localhost:3000:

To shut down Docker Compose use docker compose -f docker-compose.dev.yml -v down.
Tip
By the way, if you use VSC then you probably want to have features (highlighting, recommendations, etc) for .tpl files the same as you probably already have for your YAML files. To do so in VSC open e.g. ingress.tpl and in the bottom-right corner click on "plain-text", then scroll down and click on "YAML" so from now you will have .tpl files associated with the YAML files (treated the same as YAML files), what can be very helpful!
The CI/CD pipeline of the source code is handled by 2 GHA workflows integration.yml and delivery.yml that contains steps appropriate for particular role of each workflow,and obviosly both workflows are executed by different trigger events.

First workflow (integration.yml) is triggered when a new PR is created or new commit for the PR was pushed (also it can be executed manually) for the main branch. Moreover at least one of the commits has to contain the file that is related with the main React-Nginx container Dockerfile, package.json, package-lock.json, or some file within src or public directory except README.md files).
First are executed 4 jobs in parallel:
- Link Repo - lint files that was changed. You can comment/uncomment right lines to turn on/off options for linting the entire repo instead of only changed files, linting only specific file(s), or excluding from linting specific file(s).
- Scan Code With Snyk - perform Static Application Security Testing (SAST) testing on the entire repo to print all levels of found vulnerabilities and fail the job if any critical level vulnerability was found.
- Build Test Image (Candidate) - build a Docker image with the last stage that includes only unprivileged Nginx image, and push it to the GitHub Packages (which is treated as the playground registry where are stored both testing and official images). This container is a potential "candidate" for the new container responsible for the main React-Nginx website. The "candidate" image contains minimal software required to serve static React website through Nginx which makes it lightweight and secure.
- Build Unit Test Image - build Docker image with the stage for unit tesing. This is the only purpose of this container as it contains more dependencies within it (compared to the container build with the last step) required only for performing unit testing.
If the "Build Test Image (Candidate)" job is successful then 3 jobs are executed in parallel:
- Test Deployment In Kubernetes - spin up the k3d cluster, launch the entire Helm Chart, and perform smoke tests on the deployment. k3d is a lightweight wrapper to run k3s (Rancher Lab's minimal Kubernetes distribution) which makes it a great choice for purposes like that.
- Scan Image With Snyk - perform vulnerability testing with the usage of Snyk for the "candidate" Docker container to display all levels of vulnerabilities and fail the job if any critical vulnerability was found.
- Scan Image With Trivy - perform vulnerability testing with the usage of Trivy for the "candidate" Docker container to display all levels of vulnerabilities and fail the job if any critical vulnerability was found.
If the "Build Unit Test Image" job is successful then 1 job is executed:
- Unit Test in Docker - perform unit tests on the Docker image that was built for that purpose.
When all of the jobs end their work then the last job is executed - "Notify Slack (Final CI Result)" that is responsible for sending the message to the right Slack channel about the result of the entire workflow. If any of the jobs will fail, be skipped, or be canceled then the end result of the workflow is "Failure" and the message with appropriate content and color is sent.
If any of the jobs fail or are canceled then the end result of the workflow is "Failure" which will be shown in the interface of the PR for which the workflow was executed, GHA interface, and badge of the repository.

Second workflow (delivery.yml) is triggered when a PR is merged or there was a direct push (also it can be executed manually) for the main branch. Moreover at least one of the commits has to contain the file that is related to the main React-Nginx container Dockerfile, package.json, package-lock.json, or some file within src or public directory except README.md files).
First are executed 2 jobs in parallel:
- Build Final Image - build a Docker image with the last stage that includes only unprivileged Nginx image, and push it to both GitHub Packages (the same as "candidate") and Docker Hub (where are stored only official images). It is a new container responsible for the main React-Nginx website. The "candidate" image contains minimal software required to serve static React website through Nginx which makes it lightweight and secure.
- Scan Code With Snyk And Upload Results - perform Static Application Security Testing (SAST) testing on the entire repo to print all levels of found vulnerabilities and upload the test results to Snyk online app and GitHub Code Scanning.
If the "Build Final Image" job is successful then 4 jobs are executed in parallel:
- Deploy To Development / deploy-to-env - execution of reusable workflow reusable-change-tag.yml with specifying parameters for the development environment. This workflow just changes the tag of the deployment's image in Helm values-<env>.yaml file so Argo CD running within the dev EKS cluster can notice that change and update the used image for every pod in the development environment.
- Generate SBOM (Software Bill of Materials) For The Final Image - generate SBOM for the container and upload it to the GitHub Dependency Graph.
- Scan Image With Snyk And Upload Results - perform vulnerability testing with the usage of Snyk for the new Docker container to display all levels of vulnerabilities and upload the test results to Snyk online app and GitHub Code Scanning.
- Scan Image With Trivy And Upload Results - perform vulnerability testing using Trivy for the new Docker container to display all levels of vulnerabilities and upload the test results to GitHub Code Scanning.
If the "Deploy To Development / deploy-to-env" job is successful then 2 jobs are executed in consecutive order - Deploy To Staging -> Deploy To Production. Both jobs are exactly the same except for a different environment (different Helm values-<env>.yaml file) (moreover Production environment required manual approval from reviewer(s) before execution).
When all of the jobs end their work then the last job is executed - "Notify Slack (Final CD Result)" that is responsible for sending the message to the right Slack channel about the result of the entire workflow. If any of the jobs will fail, be skipped, or be canceled then the end result of the workflow is "Failure" and the message with appropriate content and color is sent.
If any of the jobs fail or are canceled then the end result of the workflow is "Failure" which will be shown in the GHA interface and badge of the repository. In theory, failure of this workflow shouldn't happen because all tests that could raise an error to block the PR should be previously made by CI workflow, but if the workflow was triggered by a direct commit that contains some kind of bug/vulnerability then failure can absolutely happen. That's why branch protection for at least the main branch is important but of course, everything depends on your needs. Of course, if you modify the workflow by introducing some bug then the workflow can also fail.
Important
If you suspect a temporary error of the workflow run caused by GHA then re-run failed and skipped jobs of the same workflow!
The CI/CD pipeline of the Terraform configuration files is handled by 2 GHA workflows terraform-ci.yml and terraform-cd.yml that contains steps appropriate for particular role of each workflow, and obviously both workflows are executed by different trigger events.
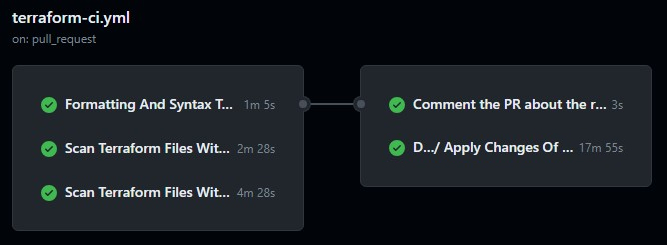
First workflow (terraform-ci.yml) is triggered when a new PR is created or a new commit for the PR was pushed (also it can be executed manually) for the main branch. Moreover at least one of the commits has to contain the file that is related to the Terraform-managed infrastructure so any file within terraform-infrastructure directory.
First are executed 3 jobs in parallel:
- Formatting And Syntax Tests - check do Terraform configuration files are formatted using
terraform fmt -check -recursivecommand and check the syntax errors by usingterraform validatecommand. - Scan Terraform Files With Trivy - use Trivy to perform vulnerability testing on every Terraform-related file (instead of automatically generated install.yaml) to print all levels of found vulnerabilities and fail the job if any critical level vulnerability was found.
- Scan Terraform Files With Snyk - use Snyk to perform vulnerability testing on every Terraform-related file (counting automatically generated install.yaml) to print all levels of found vulnerabilities and fail the job if any critical level vulnerability was found. File install.yaml is tested in this job because Snyk is not that sensitive to vulnerabilities compared to Trivy and allows for those that are in that file.
When the above 3 test jobs end their work then "Comment the PR about the results of the tests" is executed. This job is responsible for adding a comment the the PR about the results of the previous test jobs and attaching the output of them.
If all of the above 3 test jobs are successful then the last job is executed - Deploy To Development / deploy-to-env. This job uses reusable workflow reusable-terraform.yml with specifying parameters for the development environment in order to apply/deploy Terraform changes for the development environment.
If any of the jobs fail or are canceled then the end result of the workflow is "Failure" which will be shown in the interface of the PR for which the workflow was executed, GHA interface, and badge of the repository.

Second workflow (terraform-cd.yml) is triggered when a PR is merged or there was a direct push (also it can be executed manually) for the main branch. Moreover at least one of the commits has to contain the file that is related to the Terraform-managed infrastructure so any file within terraform-infrastructure directory.
First are executed 3 jobs in parallel:
- Deploy To Development / Apply Changes Of All 3 Modules (vpc -> eks -> argocd) To A Specific Environment - execution of reusable workflow reusable-terraform.yml with specifying parameters for the development environment in order to apply/deploy Terraform changes for the development environment.
- Scan Terraform Files With Trivy And Upload Results - use Trivy to perform vulnerability testing on every Terraform-related file (instead of automatically generated install.yaml) to print all levels of found vulnerabilities and upload the test results to GitHub Code Scanning.
- Scan Terraform Files With Trivy And Upload Results - use Snyk to perform vulnerability testing on every file Terraform-related file (counting automatically generated install.yaml) to print all levels of found vulnerabilities and upload the test results to Snyk online app and GitHub Code Scanning. File install.yaml is tested in this job because Snyk is not that sensitive to vulnerabilities compared to Trivy and allows for those that are in that file.
If the "Deploy To Development / Apply Changes Of All 3 Modules (vpc -> eks -> argocd) To A Specific Environment" job is successful then 2 jobs are executed in consecutive order - Deploy To Staging [...] -> Deploy To Production [...]. Both jobs are exactly the same except for a different environment (different Terraform terraform-<env>.tfvars file) (moreover Production environment required manual approval from reviewer(s) before execution).
If any of the jobs fail or are canceled then the end result of the workflow is "Failure" which will be shown in the GHA interface and badge of the repository. In theory, failure of this workflow shouldn't happen because all tests that could raise an error to block the PR should be previously made by Terraform CI workflow, but if the workflow was triggered by a direct commit that contains some kind of bug/vulnerability then failure can absolutely happen. That's why branch protection for at least the main branch is important but of course, everything depends on your needs. Of course, if you modify the workflow by introducing some bug then the workflow can also fail.
The entire infrastructure used in this project is placed in AWS and is managed through Terraform.
Below diagrams show every component of the infrastructure for a particular number of environments and where is it placed and how is it related to other components. Moreover, the diagrams animatedly show network traffic.
Diagram of every component of the infrastructure for 3 environments (each env one is exactly the same):
Diagram of every component of the infrastructure for only a single environment (for a better view and understanding):
Note
Obviously, the number of EC2 instances (cluster nodes) can be different depending on the traffic load and/or your needs.
The price of running the entire infrastructure (with 3 environments) can vary depending on your specific setup. Some variables are easy to calculate (e.g. cost of EKS service) but some services can be completely different depending on configuration and traffic load (e.g. cost of EC2 instances). In the below calculations, the biggest unknown is the number and size of EC2 instances that you want to run. This will completely depend on variables like the specification of your app and its popularity.
In our assumptions, we use an overall 50 t3.medium instances. According to article on concurrencylabs.com it's good to have 11 instances in size t3.medium for 1,000 active users at the time. Let's assume our app has a little under 5,000 active users on average, so we will run 50 t3.medium instances (for all 3 clusters) because for dev and staging, we will run on average only 2 instances for each.
Note
All calculations below take into account the use of the AWS Free Tier.
Cost of services that will be common among all configurations:
- Hosted zone for your domain in Amazon Route 53 (if you use this service for your domain) - $0.50
- 3 running EKS clusters working whole month - $216 ($0.10 per hour per cluster)
- 3 customer-managed Amazon KMS keys - $3 ($1/month (prorated hourly) for a single created KMS key)
In summary approximately $222.50
Cost of services that will are impossible to calculate in advance:
- Cost of nodes that are running within the EKS clusters. Let's assume we overall (in 3 clusters) use 50 t3.medium Linux/UNIX Spot instances in US East (N. Virginia) working the entire month - $1,497.6 (approximately~ 0.0416 USD per hour)
- Cost of services that can easily exceed the Free Tier Limit. Numerous services will for sure exceed their free limits thresholds while used in production, let's assume that will cost is - $20
In summary approximately $1,517.60
Summing up all of the minimal costs (assuming basic, average usage of EC2 service) we got in big approximation $1,740.
It is a very small price for an application with that computing power, scalability, and 3 environments. Of course, there could (and probably will be) other costs related to AWS infrastructure that you will incur depending on your needs (e.g. you don't have a purchased domain for your website, you would want to run nodes in private subnets so you will have to pay for EC2 NatGateway, and so on).
K8s resources even though are not strictly part of the infrastructure are still core and probably the most important part of software running within our nodes.
K8s resources in this project are responsible for among others running Argo CD, AWS ALB controller, resources core for the cluster (e.g. kube-proxy, coredns, metrics-server, HPA), and finally serving and running either main React-Nginx Website and Argo CD Dashboard.
TODO Above diagram shows all of the K8s resources that run within the cluster (from all namespaces).
To destroy the entire infrastructure (all 3 environments) and clean up everything related to it follow the below steps in order.
- Manually execute the infra-cleanup.yml workflow to destroy each environment in parallel. The Terraform modules will be destroyed in order: "argocd", "eks", "vpc".
- Then you have to manually delete stuff that was created manually by you. Go to AWS Console and remove A records (CNAME also if you want to delete the TLS certificate) of your hosted zone, DynamoDB table, S3 Bucket for the Terraform Remote State, and then you can also delete the TLS certificate.
While deleting the Terraform-managed infrastructure it's good to watch the workflow's logs so in case of a long deletion process of some resource (especially VPC that can take a dozen minutes although deletion timeout of VPC resource is only 5 minutes) go to the AWS Console and manually delete this resource. This will speed up the deletion process and prevent the workflow's errors caused by deletion timeout errors of the Terraform Resources.
Warning
In case of a timeout failure of workflow responsible for cleaning up the entire Terraform-managed infrastructure infra-cleanup.yml you have to comment out the right environment in infra-cleanup.yml and/or comment out the particular lines responsible for planning and destroying specific module(s) in reusable-infra-cleanup.yml.
For example, in case of a timeout error because the deletion of production VPC took too long, first go to infra-cleanup.yml and comment out the JSON values responsible for dev and staging environments, then go to reusable-infra-cleanup.yml and in "Terraform Plan" step delete lines (in this case first 6 lines) are temporarily useless because "argocd" and "eks" modules were already deleted and attempt to do a "terraform plan" or "terraform destroy" on those modules will fail among others because the EKS Cluster endpoint is already deleted (remember to change "cd ../vpc" to "cd vpc"). Then delete the steps responsible for deleting the "argocd" and "eks modules". Now you can finally execute the workflow infra-cleanup.yml once again and then undo the changes that you temporarily made to infra-cleanup.yml and reusable-infra-cleanup.yml
Golden-DevOps is still in the early stage of development. Because of this fact, there still could be some bugs that may make it more or less difficult to use some of the repo features. I highly recommend using version equal to or higher than 1.0.0 so you can be sure that everything is sophisticated to create a real-world application that will be secure on at least basic level.
Remember that you can check out the Kanban Board for insight into what is currently under constant development and what is planned to be done in the future. I continuously update this board so it reflects the real status of the task included in it.
The domains for the websites of the Golden-DevOps project (e.g. https://goldendevops.com) may not work at the moment because I shut down the entire infrastructure when I do not enhance the project in order to not spend money when I don't have to. But every relevant website's appearance should be available to see in this README.md.
Currently, there are 2 registries used for this project - GitHub Packages ![]() and Docker Hub
and Docker Hub ![]()
GitHub Packages is treated as the playground registry where are stored both testing and official images. Link to this registry for this repo is here.
Docker Hub is treated as the main registry where are stored only official images that should have passed the whole CI (unless there was a direct push or manual execution of CD workflow). Link to this registry for this repo is here.
Note
It's also recommended to, in your Docker Hub repository settings, turn new Docker feature - Docker Scout. It will allow you to analyze your images to help you understand their dependencies and potential vulnerabilities.
It can among others give you Docker Scout integration directly within your Docker Hub Registry and an entirely separate Docker Scout website for your Docker Hub Account's Docker images under link https://scout.docker.com/ (you have to log in to your Docker Hub Account).
Want to contribute to this project? Check out the contributing documentation. Feel free to write on Discussions. You can also contact me on my Gmail [email protected].
If you find an issue, please report it on the issue tracker.
This project uses MIT License and was entirely created by myself. If you want to publicly use this repo in any way I would be so thankful to leave a reference to my GitHub profile, thanks!