1. Setup
##Required software: In order to implement the solution provided by this project, its necessary to install several tools in order to compile the Arduino code (known in Arduino talk as a 'Sketch') and upload it to the Teensy board. This is what you will need to download/install:
- Download and install [Arduino IDE] (https://www.arduino.cc/en/Main/Software)
- Download and install [Teensyduino] (https://www.pjrc.com/teensy/td_download.html) - Check which Versions of Arduino IDE are supported. - Teensyduino 1.31 (the latest at time of writing) has been tested to work fine with Arduino version 1.6.12 (also the latest at time of writing).
- Download and install the three libraries provided in this repo here (note, there are some custom changes in these libraries so don't assume that if you have alternate versions already installed that these will work with this project, instead be sure to install the libraries provided here).
- Wire Teensy
- Open Program MavLink_FrSkySPort.ino from MavLink_FrSkySPort Folder and adjust AddOns and Debug Options as you require.
- From Arduino 'Tools' menu, choose:
- Board: Teensy revision matching your board
- USB Type: Serial
- CPU Speed: 72MHz
- Port - choose the USB serial port to which the Teensy is connected
- Compile and Upload Program to your Teensy
- Copy LUA Files to Tarans SD-Card. Note, for the lua screens to work, you will require the lua compatible version of OpenTx installed on your Taranis Radio - in the OpenTx Companion app, 'lua' is a check-box option under the 'Radio Profile' tab in the Preferences screen. Make sure this is selected before downloading and installing the latest firmware.
- Configure Ardupilot Parameters
- Configure Model Telemetry sensors on Taranis
- Add and configure the mixer scripts: offset and celinf to the CUSTOM SCRIPTS page of your model configuration. celinf is described here and offset is described here. offset now includes options to configure the Units of Altitude and Speed displayed on the main telemetry screen, plus the ability to select either Copter or Plane implementation.
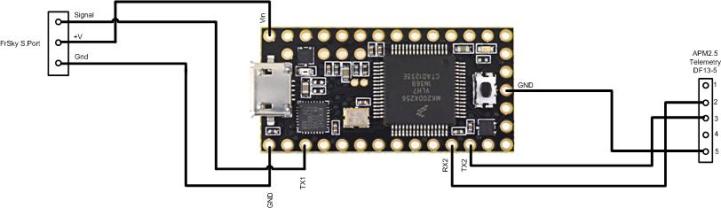 (note - the connection from the teensy's Tx2 pin shown above is optional and should only be connected where the teensy has dedicated use of the Pixhawk/APM telemetry port)
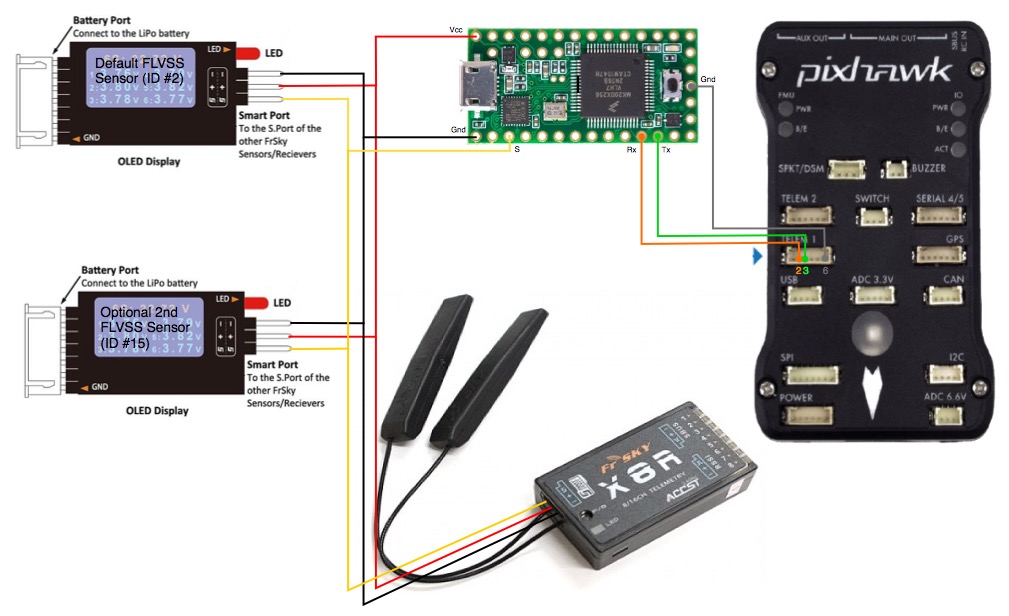
If FLVSS, FAS, or any other FrSky sensors are also included in your telemetry setup, then these will be daisy-chained with the SmartPort cable from the Teensy, E.g.: Teensy -> FrSky_Sensor1 -> FrSkySensor2 -> X_Series_Rx. This will resemble something like the following example:
Some notes:
- On the above connection diagrams it can be seen that both Tx and Rx are connected from the Teensy to the Pixhawk autopilot. In many cases it is preferable to not connect the Tx from Teensy to Rx on Pixhawk (I.e. in cases where the Pixhawk telemetry port is being shared with one or more other devices). With this connection in place, Teensy will attempt to configure the message streaming parameters in Ardupilot automatically. Without this connection, the parameters must be set manually as per the table in the following section below.
- To use a FAS sensor with the Teensy, some teensy sketch code amendments are required prior to compiling and upload to the teensy. These amendments are described in the last paragraphs of Section 2. AddOns, in this Wiki.
- The default Teensy code will allow the addition of one or two FLVSS sensors (as shown above) without any code modifications being required. Adding a single sensor is straightforward.
- To add a second FLVSS sensor to your setup (for cell monitoring of upto two 6s LiPos), the second sensor must be programmed with a unique sensor ID - the suggestion is ID #15 for this sensor. For amending the sensor ID, there are two ways: one using a FrSky servo channel changer like this, or alternatively by connecting a FrSky FUC-3/SPC cable between your PC and the S.Port and using the free FrSky S.Port Tool software for Windows downloaded from here (instructions are provided with the tool download). By implementing a second FLVSS sensor, additional telemetry configuration needs to be configured on the Taranis - see details in Section 1.2
IMPORTENT NOTE FOR Teensy LC Users:
Keep in mind that Teensy LC has a strict 3.3v signal voltage limit. This should be fine with a 3DR Pixhawk, but be careful to check the Telem port specs with Pixhawk variants. The Teensy 3.0, 3.1 or 3.2 revisions are much more tolerant in this regard.
Locate the following parameters Under the full parameters list in your ground station software and adjust as follows:
| Parameter Name | Value |
|---|---|
| SERIAL2_PROTOCOL | 1 |
| SERIAL2_BAUD | 57 |
(these example parameters assume we have the teensy connected to the Serial2 port on the Pixhawk autopilot - Serial1 can just as easily be used in which case we would set SERIAL1_ and SR1_ parameters instead)
| Ultimate LRS Users - |
|---|
| The SERIALn_BAUD rate should be set to 19 for ULRS, as this is the rate the serial port on the ULRS Rx runs at. |
If the Teensy has dedicated use of the Pixhawk Telemetry port (I.e. is NOT sharing the port with a second device such as OSD or ground station), then both the Tx and Rx connections from the teensy can be connected to the Pixhawk. The teensy will use its Tx line to configure the Stream Rate (SRn_) parameters of Ardupilot automatically. It is sometimes preferred however to have full manual control over these parameters instead (by not connecting the Teensy Tx line), in which case it is recommended to apply the following parameters settings manually in Ardupilot:
| Parameter Name | Value |
|---|---|
| SR2_EXT_STAT | 5 |
| SR2_RAW_SENS | 5 |
| SR2_POSITION | 2 |
| SR2_EXTRA1 | 5 |
| SR2_EXTRA2 | 5 |
| *SR2_RC_CHAN | 5 |
| All other SRn_ parameters can be set to 0 |
*note - SRn_RC_CHAN only required for ULRS where RSSI is enabled over Mavlink. Set to 0 otherwise.
Ultimate LRS Users - Its likely that both the Teensy and bluetooth adapters (for ground station connection) will be sharing the ULRS Tx serial port. It is essential that for 2 way ground station comms the BT module has both its Tx and Rx connections connected to the ULRS serial port. So in this configuration the Teensy must have only its Rx connection connected (only one device can be connected to send data to the autopilot when a port is shared this way). In this configuration, the ground station software, upon connection will configure the above stream rates automatically, so any manual settings applied will be overwritten at this point. Stream rate settings which are sent by ground station software can often be configured in the software itself, so for:
- APM Planner - "Config/Tuning" tab - select "APM Planner Config" on the left, choose the "Advanced" screen - "Telemetry Rates (Hz)"
- Mission Planner - "Config/Tuning" tab - select "Planner" on the left, and locate the "Telemetry Rates" line on that screen.
- Q Ground Control - Does not appear to have a SR config page