-
Notifications
You must be signed in to change notification settings - Fork 139
Running Puredata patches on Bela
This material has been superseded. Visit learn.bela.io for the maintained version.
The Bela Wiki has moved to learn.bela.io. This material has been superseded. Click here for the maintained version.
Running Pure Data patches on Bela couldn't be easier. To get started navigate to the Pure Data folder in the examples tab and select one of the examples. To run the project just hit the run button. In the IDE window you will see a rendering of the Pd patch that is currently running on the board. Editing of the Pd patch in the browser is not currently supported so you need to download the project and edit the Pd patch using Pd software on your computer. To re-upload the edited Pd patch, simply drag and drop the file onto the browser window and the project will update. You will see this in the rendering of the project. Push the run button and your patch will be running on the board.
It is important to note that you need to have a file called _main.pd in your project folder, which is the patch that will be opened by the program, so this file should be the one which invokes any subpatches or abstraction files. Below is a guide on how to access the Bela hardware in Pd.
- Just as in normal Pd you can use the
[adc~]and[dac~]objects for inputs and outputs. In the case of Bela the stereo input is accessed through[adc~ 1 2]and you can send to the stereo output by connecting to[dac~ 1 2].
-
You can directly address the analog ins and outs from within PD (note that you have to compile and run the patch onto the BeagleBone to receive the data)
-
Use the
[adc~]and[dac~]objects to receive and send the data
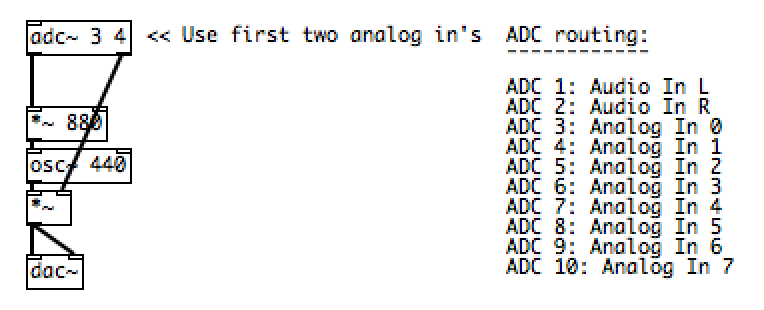
-
[adc~ 3]refers to Analog Input 0 (first two channels of[adc~]are audio inputs), likewise for[dac~]
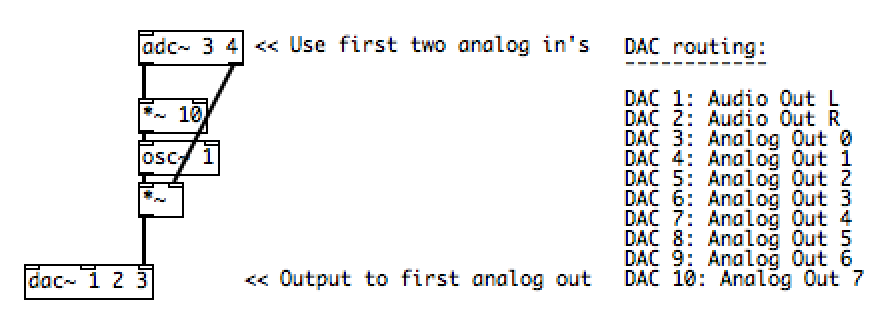
-
These inputs are sampled at audio sampling rate, so handle them as you would audio signals. (Use [snapshot~] if you want to turn them into control-rate values). When the analog channels are sampled at a different rate than the audio, they are resampled automatically in the wrapper.
-
Note that analog inputs and outputs have a range between 0 and 1, unlike regular audio signals which have a range between -1 and 1.
-
See the example patches in the /puredata folder for more information
-
Bela's digital inputs and outputs can be addressed from pd. They can either be received as messages at message rate or as signals. Unlike analog channels, each digital pin can function as an input or an output - this needs to be set explicitly from within the patch.
-
Before using digital I/O the pins need to be initialised by sending messages to the
bela_setDigital @hv_paramreceiver. -
To set a pin to be an input or output at message rate the following message needs to be passed to the receiver:
[PINMODE PIN#(, wherePINMODEisinfor input oroutfor output. The pin numbersPIN#range from 11-26, where 11 refers to digital pin 0 and 26 refers to digital pin 15. The reason for this numbering scheme is to retain consistency with the[adc~]and[dac~]numberings used. To set a pin to be received or written to at audio rate a tilde (~) is added as a third component of the message. To disable a pin the message[disable PIN#(can be sent to the receiver. See the following screenshot for example usage:
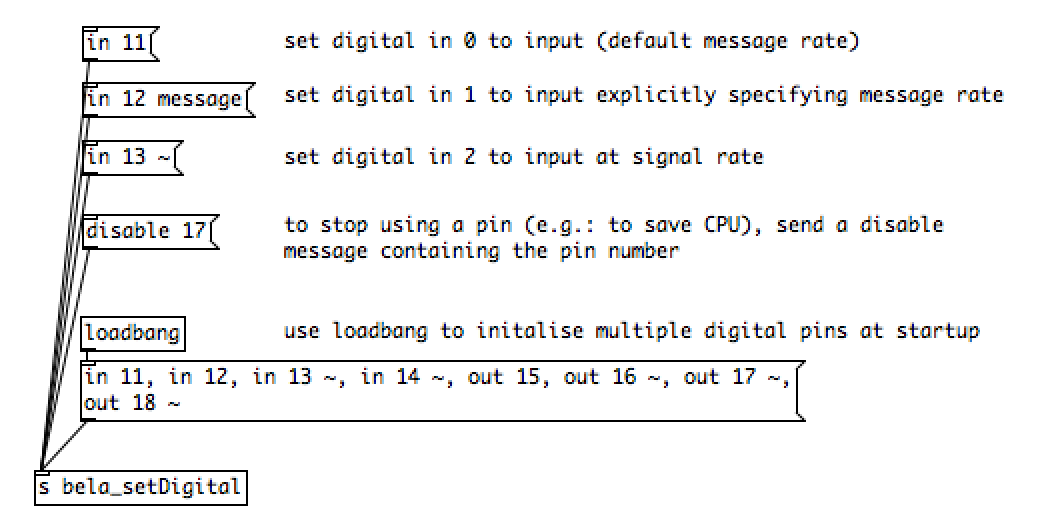
-
If a pin is set to message rate, messages will only be received or written when the pin's value changes. If audio rate is specified, values are treated as a signal where values can change between low and high (0 and 1) 44100 times per second. Use
[adc~]and[dac~]channels 11-26 to address the corresponding pin (after it has been initialised). -
See the
digitalexample inside the Puredata examples folder for more information and practical examples.
Most class-compliant USB MIDI devices are compatible with Bela. You can use the [notein] and [ctlin] objects to receive midinote and CC messages from the device. See the hello-midi example inside the Puredata examples folder for more information.
If you want to use abstractions or externals with your Pd patch then the easiest way to do this is to simply include the abstractions in the project folder. If you want abstractions to be accessible from all Pd patches that you create (like setting the path for externals in regular Pd) then this can be done by creating a folder that contains your externals here: /root/Bela/projects/pd-externals.
The default search path for a project is the one you find in https://github.com/BelaPlatform/Bela/blob/master/core/default_libpd_render.cpp#L384-L385: "." (current folder) and "../pd-externals/", which is the folder /root/Bela/projects/pd-externals. This means that if you put something in either of those folders, your program will be able to open it.
The pd-externals folder does not exist by default, so you will need to create it if you want globally available externals.
To learn more about compiling pd-extended externals for Bela see this discussion on the forum.
There are actually two ways you can run Pd patches on Bela: using Enzien Audio's Heavy Audio Tools or using libpd. Libpd is a GUI-less version of Pd which allows to embed Pd patches into other programs, whereas Heavy is an online service that generates highly-optimized C code from a Pd patch. Libpd is what runs by default in the IDE and runs all of Pd vanilla objects, almost all of of which are supported on Bela. Pd patches compiled with Heavy can only contain a subset of Pd vanilla objects. Using libpd, a patch can be run immediately, as soon as it is copied over to the Beaglebone. When using Heavy, you have to re-compile the patch every time you modify it, which may take up to one minute and requires an internet connection. In turn, code generated by Heavy runs much faster than libpd, especially when compiled with Clang.
The inputs and outputs are handled the same way for both Heavy and libpd.
Libpd on Bela is a port of the original libpd with a few minor modifications to make it run smoothly in Bela's Xenomai environment. Libpd patches can be compiled from the IDE or from the command line using the supplied build scripts.
The original libpd implementation reads files and sockets at every audio callback from within the audio thread, which is bad practice in general, and particularly in the case of Bela, as this causes mode switches in the audio thread.
The file and socket input has therefore been moved to a separate thread so that it does not interfere with the audio thread.
Another thing that changed is the minimum block size, which is now 16 samples per block (vs the 64 of stock Pd/libpd).
Actual block size can be adjusted at runtime using the -p command line parameter.
Accepted values are 16, 32, 64, 128, default is 16.
-
You can run any PureData example simply by selecting it and hitting the run button, just like any other project. When you open the example, the
_main.pdfile will be previewed in the browser window. At this point, it is not possible to edit the file in the browser. -
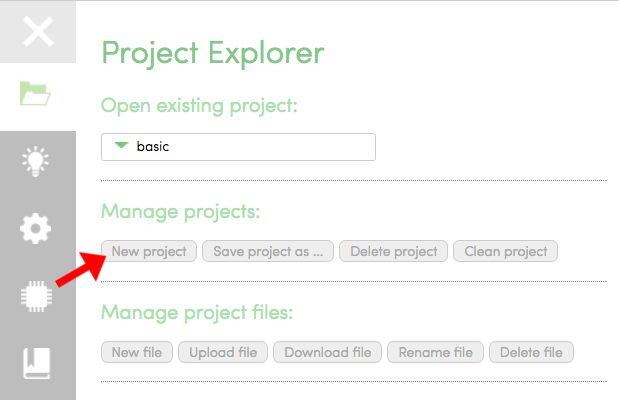
To start a new libpd project in the browser IDE navigate to the
Project Explorertab and clickNew Project. You will then be presented with a dialogue allowing you to choose between a C++ or a Puredata project. Select Puredata.
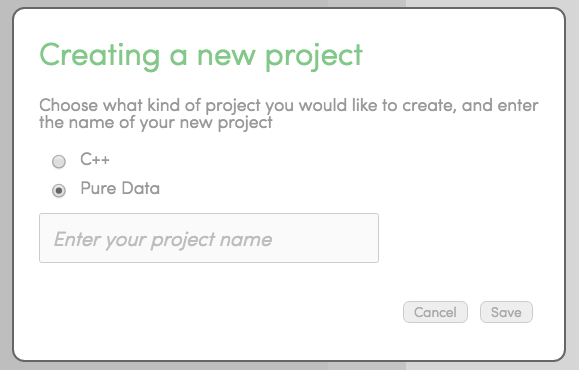
- You can now simply drag-and-drop the from your PD patch into the browser IDE, replacing the default
_main.pdfile in the folder. Note that the top-level patch needs to be named_main.pd. To edit existing examples or write your own patches, you will need to install PureData on your computer. Get the latest version of Pd from here: http://puredata.info/downloads/pure-data
To run Pd patches on Bela using libpd, you simply have to compile any project that contains a _main.pd file and run it.
You need to have the libpd.so file installed in /usr/lib on your BBB in order to be able to run projects with libpd.
This is provided with the Bela image and is updated through the update_board script.
Heavy relies on an online Pd-to-C compiler. The Pd patch and the related abstractions and audio files are uploaded to the Heavy server and then downloaded on Bela, where they are compiled into machine code. The use of the compiler is subject to Enzien Audio's terms and conditions and the generated C code is subject to the MIT license for non-commercial use.
Follow the following steps to get everything up and running on your computer to compile PureData patches with Heavy and run them on your Bela board. Commands below must be run in a terminal on your computer which has to be connected to the internet. If you are not familiar with the terminal, you can go through a minimal introduction to the use of the terminal.
-
Setup your machine
-
If you are on Windows, make sure you have a terminal emulator installed. We recommend the bash that comes with mingw, see more details here
-
Make sure python is installed:
-
Type
which pythonin a terminal window. If not installed, follow instructions here: https://wiki.python.org/moin/BeginnersGuide/Download -
Install the most up-to-date version of the requests python package (version 2.7.0). You can get it from http://docs.python-requests.org/en/latest/user/install/ or typing the following in a terminal window (make sure it is not currently installed):
-
curl -OL https://github.com/kennethreitz/requests/zipball/master && unzip master && cd requests* && sudo python setup.py install
if the above does not work, try this:
curl "https://bootstrap.pypa.io/get-pip.py" -o "get-pip.py"
sudo python get-pip.py #install pip packet manager for python
sudo pip install requests
-
Download the Bela code from https://github.com/BelaPlatform/Bela/archive/master.zip
- Extract the archive (and remember where you extracted it to)
-
Create an account on enzienaudio.com:
-
Click Login on the top right corner of the page
-
Create a new account
-
Create a new patch and call it bela (N.B. compiling won't work if you use a different name)
-
go to https://enzienaudio.com/getmytokens/ and create a new token. This will be used for authentication and will be requested upon first usage of the Heavy services.
-
Compile your first project
-
Make sure the Beaglebone is plugged in and open a terminal window:*
-
Navigate to the scripts folder on your computer (where you extracted it earlier)
cd /path/to/Bela/scripts -
If running for the first time, make sure you update your board to the same revision of Bela that you downloaded by executing:
./update_board -
./build_pd_heavy.sh ../examples/08-PureData/hello-world/This script compiles your project, uploads it to the Beaglebone and starts it. More details can be found [here](Interact with Bela using the Bela scripts#build_pd_heavypd). Note: as mentioned above, the first time you run this you will need a user token you can obtain here.
-
-
Create a new pd project
- create folder with at least a file
_main.pd: this is the entry point of your patch. You can then use abstractions if you like.
- create folder with at least a file
-
Make sure you aren't using any unsupported objects. For a full list of objects go to https://enzienaudio.com/docs/pdobjects.html
-
The Pd patch must exist in its own folder and be named _main.pd.
-
See the example pd patches for more information.
You can also access the slides from the latest Bela workshop on compiling Pd patches at the following link: https://goo.gl/59hShW This also includes some handy tips for handling Bela's sensor inputs using Puredata.
As with above we use adc~ for audio and analog input and dac~ for audio and analog output. With the CTAG cape as you have additional audio channels the numbering of the channels shifts.
Have fun!