CUSTOM TRAINING EXAMPLE (OLD) #192
Comments
|
I trained and tested mnist data by using this tutorial. Thank you for guidance. |
|
Hi @glenn-jocher , I am trying to train on my custom dataset and I get the following error
Can you please let me know the fix for this error? I see that 'model' class in utils.py does not have an attribute 'hyp'. I followed all the steps outlined in order. Thanks. |

I tried on coco_10img.data; I get the same error. |
|
@akshaygadipatil the Also, what happens if you simply run |
|
@akshaygadipatil the example executes correctly on CPU and single GPU. Your issue may be multi-GPU related (you did not specify in your post). If so, python3 train.py --data data/coco_1img.data
Namespace(accumulate=1, backend='nccl', batch_size=16, cfg='cfg/yolov3-spp.cfg', data_cfg='data/coco_1img.data', dist_url='tcp://127.0.0.1:9999', epochs=273, evolve=False, img_size=416, multi_scale=False, nosave=False, notest=False, num_workers=4, rank=0, resume=False, transfer=False, var=0, world_size=1)
Using CPU
layer name gradient parameters shape mu sigma
0 0.conv_0.weight True 864 [32, 3, 3, 3] -0.00339 0.0648
1 0.batch_norm_0.weight True 32 [32] 0.987 1.07
2 0.batch_norm_0.bias True 32 [32] -0.698 2.07
3 1.conv_1.weight True 18432 [64, 32, 3, 3] 0.000298 0.0177
4 1.batch_norm_1.weight True 64 [64] 0.88 0.389
5 1.batch_norm_1.bias True 64 [64] -0.409 1.01
...
223 112.conv_112.weight True 65280 [255, 256, 1, 1] 0.000119 0.0362
224 112.conv_112.bias True 255 [255] -0.000773 0.0356
Model Summary: 225 layers, 6.29987e+07 parameters, 6.29987e+07 gradients
Epoch Batch xy wh conf cls total nTargets time
0/272 0/0 0.192 0.105 15.3 2.36 18 4 5.58
Class Images Targets P R mAP F1
Computing mAP: 100%|████████████████████████████████████████████████████████████████| 1/1 [00:01<00:00, 1.90s/it]
all 1 6 0 0 0 0
person 1 3 0 0 0 0
surfboard 1 3 0 0 0 0
Epoch Batch xy wh conf cls total nTargets time
1/272 0/0 0.218 0.0781 15.3 2.36 17.9 5 8.2
Class Images Targets P R mAP F1
Computing mAP: 100%|████████████████████████████████████████████████████████████████| 1/1 [00:01<00:00, 1.64s/it]
all 1 6 0 0 0 0
person 1 3 0 0 0 0
surfboard 1 3 0 0 0 0
Epoch Batch xy wh conf cls total nTargets time
2/272 0/0 0.165 0.0669 14.7 2.31 17.2 5 7
Class Images Targets P R mAP F1
Computing mAP: 100%|████████████████████████████████████████████████████████████████| 1/1 [00:01<00:00, 1.49s/it]
all 1 6 0 0 0 0
person 1 3 0 0 0 0
surfboard 1 3 0 0 0 0 |
|
@glenn-jocher, thanks! To be in sync, I tried with the latest changes in the repo.
|

|
Hi @glenn-jocher , Ran into a problem- requesting help: When I run Can you help me solve this? |

Never mind, I should have changed line 67 instead of 87 (in train.py).
And the error was gone after my fix and the training began ( this was all yesterday). |
|
@akshaygadipatil as the README clearly states https://github.com/ultralytics/yolov3#training Start Training: |
|
@glenn-jocher Hi Glen didn't know that this custom training exist. Thanks for the reply earlier, I just abit confuse on how we actually train. when we run
are we actually training the model to look for the bounding box of a random image(from coco dataset) because Im confused with step 1 and 2; where 1 you convert your data into darknet format where it consist of 1.jpg(image) and 1.txt(bounding boxes) but in 2 we actually train with our coco dataset, not our data set? since the text file is the path of images |
|
@Jriandono you need to create your own *.txt files pointing to your own list of training and testing images. |
|
I want to train custom data ,but the following error happened. I think my converted.pt was not correct ,i dont kown how to modify it ,please help me . |
|
@you don't need converted.pt to train custom data, you can start training from scratch (i.e. the darknet53 backbone). Just run: |
Thank u so much for your kind reply. if i want to tranfer learning ,how to deal with that question?The converted.pt was created by convert.py in yolov3 |
|
@glenn-jocher I guess most probably it is due to my image input size. My images are all in the fixed size of 100x100. |

|
@Sam813 this may be related to a recent commit which was fixed. |
Hi @glenn-jocher, I have 3 classes, and also modified the data.cfg and *.cfg |

|
@Sam813 your custom data is not configured correctly. If you have 3 classes they should be zero indexed and the class counts in your cfg and .data file should correspond. The error message is saying you are stating 4 classes somewhere and it is not matching up with 3.
|
@glenn-jocher
all the Precision, recall and F1 are constantly 0. Yet, I can see the confidence is reducing true the training. |

|
@Sam813 you are plotting multiple runs sequentially, as results.txt is not erased between runs. If you have zero losses for bounding box regresions, it means you have no bounding boxes to regress, which likely means you have no targets at all, and that the repo can not find your training data. |
@glenn-jocher thank you for the help, Does it have any meaning for you? I guess the bounding boxes have been detected but the image is pure white? could you help to explain it a bit more? |

|
@Sam813 no this is not correct, your data seems to be missing the images. The
|

|
@glenn-jocher would mind give me an example about |
|
Dear glenn, |
|
Hi I could not find any way to fix it |
Hi, I got a same error, have you solved it yet? |
|
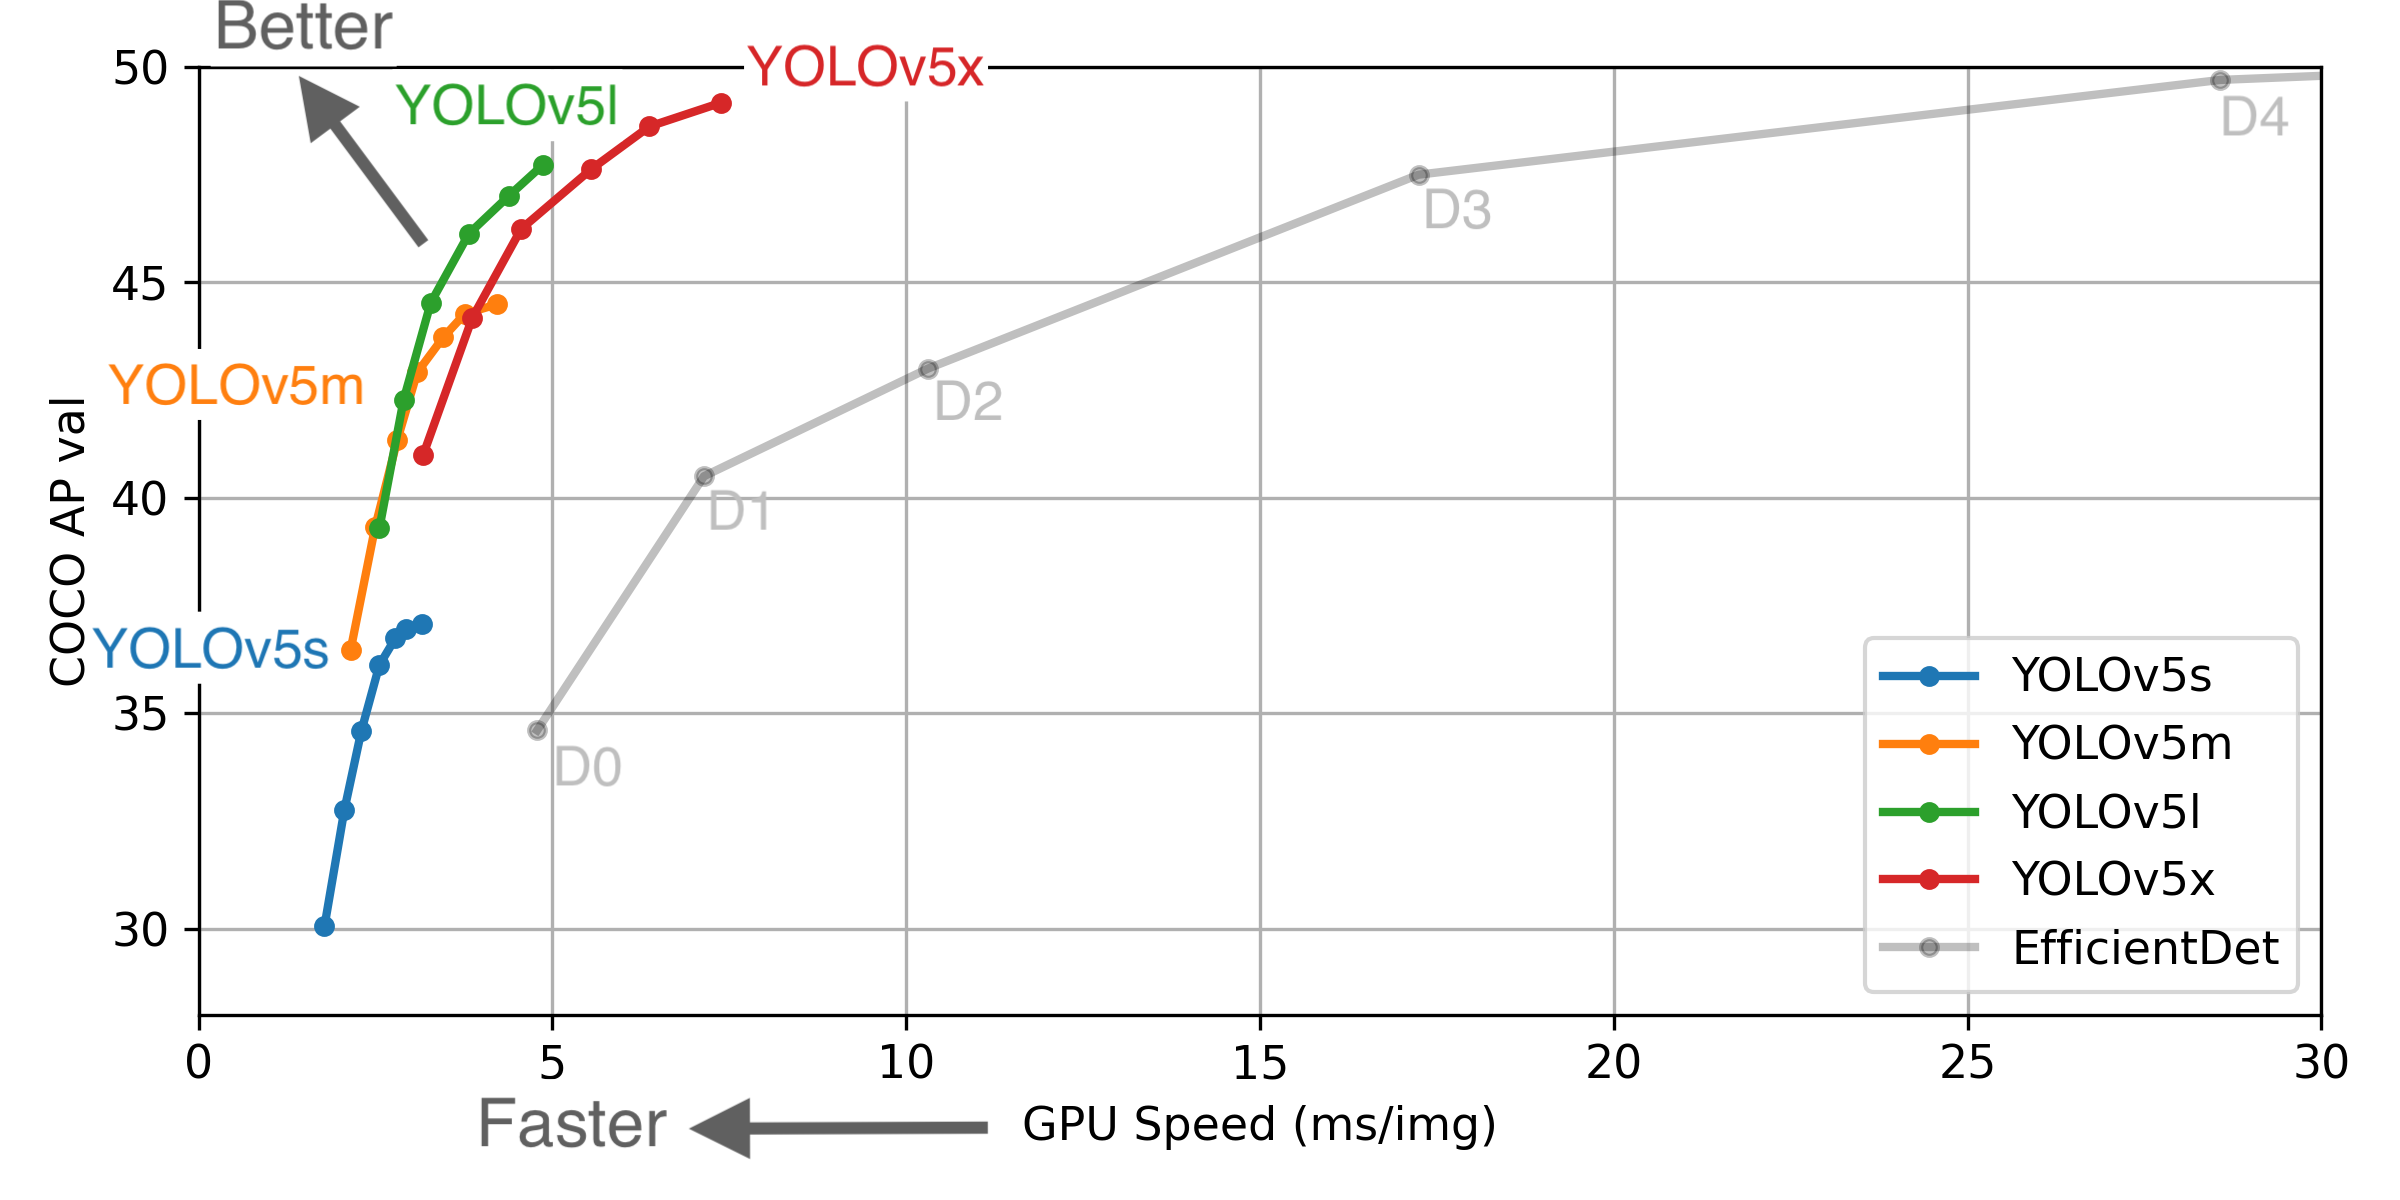
Ultralytics has open-sourced YOLOv5 at https://github.com/ultralytics/yolov5, featuring faster, lighter and more accurate object detection. YOLOv5 is recommended for all new projects. 
Pretrained Checkpoints
** APtest denotes COCO test-dev2017 server results, all other AP results in the table denote val2017 accuracy. For more information and to get started with YOLOv5 please visit https://github.com/ultralytics/yolov5. Thank you! |
Hi |
|
@glenn-jocher I have received your reply that the map errors of multiple Gpus have been fixed, but I can't get good results. I'm using Coco64 to test and it still doesn't work. You are using Coco64 for this tutorial, and can you give me the results for coco64 with multiple GPU training, which may take more than ten minutes |
|
@glenn-jocher Hello,bro. --weights '' will be remind '' missing,try downloading.... How to solve it? I'm looking forward to your answer |

|
@glenn-jocher Thank you. I love you ~~ |

|
@summeryumyee pushed a fix for this in cec59f1 |
|
@glenn-jocher Thank you very much!! After I replace the code, using -Weights "gives an error, but using -Weights "" can run the training program. I love you ~ |
|
@glenn-jocher oh!!!!! my idol!! Creators of Mosaic data augment!!! I have a question to ask you, this mosaic augment of the repo can blend in with Mixup?I want to simulate overlap and occlusion situation. |
|
@summeryumyee haha, thank you. Yes Mosaic and Mixup (and CutMix) can be used together. See ultralytics/yolov5#357 for an example. |
|
@glenn-jocher I trained with my own data. I only marked 1000 pieces of training for the first time, and then 1000 pieces for the second time. How can I continue to train 1000 pieces of training in the weight of the first training, instead of merging the first data into the second training again? thank you |
|
Hi, Doctor, I have trained 300 times with my data set, map is no longer promoted and I have saved weights. |
|
@honghande @Bingcor I would highly recommend starting from YOLOv5 rather than v3. For more information and to get started with YOLOv5 please visit https://github.com/ultralytics/yolov5. Thank you! |
|
This issue has been automatically marked as stale because it has not had recent activity. It will be closed if no further activity occurs. Thank you for your contributions. |
|
This issue has been automatically marked as stale because it has not had recent activity. It will be closed if no further activity occurs. Thank you for your contributions. |
|
@ikramelhattab the trainloader will utilize all valid images in your supplied directory (2112 in total). If images are not appearing they may not be suitable image formats for training. The list of possible image formats is here. If your format is not here you might try adding it to the list, though there is not guarantee it will load correctly: |
|
@ikramelhattab then you should be all set. If all of your images are *.jpeg then they should all be detected and used for training. You should also make sure you are using the latest code from master. If you believe you have a reproducible issue, we suggest you close this issue and raise a new one using the 🐛 Bug Report template, providing screenshots and a minimum reproducible example to help us better understand and diagnose your problem. Thank you! |
|
I would like to use this guide to train yolov3 on my custom dataset. I have used self supervised model like BYOL to pretrain the weight for the first 10 layers. I would like yolov3 model use these weights for the first 10 layers and random initialization for the rest of it. Could you please let me know what changes I need to make to incorporate this method? |
This guide explains how to train your own custom dataset with YOLOv3.
Before You Start
Clone this repo, download COCO dataset, and install requirements.txt dependencies, including Python>=3.7 and PyTorch>=1.4.
Train On Custom Data
1. Label your data in Darknet format. After using a tool like Labelbox to label your images, you'll need to export your data to darknet format. Your data should follow the example created by
get_coco2017.sh, with images and labels in separate parallel folders, and one label file per image (if no objects in image, no label file is required). The label file specifications are:class x_center y_center width heightformat.x_centerandwidthby image width, andy_centerandheightby image height.Each image's label file must be locatable by simply replacing
/images/*.jpgwith/labels/*.txtin its pathname. An example image and label pair would be:An example label file with 5 persons (all class
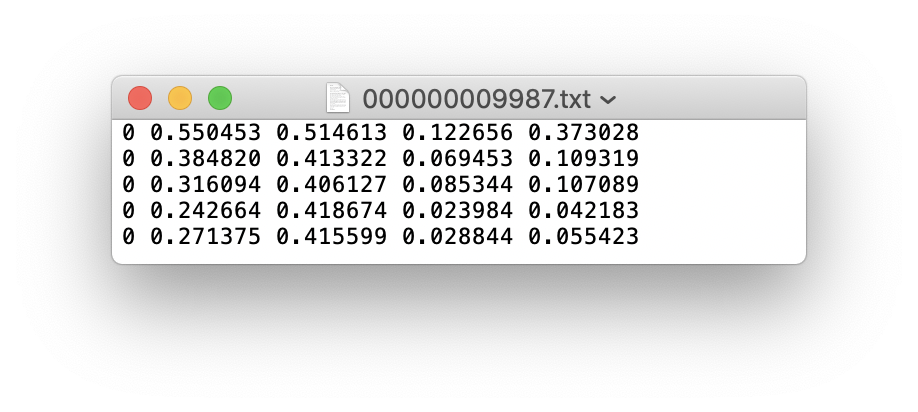
0):2. Create train and test

*.txtfiles. Here we createdata/coco16.txt, which contains the first 16 images of the COCO2017 dataset. We will use this small dataset for both training and testing. Each row contains a path to an image, and remember one label must also exist in a corresponding/labelsfolder for each image containing objects.3. Create new

*.namesfile listing the class names in our dataset. Here we use the existingdata/coco.namesfile. Classes are zero indexed, sopersonis class0,bicycleis class1, etc.4. Create new

*.datafile with your class count (COCO has 80 classes), paths to train and validation datasets (we use the same images twice here, but in practice you'll want to validate your results on a separate set of images), and with the path to your*.namesfile. Save asdata/coco16.data.5. Update

yolov3-spp.cfg(optional). By default each YOLO layer has 255 outputs: 85 values per anchor [4 box coordinates + 1 object confidence + 80 class confidences], times 3 anchors. Update the settings tofilters=[5 + n] * 3andclasses=n, wherenis your class count. This modification should be made in all 3 YOLO layers.6. (OPTIONAL) Update hyperparameters such as LR, LR scheduler, optimizer, augmentation settings, multi_scale settings, etc in
train.pyfor your particular task. If in doubt about these settings, we recommend you start with all-default settings before changing anything.7. Train. Run
python3 train.py --cfg yolov3-spp.cfg --data data/coco16.data --nosaveto train using your custom *.data and *.cfg. By default pretrained--weights yolov3-spp-ultralytics.ptis used to initialize your model. You can instead train from scratch with--weights '', or from any other weights or backbone of your choice, as long as it corresponds to your *.cfg.Visualize Results
Run
from utils import utils; utils.plot_results()to see your training losses and performance metrics vs epoch. If you don't see acceptable performance, try hyperparameter tuning and re-training. Multipleresults.txtfiles are overlaid automatically to compare performance.Here we see training results from
data/coco64.datastarting from scratch, a darknet53 backbone, and ouryolov3-spp-ultralytics.ptpretrained weights.Run inference with your trained model by copying an image to
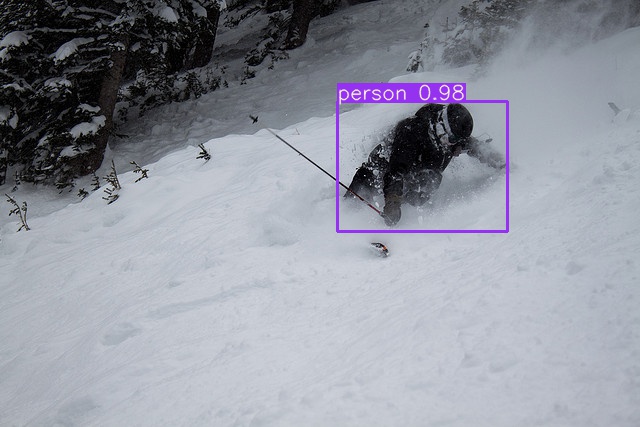
data/samplesfolder and runningpython3 detect.py --weights weights/last.ptReproduce Our Results
To reproduce this tutorial, simply run the following code. This trains all the various tutorials, saves each results*.txt file separately, and plots them together as
results.png. It all takes less than 30 minutes on a 2080Ti.Reproduce Our Environment
To access an up-to-date working environment (with all dependencies including CUDA/CUDNN, Python and PyTorch preinstalled), consider a:
The text was updated successfully, but these errors were encountered: