
Check out this video tutorial on the Makerbits channel or the original demo.
Easy setup using browser https://lnpos.lnbits.com
- Online LN payments (former LNPoS project)
- Offline LN payments (former LNURLPoS project)
- Offline LN withdraw links (LNURLATM)
- Optional onchain payments
- Lilygo TTGO/Tdisplay
- The Lilygo Keyboard specifically made for LNPoS => or get yourself the LNPoS Kit, dimensions 40x52x11mm e.g. in the LNbits shop
- 3.7V lithium iron flat battery with 1.25mm JST with < 1000 mAh to fit inside the standard LNPoS Kit
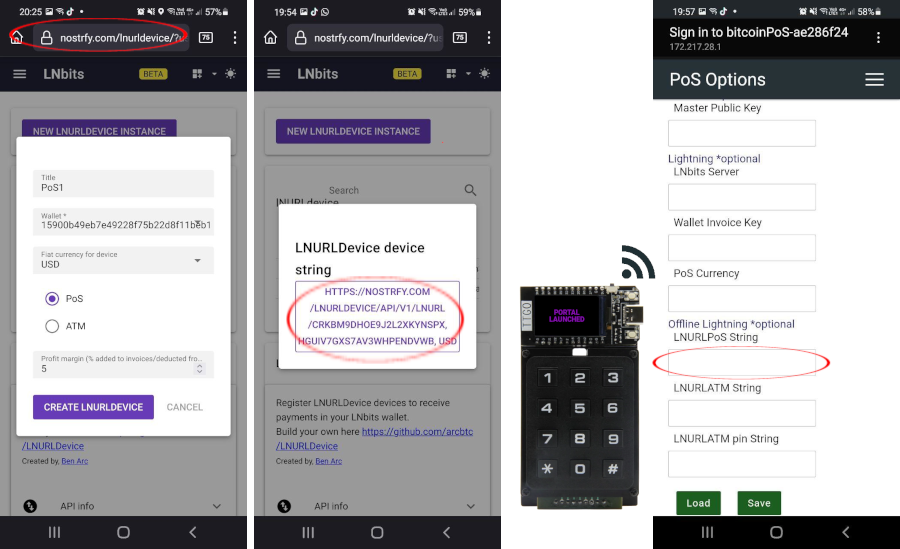
- LNbits LNURLdevice extension
Got questions ? Join us t.me/lnbits, t.me/makerbits
Launch portal and enter an LNbits endpoint (ie.legend.lnbits.com), invoice key, and a fiat currency to make things easier for product pricing.
Go to settings to lanch USB config mode or wifi access point
If using access point the device SSID default password is "ToTheMoon1"

A random pin generated on the device is encrypted and passed trough the payee. When the payment has been made the unencrypted pin is sent as a receipt. This function makes use of LNURL-pay protocol. Uses LNbits LNURLDevice extension.
Launch portal and enter the string from the LNURLDevice extension on LNbits
Use an xPub to generate a fresh address for every payment. Useful for large purchases. Includes a mempool.space QR so the payment can be verified.
Launch portal and enter BIP39 xPub and a pin, to make the function secure.

Create withdraw/faucet links. Uses more-or-less. This function makes use of LNURL-withdraw protocol. Uses LNbits LNURLDevice extension.
Launch portal and enter the string from the LNURLDevice extension on LNbits

-
Install Arduino IDE 1.8.19
-
Install ESP32 boards, using boards manager
-
Role back ESP32 boards to 2.0.1 in boards manager

-
Download this repo
-
Copy these libraries into your Arduino install "libraries" folder
-
Open this LNPoSTdisplay.ino file in the Arduino IDE
-
Select "TTGO-LoRa32-OLED-V1" from tools>board
-
Upload to device
Press/hold any button on the keypad during startup to launch portal. Default password is "ToTheMoon1" (without the quotes)
Note: If using MacOS, you will need the CP210x USB to UART Bridge VCP Drivers available here https://www.silabs.com/developers/usb-to-uart-bridge-vcp-drivers If you are using MacOS Big Sur or an Mac with M1 chip, you might encounter the issue
A fatal error occurred: Failed to write to target RAM (result was 0107), this is related to the chipsest used by TTGO, you can find the correct driver and more info in this GitHub issue
If you want to build something new from the parts, check out the LNbits wiki to see some examples.