Connecting a camera
The first step is connecting a camera feed to you computer, refine its parameters and check whether it meets the requirements for good tracking. You can also use a phone.
OPTIMAL CAMERA FEATURES:
- Resolution: A resolution of 720p is usualy optimal. 480p can work, but you will have reduced range of detection.
- FPS: While 60fps can help, it is not necesary. 30fps cameras are enough.
- FOV: Any will work, but low FOV cameras will reduce your play space. 90° or more is preferred in order to cover your whole playspace if you put it into a corner.
- The most important feature of your camera is MANUAL EXPOSURE CONTROL. Not having this feature means that your camera will have motion blur, which will break detection when you move.
Try whatever camera you have before buying any specificaly for this!
This step is probably the most complex, since you will have to find out what works best for you. Each of the methods has its pros and cons, so try them out and see what works best. If you know of any other option, feel free to use that!
This tutorial only outlines the methods to connect a camera, and their pros and cons. If you have problems related to these, you should refer to their official tutorials. You should get it working before continuing with the tutorial.
A quick comparison of diffrent methods can be found in the Camera method comparison
Below are tutorials for USB webcams, and for the Android app IP-Webcam. Make sure you get it working as optimal as you can before continuing!
To select which camera to open, use the IP/ID of camera parameter. To check whether it is opened properly, press the Open camera button and check the Camera preview checkbox.
Don't forget to set the Quad decimate parameter as well! Good values are 1 for 480p, 2 for 720p and 3 for 1080p. You will refine this parameter later.
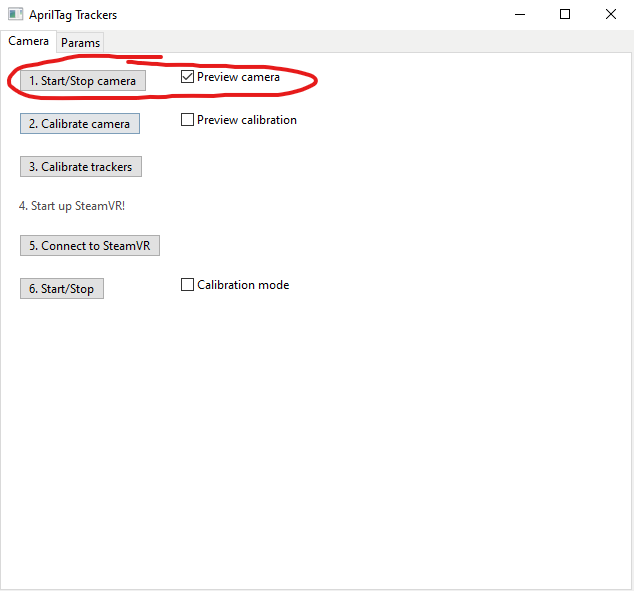
When camera is opened properly, you will see its resolution and fps in the upper left corner. Make sure it is correct!
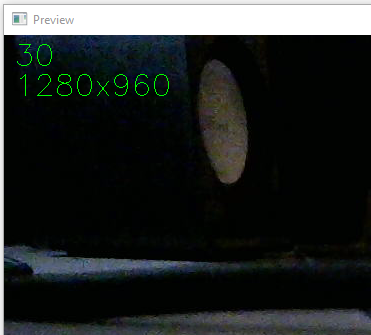
We must ensure the camera is opened correctly. The preview window is not scaled - if you use a 1080p camera, the window will be over the whole screen. If its too small or has black bars around it, we have to fix it. First, enter the correct width and height parameters.
If that doesn't work, or the window still has black bars despite being larger, we have to look at the camera api. Changing it to DirectShow, so 700, should fix the resolution problem. But the camera may now have a low fps - in that case, drop the resolution down to 720p.
If the camera does not work no matter the parameters, you may open it through OBS, then stream it through the virtualcam plugin.
This is not enough to ensure good tracking however - we still have to remove as much motion blur from the camera as we can, or tracking will fail when we move. To do this, we have to lower the exposure of the camera. First step, if the camera supports 60fps, set it here.
Then, there are a couple of options to set exposure based on your camera. First is on your camera software - some cameras, like logitech, have their own software where you can set exposure and gain. Second, if you use the directshow api, you can set open camera settings, save, open camera - settings should show up. Third, you can check the enable bottom 3 options, and write the values there.
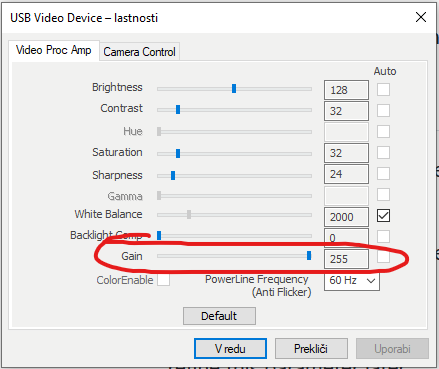
For the actual settings, we first have to disable autoexposure. On the settings window this will be a checkbox, in the params tab its usualy 0. For exposure, this value is usualy in exponents of 2. We want at least 8ms, which is -7, but idealy 4ms, or -8. For gain, just set it high enough that the image looks normaly bright.
Once that is set, there is one more parameter to look at - you can check the Rotate camera parameters to rotate the camera sideways. This will give you more vertical space, meaning you can be closer to the camera.
For IP Webcam, you can set resolution in the app - try to have a 4:3 aspect ratio, around 800x600 works best. Use portrait mode if you use all three trackers, and landscape
In the downloaded folder, in /utilities, there is a set_exposure.bat script. Edit it, writing in your cameras IP adress, and the desired exposure - test a few to find the one with the best brightness, but it should be under 10 ms, or 10000 ns.
Running this script will now set the exposure of your phones camera, if your phone supports it.