This guide helps you using Firebase Authentication with React and Spring Boot.
At the end of this guide you will be using Firebase Authentication, Cloud Firestore, React, and Spring Boot. Also, we will create a Docker image to deploy our whole application.
- Creating a Firebase Application
- React App
- Spring Boot App
- Redux and Saga
- Serving React App from Spring Boot
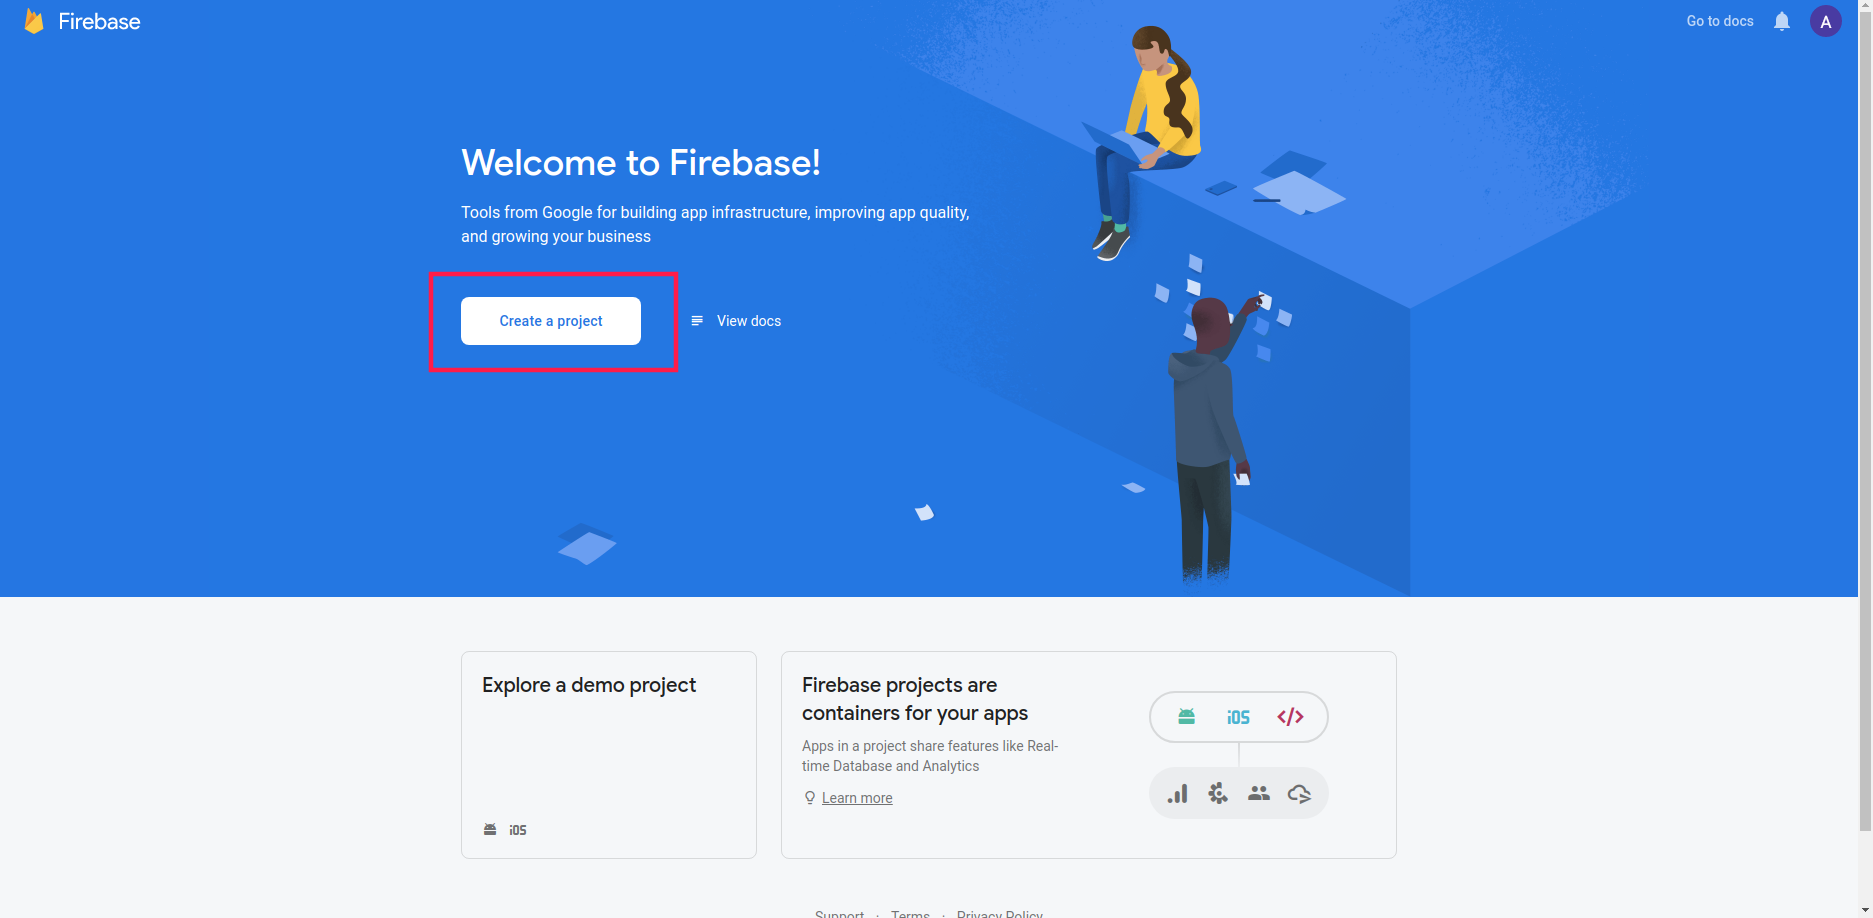
Start with a creating Firebase app by clicking "Create a Project" on Firebase Console. When we click this button the Firebase setup will begin. There are 3 steps in this setup.
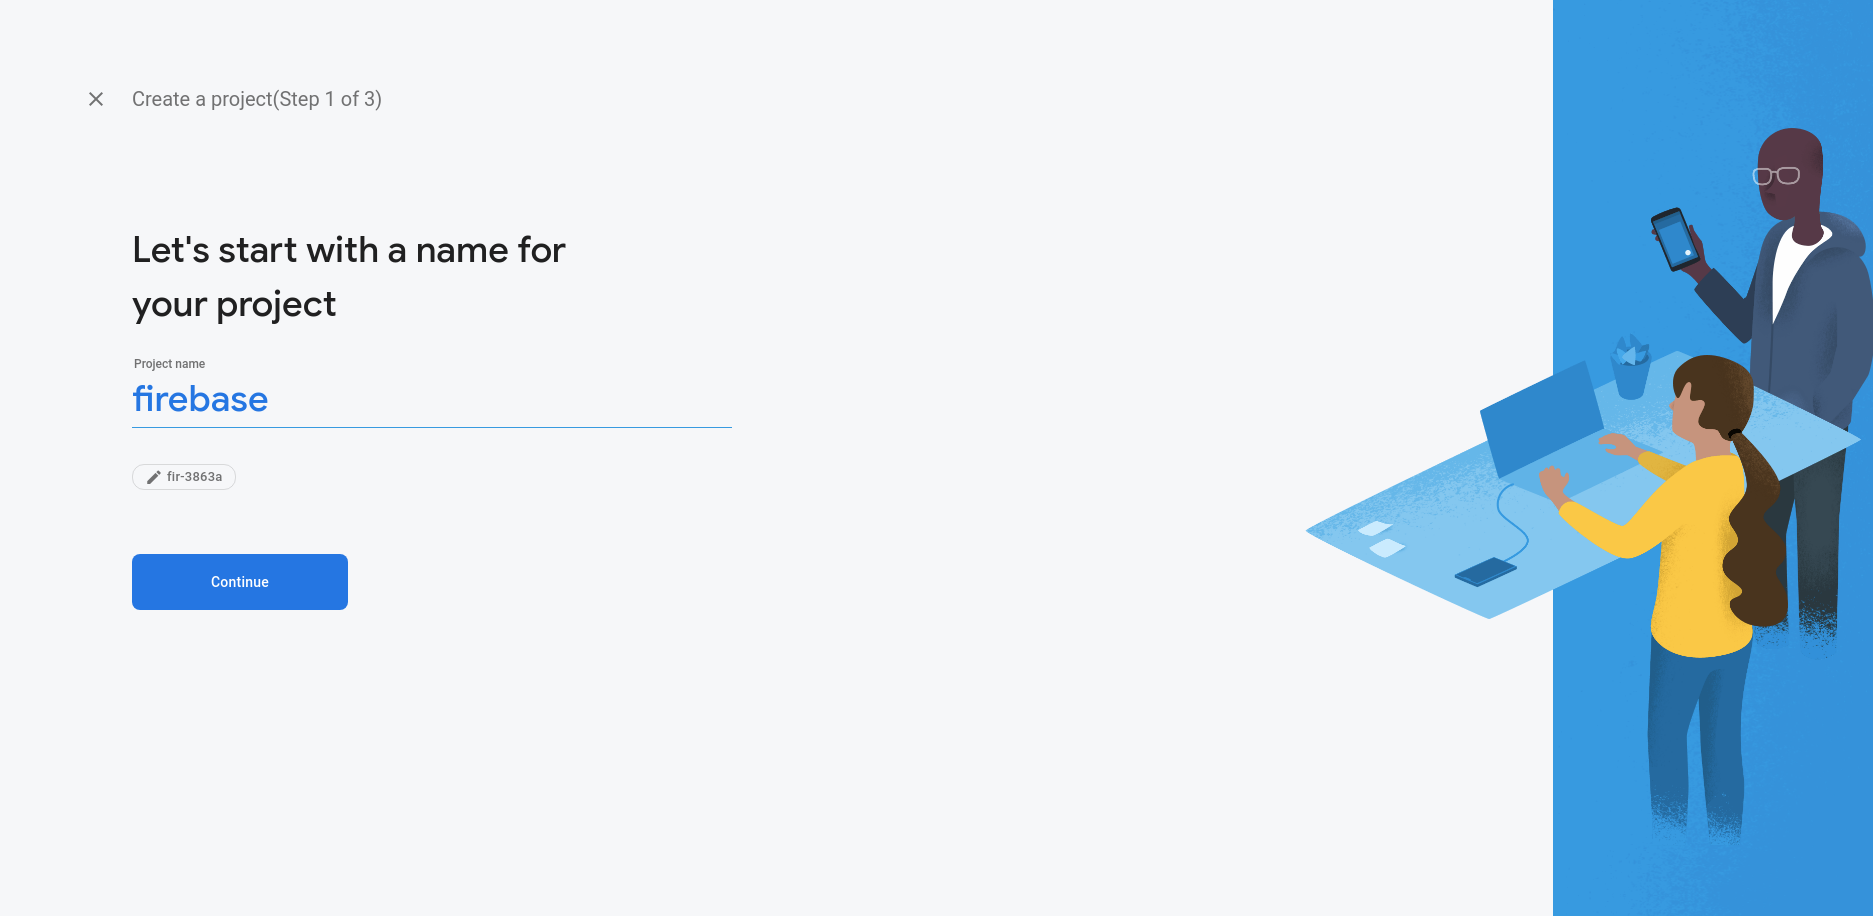
In Step 1 you must give a name for your project.
In Step 2 configure Google Analytics for your project. In this app, we are not going to use Google Analytics.

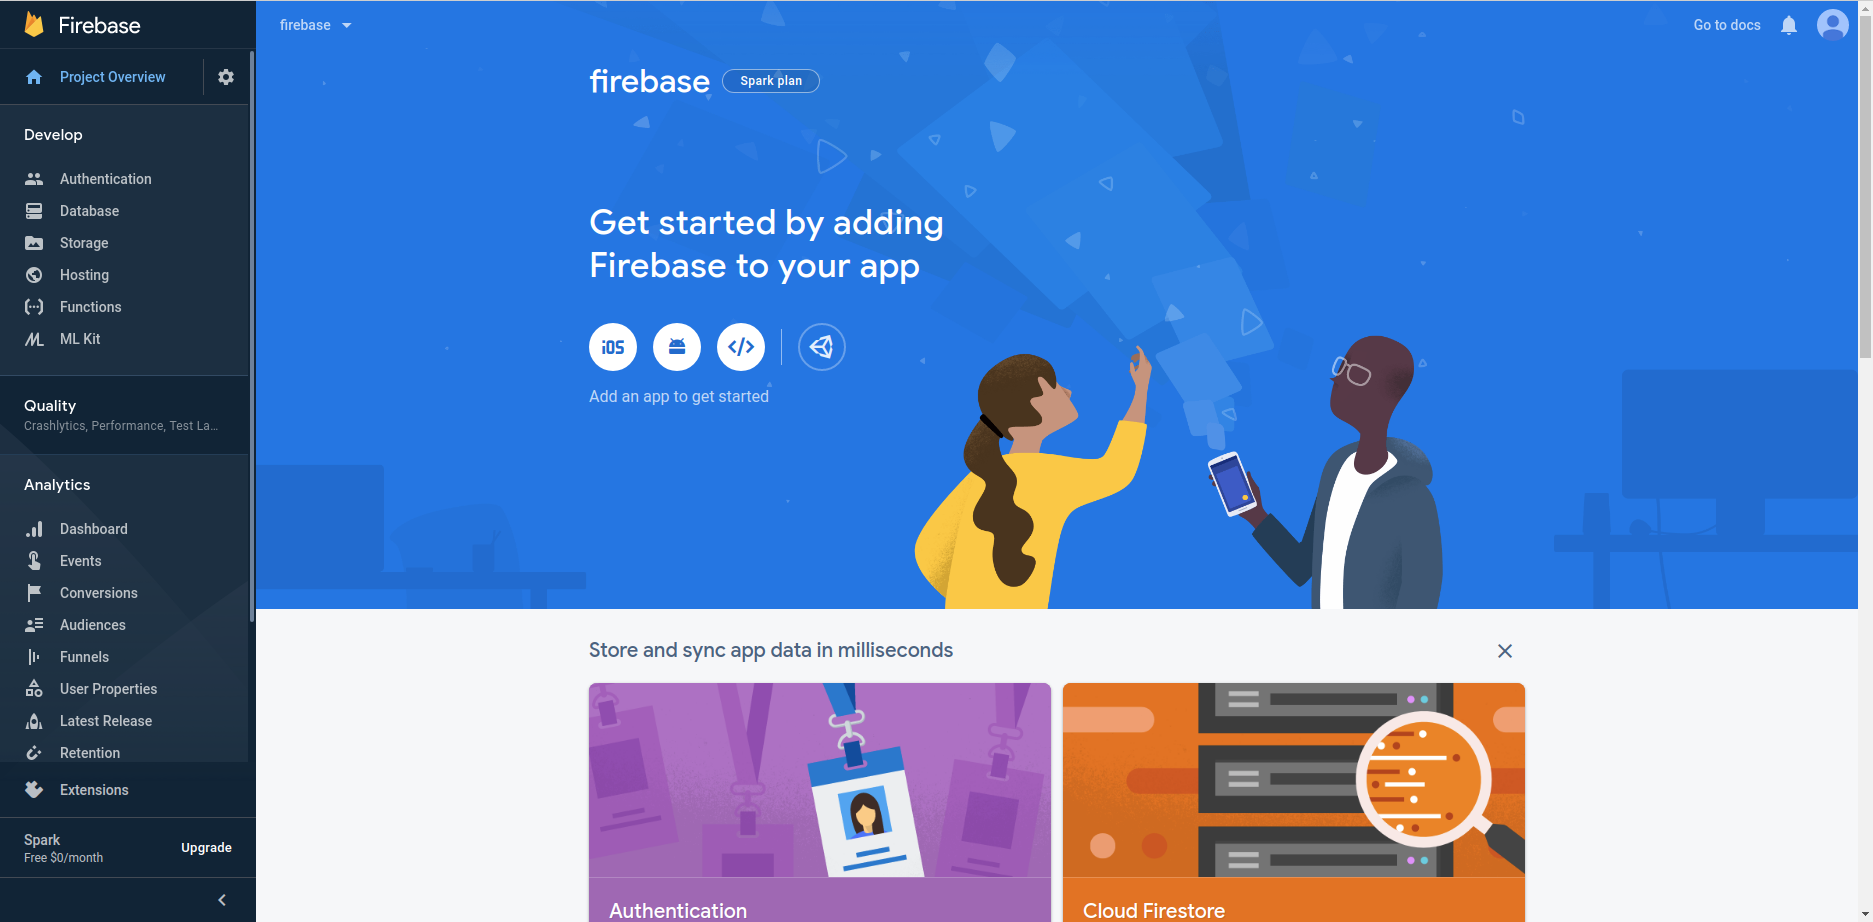
After the steps completed setup will redirect us to the Firebase Dashboard. Click the settings left to the "Project Overview" and go to Project Settings.
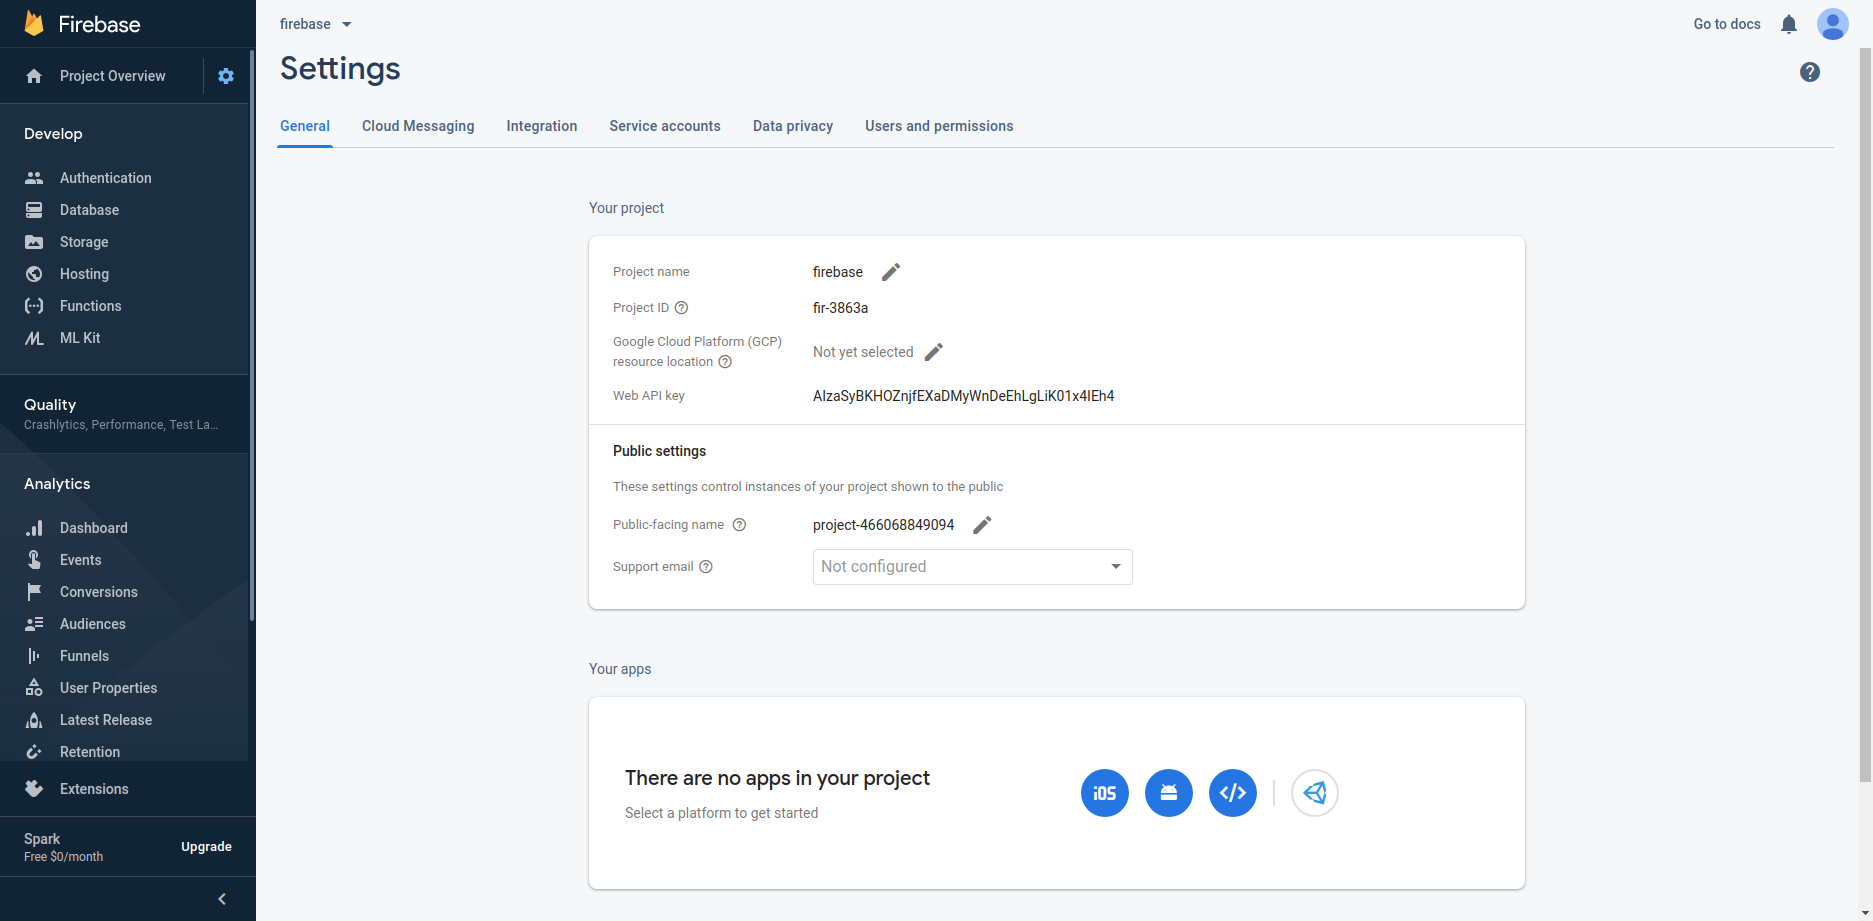
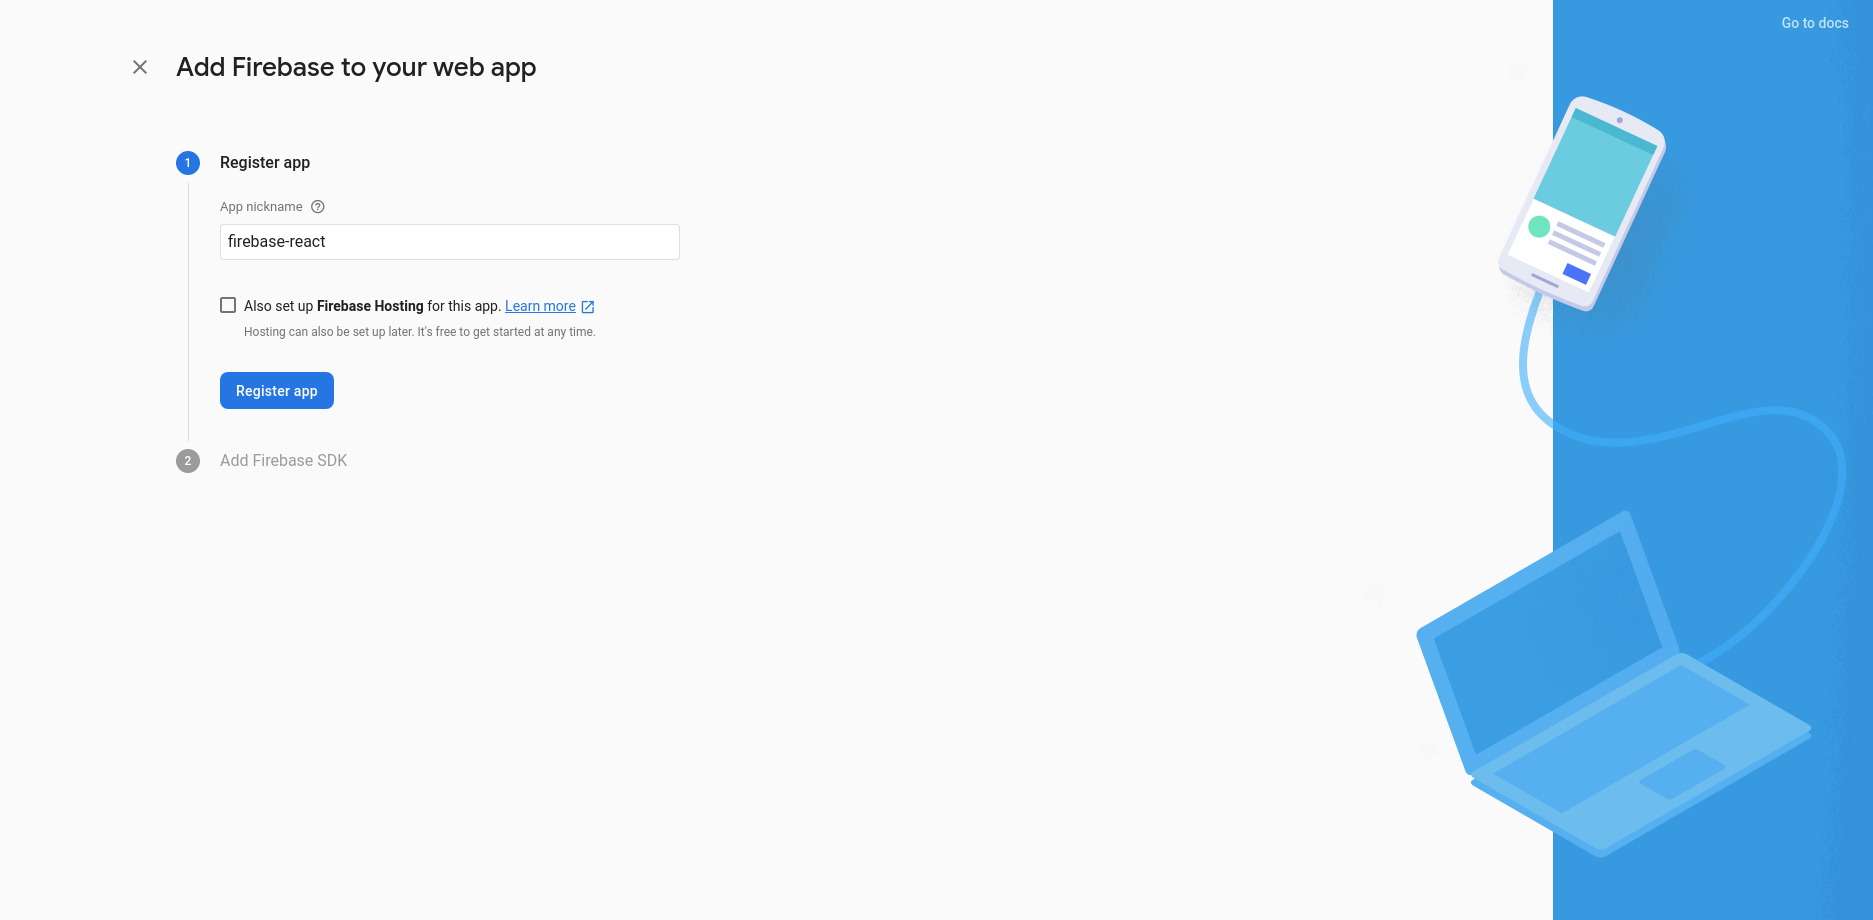
In the General section, you will see some project information and your apps. Create a web application by selecting a platform. Click the </> icon.
Then give an app nickname for your app. Do not enable Firebase Hosting.
When you register the app Firebase will give you config for using Firebase services. In this step click the "Continue to the console" button.
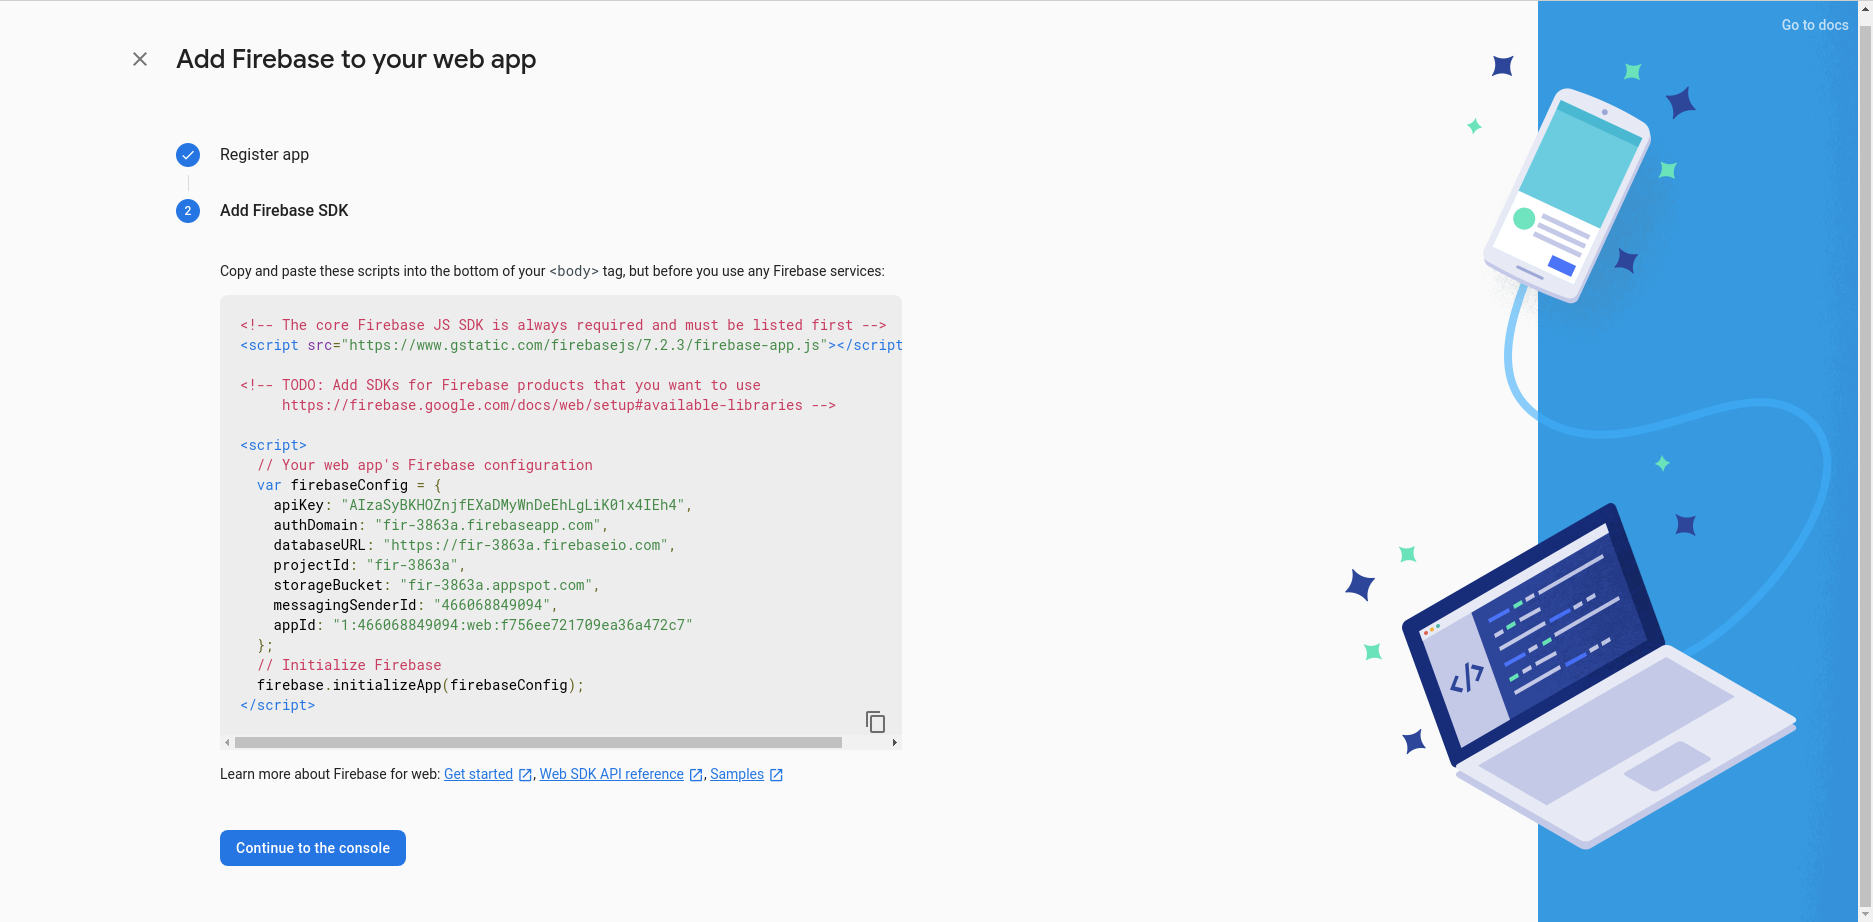
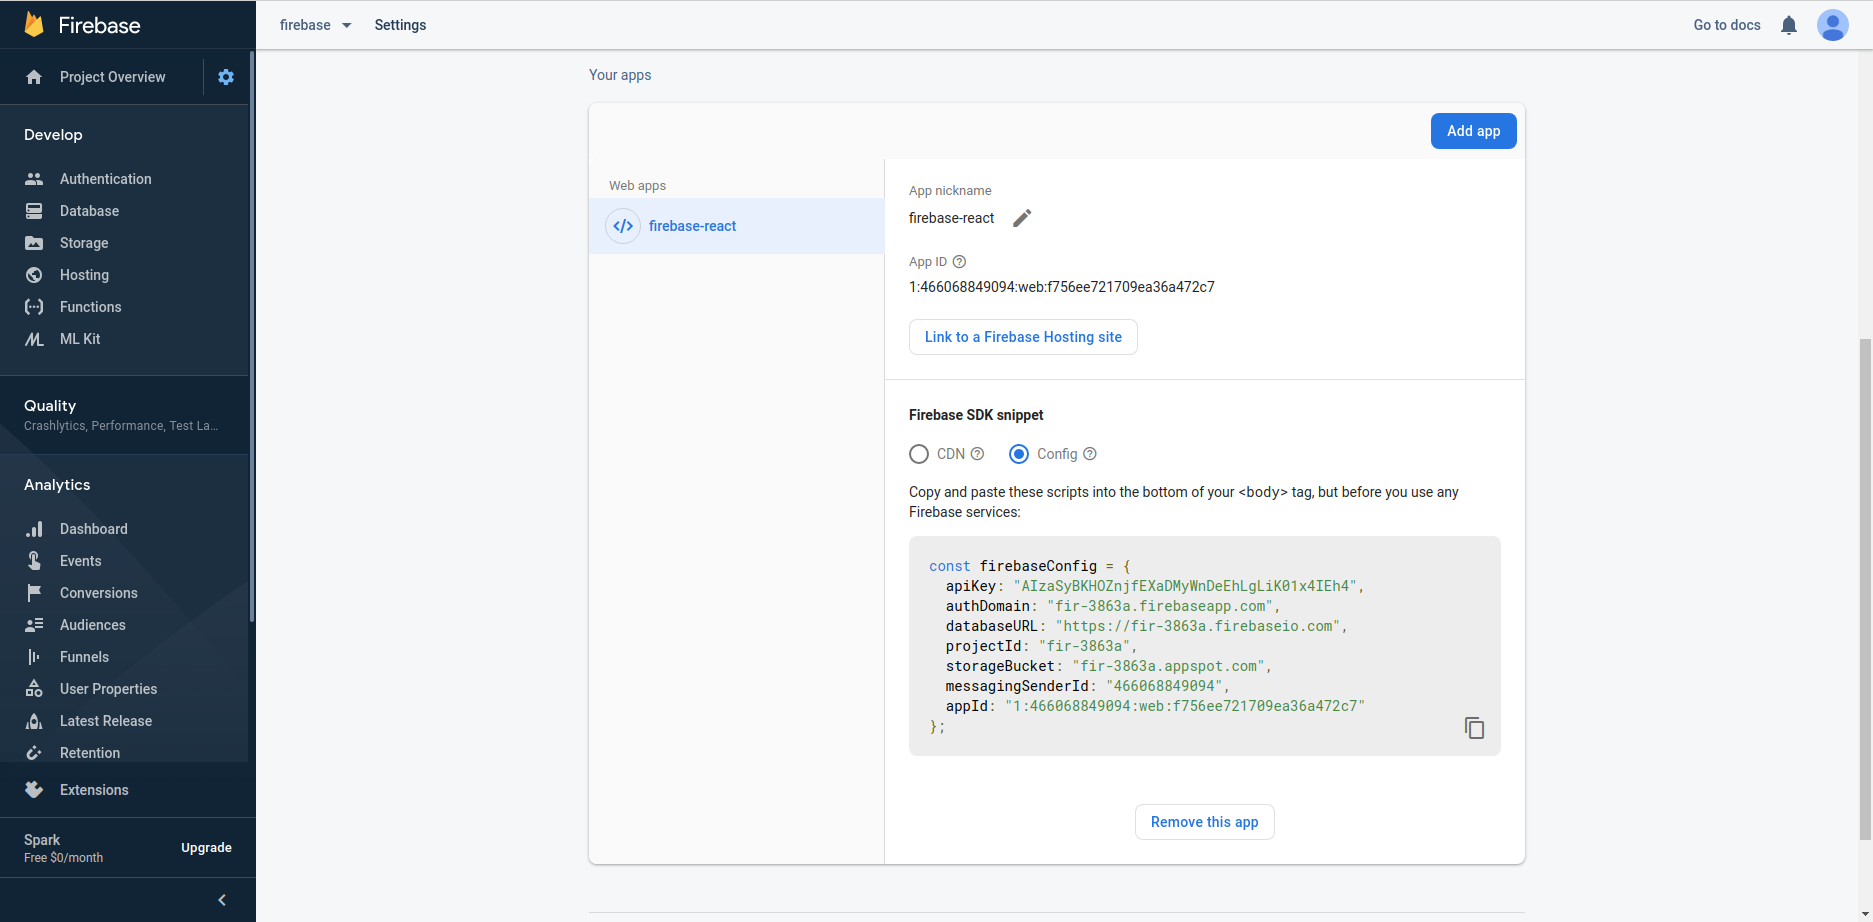
In the General section, you will see the information about your web app. Also, you will see Firebase SDK snippet on the Config area. We will use this config in our React app.
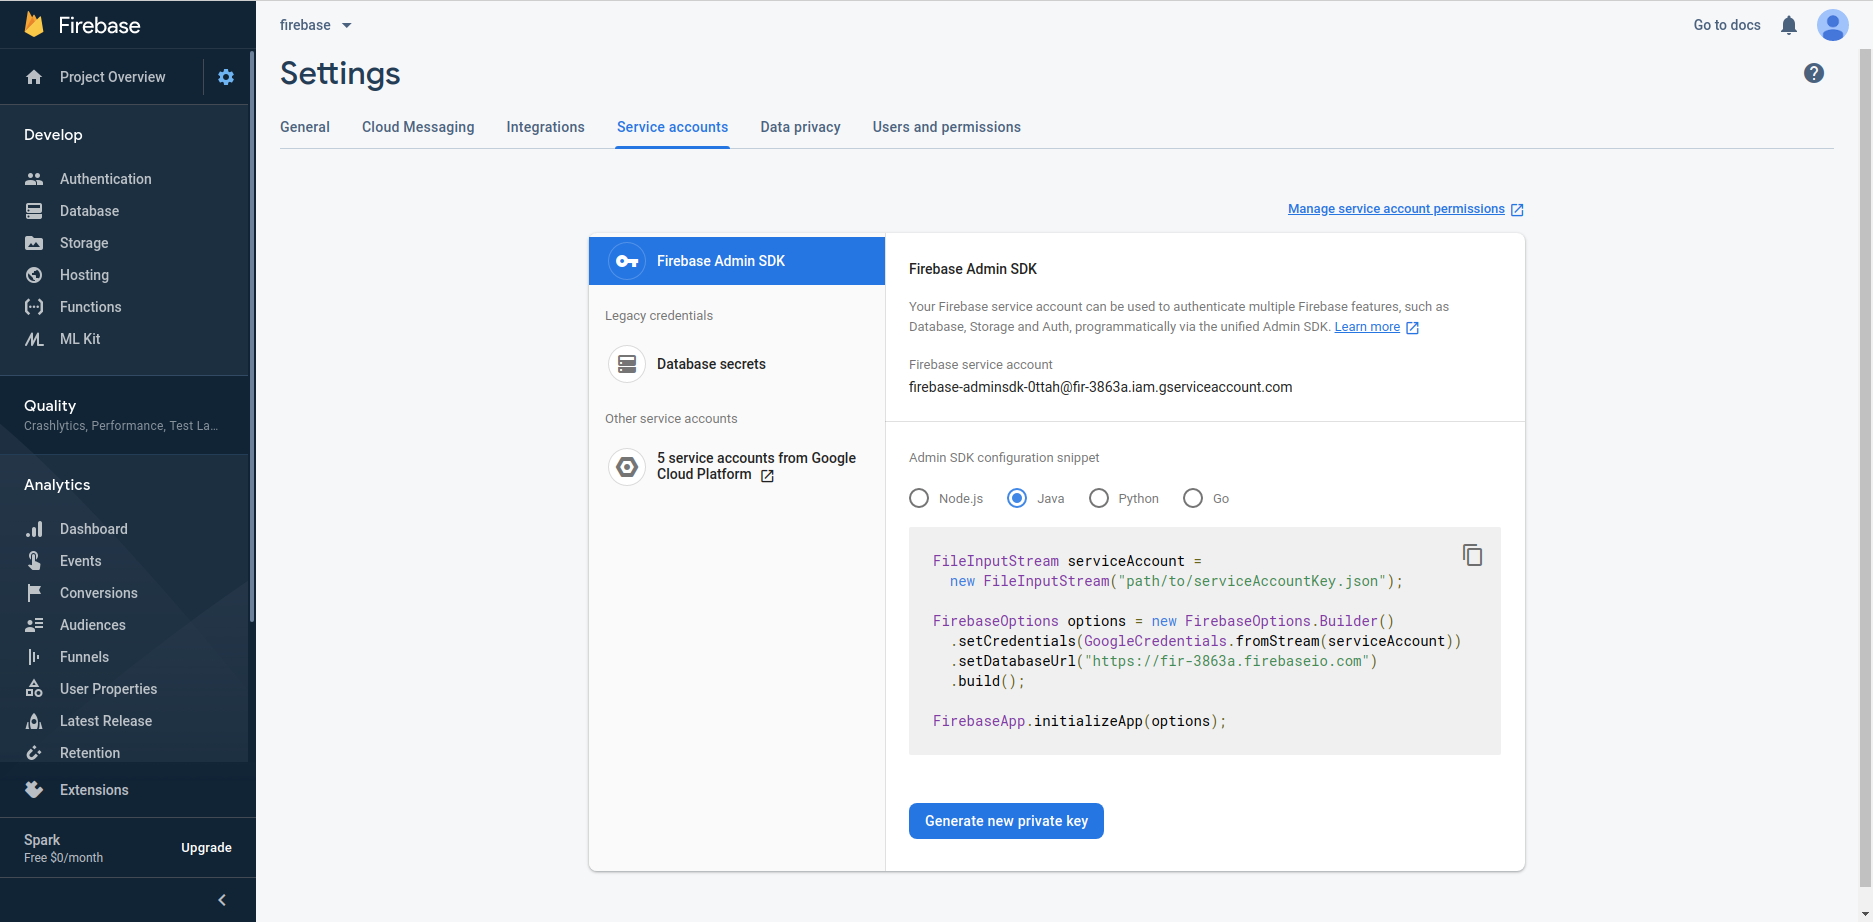
Go to the Service Accounts tab on the same page. Generate a new private key for Java. We will use this key in our Spring Boot application. Don't lose it.

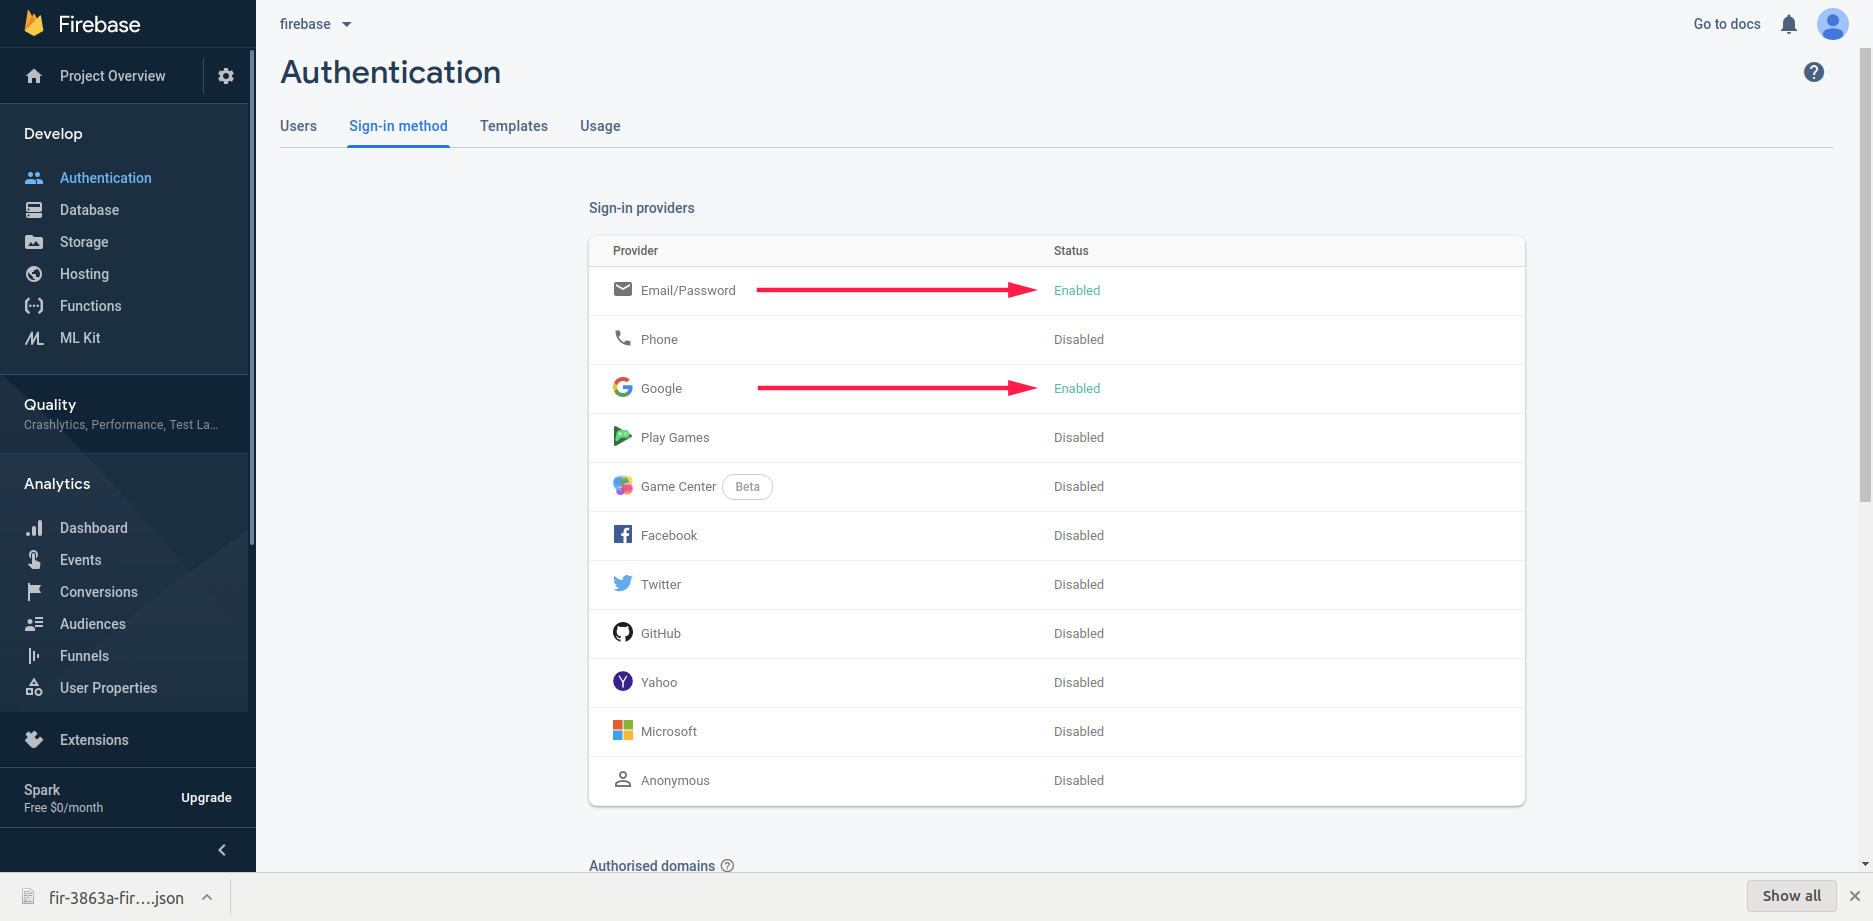
We will configure the Authentication/Sign in methods in order that users can be login. Navigate to the Authentication tab and set up the Sign-in method. Set enable Email/Password and Google for sign-in method. If you have another sign-in method like Facebook or Twitter you can enable these accounts too.
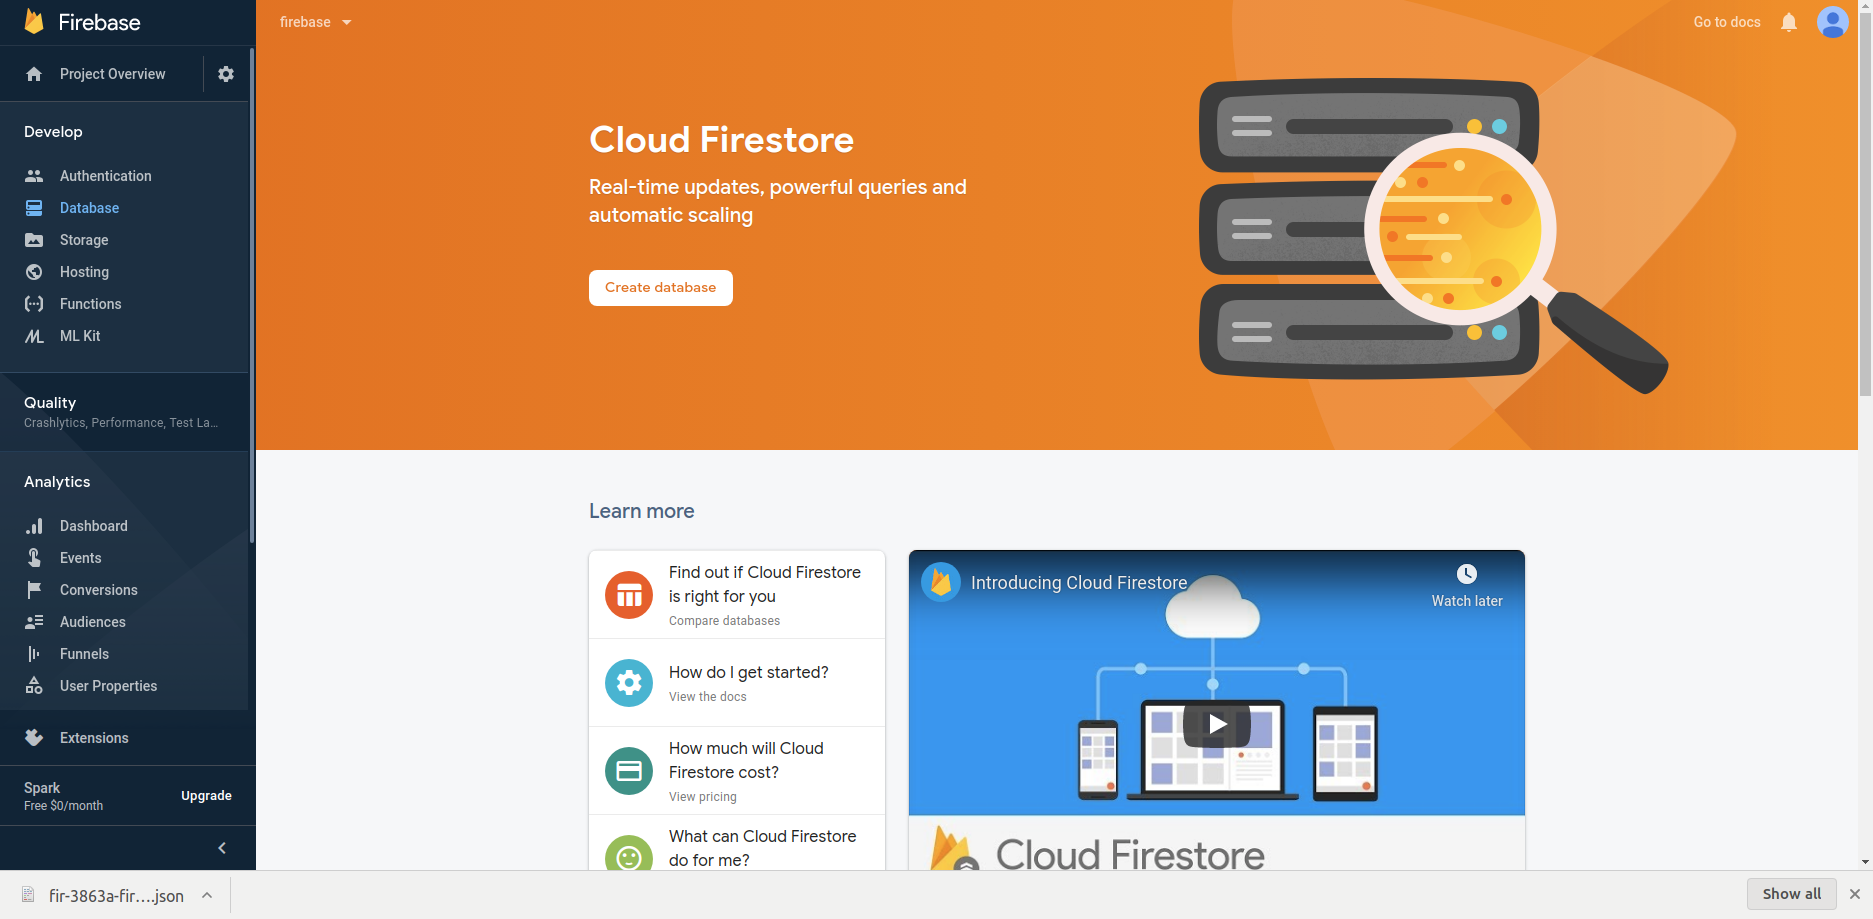
Our last process is activating the Cloud Firestore. Navigate to the database section and create a database.
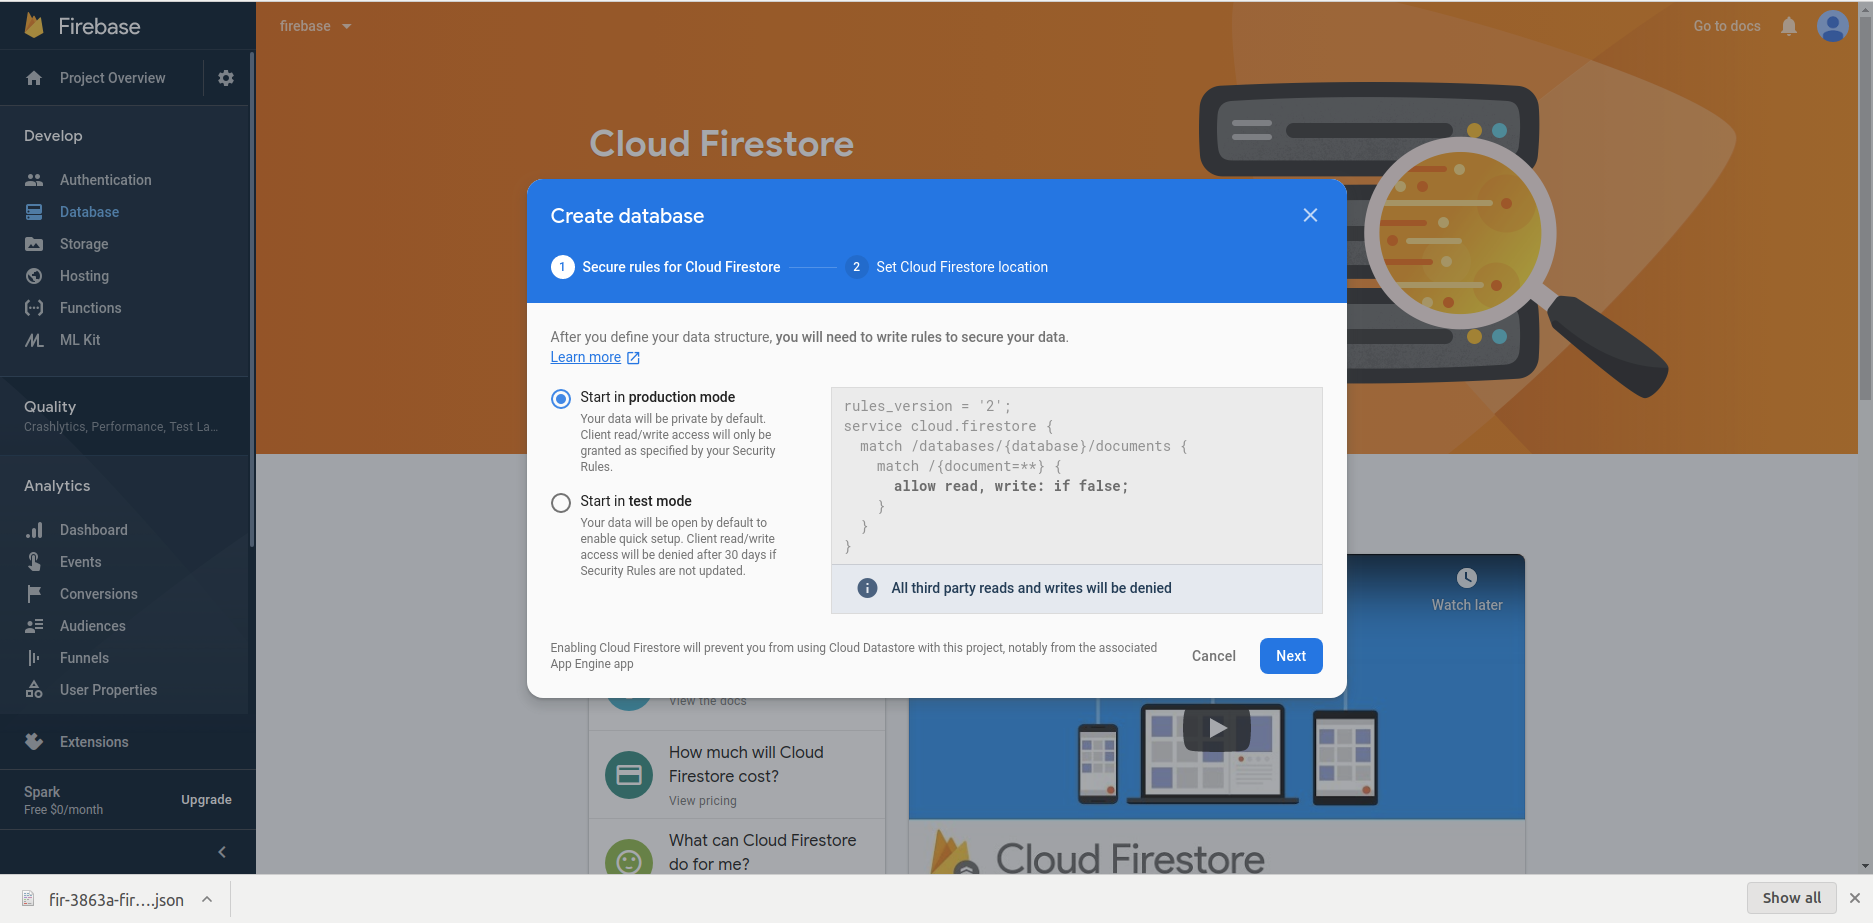
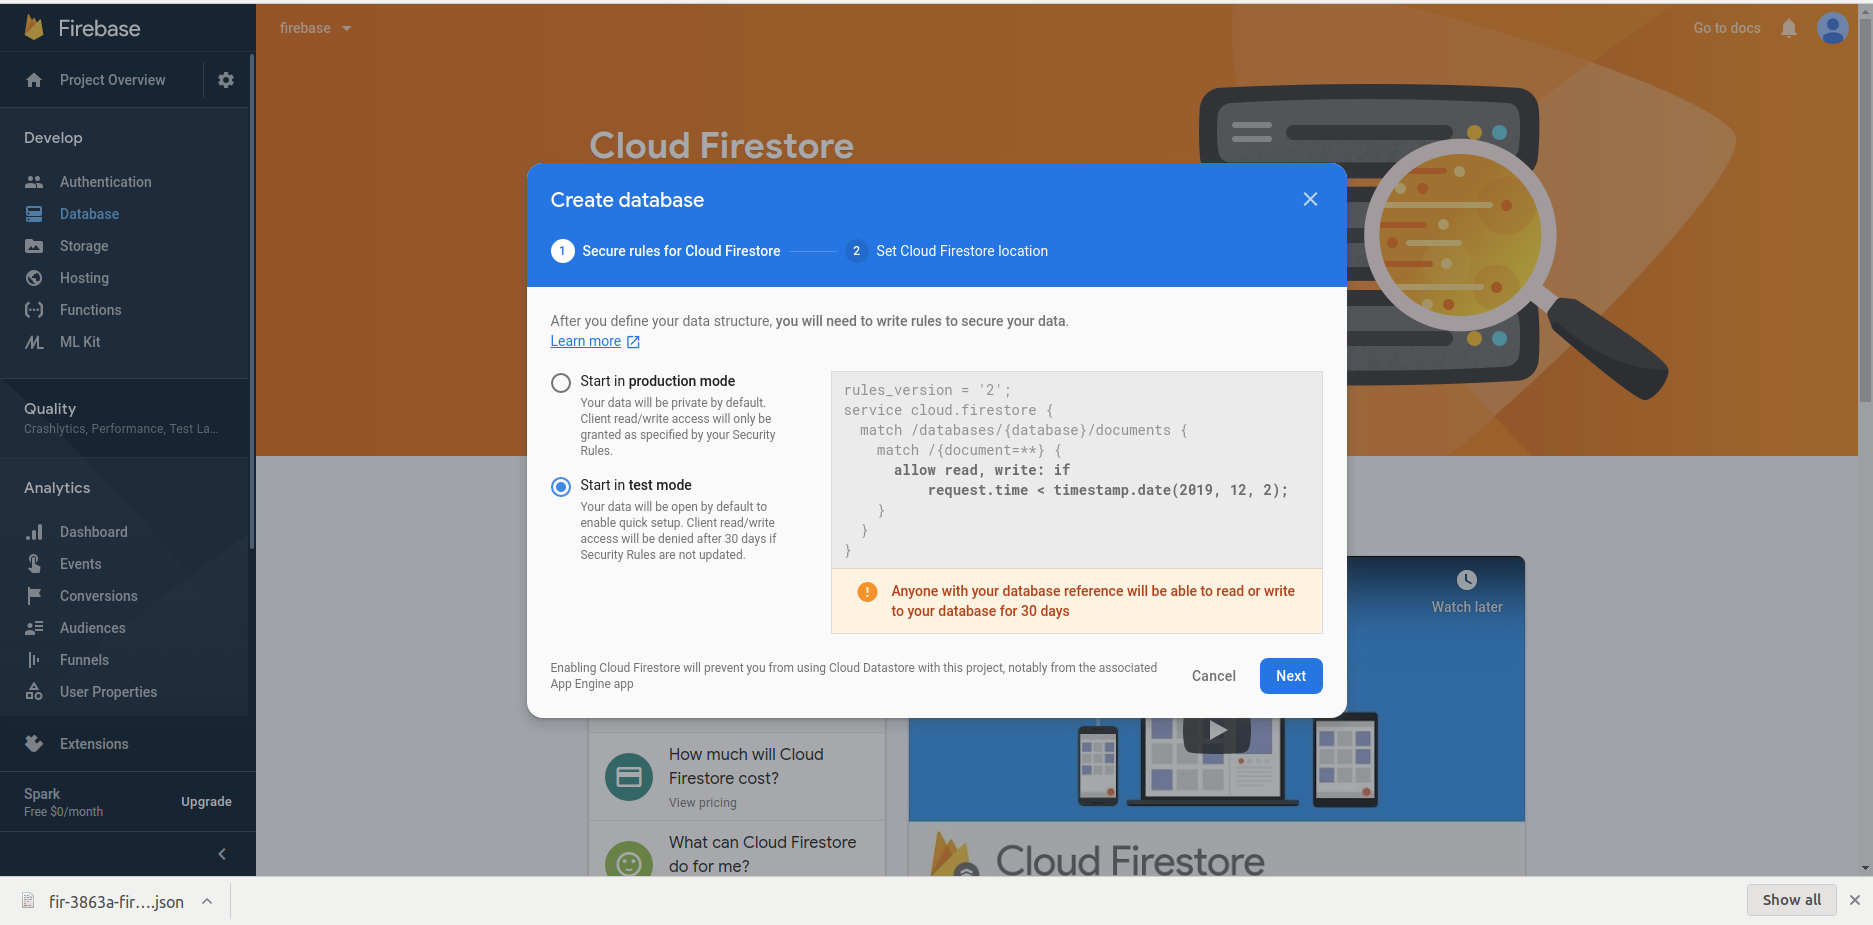
In development, we should set test mode. You can see the warning.
Then choose a location for db.

It is time to create a React project. We are going to use react-boilerplate but you don't have to use this project. You can use create-react-app or something else. In react-boilerplate, we do not need to implement redux-saga stuff because it is ready to use redux-saga.
- Make sure that you have Node.js v8.15.1 and npm v5 or above installed.
- Clone this repo using
git clone --depth=1 https://github.com/react-boilerplate/react-boilerplate.git <YOUR_PROJECT_NAME> - Move to the appropriate directory:
cd <YOUR_PROJECT_NAME>. - Run
npm run setupin order to install dependencies and clean the git repo.
At this point you can runnpm startto see the example app athttp://localhost:3000. - Run
npm run cleanto delete the example app.
For using Firebase services we have to add some npm dependencies.
- axios: Promise based HTTP client for the browser and node.js
- firebase: Provides the tools and infrastructure you need to develop, grow, and earn money from your app. This package supports web (browser), mobile-web, and server (Node.js) clients.
- react-firebaseui: Provides a drop-in auth solution that handles the UI flows for signing in users with email addresses and passwords, and Identity Provider Sign In using Google, Facebook and others. It is built on top of Firebase Auth.
- reactstrap: Simple React Bootstrap 4 components
- bootstrap: The most popular HTML, CSS, and JavaScript framework for developing responsive, mobile first projects on the web.
Install dependencies:
npm i axios firebase react-firebaseui reactstrap bootstrap
Open app/app.js in order that configuring the Firebase on the React app. Add the config which was generated Firebase on initialization steps. Import config and initialize the app using the Firebase package. Also, import bootstrap for styling. app.js file should look like this:
/**
 * app.js
 *
 * This is the entry file for the application, only setup and boilerplate
 * code.
 */

// Needed for redux-saga es6 generator support
import '@babel/polyfill';

// Import all the third party stuff
import React from 'react';
import ReactDOM from 'react-dom';
import { Provider } from 'react-redux';
import { ConnectedRouter } from 'connected-react-router';
import FontFaceObserver from 'fontfaceobserver';
import history from 'utils/history';
import 'bootstrap/dist/css/bootstrap.min.css';

// Import Firebase
import firebase from 'firebase';

// Import root app
import App from 'containers/App';

// Import Language Provider
import LanguageProvider from 'containers/LanguageProvider';

// Load the favicon and the .htaccess file
import '!file-loader?name=[name].[ext]!./images/favicon.ico';
import 'file-loader?name=.htaccess!./.htaccess'; // eslint-disable-line import/extensions

import configureStore from './configureStore';

// Import i18n messages
import { translationMessages } from './i18n';

// Firebase Config
const firebaseConfig = {
  apiKey: 'AIzaSyAG0uQ4DhG43gnBzid7f7c72dJoSCjzAtU',
  authDomain: 'fir-ml-bf63d.firebaseapp.com',
  databaseURL: 'https://fir-ml-bf63d.firebaseio.com',
  projectId: 'fir-ml-bf63d',
  storageBucket: 'fir-ml-bf63d.appspot.com',
  messagingSenderId: '675454488901',
  appId: '1:675454488901:web:405b8d946a61de6f45ae2c',
  measurementId: 'G-PJ80M4CRYZ',
};

// Initialize Firebase
firebase.initializeApp(firebaseConfig);

// Observe loading of Open Sans (to remove open sans, remove the <link> tag in
// the index.html file and this observer)
const openSansObserver = new FontFaceObserver('Open Sans', {});

// When Open Sans is loaded, add a font-family using Open Sans to the body
openSansObserver.load().then(() => {
  document.body.classList.add('fontLoaded');
});

// Create redux store with history
const initialState = {};
const store = configureStore(initialState, history);
const MOUNT_NODE = document.getElementById('app');

const render = messages => {
  ReactDOM.render(
    <Provider store={store}>
      <LanguageProvider messages={messages}>
        <ConnectedRouter history={history}>
          <App />
        </ConnectedRouter>
      </LanguageProvider>
    </Provider>,
    MOUNT_NODE,
  );
};

if (module.hot) {
  // Hot reloadable React components and translation json files
  // modules.hot.accept does not accept dynamic dependencies,
  // have to be constants at compile-time
  module.hot.accept(['./i18n', 'containers/App'], () => {
    ReactDOM.unmountComponentAtNode(MOUNT_NODE);
    render(translationMessages);
  });
}

// Chunked polyfill for browsers without Intl support
if (!window.Intl) {
  new Promise(resolve => {
    resolve(import('intl'));
  })
    .then(() =>
      Promise.all([
        import('intl/locale-data/jsonp/en.js'),
        import('intl/locale-data/jsonp/de.js'),
      ]),
    ) // eslint-disable-line prettier/prettier
    .then(() => render(translationMessages))
    .catch(err => {
      throw err;
    });
} else {
  render(translationMessages);
}

// Install ServiceWorker and AppCache in the end since
// it's not most important operation and if main code fails,
// we do not want it installed
if (process.env.NODE_ENV === 'production') {
  require('offline-plugin/runtime').install(); // eslint-disable-line global-require
}
We should do the auth screen to sign-in/up for our app users. First remove app/containers/HomePage folder. Then run the command below:
npm run generate
The command will ask prompt:
1 - choose container
2 - type HomePage
3 - accept all properties
Why did we remove the HomePage container and regenerate it? Old HomePage container does not have a reducer/saga/selector and using the generator to make a reducer/saga/selector is easy. For more information about react-boilerplate
Open app/containers/HomePage/index.js file and start editing.
app/containers/Homepage/index.js:
/**
 *
 * HomePage
 *
 */

import React, { useState, useEffect, memo } from 'react';
import PropTypes from 'prop-types';
import { connect } from 'react-redux';
import {
  Alert,
  Button,
  Container,
  Nav,
  Navbar,
  NavItem,
  NavbarBrand,
} from 'reactstrap';
import { createStructuredSelector } from 'reselect';
import { compose } from 'redux';
import firebase from 'firebase';
import StyledFirebaseAuth from 'react-firebaseui/StyledFirebaseAuth';

import { useInjectSaga } from 'utils/injectSaga';
import { useInjectReducer } from 'utils/injectReducer';

import makeSelectHomePage from './selectors';
import reducer from './reducer';
import saga from './saga';

const uiConfig = {
  // Popup signin flow rather than redirect flow.
  signInFlow: 'popup',
  // We will display Email and Google as auth providers.
  signInOptions: [
    firebase.auth.EmailAuthProvider.PROVIDER_ID,
    firebase.auth.GoogleAuthProvider.PROVIDER_ID,
  ],
  callbacks: {
    // Avoid redirects after sign-in.
    signInSuccessWithAuthResult: () => false,
  },
};

export function HomePage({ loading, error  }) {
  useInjectReducer({ key: 'homePage', reducer });
  useInjectSaga({ key: 'homePage', saga });

  const [isSignedIn, setSignedIn] = useState(false);

  useEffect(() => {
    // componentDidMount
    const unregisterAuthObserver = firebase
      .auth()
      .onAuthStateChanged(firebaseUser => {
        setSignedIn(!!firebaseUser);
      });

    // componentWillUnmount
    return () => {
      unregisterAuthObserver();
    };
  }, []);

  function logout() {
    firebase.auth().signOut();
  }

  return (
    <div>
      <Navbar color="dark" dark expand="md">
        <NavbarBrand>Home</NavbarBrand>
        {isSignedIn && (
          <Nav className="ml-auto" navbar>
            <NavItem>
              <Button color="danger" type="button" onClick={logout}>
                Logout
              </Button>
            </NavItem>
          </Nav>
        )}
      </Navbar>
      <Container className="mt-3" fluid>
        {loading ? (
          <Alert color="info">Loading...</Alert>
        ) : (
          <div>
            {isSignedIn ? (
              <>
                {error && <Alert color="danger">{error.message}</Alert>}
                <h3>
                  Welcome {firebase.auth().currentUser.displayName}! You are now
                  signed-in!
                </h3>
              </>
            ) : (
              <>
                <h5 className="text-center">Login:</h5>
                <StyledFirebaseAuth
                  uiConfig={uiConfig}
                  firebaseAuth={firebase.auth()}
                />
              </>
            )}
          </div>
        )}
      </Container>
    </div>
  );
}

HomePage.propTypes = {
  loading: PropTypes.bool,
  error: PropTypes.object,
};

const mapStateToProps = createStructuredSelector({
  homePage: makeSelectHomePage(),
});

function mapDispatchToProps(dispatch) {
  return {
    dispatch,
  };
}

const withConnect = connect(
  mapStateToProps,
  mapDispatchToProps,
);

export default compose(
  withConnect,
  memo,
)(HomePage);
In the HomePage container, we set the UI config for Firebase sign-in flow. We will use the react-firebaseui package. Using this package is easy to generate auth screens. It needs a UI config like this:
{
	// Popup signin flow rather than redirect flow.
	signInFlow: 'popup',
	// We will display Google and Facebook as auth providers.
	signInOptions: [
		firebase.auth.EmailAuthProvider.PROVIDER_ID,
		firebase.auth.GoogleAuthProvider.PROVIDER_ID,
	],
	callbacks: {
		// Avoid redirects after sign-in.
		signInSuccessWithAuthResult: () => false
	}

};The following lines are generated on creating HomePage container. These lines are responsible for attaching reducer or saga dynamically. Dynamic means that it will be injected when the component it attached to is mounted.
useInjectReducer({ key: 'homePage', reducer });
useInjectSaga({ key: 'homePage', saga });
We define a local state using the useState hook for holding the user's auth state.
const [isSignedIn, setSignedIn] = useState(false);We use the useEffect hook to listen to the Firebase Auth state and set the local state.
useEffect(() => {
    // componentDidMount
    const unregisterAuthObserver = firebase
      .auth()
      .onAuthStateChanged(firebaseUser => {
        setSignedIn(!!firebaseUser);
      });

    // componentWillUnmount
    return () => {
      unregisterAuthObserver();
    };
  }, []);
To log out we use Firebase API.
function logout() {
  firebase.auth().signOut();
}
On the render section, we use loading and error props, but for now, our flow is not affected by these props. We have not implemented redux stuff yet.
Save and run:
npm start
This command will open our react app in the browser:
http://localhost:3000
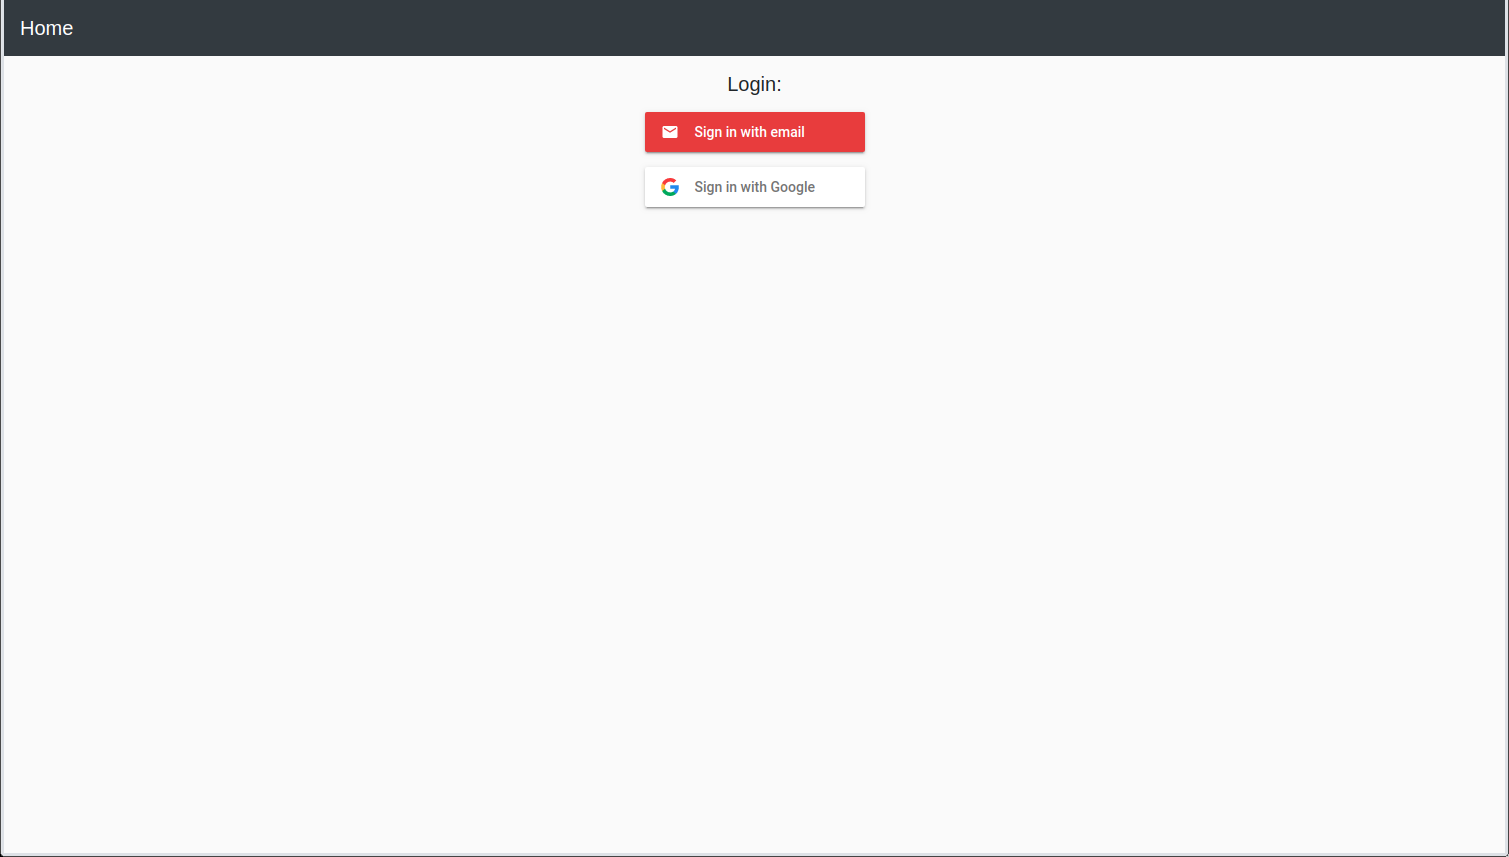
Lets login and see the result:

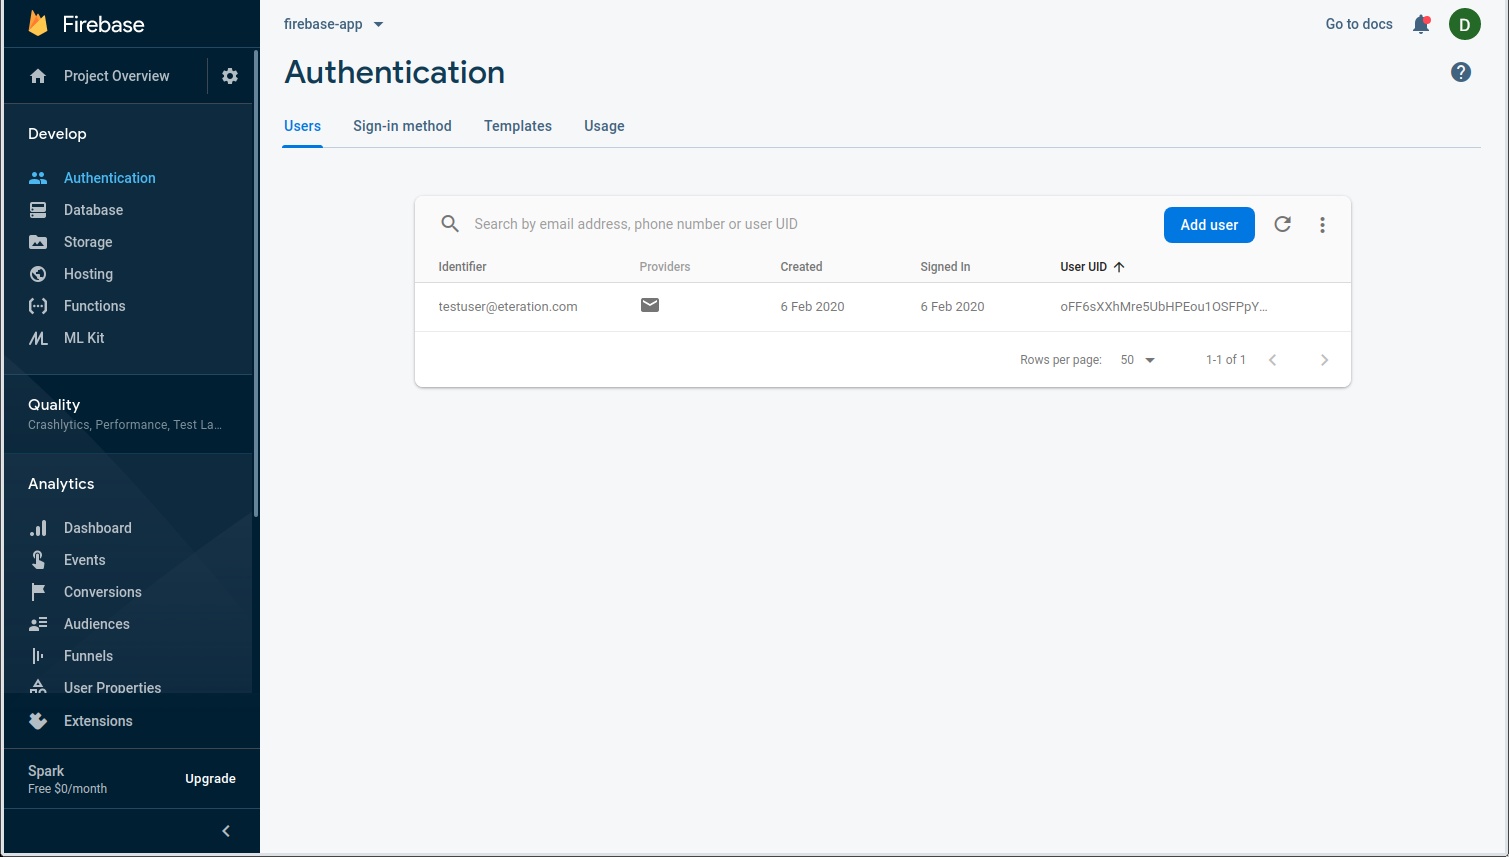
Also, go to the Firebase dashboard and check the Authentication tab.
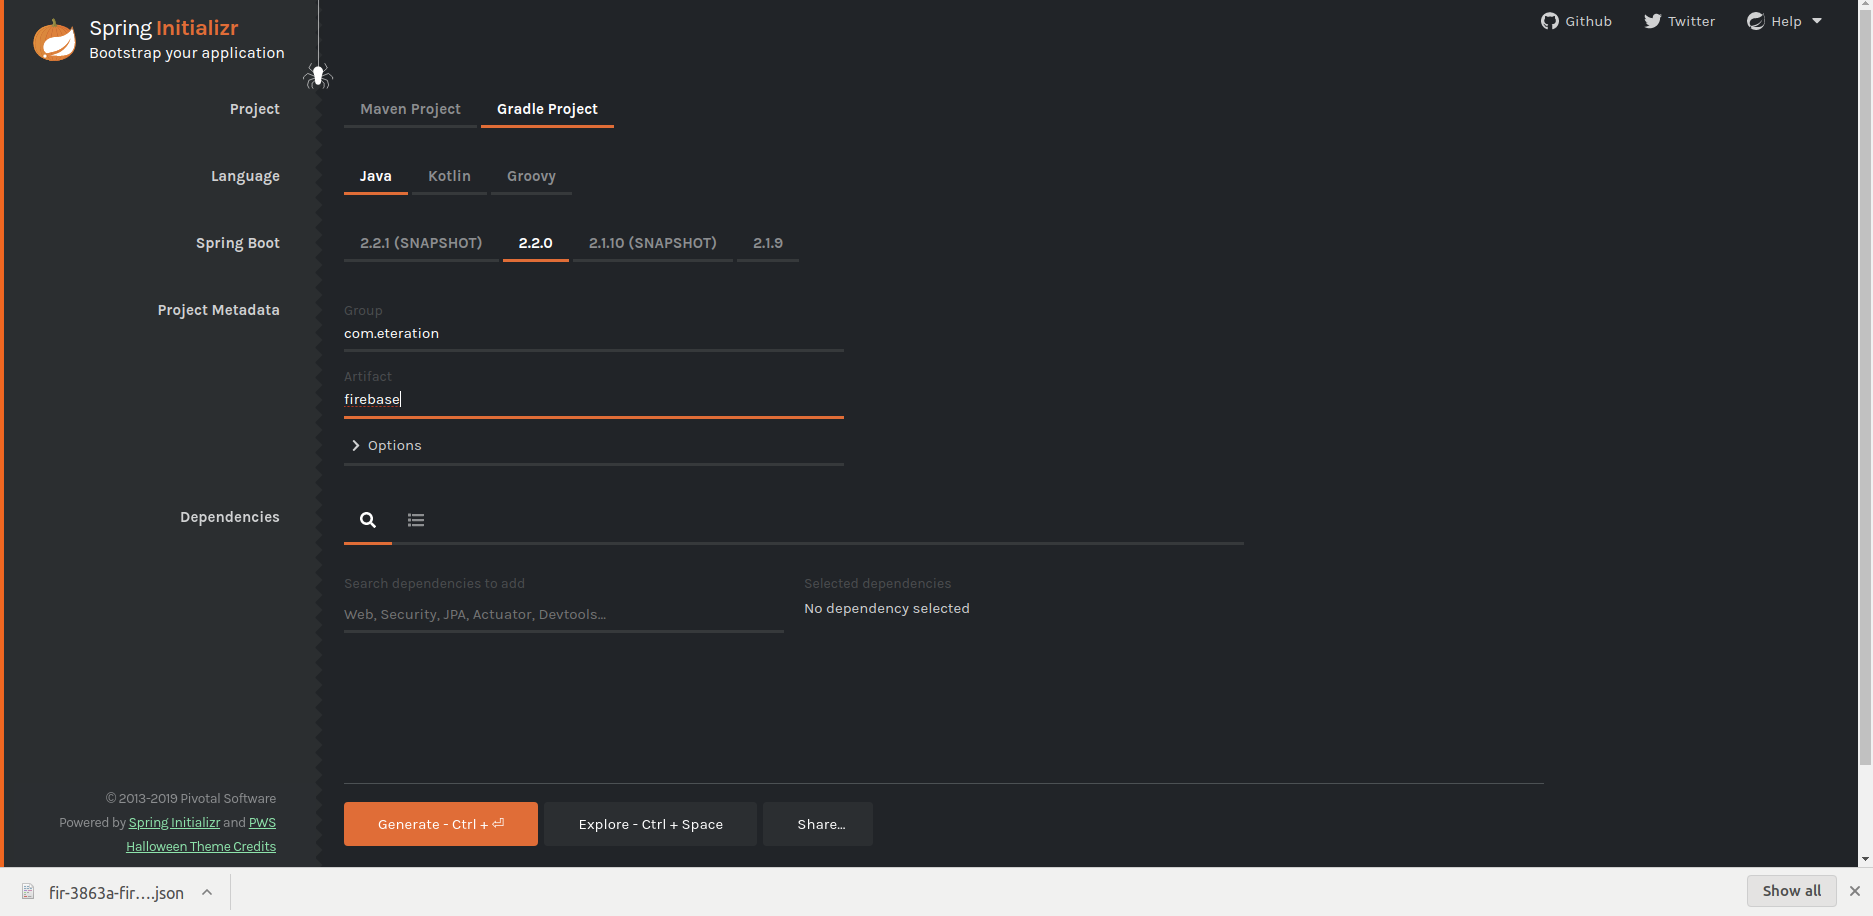
Let's start creating a Spring Boot app. Go to Spring Initializr and create a project with Gradle.
After creating the Spring Boot app open it using your favorite IDE. We recommend using Eclipse.
We will use Firebase Admin SDK so that we use Firebase services. Add Firebase Admin SDK to build.gradle file dependencies section. We will change this gradle file in future but now use look like this:
plugins {
	id 'org.springframework.boot' version '2.2.0.RELEASE'
	id 'io.spring.dependency-management' version '1.0.8.RELEASE'
	id 'java'
}

group = 'com.eteration'
version = '0.0.1-SNAPSHOT'
sourceCompatibility = '1.8'

repositories {
	mavenCentral()
}

dependencies {
	implementation 'com.google.firebase:firebase-admin:6.12.2'

	implementation 'org.springframework.boot:spring-boot-starter'
	implementation 'org.springframework.boot:spring-boot-starter-web'
    implementation 'org.springframework.boot:spring-boot-starter-oauth2-resource-server'
	testImplementation('org.springframework.boot:spring-boot-starter-test') {
		exclude group: 'org.junit.vintage', module: 'junit-vintage-engine'
	}
}

test {
	useJUnitPlatform()
}
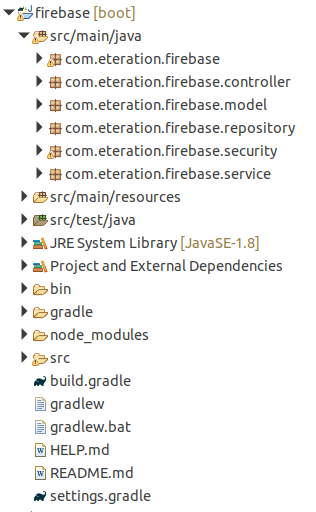
Then add packages to the Spring Boot project for modularity.
This package structure may not be a best practice but our purpose of using this structure is to keep things simple.
In Firebase initialization steps we have generated the Service Account key. Move this key to src/main/resources directory. We will use this key for initializing the Firebase app.
When starting the Spring Boot application, we need to set up Firebase credentials. Thus, our application will be able to use Firebase services.
Add FirebaseService.java class under the com.eteration.firebase.service package.
package com.eteration.firebase.service;

import java.io.IOException;
import java.io.InputStream;

import javax.annotation.PostConstruct;

import org.springframework.stereotype.Service;

import com.google.auth.oauth2.GoogleCredentials;
import com.google.firebase.FirebaseApp;
import com.google.firebase.FirebaseOptions;

@Service
public class FirebaseService {

	@PostConstruct
	public void initializeFirebaseApp() throws IOException {
		InputStream serviceAccount = this.getClass().getResourceAsStream("/firebase-service-credentials.json");

		FirebaseOptions options = new FirebaseOptions.Builder()
				.setCredentials(GoogleCredentials.fromStream(serviceAccount))
				.setDatabaseUrl("https://fir-ml-bf63d.firebaseio.com").build();

		FirebaseApp.initializeApp(options);
	}

}
In the code above when the application started our credentials are used to initialize the Firebase app for using Firebase Services. In your Firebase app, the database URL is different. If you don't know your database URL go to Project Settings/Service Accounts page and copy configuration snippet. Also, this URL is generated from your project_id in firebase-service-credentials.json file so you can find your project id in this file.
// Firebase service credentials (.json file)
{
  "type": "service_account",
  "project_id": "fir-ml-bf63d",
  ...
  ...
}
When we login via the React app we have an access token. So we can use this token for authentication. We don't need an Authorization Server (Firebase holds a token for us in React app). We only need a Resource Server. We should add some configuration our Spring Boot app. These concepts (Authorization Server, Resource Server, Access Token, JWT, public key, issuer etc.) are related to OAuth2 specification.
Now, let's take a look at how to configure our Resource Server to use JWT.
Rename application.properties to application.yml under src/main/resources folder and add the following lines, and replace <project-id> with your Firebase project id:
spring:
  security:
    oauth2:
      resourceserver:
        jwt:
          issuer-uri: https://securetoken.google.com/<project-id>
          jwk-set-uri: https://www.googleapis.com/robot/v1/metadata/jwk/[email protected]
Add a class named SecurityConfig under the security package.
package com.eteration.firebase.security;

@Configuration
public class SecurityConfig extends WebSecurityConfigurerAdapter {

	@Override
	protected void configure(HttpSecurity http) throws Exception {
		http
				.authorizeRequests()
					.antMatchers("/api/**")
						.authenticated()
					.anyRequest()
						.permitAll()
			.and()
				.oauth2ResourceServer()
					.jwt();
	}
}
This configuration is all about validating access tokens. So if we have a valid token we can use authenticated resources.
We created the database (Cloud Firestore) on creating a new Firebase App. We want to save authenticated user data (uid, name, email, bio, lastLogin) on this database.
Create a package named model and create a class named User under this package.
package com.eteration.firebase.model;

public class User {
	private String uid;
	private String name;
	private String email;
	private long lastLogin;
	private String bio;

	public User(String uid, String name, String email, long lastLogin, String bio) {
		super();
		this.uid = uid;
		this.name = name;
		this.email = email;
		this.lastLogin = lastLogin;
		this.setBio(bio);
	}

	public User() {
	}

	public String getUid() {
		return uid;
	}

	public void setUid(String uid) {
		this.uid = uid;
	}

	public String getName() {
		return name;
	}

	public void setName(String name) {
		this.name = name;
	}

	public String getEmail() {
		return email;
	}

	public void setEmail(String email) {
		this.email = email;
	}

	public long getLastLogin() {
		return lastLogin;
	}

	public void setLastLogin(long lastLogin) {
		this.lastLogin = lastLogin;
	}

	public String getBio() {
		return bio;
	}

	public void setBio(String bio) {
		this.bio = bio;
	}
}
After creating the User class we will create a service for communicating our database.
Create a class named UserRepository under the repository package. This class responsible to save and get data from Cloud Firestore. More information about getting and adding data on Cloud Firestore.
package com.eteration.firebase.repository;

import java.util.concurrent.ExecutionException;

import org.slf4j.Logger;
import org.slf4j.LoggerFactory;
import org.springframework.stereotype.Service;

import com.eteration.firebase.model.User;
import com.google.api.core.ApiFuture;
import com.google.cloud.firestore.DocumentSnapshot;
import com.google.cloud.firestore.Firestore;
import com.google.cloud.firestore.SetOptions;
import com.google.cloud.firestore.WriteResult;
import com.google.firebase.cloud.FirestoreClient;

@Service
public class UserRepository {
	private static final Logger logger = LoggerFactory.getLogger(UserRepository.class);

	public User save(User user) throws Exception {
		Firestore db = FirestoreClient.getFirestore();

		ApiFuture<WriteResult> apiFuture = db.collection("user").document(user.getUid()).set(user, SetOptions.merge());
		WriteResult writeResult = apiFuture.get();
		logger.info("Succesfully saved, updated time: {}", writeResult.getUpdateTime());
		return user;
	}

	public User get(String uid) throws InterruptedException, ExecutionException {
		Firestore db = FirestoreClient.getFirestore();
		ApiFuture<DocumentSnapshot> apiFuture = db.collection("user").document(uid).get();

		DocumentSnapshot document = apiFuture.get();
		if (document.exists()) {
			logger.info("User found: {}", uid);
			return document.toObject(User.class);
		}

		logger.info("User not found: {}", uid);
		return null;
	}
}
The final module is a very simple REST endpoint for serving our resources.
Create a class named UserController under controller package. The resource has two endpoints: get and post
package com.eteration.firebase.controller;

import org.springframework.beans.factory.annotation.Autowired;
import org.springframework.http.HttpStatus;
import org.springframework.http.ResponseEntity;
import org.springframework.security.core.Authentication;
import org.springframework.security.core.context.SecurityContextHolder;
import org.springframework.web.bind.annotation.GetMapping;
import org.springframework.web.bind.annotation.PostMapping;
import org.springframework.web.bind.annotation.RequestBody;
import org.springframework.web.bind.annotation.RequestMapping;
import org.springframework.web.bind.annotation.RestController;

import com.google.firebase.auth.FirebaseAuth;
import com.google.firebase.auth.UserRecord;

import com.eteration.firebase.model.User;
import com.eteration.firebase.repository.UserRepository;

@RestController
@RequestMapping("api/user")
public class UserController {

	@Autowired
	UserRepository userRepository;

	@GetMapping
	public ResponseEntity<User> get() throws Exception {
		Authentication authentication = SecurityContextHolder.getContext().getAuthentication();

		String uid = authentication.getName(); // Firebase uid
		User user = userRepository.get(uid);

		return new ResponseEntity<>(user, HttpStatus.OK);
	}

	@PostMapping
	public ResponseEntity<User> save(@RequestBody String bio) throws Exception {
		Authentication authentication = SecurityContextHolder.getContext().getAuthentication();

		String uid = authentication.getName();
		UserRecord userRecord = FirebaseAuth.getInstance().getUser(uid);

		User user = new User();
		user.setEmail(userRecord.getEmail());
		user.setName(userRecord.getDisplayName());
		user.setUid(uid);
		user.setLastLogin(userRecord.getUserMetadata().getLastSignInTimestamp());
		user.setBio(bio);

		User savedUser = userRepository.save(user);

		return new ResponseEntity<>(savedUser, HttpStatus.OK);
	}
}
We can use a layer (service) between controller and repository but we did not use it for simplicity.
Our endpoints are ready to use. Start the Spring Boot application and test endpoints via curl or Postman. If you did not define a valid access token to your requests you can not access endpoints and you get a status code that is 401 (unauthorized). We need a valid token to authenticate our user and access the endpoints. Next section we will combine the React and Spring Boot app, authenticate our user, and save user data to Cloud Firestore.
Our Spring boot app is ready to use but before add some stuff the React project. Go to the React project, add request.js file under utils folder, and start editing. `request.js' module contains the request function. This function is responsible for performing a request for any resource. We will expand this method with the Authorization header.
To get an access token on Firebase:
firebase
    .auth()
    .currentUser
    .getIdToken(true)
.then(idToken => console.log(idToken));request.js:
import axios from 'axios';
import firebase from 'firebase';

/**
 * Requests a URL, returning a promise
 *
 * @param  {string} url       The URL we want to request
 * @param  {object} [options] The options we want to pass to "fetch"
 *
 * @return {object}           The response data
 */
export function requestWithoutAuth(url, options) {
  const headers = options.headers || {};

  return axios({
    method: options.method,
    url,
    headers: { ...headers },
    data: options.body,
  });
}

/**
 * Requests a URL, returning a promise
 *
 * @param  {string} url       The URL we want to request
 * @param  {object} [options] The options we want to pass to "fetch"
 *
 * @return {object}           The response data
 */
export default function request(url, options) {
  const headers = options.headers || {};
  return firebase
    .auth()
    .currentUser.getIdToken(true)
    .then(idToken => {
      const auth = idToken && { Authorization: `Bearer ${idToken}` };

      return axios({
        method: options.method,
        url,
        headers: { ...auth, ...headers },
        data: options.body,
      });
    });
}
When we need to request an authenticated endpoint that needs a token we use the request method. This method uses Firebase idToken and sends to the server. If the token is valid we get authorized response otherwise get an error (401).
// example
const requestUrl = 'http://localhost:8080/api/user';
const options = {
  method: 'POST',
  headers: {
    Accept: 'application/json',
    'Content-Type': 'application/json',
  },
  body: foo,
};

const response = request(requestUrl, options);Let's start adding reducer and saga stuff. Go to HomePage container and edit these files:
index.js;
/**
 *
 * HomePage
 *
 */

import React, { useState, useEffect, memo } from 'react';
import PropTypes from 'prop-types';
import { connect } from 'react-redux';
import {
  Alert,
  Button,
  Container,
  Form,
  FormGroup,
  Input,
  Label,
  Nav,
  Navbar,
  NavItem,
  NavbarBrand,
} from 'reactstrap';
import { createStructuredSelector } from 'reselect';
import { compose } from 'redux';
import firebase from 'firebase';
import StyledFirebaseAuth from 'react-firebaseui/StyledFirebaseAuth';

import { useInjectSaga } from 'utils/injectSaga';
import { useInjectReducer } from 'utils/injectReducer';

import makeSelectHomePage, {
  makeSelectUser,
  makeSelectLoading,
  makeSelectError,
} from './selectors';
import reducer from './reducer';
import saga from './saga';
import { getUser, saveUser } from './actions';

const uiConfig = {
  // Popup signin flow rather than redirect flow.
  signInFlow: 'popup',
  // We will display Email and Google as auth providers.
  signInOptions: [
    firebase.auth.EmailAuthProvider.PROVIDER_ID,
    firebase.auth.GoogleAuthProvider.PROVIDER_ID,
  ],
  callbacks: {
    // Avoid redirects after sign-in.
    signInSuccessWithAuthResult: () => false,
  },
};

export function HomePage({ user, loading, error, dispatch }) {
  useInjectReducer({ key: 'homePage', reducer });
  useInjectSaga({ key: 'homePage', saga });

  const [isSignedIn, setSignedIn] = useState(false);
  const [bio, setBio] = useState(user.bio);

  useEffect(() => {
    // componentDidMount
    const unregisterAuthObserver = firebase
      .auth()
      .onAuthStateChanged(firebaseUser => {
        setSignedIn(!!firebaseUser);
      });

    // componentWillUnmount
    return () => {
      unregisterAuthObserver();
    };
  }, []);

  useEffect(() => {
    if (isSignedIn) dispatch(getUser());
  }, [isSignedIn]);

  function onChangeBio(e) {
    const { value } = e.target;
    setBio(value);
  }

  function onSubmitForm(e) {
    e.preventDefault();

    const newUser = { ...user, bio };
    dispatch(saveUser(newUser));
  }

  function logout() {
    firebase.auth().signOut();
  }

  return (
    <div>
      <Navbar color="dark" dark expand="md">
        <NavbarBrand>Home</NavbarBrand>
        {isSignedIn && (
          <Nav className="ml-auto" navbar>
            <NavItem>
              <Button color="danger" type="button" onClick={logout}>
                Logout
              </Button>
            </NavItem>
          </Nav>
        )}
      </Navbar>
      <Container className="mt-3" fluid>
        {loading ? (
          <Alert color="info">Loading...</Alert>
        ) : (
          <div>
            {isSignedIn ? (
              <>
                {error && <Alert color="danger">{error.message}</Alert>}
                <h3>
                  Welcome {firebase.auth().currentUser.displayName}! You are now
                  signed-in!
                </h3>
                <Form onSubmit={onSubmitForm}>
                  <FormGroup>
                    <Label for="name">Bio</Label>
                    <Input
                      type="text"
                      name="name"
                      id="name"
                      defaultValue={user.bio}
                      onChange={onChangeBio}
                      autoComplete="name"
                    />
                  </FormGroup>
                  <FormGroup>
                    <Button color="primary" type="submit">
                      Save
                    </Button>
                  </FormGroup>
                </Form>
              </>
            ) : (
              <>
                <h5 className="text-center">Login:</h5>
                <StyledFirebaseAuth
                  uiConfig={uiConfig}
                  firebaseAuth={firebase.auth()}
                />
              </>
            )}
          </div>
        )}
      </Container>
    </div>
  );
}

HomePage.propTypes = {
  dispatch: PropTypes.func.isRequired,
  user: PropTypes.object,
  loading: PropTypes.bool,
  error: PropTypes.object,
};

const mapStateToProps = createStructuredSelector({
  homePage: makeSelectHomePage(),
  user: makeSelectUser(),
  loading: makeSelectLoading(),
  error: makeSelectError(),
});

function mapDispatchToProps(dispatch) {
  return {
    dispatch,
  };
}

const withConnect = connect(
  mapStateToProps,
  mapDispatchToProps,
);

export default compose(
  withConnect,
  memo,
)(HomePage);constants.js:
/*
 *
 * HomePage constants
 *
 */

export const DEFAULT_ACTION = 'app/HomePage/DEFAULT_ACTION';

export const GET_USER = 'app/HomePage/GET_USER';
export const GET_USER_SUCCESS = 'app/HomePage/GET_USER_SUCCESS';
export const GET_USER_FAILURE = 'app/HomePage/GET_USER_FAILURE';

export const SAVE_USER = 'app/HomePage/SAVE_USER';
export const SAVE_USER_SUCCESS = 'app/HomePage/SAVE_USER_SUCCESS';
export const SAVE_USER_FAILURE = 'app/HomePage/SAVE_USER_FAILURE';actions.js:
/*
 *
 * HomePage actions
 *
 */

import {
  DEFAULT_ACTION,
  GET_USER,
  GET_USER_SUCCESS,
  GET_USER_FAILURE,
  SAVE_USER,
  SAVE_USER_FAILURE,
  SAVE_USER_SUCCESS,
} from './constants';

export function defaultAction() {
  return {
    type: DEFAULT_ACTION,
  };
}

export function getUser() {
  return {
    type: GET_USER,
  };
}

export function getUserSuccess(user) {
  return {
    type: GET_USER_SUCCESS,
    user,
  };
}

export function getUserFailure(error) {
  return {
    type: GET_USER_FAILURE,
    error,
  };
}

export function saveUser(user) {
  return {
    type: SAVE_USER,
    user,
  };
}

export function saveUserSuccess() {
  return {
    type: SAVE_USER_SUCCESS,
  };
}

export function saveUserFailure(error) {
  return {
    type: SAVE_USER_FAILURE,
    error,
  };
}reducer.js:
/*
 *
 * HomePage reducer
 *
 */
import produce, { isDraft } from 'immer';
import {
  DEFAULT_ACTION,
  GET_USER,
  GET_USER_SUCCESS,
  GET_USER_FAILURE,
  SAVE_USER,
  SAVE_USER_SUCCESS,
  SAVE_USER_FAILURE,
} from './constants';

export const initialState = {
  user: { bio: '' },
  loading: false,
  error: null,
};

/* eslint-disable default-case, no-param-reassign */
const homePageReducer = (state = initialState, action) =>
  produce(state, draft => {
    switch (action.type) {
      case DEFAULT_ACTION:
        break;
      case GET_USER:
        draft.loading = true;
        draft.error = null;
        break;
      case GET_USER_SUCCESS:
        draft.user = action.user;
        draft.loading = false;
        break;
      case GET_USER_FAILURE:
        draft.error = action.error;
        draft.loading = false;
        break;
      case SAVE_USER:
        draft.user = action.user;
        draft.loading = true;
        draft.error = null;
        break;
      case SAVE_USER_SUCCESS:
        draft.loading = false;
        break;
      case SAVE_USER_FAILURE:
        draft.error = action.error;
        draft.loading = false;
        break;
    }
  });

export default homePageReducer;saga.js:
import { call, put, select, takeLatest } from 'redux-saga/effects';
import request from 'utils/request';
import { GET_USER, SAVE_USER } from './constants';
import { getUserFailure, getUserSuccess } from './actions';
import makeSelectHomePage from './selectors';

const requestUrl = 'api/user';

function* getUser() {
  const options = {
    method: 'GET',
  };

  try {
    const response = yield call(request, requestUrl, options);
    yield put(getUserSuccess(response.data));
  } catch (error) {
    yield put(getUserFailure(error));
  }
}

function* saveUser() {
  const { user } = yield select(makeSelectHomePage());
  const options = {
    method: 'POST',
    headers: {
      Accept: 'application/json',
      'Content-Type': 'application/json',
    },
    body: user.bio,
  };

  try {
    const response = yield call(request, requestUrl, options);
    yield put(getUserSuccess(response.data));
  } catch (error) {
    yield put(getUserFailure(error));
  }
}

// Individual exports for testing
export default function* homePageSaga() {
  yield takeLatest(GET_USER, getUser);
  yield takeLatest(SAVE_USER, saveUser);
}selectors.js:
import { createSelector } from 'reselect';
import { initialState } from './reducer';

/**
 * Direct selector to the homePage state domain
 */

const selectHomePageDomain = state => state.homePage || initialState;

/**
 * Other specific selectors
 */

/**
 * Default selector used by HomePage
 */

const makeSelectHomePage = () =>
  createSelector(
    selectHomePageDomain,
    substate => substate,
  );

const makeSelectUser = () =>
  createSelector(
    selectHomePageDomain,
    substate => substate.user,
  );

const makeSelectLoading = () =>
  createSelector(
    selectHomePageDomain,
    substate => substate.loading,
  );

const makeSelectError = () =>
  createSelector(
    selectHomePageDomain,
    substate => substate.error,
  );

export default makeSelectHomePage;
export {
  selectHomePageDomain,
  makeSelectUser,
  makeSelectLoading,
  makeSelectError,
};
You can run the application and add a bio on bio input and click the save button.
You will get 404 because your app will request to http://localhost:3000/api/user and there is no content on this url.
So we should add a proxy to request our resource server.

First install http-proxy-middleware:
npm i --save-dev http-proxy-middleware
Then go to server/middlewares folder and open addDevMiddleware.js:
const path = require('path');
const webpack = require('webpack');
const webpackDevMiddleware = require('webpack-dev-middleware');
const webpackHotMiddleware = require('webpack-hot-middleware');
const { createProxyMiddleware } = require('http-proxy-middleware');

function createWebpackMiddleware(compiler, publicPath) {
  return webpackDevMiddleware(compiler, {
    logLevel: 'warn',
    publicPath,
    silent: true,
    stats: 'errors-only',
  });
}

module.exports = function addDevMiddlewares(app, webpackConfig) {
  const compiler = webpack(webpackConfig);
  const middleware = createWebpackMiddleware(
    compiler,
    webpackConfig.output.publicPath,
  );

  app.use(middleware);
  app.use(webpackHotMiddleware(compiler));

  // Set up the proxy.
  const proxy = {
    '/api': {
      target: 'http://localhost:8080',
      pathRewrite: {
        '^/api': '/api',
      },
    },
  };

  if (proxy) {
    Object.keys(proxy).forEach(function(context) {
      app.use(createProxyMiddleware(context, proxy[context]));
    });
  }

  // Since webpackDevMiddleware uses memory-fs internally to store build
  // artifacts, we use it instead
  const fs = middleware.fileSystem;

  app.get('*', (req, res) => {
    fs.readFile(path.join(compiler.outputPath, 'index.html'), (err, file) => {
      if (err) {
        res.sendStatus(404);
      } else {
        res.send(file.toString());
      }
    });
  });
};
This proxy is valid for only development mode. It does not effect production.
When we start the react app the console output should look like this:
[HPM] Proxy created: /api  -> http://localhost:8080
[HPM] Proxy rewrite rule created: "^/api" ~> "/api"
Server started ! ✓

Access URLs:
-----------------------------------
Localhost: http://localhost:3000
      LAN: http://192.168.1.7:3000
-----------------------------------
Press CTRL-C to stop

Browserslist: caniuse-lite is outdated. Please run next command `npm update`
webpack built 4d3c7df44f693342a204 in 5853ms
Login and save your bio and check Cloud Firestore.
Our two application is ready to use. These applications can be deployed as separate applications but in this guide, we will bring them together to dockerize.
First, create a directory named javascript under the src/main folder in the Spring Boot application.
Move files under the React project directory to src/main/javascript.
Then create a folder named web under the src/main/resources. This folder keeps build output.
Create a file named MvcConfig.java to src/main/java/com/eteration/firebase:
MvcConfig.java:
package com.eteration.firebase;

import org.springframework.context.annotation.Configuration;
import org.springframework.web.bind.annotation.GetMapping;
import org.springframework.web.servlet.config.annotation.ResourceHandlerRegistry;
import org.springframework.web.servlet.config.annotation.ViewControllerRegistry;
import org.springframework.web.servlet.config.annotation.WebMvcConfigurer;
import org.springframework.web.servlet.resource.GzipResourceResolver;
import org.springframework.web.servlet.resource.PathResourceResolver;

@Configuration
public class MvcConfig implements WebMvcConfigurer {

    @GetMapping("/error")
    public String error() {
        return "Error handling";
    }

	@Override
	public void addViewControllers(ViewControllerRegistry registry) {
		registry
		  .addViewController("/")
		  .setViewName("forward:/index.html");
    // If you need different routing uncomment below lines and edit your own settings
		// registry
		// 	.addViewController("/management")
		// 	.setViewName("forward:/index.html");
	}

	@Override
	public void addResourceHandlers(ResourceHandlerRegistry registry) {
		registry
		  .addResourceHandler("*.js")
		    .addResourceLocations("classpath:/web/")
		    .resourceChain(true)
		    .addResolver(new GzipResourceResolver())
		    .addResolver(new PathResourceResolver());
		registry
		  .addResourceHandler("*.html")
		    .addResourceLocations("classpath:/web/")
		    .resourceChain(true)
		    .addResolver(new GzipResourceResolver())
		    .addResolver(new PathResourceResolver());
		registry
		  .addResourceHandler("*.js.gz")
		    .addResourceLocations("classpath:/web/")
		    .resourceChain(true)
		    .addResolver(new PathResourceResolver());
		registry
		  .addResourceHandler("*.svg")
		    .addResourceLocations("classpath:/web/")
		    .resourceChain(true)
		    .addResolver(new PathResourceResolver());
		registry
		  .addResourceHandler("*.jpg")
		    .addResourceLocations("classpath:/web/")
		    .resourceChain(true)
		    .addResolver(new GzipResourceResolver())
		    .addResolver(new PathResourceResolver());
		registry
		  .addResourceHandler("*.png")
		    .addResourceLocations("classpath:/web/")
		    .resourceChain(true)
		    .addResolver(new GzipResourceResolver())
		    .addResolver(new PathResourceResolver());
		registry
		  .addResourceHandler("*.json")
		    .addResourceLocations("classpath:/web/")
		    .resourceChain(true)
		    .addResolver(new GzipResourceResolver())
		    .addResolver(new PathResourceResolver());
		registry
		  .addResourceHandler("*.ttf")
		    .addResourceLocations("classpath:/web/")
		    .resourceChain(true)
		    .addResolver(new GzipResourceResolver())
		    .addResolver(new PathResourceResolver());
		registry
		  .addResourceHandler("*.eot")
		    .addResourceLocations("classpath:/web/")
		    .resourceChain(true)
		    .addResolver(new GzipResourceResolver())
		    .addResolver(new PathResourceResolver());
		registry
		  .addResourceHandler("*.woff")
		    .addResourceLocations("classpath:/web/")
		    .resourceChain(true)
		    .addResolver(new GzipResourceResolver())
		    .addResolver(new PathResourceResolver());
		registry
		  .addResourceHandler("*.woff2")
		    .addResourceLocations("classpath:/web/")
		    .resourceChain(true)
		    .addResolver(new GzipResourceResolver())
		    .addResolver(new PathResourceResolver());
		registry
		  .addResourceHandler("*.ico")
		    .addResourceLocations("classpath:/web/")
		    .resourceChain(true)
		    .addResolver(new GzipResourceResolver())
		    .addResolver(new PathResourceResolver());
	}
}
The MvcConfig is responsible for serving javascript build from the Spring Boot application. If you add routing on React App you may need to add new view controllers.
To dockerize our app we need to create a Dockerfile. Create a directory named docker under the src/main folder. Create files named Dockerfile and run.sh.
Dockerfile:
FROM openjdk:8-jdk

ADD app.jar app.jar
ADD run.sh run.sh
RUN chmod +x run.sh
CMD ./run.shrun.sh:
#!/bin/sh

echo "********************************************************"
echo "Starting Firebase App"
echo "********************************************************"
java   $MEM_ARGS -Dspring.profiles.active=$PROFILE -jar app.jar
We need to update our build.gradle;
build.gradle:
buildscript {
  dependencies {
    classpath "gradle.plugin.com.palantir.gradle.docker:gradle-docker:0.22.1"
  }
}

plugins {
	id 'org.springframework.boot' version '2.2.0.RELEASE'
	id 'io.spring.dependency-management' version '1.0.8.RELEASE'
	id 'java'
	id 'com.palantir.docker' version '0.22.1'
}

group = 'com.eteration'
version = '0.0.1-SNAPSHOT'
sourceCompatibility = '1.8'

repositories {
	mavenCentral()
}

dependencies {
	implementation 'com.google.firebase:firebase-admin:6.12.2'

	implementation 'org.springframework.boot:spring-boot-starter'
	implementation 'org.springframework.boot:spring-boot-starter-web'
	implementation 'org.springframework.boot:spring-boot-starter-oauth2-resource-server'
	testImplementation('org.springframework.boot:spring-boot-starter-test') {
		exclude group: 'org.junit.vintage', module: 'junit-vintage-engine'
	}
}

docker {
  name "eteration/${project.name}:latest"
  tags 'latest'
  dockerfile file('src/main/docker/Dockerfile')
  files tasks.jar.outputs,
        'src/main/docker/run.sh'
  copySpec.rename("${project.name}-${version}.jar", "app.jar")
  buildArgs([BUILD_VERSION: "${version}"])
  buildArgs([PROJECT: "${project.name}"])
  labels(['project': "${project.name}"])
}

test {
	useJUnitPlatform()
}

task npmInstall(type: Exec) {
  workingDir 'src/main/javascript'
  commandLine 'npm', 'install'
}

task npmBuild(type: Exec) {
  workingDir 'src/main/javascript'
  commandLine 'npm', 'run', 'build'
}

task deleteOldBuild(type: Delete) {
	delete "src/main/resources/web/"
}

task copyNewBuild(type: Copy) {
	from 'src/main/javascript/build'
	into 'src/main/resources/web/'
}

copyNewBuild.dependsOn(deleteOldBuild)
This file has been updated with some new tasks.
// Install npm packages
task npmInstall(type: Exec) {
  workingDir 'src/main/javascript'
  commandLine 'npm', 'install'
}

// Build React App
task npmBuild(type: Exec) {
  workingDir 'src/main/javascript'
  commandLine 'npm', 'run', 'build'
}

// Delete old build under the web folder
task deleteOldBuild(type: Delete) {
	delete "src/main/resources/web/"
}

// Copy new build to web folder
task copyNewBuild(type: Copy) {
	from 'src/main/javascript/build'
	into 'src/main/resources/web/'
}

// Delete old build before copying new build
copyNewBuild.dependsOn(deleteOldBuild)
You can run these tasks as follows:
./gradlew npmInstall
./gradlew npmBuild
./gradlew npmBuild copyNewBuild
Open the project from CLI and run the following commands:
To install npm packages:
If you installed packages you don't need to run this command
./gradlew npmInstall
To build react app:
./gradlew npmBuild
To copy build output to src/main/resources/web:
./gradlew copyNewBuild
To build Java app:
./gradlew build
To create docker image for the whole application:
./gradlew docker
Once the build has finished, you can start the application via the command-line. Go to build/libs folder and execute the jar file:
java -jar firebase-0.0.1-SNAPSHOT.jar
Point your browser to it and you should see the newly created React app running.
http://localhost:8080
To dockerize our application:
./gradlew build docker
To run docker image:
docker run --rm -it -p 8080:8080 eteration/firebase
We went through how to create a basic React web app and serve it with Spring Boot. The key is to configure our Gradle build script so that in addition to building and packaging our Java code, we also build and minify the web app and copy it to the Jar file. Essentially, the same principles apply if you’re using any other build tool (e.g. Maven) or you want to use something else (e.g. Angular) than React.