-
Notifications
You must be signed in to change notification settings - Fork 405
Menu Appearance
cmp support three different completion menu types:
- Custom popup menu, supporting item highlights, etc.
- Custom wildmenu, displaying items horizontally on the bottom of the window (userful for search in cmdline mode)
- Native menu (experimental)
By default, the Custom menu is enabled. This can be changed as follows:
cmp.setup({
   view = {
      entries = "custom" -- can be "custom", "wildmenu" or "native"
   }
})
For wildmenu, you can specify the separator between items. Also, in the following, we also set up wildmenu in cmdline mode:
cmp.setup.cmdline('/', {
  view = {
    entries = {name = 'wildmenu', separator = '|' }
  },
})
The above config results in the following:

By default, the custom completion menu's order is top-down; The highest scoring entry appears at the top of the menu. However, when in cmdline mode, or when the cursor is near the bottom of the screen, and the menu opens above the cursor, it sometimes can be preferable if the menu used a bottom down approach. Consider the following example:

To enable this behavior, use something like the following:
view = {
  entries = {name = 'custom', selection_order = 'near_cursor' }
}, You can display the fancy icons to completion-menu with lspkind-nvim.
Install the plugin and put this snippet on your config.
local cmp = require('cmp')
local lspkind = require('lspkind')
cmp.setup {
  formatting = {
    format = lspkind.cmp_format(),
  },
}
You can optionally append mode = "symbol_text" or mode = "text_symbol" into lspkind.cmp_format() to also show the name of item's kind.
To display the source of the completion items, add menu and put the source names in the table.
formatting = {
  format = lspkind.cmp_format({
    mode = "symbol_text",
    menu = ({
      buffer = "[Buffer]",
      nvim_lsp = "[LSP]",
      luasnip = "[LuaSnip]",
      nvim_lua = "[Lua]",
      latex_symbols = "[Latex]",
    })
  }),
},
Alternatively, you can also do the above without having to install an extra plugin.
Define icons on your own
local kind_icons = {
Text = "",
Method = "",
Function = "",
Constructor = "",
Field = "",
Variable = "",
Class = "ﴯ",
Interface = "",
Module = "",
Property = "ﰠ",
Unit = "",
Value = "",
Enum = "",
Keyword = "",
Snippet = "",
Color = "",
File = "",
Reference = "",
Folder = "",
EnumMember = "",
Constant = "",
Struct = "",
Event = "",
Operator = "",
TypeParameter = ""
}Setup
local cmp = require('cmp')
cmp.setup {
  formatting = {
    format = function(entry, vim_item)
      -- Kind icons
      vim_item.kind = string.format('%s %s', kind_icons[vim_item.kind], vim_item.kind) -- This concatonates the icons with the name of the item kind
      -- Source
      vim_item.menu = ({
        buffer = "[Buffer]",
        nvim_lsp = "[LSP]",
        luasnip = "[LuaSnip]",
        nvim_lua = "[Lua]",
        latex_symbols = "[LaTeX]",
      })[entry.source.name]
      return vim_item
    end
  },
}
To combine both (lspkind and your own kind_icons when lspkind plugin is not installed), try this:
local cmp = require('cmp')
cmp.setup {
  formatting = {
    format = function(entry, vim_item)
      local prsnt, lspkind = pcall(require, "lspkind")
        if not prsnt then
	  -- Kind icons
	  vim_item.kind = string.format('%s %s', kind_icons[vim_item.kind], vim_item.kind) -- This concatonates the icons with the name of the item kind
	  -- Source
	  vim_item.menu = ({
	    buffer = "[Buffer]",
	    nvim_lsp = "[LSP]",
	    luasnip = "[LuaSnip]",
	    nvim_lua = "[Lua]",
            latex_symbols = "[LaTeX]",
	  })[entry.source.name]
	  return vim_item
	else
	  return lspkind.cmp_format()
	end
      end
  },

}Since the addition of specific kind highlights you can emulate the Dark+ Theme of VS Code using the following settings (if your theme does not already provide them):
" gray
highlight! CmpItemAbbrDeprecated guibg=NONE gui=strikethrough guifg=#808080
" blue
highlight! CmpItemAbbrMatch guibg=NONE guifg=#569CD6
highlight! CmpItemAbbrMatchFuzzy guibg=NONE guifg=#569CD6
" light blue
highlight! CmpItemKindVariable guibg=NONE guifg=#9CDCFE
highlight! CmpItemKindInterface guibg=NONE guifg=#9CDCFE
highlight! CmpItemKindText guibg=NONE guifg=#9CDCFE
" pink
highlight! CmpItemKindFunction guibg=NONE guifg=#C586C0
highlight! CmpItemKindMethod guibg=NONE guifg=#C586C0
" front
highlight! CmpItemKindKeyword guibg=NONE guifg=#D4D4D4
highlight! CmpItemKindProperty guibg=NONE guifg=#D4D4D4
highlight! CmpItemKindUnit guibg=NONE guifg=#D4D4D4
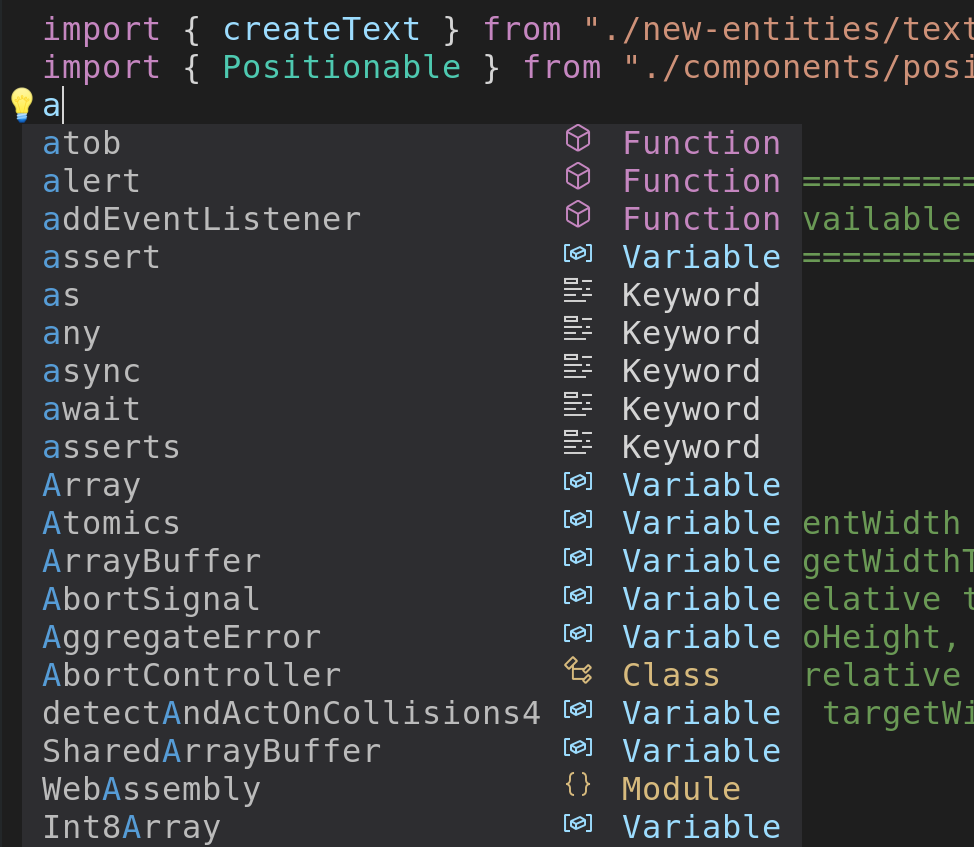
With the official vs code codicons, the results look like this:
(These colors are now included in tomasiser/vim-code-dark)
You can obtain the codicons.ttf file by following this link. (required for the icons to show properly.)
The definitions are:
local cmp_kinds = {
Text = ' ',
Method = ' ',
Function = ' ',
Constructor = ' ',
Field = ' ',
Variable = ' ',
Class = ' ',
Interface = ' ',
Module = ' ',
Property = ' ',
Unit = ' ',
Value = ' ',
Enum = ' ',
Keyword = ' ',
Snippet = ' ',
Color = ' ',
File = ' ',
Reference = ' ',
Folder = ' ',
EnumMember = ' ',
Constant = ' ',
Struct = ' ',
Event = ' ',
Operator = ' ',
TypeParameter = ' ',
} formatting = {
format = function(_, vim_item)
vim_item.kind = (cmp_kinds[vim_item.kind] or '') .. vim_item.kind
return vim_item
end,
},Alternatively, if you want to mimic VS Code's menu appearance you can use this setup:
  formatting = {
    fields = { "kind", "abbr" },
    format = function(_, vim_item)
      vim_item.kind = cmp_kinds[vim_item.kind] or ""
      return vim_item
    end,
  },