-
Notifications
You must be signed in to change notification settings - Fork 2
EasyNPC ‐ Home

Painlessly mix, merge, and resolve conflicts and compatibility issues for all of your NPC overhauls.

|

|

|

|
EasyNPC is a modding and automation tool for NPC appearances in Bethesda games. Its mission is to highlight the choices that truly matter - i.e. how an NPC is going to look - while automating most of the tedious work around conflict resolution and load-time optimization.
With EasyNPC, you can:
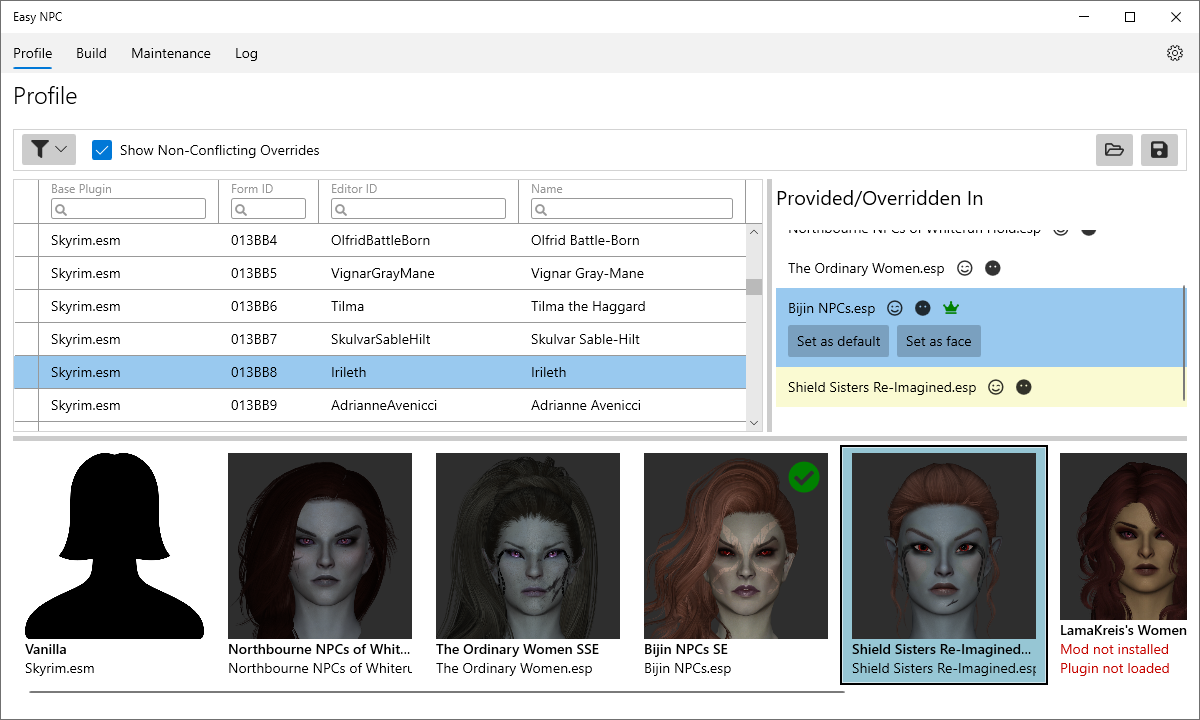
- See visual previews for most popular NPC visual overhauls (replacers)
- Use as many or few options as you like from any visual overhaul
- Choose any NPC option from any installed replacer, regardless of priority or load order
- Automatically patch visual replacers to work with foundational mods such as the Unofficial Patch or AI Overhaul
- Merge all of the above into a single standalone mod, packed as BSAs for optimal load times
- Avoid crashes and blackface bugs.
For more details about individual features, refer to the changelog and open issues.
- Windows 10
- Mod Organizer 2 (recommended) or Vortex Mod Manager
- A supported game, such as Skyrim Special Edition or Skyrim VR.
EasyNPC's primary audience is individual players with basic modding experience, as well as some mod-list developers. You should give this a try if all of the following apply:
- You already use or plan to use a large number of overlapping NPC overhauls
- You want an easy way to resolve conflicts between these overhauls and/or reduce the number of active ESPs
- You are generally familiar with how Bethesda mods work, and what causes conflicts or incompatibilities.
You don't need to be an expert to use EasyNPC. However, people who are just starting out on their modding journey may find some of the concepts confusing, and have difficulty setting up a good profile and ending up with a clean and compatible mod. Here is a quick checklist to see if the app is right for you:
- Have you used a tool such as xEdit or Synthesis at least once, without following a step-by-step guide?
- Can you define important modding terms such as "plugin", "record", "override", "file", and "BSA"?
- Do you know which mods in your current list are "NPC overhauls/replacers", or could you identify them in a few seconds?
- Can you explain in one sentence what a file such as
Qw_PANNPCs_CRF Patch.espis supposed to do, and how?
If you can confidently answer "yes" to the above questions, then you should have no trouble getting EasyNPC to work for you.
- Download the latest release. Look for the file named like
EasyNPC-x.y.z.7z. - Extract to the folder of your choice.
- Download and extract any Face Previews ("mugshots") you want from the Nexus optional files. You can either extract these all to the same folder as above, or pick a different folder which you'll point EasyNPC to later on. The advantage of using a different folder for mugshots is that you don't have to remember to move them if you later upgrade to a newer version of EasyNPC.
- If there's an NPC mod that you want previews for, but don't see anywhere in the Nexus files, check if there's an unofficial version in the Mugshot Prereleases Discord channel.
- Register Easy NPC with your mod manager, ensuring that you use the correct command-line arguments:
- Mod Organizer: Add Easy NPC as an executable.
- Vortex: Launch EasyNPC using the Vortex extension.
- Mod Organizer users: add a second executable for the Post-Build Checker, by adding the
-zargument to the same command-line arguments used in step 4. Vortex users don't need to do this, the extension automatically registers both buttons.
- While not required, it is recommended that you optimize your load order for EasyNPC before launching it the first time. This does not matter after the first time, unless you reset your profile.
- You'll be asked to confirm your settings. Make sure that both the Mod Root Directory and Face Preview (Mugshots) are correct.
- The Mod Directory should have been detected from your mod manager, while the Face Preview directory always defaults to your installation directory. If you chose to extract mugshots to a different directory, update this setting now.
- After confirming your settings, you'll be shown a load order screen similar to xEdit's. Click OK when ready to run.
- If any plugins are showing
⚠️ warnings, hover over the icon to see what the problem is. - If all of your plugins are showing
⚠️ warnings, this almost always means that your game directory wasn't detected correctly. Either you're trying to run EasyNPC on a game other than Special Edition and didn't specify the-gargument, or you're running a non-standard game configuration (e.g. a Steam installation that was moved to a different directory/drive without going through Steam), in which case you need to provide a-pargument to point to the correctdatadirectory.
- If any plugins are showing
- After analyzing your load order, you'll either be taken directly to your autogenerated profile, or possibly a warning screen telling you that there are problems with some of your mods. If you see warnings, just click "Continue to profile" for now.
- Make any changes you like to the profile.
- Most users, most of the time, should accept what EasyNPC has chosen as the
 Default Plugin. Only change this if you are sure you know what you're doing, or don't want the EasyNPC output to depend on that plugin as a master.
 - The
 Face Plugin for any given NPC can and should be changed to whichever plugin has the appearance you like the most. You can also double-click on one of the thumbnails (mugshots) to change the face.
- Most users, most of the time, should accept what EasyNPC has chosen as the
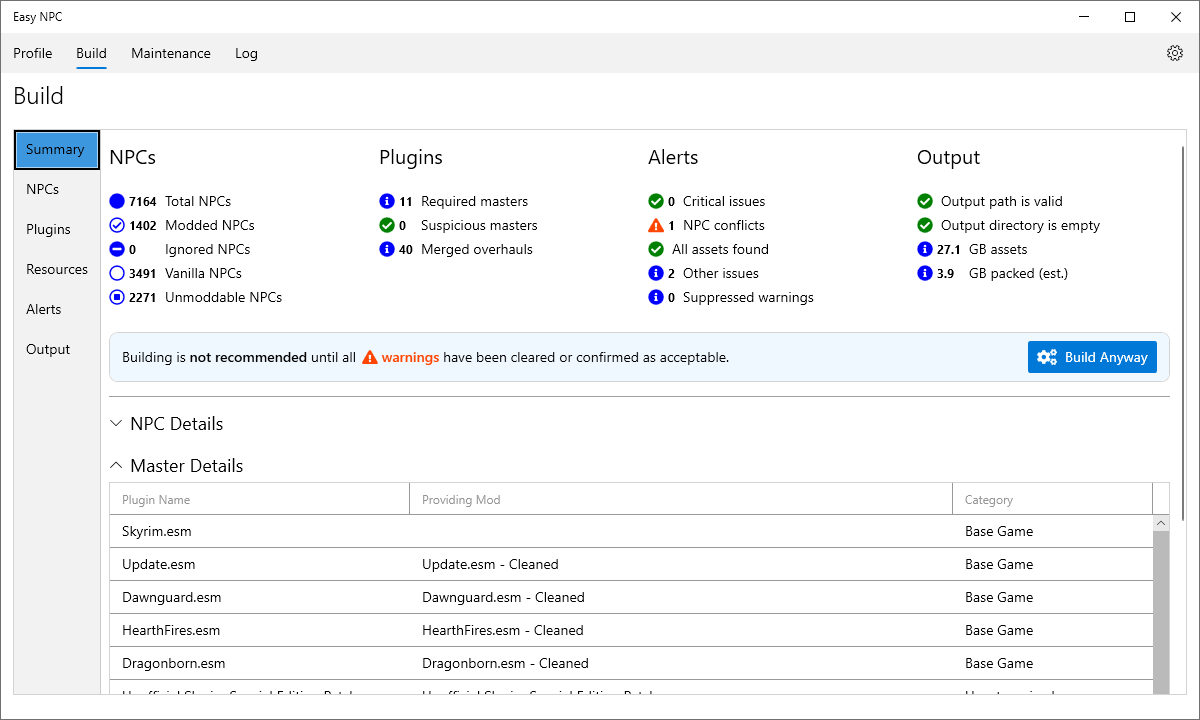
- Switch from the Profile tab to the Build tab. Resolve any important errors/warnings, and click the Build button.
- You'll be shown a screen with the build progress. When completed, this will switch to a view containing a link to your new mod, and some instructions for getting it activated, which you should follow.
- Activate the new EasyNPC mod and deactivate the original NPC visual overhauls. This step is important and generally not optional. The EasyNPC mod files are BSA-packed, which means that leaving the original mods active can cause conflicts from loose files, even if you've correctly added the EasyNPC mod to the bottom of your load order.
- It is recommended to do this in a new profile in your mod manager, so that you can easily switch back if you decide to change your settings and build a new mod.
Some people end up with conflicts at the end of the process, leading to the typical in-game issues such as blackface, bald heads with vanilla appearance, etc. Most of the time, this is simply a failure to follow step 8 above, although there may be cases where it is not possible to disable all of the conflicting mods. If this is happening to you - or if you just want to check to make sure everything's OK before you launch the game - then you can run EasyNPC in post-build mode.

Post-build mode will identify any problems with your EasyNPC mod setup, including conflicts. After following step 8 above (not before!) and switching to your "final" mod manager profile, run the second executable you set up in the Installation section, with the -z option. (Vortex users, simply click the "EasyNPC Post-Build" button next to the regular EasyNPC launcher.)
Questions? Problems? Please have a look at the following options.
- For bug reports or new feature requests, please create a GitHub issue and follow the bug reporting guidelines. Bug reports that are vague, confusing, ambiguous or abusive may be rejected.
- For general questions about the app, roadmap, etc. that are not related to your specific install, please consider starting a GitHub discussion.
- For support with a specific issue affecting your specific profile or game, the EasyNPC Discord channel is recommended.
If you've come here from Nexus Mods, please note that developer responses to the Nexus discussion thread happen on a much lower frequency, generally once or twice every few weeks. The best way to get an answer is through the channels listed above.
