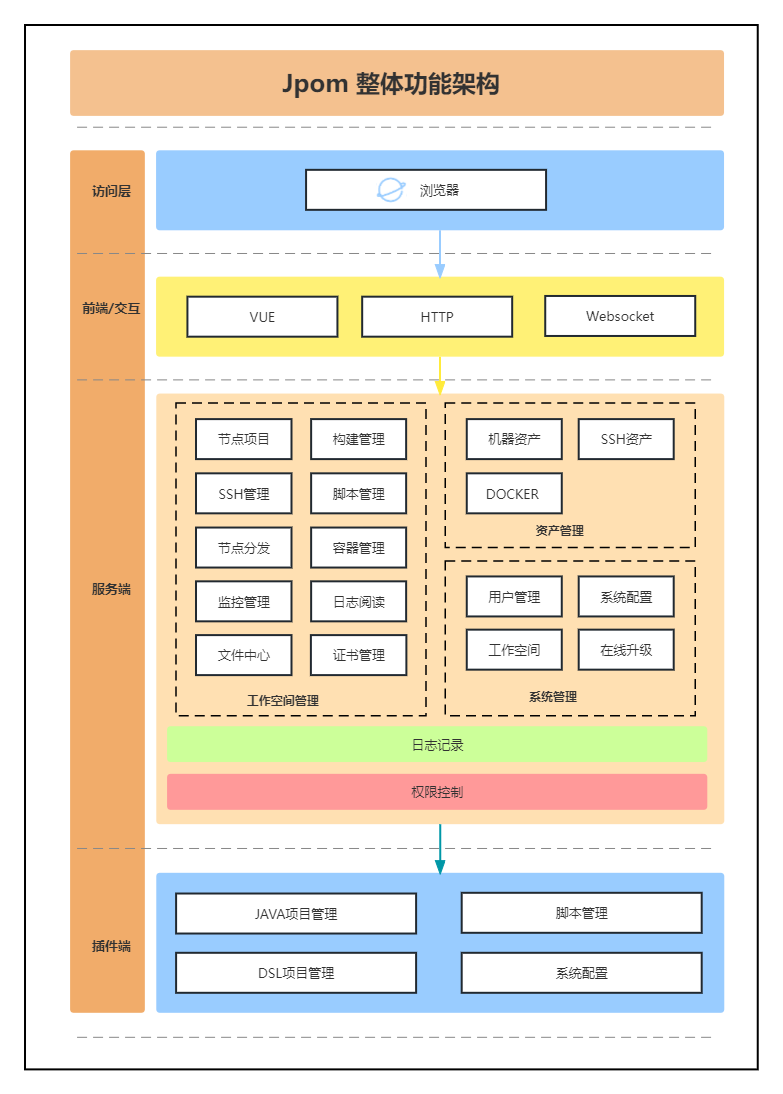
🚀Simple and lightweight low-invasive online build, automated deployment, daily operations, and project monitoring software.
【It is also a native ops software / 中文】
- No dedicated operations team, so developers have to handle operations tasks, including manual project building and deployment.
- Different projects require different build and deployment commands.
- Need to package for various environments like development, testing, and production.
- Need to monitor the status of multiple projects simultaneously.
- Need to download SSH tools to remotely connect to servers.
- Need to download FTP tools to transfer files to servers.
- Syncing account passwords across multiple servers and computers is inconvenient.
- Want to use automation tools, but they are high-demanding on server performance and too complicated to set up.
- Have specific needs for automation tools and want to modify the project, but existing tools are too complex.
For distributed projects, these steps are even more cumbersome.
Let Jpom help you solve these pain points! And these are just the basic features that Jpom offers.
😁 After using Jpom
- Convenient User Management
- User activity monitoring, with email notifications for specific user actions
- Multi-user management with independent project permissions (control over upload and delete rights), comprehensive operation logs, and workspace-based permission isolation
- Accounts can enable MFA (Multi-Factor Authentication) for security
- Real-time interface to view project status, console logs, and manage project files
- Edit project text files online
- Docker container management and Docker Swarm cluster management(Docker UI)
- Online SSH Terminal, allowing easy server management without using PuTTY, Xshell, FinalShell, etc.
- No need to know server passwords after logging into the Jpom system
- Specify forbidden SSH commands to prevent high-risk operations and automatically log command execution
- Set file directories to manage project files and configuration files online
- Execute SSH command templates and schedule scripts online
- Edit text files online
- Lightweight implementation of basic"bastion host"functionality
- One-click cluster project deployment using project distribution
- Online build process eliminates the need for manual project updates and upgrades
- Supports pulling from GIT and SVN repositories
- Supports container builds (docker)
- Supports SSH-based deployment
- Supports scheduled builds
- Supports WebHook-triggered builds
- Supports online editing of nginx configuration files and automatic reload operations
- Manage nginx status and SSL certificates
- Automatic alerts and restart attempts for abnormal project status
- Supports notifications via email, DingTalk groups, and WeChat groups, actively monitoring project status
- Node script templates with scheduling or triggers for expanded functionality
- Configurable authorization for important paths to prevent user errors with system files
- On Windows servers, some features may have compatibility issues due to system characteristics. It is recommended to thoroughly test in practical use. Linux currently has good compatibility.
- Install the server and plugin components in different directories; do not install them in the same directory.
- To uninstall Jpom plugin or server components, first stop the corresponding service, then delete the related program files, log folders, and data directories.
- Local builds depend on the system environment. If build commands require Maven or Node.js, ensure the corresponding environment is installed on the build server. If the environment is installed after the server is started, restart the server via the command line for the environment to take effect.
- On Ubuntu/Debian servers, the plugin component may fail to add. Please create a .bash_profile file in the root directory of the current user.
- After upgrading to version 2.7.x, downgrading is not recommended due to potential data incompatibility issues.
- Currently, version 2.x.x uses HTTP for communication between the plugin and server components, so ensure network connectivity between them during use.
- Jpom version 3.0 is already being planned. Stay tuned for the new release!
🗒️ Changelog
Must-read before upgrading: CHANGELOG.md
Jpom supports various installation methods to meet different user needs. Just choose one method to install.
Note: The installation directory is the current directory where the command is executed!
⚠️ Special Reminder: When using the one-click installation, ensure the command is executed in different directories. The Server and Agent cannot be installed in the same directory!To change the data and log storage paths of the server, modify the
jpom.pathconfiguration property in the fileapplication.yml
# Default one-click installation
curl -fsSL https://jpom.top/docs/install.sh | bash -s Server jdk+default
# Default one-click installation and automatic startup service configuration
curl -fsSL https://jpom.top/docs/install.sh | bash -s Server jdk+default+service

# Install server and jdk environment
yum install -y wget && \
wget -O install.sh https://jpom.top/docs/install.sh && \
bash install.sh Server jdk

# Install server and jdk, maven environment
yum install -y wget && \
wget -O install.sh https://jpom.top/docs/install.sh && \
bash install.sh Server jdk+mvn

# ubuntu
apt-get install -y wget && \
wget -O install.sh https://jpom.top/docs/install.sh && \
bash install.sh Server jdk
After a successful startup, the server port is 2122. You can access the management page via http://127.0.0.1:2122/
(if not accessing from the local machine, replace 127.0.0.1 with the IP address of the installed server).
If you cannot access the management system, run the command
systemctl status firewalldto check if the firewall is enabled. If you seeActive: active (running)in green in the status bar, you need to allow port2122.# Allow port 2122 for the management system firewall-cmd --add-port=2122/tcp --permanent # Reload the firewall to take effect firewall-cmd --reloadIf you have allowed the port in the operating system but still cannot access it, and you are using a cloud server, check the security group rules in the cloud server's control panel to see if port 2122 is allowed.
⚠️ Note: There are multiple firewalls in Linux systems: Firewall, Iptables, SELinux, etc. When checking firewall configurations, make sure to check all of them.
If the server where the server side is installed also needs to be managed, you need to install the agent on the server side as well (both the server and agent can be installed on the same server but in different directories).
⚠️ Special reminder: Do not execute the one-click installation command in the same directory for both the Server and Agent!If you need to modify the agent data and log storage paths, update the
jpom.pathconfiguration property in the fileapplication.yml
# Default one-click installation
curl -fsSL https://jpom.top/docs/install.sh | bash -s Agent jdk+default
# Default one-click installation and auto-configure startup service
curl -fsSL https://jpom.top/docs/install.sh | bash -s Agent jdk+default+service

# Install agent and JDK environment
yum install -y wget && \
wget -O install.sh https://jpom.top/docs/install.sh && \
bash install.sh Agent jdk

# ubuntu
apt-get install -y wget && \
wget -O install.sh https://jpom.top/docs/install.sh && \
bash install.sh Agent jdk
After a successful startup, the agent port is 2123, which is used by the server.
⚠️ Note: Container installation requires Docker to be installed first. Click here for Docker installation documentation
docker run -p 2122:2122 --name jpom-server jpomdocker/jpomdocker pull jpomdocker/jpom
mkdir -p /home/jpom-server/logs
mkdir -p /home/jpom-server/data
mkdir -p /home/jpom-server/conf
docker run -d -p 2122:2122 \
--name jpom-server \
-v /home/jpom-server/logs:/usr/local/jpom-server/logs \
-v /home/jpom-server/data:/usr/local/jpom-server/data \
-v /home/jpom-server/conf:/usr/local/jpom-server/conf \
jpomdocker/jpomdocker pull jpomdocker/jpom
docker volume create jpom-server-data
docker volume create jpom-server-logs
docker volume create jpom-server-conf
docker run -d -p 2122:2122 \
--name jpom-server \
-v jpom-server-data:/usr/local/jpom-server/data \
-v jpom-server-logs:/usr/local/jpom-server/logs \
-v jpom-server-conf:/usr/local/jpom-server/conf \
jpomdocker/jpomContainer installation only provides the server version. Due to isolation between the container and the host environment, many functionalities of the agent cannot be used properly. Therefore, containerization of the agent is not very meaningful.
For more information on installing Docker, configuring images, auto-start, and locating the installation directory, refer to the documentation https://jpom.top/pages/b63dc5/
In lower versions of Docker, you may encounter the error
ls: cannot access'/usr/local/jpom-server/lib/': Operation not permittedIn this case, add the--privilegedparameter Example:docker run -p 2122:2122 --name jpom-server jpomdocker/jpom --privileged
- Download the installation package from https://jpom.top/pages/all-downloads/
- Extract the files
- Install the agent:
- The
agent-x.x.x-releasedirectory contains all the installation files for the agent - Upload the entire directory to the corresponding server
- Start the agent. Use the bat script on Windows and the sh script on Linux (if there are garbled characters or execution issues, check the encoding format and line endings)
- The default running port for the agent is
2123
- The
- Install the server:
- The
server-x.x.x-releasedirectory contains all the installation files for the server - Upload the entire directory to the corresponding server
- Start the server. Use the bat script on Windows and the sh script on Linux (if there are garbled characters or execution issues, check the encoding format and line endings)
- The default running port for the server is
2122. Access the management page athttp://127.0.0.1:2122/(if not accessed locally, replace127.0.0.1with your server's IP address)
- The
- Visit the Jpom Gitee page and pull the latest complete code (recommended to use the master branch)
- Switch to the
web-vuedirectory and runnpm install(you need to have the Vue environment set up in advance; refer to the README.md in the web-vue directory for details) - Run
npm run buildto package the Vue project - Switch to the project root directory and run:
mvn clean package - Install the agent:
- Check the agent installation package in
modules/agent/target/agent-x.x.x-release - Upload the entire directory to the server
- Start the agent. Use the bat script on Windows and the sh script on Linux (if there are garbled characters or execution issues, check the encoding format and line endings)
- The default running port for the agent is
2123
- Check the agent installation package in
- Install the server:
- Check the server installation package in
modules/server/target/server-x.x.x-release - Upload the entire directory to the server
- Start the server. Use the bat script on Windows and the sh script on Linux (if there are garbled characters or execution issues, check the encoding format and line endings)
- The default running port for the server is
2122. Access the management page athttp://127.0.0.1:2122/(if not accessed locally, replace127.0.0.1with your server's IP address)
- Check the server installation package in
You can also use
script/release.batorscript/release.shfor quick packaging.
- No environment installation required; automatically compiles and builds
Note: Remember to modify the token value in the
.envfile
yum install -y git
git clone https://gitee.com/dromara/Jpom.git
cd Jpom
docker-compose -f docker-compose.yml up
# docker-compose -f docker-compose.yml up --build
# docker-compose -f docker-compose.yml build --no-cache
# docker-compose -f docker-compose-local.yml up
# docker-compose -f docker-compose-local.yml build --build-arg TEMP_VERSION=.0
# docker-compose -f docker-compose-cluster.yml up --build- Visit the Jpom Gitee page and pull the latest complete code (it's recommended to use the master branch, but if you want to experience new features, you can use the dev branch)
- Run the agent:
- Run
org.dromara.jpom.JpomAgentApplication - Note the default username and password information printed in the console.
- The agent's default running port:
2123
- Run
- Run the server:
- Run
org.dromara.jpom.JpomServerApplication - The server's default running port:
2122
- Run
- Build the Vue page, switch to the
web-vuedirectory (make sure you have node and npm environments set up locally). - Install the Vue project dependencies by executing
npm installin the console. - Start development mode by executing
npm run devin the console. - Access the frontend page using the address output in the console:
http://127.0.0.1:3000/(if not accessing from the local machine, replace127.0.0.1with your server's IP address).
- Using BAT Script Files on Windows
# Server management scripts (command line)
./bin/Server.bat start   # Start the Jpom server
./bin/Server.bat stop    # Stop the Jpom server
./bin/Server.bat restart # Restart the Jpom server
./bin/Server.bat status  # Check the Jpom server status
# Server management script (control panel), follow the panel prompts for operations
./bin/Server.bat

# Agent management scripts
./bin/Agent.bat start   # Start the Jpom agent
./bin/Agent.bat stop    # Stop the Jpom agent
./bin/Agent.bat restart # Restart the Jpom agent
./bin/Agent.bat status  # Check the Jpom agent status
# Agent management script (control panel), follow the panel prompts for operations
./bin/Agent.bat
After executing the startup script on Windows, follow the logs to check the startup status. If you encounter garbled text, check or modify the encoding format. It is recommended to use
GB2312for BAT script encoding on Windows.
- Using SH Script Files on Linux
# Server management scripts
./bin/Server.sh start     # Start the Jpom server
./bin/Server.sh stop      # Stop the Jpom server
./bin/Server.sh restart   # Restart the Jpom server
./bin/Server.sh status    # Check the Jpom server status
./bin/Service.sh install  # Create a service for the Jpom server (jpom-server)

# Agent management scripts
./bin/Agent.sh start     # Start the Jpom agent
./bin/Agent.sh stop      # Stop the Jpom agent
./bin/Agent.sh restart   # Restart the Jpom agent
./bin/Agent.sh status    # Check the Jpom agent status
./bin/Service.sh install # Create a service for the Jpom agent (jpom-agent)The following service installation instructions are for reference only; customize configurations as needed.
After successfully using
./bin/Service.sh install:systemctl {status | start | stop | restart} jpom-server
systemctl {status | start | stop | restart} jpom-agent
Located in the project's root path:
- Agent example:
application.yml - Server example:
application.yml
- Agent example:
logback.xml - Server example:
logback.xml
Some images may load slowly.
- Local Build + SSH Deployment for Java Projects
- Local Build + Project Deployment for Node Projects
- Local Build + SSH Deployment for Node Projects
- Local Build + Custom Management for Python Projects
- Custom Management for Java Projects
- Managing Compiled and Installed Nginx
- Managing Docker
- Container Build + Project Deployment for Java Projects
- More Practical Examples>>
- Jboot Example Code
- SpringBoot Example Code (ClassPath)
- SpringBoot Example Code (Jar)
- Node Vue Example Code (antdv)
- Python Example Code
Node.js compile specific directory:
yarn --cwd xxxx/ install
yarn --cwd xxxx/ build
Maven compile specific directory:
mvn -f xxxx/pom.xml clean package- Scan the QR code below on the left to join our WeChat group! (Add the assistant and mention Jpom to join the group)
- Open source projects rely on community support. If Jpom has helped you, consider buying us a coffee. You can scan the WeChat and Alipay QR codes or support us through Gitee sponsorship (click the donate button at the bottom of the project homepage, supports WeChat and Alipay). Sponsorship records
- Purchase open source merchandise: Merchandise Introduction
- For enterprise technical services, please contact us directly to discuss service plans.
- For bug reports and suggestions, feel free to create issues; developers will respond periodically.
- To contribute, please see the [Contribution Guide](#Contribution Guide)。
Thank you to all sponsors and contributors; your support is our motivation for continuous updates and improvements!
To better support the open-source project, we have decided to launch merchandise.
By purchasing, you get a small item, and we receive the profit from your purchase (the prices of the merchandise may be slightly higher than market prices; please be aware before ordering).
By contributing, you agree to the terms of the CLA agreement
As an open-source project, Jpom relies on community support and welcomes contributions from everyone. Whether big or small, your contributions will help thousands of users and developers. Your contributions will also be permanently recorded in the list of contributors, which is the essence of open-source projects!
To ensure code quality and standards, and to help you quickly understand the project structure, please read the following before contributing:
-
Fork this repository.
-
Clone your forked repository to your local machine.
Replace
branch-nameandusernamewith the appropriate values.Use
devfor code contributions anddocsfor documentation contributions.git clone -b branch-name https://gitee.com/username/Jpom.git
-
Modify the code/documentation and commit your changes.
# Add your changes to the staging area
git add .
# Commit your changes with a descriptive message
git commit -m 'Describe your changes'
# Push to your remote repository, replacing branch-name with dev or docs
git push origin branch-name
-
Create a Pull Request (PR).
Go to your repository on Gitee, create a PR request, and wait for the administrators to merge your changes.
| Branch | Description |
|---|---|
| master | Main branch, protected. Does not accept PRs. Merges from the beta branch after testing. |
| beta | Beta version branch, protected. Does not accept PRs. Merges from the dev branch after testing. |
| dev | Development branch, accepts PRs. Please submit PRs to the dev branch. |
| docs | Documentation branch, accepts PRs. Used for project documentation, feature introductions, and FAQ summaries. |
Primarily use the dev and docs branches for PR submissions. Other branches are for archiving and can be ignored by contributors.
| Project Name | Project Link | Description |
|---|---|---|
| SpringBoot_v2 | https://gitee.com/bdj/SpringBoot_v2 | A pure SpringBoot scaffold |
| TLog GVP Project | https://gitee.com/dromara/TLog | A lightweight distributed log tagging and tracking tool for microservices |
| Sa-Token | https://gitee.com/dromara/sa-token | Possibly the most feature-rich Java authentication framework |
| Erupt | https://gitee.com/erupt/erupt | Zero frontend code, pure annotation-based admin backend development |
| hippo4j | https://gitee.com/magegoofy/hippo4j | Powerful dynamic thread pool framework with monitoring and alert features |
| HertzBeat | https://gitee.com/dromara/hertzbeat | Easy-to-use cloud monitoring system with strong custom monitoring capability |
- Special thanks to JetBrains for providing a free open-source license:


