This document has additional information for configuration Debian-based LINUX operating systems, including Raspbian and Ubuntu.
After installing LINUX, creating user account, and accessing device, configure the domainname and optionally grant privileges to enable automated sudo, for example:
echo "mydomain.com" | sudo tee /etc/domainname
echo "${USER} ALL=(ALL) NOPASSWD: ALL" | sudo tee "/etc/sudoers.d/010_${USER}-nopasswd"
To setup DNS properly on Ubuntu 18.04 an additional package, resolvconf, needs to be installed and configured.
sudo apt install -qq -y resolvconf
Then configure by appending the desired nameservers, one per line; for example:
echo 'nameserver 192.168.1.50' | sudo tee -a /etc/resolvconf/resolv.conf.d/head
echo 'nameserver 1.1.1.1' | sudo tee -a /etc/resolvconf/resolv.conf.d/head
Alternatively, you can disable systemd resolvd by setting DNSStubListener=no in /etc/systemd/resolved.conf and then restart the systemd-resolved service. It will then start without binding to port 53, allowing dnsmasq to bind instead.
sudo sed -e 's/^.*DNSStubListener=.*/DNSStubListener=no/' /etc/systemd/resolved.conf
sudo systemctl restart systemd-resolved
If you want to use the Home Assistant DNS addon, the existing DNS resolver for Ubuntu must be disabled. This method works on Ubuntu Releases 17.04 (Zasty), 17.10 (Artful), 18.04 (Bionic) and 18.10 (Cosmic):
Disable and stop the systemd-resolved service:
sudo systemctl disable systemd-resolved.service
sudo systemctl stop systemd-resolved
Set DNS to default
sudo echo 'dns=default' >> /etc/NetworkManager/NetworkManager.conf
Delete /etc/resolv.conf
sudo rm /etc/resolv.conf
Restart network-manager
sudo service network-manager restart
To use static IP addresses, change the /etc/network/interfaces file, for example to configure a system with both wired (eth0) and wireless (wlan0) networking (presuming host is also running dnsmasq addon):
auto lo
iface lo inet loopback

auto eth0
iface eth0 inet static
address 192.168.1.50
gateway 192.168.1.1
netmask 24

auto wlan0
iface wlan0 inet static
address 192.168.1.51
gateway 192.168.1.1
netmask 24

dns-nameservers 192.168.1.50 1.1.1.1 9.9.9.9 8.8.8.8 8.8.4.4
To accomodate running Home Assistant and its components in addition to the motion and YOLO software, the size of the swap file should be increased. It is recommended to increase from the default 100 Mbytes; recommended size is 256.
sudo systemctl stop docker
sudo dphys-swapfile swapoff
SWAPSIZE=256
sudo sed -i "s/CONF_SWAPSIZE=.*/CONF_SWAPSIZE=${SWAPSIZE}/" /etc/dphys-swapfile
sudo dphys-swapfile swapon
sudo systemctl start docker
If using a RaspberryPi with a connected display the device may be configured to automatically log into the device and start the graphical user interface (GUI).
The first step is installing the desktop manager:
sudo apt install -qq -y lightdm
Second step is to run the raspi-config program from the command-line and configure the system to boot to desktop GUI:
sudo raspi-config
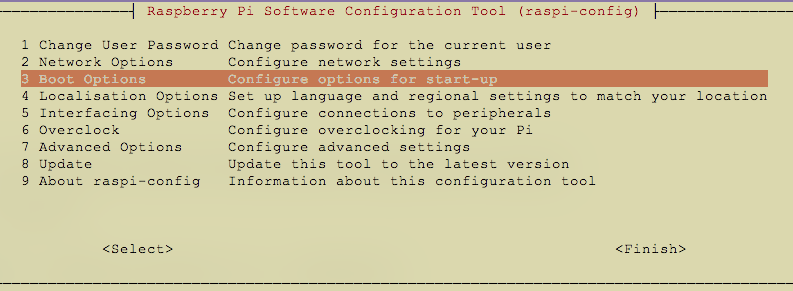
Navigate through the screens; first selecting option 3. Boot Options:
Then option B1 Desktop / CLI:
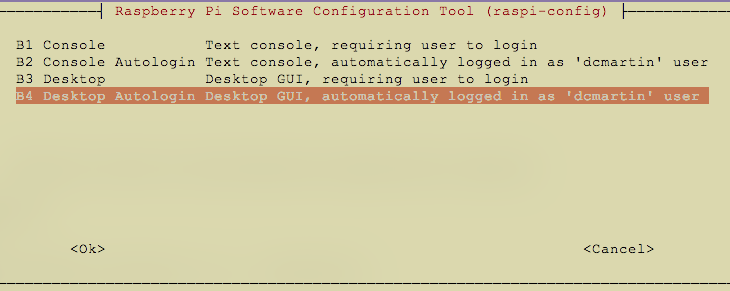
Finally, select option B4 Desktop Autologin Desktop GUI with the utilized account (e.g. dcmartin):
Select <OK> and exit the rasp-config application. Then reboot the computer:
sudo reboot
To configure a RaspberryPi with a local display, e.g. the 7" touchscreen, the system needs to be configured to auto-login as a designated user (e.g. pi)
and invoke the X server.
Run this configuration utility as root, e.g. sudo raspi-config to setup automatic login.
The options are listed below; use option three (3):
1 Change User Password Change password for the '<you>' user
2 Network Options      Configure network settings
3 Boot Options         Configure options for start-up
4 Localisation Options Set up language and regional settings to match your location
5 Interfacing Options  Configure connections to peripherals
6 Overclock            Configure overclocking for your Pi
7 Advanced Options     Configure advanced settings
8 Update               Update this tool to the latest version
9 About raspi-config   Information about this configuration tool
The options are listed below; use option one (1):
B1 Desktop / CLI            Choose whether to boot into a desktop environment or the command line
B2 Wait for Network at Boot Choose whether to wait for network connection during boot
B3 Splash Screen            Choose graphical splash screen or text boot
The options are listed below; use option two (2):
B1 Console           Text console, requiring user to login
B2 Console Autologin Text console, automatically logged in as '<you>' user
B3 Desktop           Desktop GUI, requiring user to login
B4 Desktop Autologin Desktop GUI, automatically logged in as '<you>' user
The following software is required:
- X Window System
openboxto automatically start the appropriate programs- the Chromium Web browser
sudo apt update -qq -y
sudo apt install -qq -y xserver-xorg x11-xserver-utils xinit openbox chromium-browser
This file initiates the X Window System for the graphical-user interface when the user, i.e. <you>, logs in on the console:
echo 'startx --' >> ~/.bash_profile
The openbox application runs when the X Window System starts; it's configuration is defined as follows:
- disable any form of screen saver, screen blanking, or power management
- set keyboard layout for US english (your mileage may vary)
- allow quitting the X server with CTRL-ATL-Backspace
- set browser options to always indicate clean exit
- start browser in kiosk mode with local server (note: may require port
8123)
Use the script below to create the necessary autostart configuration file.
sudo cat > /etc/xdg/openbox/autostart << EOF
# 1
xset s off
xset s noblank
xset -dpms
# 2
setxkbmap -layout us
# 3
setxkbmap -option terminate:ctrl_alt_bksp
# 4
sed -i 's/"exited_cleanly":false/"exited_cleanly":true/' ~/.config/chromium/'Local State'
sed -i 's/"exited_cleanly":false/"exited_cleanly":true/; s/"exit_type":"[^"]\+"/"exit_type":"Normal"/' ~/.config/chromium/Default/Preferences
# 5
chromium-browser --disable-infobars --kiosk http://127.0.0.1/
EOF


