-
Notifications
You must be signed in to change notification settings - Fork 46
/
Copy pathai.json
451 lines (451 loc) · 121 KB
/
ai.json
1
2
3
4
5
6
7
8
9
10
11
12
13
14
15
16
17
18
19
20
21
22
23
24
25
26
27
28
29
30
31
32
33
34
35
36
37
38
39
40
41
42
43
44
45
46
47
48
49
50
51
52
53
54
55
56
57
58
59
60
61
62
63
64
65
66
67
68
69
70
71
72
73
74
75
76
77
78
79
80
81
82
83
84
85
86
87
88
89
90
91
92
93
94
95
96
97
98
99
100
101
102
103
104
105
106
107
108
109
110
111
112
113
114
115
116
117
118
119
120
121
122
123
124
125
126
127
128
129
130
131
132
133
134
135
136
137
138
139
140
141
142
143
144
145
146
147
148
149
150
151
152
153
154
155
156
157
158
159
160
161
162
163
164
165
166
167
168
169
170
171
172
173
174
175
176
177
178
179
180
181
182
183
184
185
186
187
188
189
190
191
192
193
194
195
196
197
198
199
200
201
202
203
204
205
206
207
208
209
210
211
212
213
214
215
216
217
218
219
220
221
222
223
224
225
226
227
228
229
230
231
232
233
234
235
236
237
238
239
240
241
242
243
244
245
246
247
248
249
250
251
252
253
254
255
256
257
258
259
260
261
262
263
264
265
266
267
268
269
270
271
272
273
274
275
276
277
278
279
280
281
282
283
284
285
286
287
288
289
290
291
292
293
294
295
296
297
298
299
300
301
302
303
304
305
306
307
308
309
310
311
312
313
314
315
316
317
318
319
320
321
322
323
324
325
326
327
328
329
330
331
332
333
334
335
336
337
338
339
340
341
342
343
344
345
346
347
348
349
350
351
352
353
354
355
356
357
358
359
360
361
362
363
364
365
366
367
368
369
370
371
372
373
374
375
376
377
378
379
380
381
382
383
384
385
386
387
388
389
390
391
392
393
394
395
396
397
398
399
400
401
402
403
404
405
406
407
408
409
410
411
412
413
414
415
416
417
418
419
420
421
422
423
424
425
426
427
428
429
430
431
432
433
434
435
436
437
438
439
440
441
442
443
444
445
446
447
448
449
450
451
{
"version": "1.0",
"recipes": [
{
"id": "chatbot",
"description": "This recipe provides a blueprint for developers to create their own AI-powered chat applications using Streamlit.",
"name": "ChatBot",
"repository": "https://github.com/containers/ai-lab-recipes",
"ref": "v1.3.3.2",
"icon": "natural-language-processing",
"categories": ["natural-language-processing"],
"basedir": "recipes/natural_language_processing/chatbot",
"readme": "# Chat Application\n\n This recipe helps developers start building their own custom LLM enabled chat applications. It consists of two main components: the Model Service and the AI Application.\n\n There are a few options today for local Model Serving, but this recipe will use [`llama-cpp-python`](https://github.com/abetlen/llama-cpp-python) and their OpenAI compatible Model Service. There is a Containerfile provided that can be used to build this Model Service within the repo, [`model_servers/llamacpp_python/base/Containerfile`](/model_servers/llamacpp_python/base/Containerfile).\n\n The AI Application will connect to the Model Service via its OpenAI compatible API. The recipe relies on [Langchain's](https://python.langchain.com/docs/get_started/introduction) python package to simplify communication with the Model Service and uses [Streamlit](https://streamlit.io/) for the UI layer. You can find an example of the chat application below.\n\n \n\n\n## Try the Chat Application\n\nThe [Podman Desktop](https://podman-desktop.io) [AI Lab Extension](https://github.com/containers/podman-desktop-extension-ai-lab) includes this recipe among others. To try it out, open `Recipes Catalog` -> `Chatbot` and follow the instructions to start the application.\n\n# Build the Application\n\nThe rest of this document will explain how to build and run the application from the terminal, and will\ngo into greater detail on how each container in the Pod above is built, run, and \nwhat purpose it serves in the overall application. All the recipes use a central [Makefile](../../common/Makefile.common) that includes variables populated with default values to simplify getting started. Please review the [Makefile docs](../../common/README.md), to learn about further customizing your application.\n\n\nThis application requires a model, a model service and an AI inferencing application.\n\n* [Quickstart](#quickstart)\n* [Download a model](#download-a-model)\n* [Build the Model Service](#build-the-model-service)\n* [Deploy the Model Service](#deploy-the-model-service)\n* [Build the AI Application](#build-the-ai-application)\n* [Deploy the AI Application](#deploy-the-ai-application)\n* [Interact with the AI Application](#interact-with-the-ai-application)\n* [Embed the AI Application in a Bootable Container Image](#embed-the-ai-application-in-a-bootable-container-image)\n\n\n## Quickstart\nTo run the application with pre-built images from `quay.io/ai-lab`, use `make quadlet`. This command\nbuilds the application's metadata and generates Kubernetes YAML at `./build/chatbot.yaml` to spin up a Pod that can then be launched locally.\nTry it with:\n\n```\nmake quadlet\npodman kube play build/chatbot.yaml\n```\n\nThis will take a few minutes if the model and model-server container images need to be downloaded. \nThe Pod is named `chatbot`, so you may use [Podman](https://podman.io) to manage the Pod and its containers:\n\n```\npodman pod list\npodman ps\n```\n\nOnce the Pod and its containers are running, the application can be accessed at `http://localhost:8501`. \nPlease refer to the section below for more details about [interacting with the chatbot application](#interact-with-the-ai-application).\n\nTo stop and remove the Pod, run:\n\n```\npodman pod stop chatbot\npodman pod rm chatbot\n```\n\n## Download a model\n\nIf you are just getting started, we recommend using [granite-7b-lab](https://huggingface.co/instructlab/granite-7b-lab). This is a well\nperformant mid-sized model with an apache-2.0 license. In order to use it with our Model Service we need it converted\nand quantized into the [GGUF format](https://github.com/ggerganov/ggml/blob/master/docs/gguf.md). There are a number of\nways to get a GGUF version of granite-7b-lab, but the simplest is to download a pre-converted one from\n[huggingface.co](https://huggingface.co) here: https://huggingface.co/instructlab/granite-7b-lab-GGUF.\n\nThe recommended model can be downloaded using the code snippet below:\n\n```bash\ncd ../../../models\ncurl -sLO https://huggingface.co/instructlab/granite-7b-lab-GGUF/resolve/main/granite-7b-lab-Q4_K_M.gguf\ncd ../recipes/natural_language_processing/chatbot\n```\n\n_A full list of supported open models is forthcoming._ \n\n\n## Build the Model Service\n\nThe complete instructions for building and deploying the Model Service can be found in the\n[llamacpp_python model-service document](../../../model_servers/llamacpp_python/README.md).\n\nThe Model Service can be built from make commands from the [llamacpp_python directory](../../../model_servers/llamacpp_python/).\n\n```bash\n# from path model_servers/llamacpp_python from repo containers/ai-lab-recipes\nmake build\n```\nCheckout the [Makefile](../../../model_servers/llamacpp_python/Makefile) to get more details on different options for how to build.\n\n## Deploy the Model Service\n\nThe local Model Service relies on a volume mount to the localhost to access the model files. It also employs environment variables to dictate the model used and where its served. You can start your local Model Service using the following `make` command from `model_servers/llamacpp_python` set with reasonable defaults:\n\n```bash\n# from path model_servers/llamacpp_python from repo containers/ai-lab-recipes\nmake run\n```\n\n## Build the AI Application\n\nThe AI Application can be built from the make command:\n\n```bash\n# Run this from the current directory (path recipes/natural_language_processing/chatbot from repo containers/ai-lab-recipes)\nmake build\n```\n\n## Deploy the AI Application\n\nMake sure the Model Service is up and running before starting this container image. When starting the AI Application container image we need to direct it to the correct `MODEL_ENDPOINT`. This could be any appropriately hosted Model Service (running locally or in the cloud) using an OpenAI compatible API. In our case the Model Service is running inside the Podman machine so we need to provide it with the appropriate address `10.88.0.1`. To deploy the AI application use the following:\n\n```bash\n# Run this from the current directory (path recipes/natural_language_processing/chatbot from repo containers/ai-lab-recipes)\nmake run \n```\n\n## Interact with the AI Application\n\nEverything should now be up an running with the chat application available at [`http://localhost:8501`](http://localhost:8501). By using this recipe and getting this starting point established, users should now have an easier time customizing and building their own LLM enabled chatbot applications. \n\n## Embed the AI Application in a Bootable Container Image\n\nTo build a bootable container image that includes this sample chatbot workload as a service that starts when a system is booted, run: `make -f Makefile bootc`. You can optionally override the default image / tag you want to give the make command by specifying it as follows: `make -f Makefile BOOTC_IMAGE=<your_bootc_image> bootc`.\n\nSubstituting the bootc/Containerfile FROM command is simple using the Makefile FROM option.\n\n```bash\nmake FROM=registry.redhat.io/rhel9/rhel-bootc:9.4 bootc\n```\n\nSelecting the ARCH for the bootc/Containerfile is simple using the Makefile ARCH= variable.\n\n```\nmake ARCH=x86_64 bootc\n```\n\nThe magic happens when you have a bootc enabled system running. If you do, and you'd like to update the operating system to the OS you just built\nwith the chatbot application, it's as simple as ssh-ing into the bootc system and running:\n\n```bash\nbootc switch quay.io/ai-lab/chatbot-bootc:latest\n```\n\nUpon a reboot, you'll see that the chatbot service is running on the system. Check on the service with:\n\n```bash\nssh user@bootc-system-ip\nsudo systemctl status chatbot\n```\n\n### What are bootable containers?\n\nWhat's a [bootable OCI container](https://containers.github.io/bootc/) and what's it got to do with AI?\n\nThat's a good question! We think it's a good idea to embed AI workloads (or any workload!) into bootable images at _build time_ rather than\nat _runtime_. This extends the benefits, such as portability and predictability, that containerizing applications provides to the operating system.\nBootable OCI images bake exactly what you need to run your workloads into the operating system at build time by using your favorite containerization\ntools. Might I suggest [podman](https://podman.io/)?\n\nOnce installed, a bootc enabled system can be updated by providing an updated bootable OCI image from any OCI\nimage registry with a single `bootc` command. This works especially well for fleets of devices that have fixed workloads - think\nfactories or appliances. Who doesn't want to add a little AI to their appliance, am I right?\n\nBootable images lend toward immutable operating systems, and the more immutable an operating system is, the less that can go wrong at runtime!\n\n#### Creating bootable disk images\n\nYou can convert a bootc image to a bootable disk image using the\n[quay.io/centos-bootc/bootc-image-builder](https://github.com/osbuild/bootc-image-builder) container image.\n\nThis container image allows you to build and deploy [multiple disk image types](../../common/README_bootc_image_builder.md) from bootc container images.\n\nDefault image types can be set via the DISK_TYPE Makefile variable.\n\n`make bootc-image-builder DISK_TYPE=ami`\n",
"recommended": [
"hf.bartowski.granite-3.1-8b-instruct-GGUF",
"hf.instructlab.granite-7b-lab-GGUF",
"hf.instructlab.merlinite-7b-lab-GGUF",
"hf.lmstudio-community.granite-3.0-8b-instruct-GGUF"
],
"backend": "llama-cpp",
"languages": ["python"],
"frameworks": ["streamlit", "langchain"]
},
{
"id": "summarizer",
"description": "This recipe guides into creating custom LLM-powered summarization applications using Streamlit.",
"name": "Summarizer",
"repository": "https://github.com/containers/ai-lab-recipes",
"ref": "v1.3.3.2",
"icon": "natural-language-processing",
"categories": ["natural-language-processing"],
"basedir": "recipes/natural_language_processing/summarizer",
"readme": "# Text Summarizer Application\n\n This recipe helps developers start building their own custom LLM enabled summarizer applications. It consists of two main components: the Model Service and the AI Application.\n\n There are a few options today for local Model Serving, but this recipe will use [`llama-cpp-python`](https://github.com/abetlen/llama-cpp-python) and their OpenAI compatible Model Service. There is a Containerfile provided that can be used to build this Model Service within the repo, [`model_servers/llamacpp_python/base/Containerfile`](/model_servers/llamacpp_python/base/Containerfile).\n\n The AI Application will connect to the Model Service via its OpenAI compatible API. The recipe relies on [Langchain's](https://python.langchain.com/docs/get_started/introduction) python package to simplify communication with the Model Service and uses [Streamlit](https://streamlit.io/) for the UI layer. You can find an example of the summarizer application below.\n\n \n\n\n## Try the Summarizer Application\n\nThe [Podman Desktop](https://podman-desktop.io) [AI Lab Extension](https://github.com/containers/podman-desktop-extension-ai-lab) includes this recipe among others. To try it out, open `Recipes Catalog` -> `Summarizer` and follow the instructions to start the application.\n\n# Build the Application\n\nThe rest of this document will explain how to build and run the application from the terminal, and will\ngo into greater detail on how each container in the Pod above is built, run, and \nwhat purpose it serves in the overall application. All the recipes use a central [Makefile](../../common/Makefile.common) that includes variables populated with default values to simplify getting started. Please review the [Makefile docs](../../common/README.md), to learn about further customizing your application.\n\n\nThis application requires a model, a model service and an AI inferencing application.\n\n* [Quickstart](#quickstart)\n* [Download a model](#download-a-model)\n* [Build the Model Service](#build-the-model-service)\n* [Deploy the Model Service](#deploy-the-model-service)\n* [Build the AI Application](#build-the-ai-application)\n* [Deploy the AI Application](#deploy-the-ai-application)\n* [Interact with the AI Application](#interact-with-the-ai-application)\n* [Embed the AI Application in a Bootable Container Image](#embed-the-ai-application-in-a-bootable-container-image)\n\n\n## Quickstart\nTo run the application with pre-built images from `quay.io/ai-lab`, use `make quadlet`. This command\nbuilds the application's metadata and generates Kubernetes YAML at `./build/summarizer.yaml` to spin up a Pod that can then be launched locally.\nTry it with:\n\n```\nmake quadlet\npodman kube play build/summarizer.yaml\n```\n\nThis will take a few minutes if the model and model-server container images need to be downloaded. \nThe Pod is named `summarizer`, so you may use [Podman](https://podman.io) to manage the Pod and its containers:\n\n```\npodman pod list\npodman ps\n```\n\nOnce the Pod and its containers are running, the application can be accessed at `http://localhost:8501`. \nPlease refer to the section below for more details about [interacting with the summarizer application](#interact-with-the-ai-application).\n\nTo stop and remove the Pod, run:\n\n```\npodman pod stop summarizer\npodman pod rm summarizer\n```\n\n## Download a model\n\nIf you are just getting started, we recommend using [granite-7b-lab](https://huggingface.co/instructlab/granite-7b-lab). This is a well\nperformant mid-sized model with an apache-2.0 license. In order to use it with our Model Service we need it converted\nand quantized into the [GGUF format](https://github.com/ggerganov/ggml/blob/master/docs/gguf.md). There are a number of\nways to get a GGUF version of granite-7b-lab, but the simplest is to download a pre-converted one from\n[huggingface.co](https://huggingface.co) here: https://huggingface.co/instructlab/granite-7b-lab-GGUF/blob/main/granite-7b-lab-Q4_K_M.gguf.\n\nThe recommended model can be downloaded using the code snippet below:\n\n```bash\ncd ../../../models\ncurl -sLO https://huggingface.co/instructlab/granite-7b-lab-GGUF/resolve/main/granite-7b-lab-Q4_K_M.gguf\ncd ../recipes/natural_language_processing/summarizer\n```\n\n_A full list of supported open models is forthcoming._ \n\n\n## Build the Model Service\n\nThe complete instructions for building and deploying the Model Service can be found in the\n[llamacpp_python model-service document](../../../model_servers/llamacpp_python/README.md).\n\nThe Model Service can be built from make commands from the [llamacpp_python directory](../../../model_servers/llamacpp_python/).\n\n```bash\n# from path model_servers/llamacpp_python from repo containers/ai-lab-recipes\nmake build\n```\nCheckout the [Makefile](../../../model_servers/llamacpp_python/Makefile) to get more details on different options for how to build.\n\n## Deploy the Model Service\n\nThe local Model Service relies on a volume mount to the localhost to access the model files. It also employs environment variables to dictate the model used and where its served. You can start your local Model Service using the following `make` command from `model_servers/llamacpp_python` set with reasonable defaults:\n\n```bash\n# from path model_servers/llamacpp_python from repo containers/ai-lab-recipes\nmake run\n```\n\n## Build the AI Application\n\nThe AI Application can be built from the make command:\n\n```bash\n# Run this from the current directory (path recipes/natural_language_processing/summarizer from repo containers/ai-lab-recipes)\nmake build\n```\n\n## Deploy the AI Application\n\nMake sure the Model Service is up and running before starting this container image. When starting the AI Application container image we need to direct it to the correct `MODEL_ENDPOINT`. This could be any appropriately hosted Model Service (running locally or in the cloud) using an OpenAI compatible API. In our case the Model Service is running inside the Podman machine so we need to provide it with the appropriate address `10.88.0.1`. To deploy the AI application use the following:\n\n```bash\n# Run this from the current directory (path recipes/natural_language_processing/summarizer from repo containers/ai-lab-recipes)\nmake run \n```\n\n## Interact with the AI Application\n\nEverything should now be up an running with the summarizer application available at [`http://localhost:8501`](http://localhost:8501). By using this recipe and getting this starting point established, users should now have an easier time customizing and building their own LLM enabled summarizer applications. \n\n## Embed the AI Application in a Bootable Container Image\n\nTo build a bootable container image that includes this sample summarizer workload as a service that starts when a system is booted, run: `make -f Makefile bootc`. You can optionally override the default image / tag you want to give the make command by specifying it as follows: `make -f Makefile BOOTC_IMAGE=<your_bootc_image> bootc`.\n\nSubstituting the bootc/Containerfile FROM command is simple using the Makefile FROM option.\n\n```bash\nmake FROM=registry.redhat.io/rhel9/rhel-bootc:9.4 bootc\n```\n\nSelecting the ARCH for the bootc/Containerfile is simple using the Makefile ARCH= variable.\n\n```\nmake ARCH=x86_64 bootc\n```\n\nThe magic happens when you have a bootc enabled system running. If you do, and you'd like to update the operating system to the OS you just built\nwith the summarizer application, it's as simple as ssh-ing into the bootc system and running:\n\n```bash\nbootc switch quay.io/ai-lab/summarizer-bootc:latest\n```\n\nUpon a reboot, you'll see that the summarizer service is running on the system. Check on the service with:\n\n```bash\nssh user@bootc-system-ip\nsudo systemctl status summarizer\n```\n\n### What are bootable containers?\n\nWhat's a [bootable OCI container](https://containers.github.io/bootc/) and what's it got to do with AI?\n\nThat's a good question! We think it's a good idea to embed AI workloads (or any workload!) into bootable images at _build time_ rather than\nat _runtime_. This extends the benefits, such as portability and predictability, that containerizing applications provides to the operating system.\nBootable OCI images bake exactly what you need to run your workloads into the operating system at build time by using your favorite containerization\ntools. Might I suggest [podman](https://podman.io/)?\n\nOnce installed, a bootc enabled system can be updated by providing an updated bootable OCI image from any OCI\nimage registry with a single `bootc` command. This works especially well for fleets of devices that have fixed workloads - think\nfactories or appliances. Who doesn't want to add a little AI to their appliance, am I right?\n\nBootable images lend toward immutable operating systems, and the more immutable an operating system is, the less that can go wrong at runtime!\n\n#### Creating bootable disk images\n\nYou can convert a bootc image to a bootable disk image using the\n[quay.io/centos-bootc/bootc-image-builder](https://github.com/osbuild/bootc-image-builder) container image.\n\nThis container image allows you to build and deploy [multiple disk image types](../../common/README_bootc_image_builder.md) from bootc container images.\n\nDefault image types can be set via the DISK_TYPE Makefile variable.\n\n`make bootc-image-builder DISK_TYPE=ami`\n",
"recommended": [
"hf.bartowski.granite-3.1-8b-instruct-GGUF",
"hf.instructlab.granite-7b-lab-GGUF",
"hf.instructlab.merlinite-7b-lab-GGUF",
"hf.lmstudio-community.granite-3.0-8b-instruct-GGUF"
],
"backend": "llama-cpp",
"languages": ["python"],
"frameworks": ["streamlit", "langchain"]
},
{
"id": "codegeneration",
"description": "This recipes showcases how to leverage LLM to build your own custom code generation application.",
"name": "Code Generation",
"repository": "https://github.com/containers/ai-lab-recipes",
"ref": "v1.3.3.2",
"icon": "generator",
"categories": ["natural-language-processing"],
"basedir": "recipes/natural_language_processing/codegen",
"readme": "# Code Generation Application\n\n This recipe helps developers start building their own custom LLM enabled code generation applications. It consists of two main components: the Model Service and the AI Application.\n\n There are a few options today for local Model Serving, but this recipe will use [`llama-cpp-python`](https://github.com/abetlen/llama-cpp-python) and their OpenAI compatible Model Service. There is a Containerfile provided that can be used to build this Model Service within the repo, [`model_servers/llamacpp_python/base/Containerfile`](/model_servers/llamacpp_python/base/Containerfile).\n\n The AI Application will connect to the Model Service via its OpenAI compatible API. The recipe relies on [Langchain's](https://python.langchain.com/docs/get_started/introduction) python package to simplify communication with the Model Service and uses [Streamlit](https://streamlit.io/) for the UI layer. You can find an example of the code generation application below.\n\n \n\n\n## Try the Code Generation Application\n\nThe [Podman Desktop](https://podman-desktop.io) [AI Lab Extension](https://github.com/containers/podman-desktop-extension-ai-lab) includes this recipe among others. To try it out, open `Recipes Catalog` -> `Code Generation` and follow the instructions to start the application.\n\n# Build the Application\n\nThe rest of this document will explain how to build and run the application from the terminal, and will\ngo into greater detail on how each container in the Pod above is built, run, and \nwhat purpose it serves in the overall application. All the recipes use a central [Makefile](../../common/Makefile.common) that includes variables populated with default values to simplify getting started. Please review the [Makefile docs](../../common/README.md), to learn about further customizing your application.\n\n\nThis application requires a model, a model service and an AI inferencing application.\n\n* [Quickstart](#quickstart)\n* [Download a model](#download-a-model)\n* [Build the Model Service](#build-the-model-service)\n* [Deploy the Model Service](#deploy-the-model-service)\n* [Build the AI Application](#build-the-ai-application)\n* [Deploy the AI Application](#deploy-the-ai-application)\n* [Interact with the AI Application](#interact-with-the-ai-application)\n* [Embed the AI Application in a Bootable Container Image](#embed-the-ai-application-in-a-bootable-container-image)\n\n\n## Quickstart\nTo run the application with pre-built images from `quay.io/ai-lab`, use `make quadlet`. This command\nbuilds the application's metadata and generates Kubernetes YAML at `./build/codegen.yaml` to spin up a Pod that can then be launched locally.\nTry it with:\n\n```\nmake quadlet\npodman kube play build/codegen.yaml\n```\n\nThis will take a few minutes if the model and model-server container images need to be downloaded. \nThe Pod is named `codegen`, so you may use [Podman](https://podman.io) to manage the Pod and its containers:\n\n```\npodman pod list\npodman ps\n```\n\nOnce the Pod and its containers are running, the application can be accessed at `http://localhost:8501`. \nPlease refer to the section below for more details about [interacting with the codegen application](#interact-with-the-ai-application).\n\nTo stop and remove the Pod, run:\n\n```\npodman pod stop codegen\npodman pod rm codgen\n```\n\n## Download a model\n\nIf you are just getting started, we recommend using [Mistral-7B-code-16k-qlora](https://huggingface.co/Nondzu/Mistral-7B-code-16k-qlora). This is a well\nperformant mid-sized model with an apache-2.0 license fine tuned for code generation. In order to use it with our Model Service we need it converted\nand quantized into the [GGUF format](https://github.com/ggerganov/ggml/blob/master/docs/gguf.md). There are a number of\nways to get a GGUF version of Mistral-7B-code-16k-qlora, but the simplest is to download a pre-converted one from\n[huggingface.co](https://huggingface.co) here: https://huggingface.co/TheBloke/Mistral-7B-Code-16K-qlora-GGUF.\n\nThere are a number of options for quantization level, but we recommend `Q4_K_M`. \n\nThe recommended model can be downloaded using the code snippet below:\n\n```bash\ncd ../../../models\ncurl -sLO https://huggingface.co/TheBloke/Mistral-7B-Code-16K-qlora-GGUF/resolve/main/mistral-7b-code-16k-qlora.Q4_K_M.gguf\ncd ../recipes/natural_language_processing/codgen\n```\n\n_A full list of supported open models is forthcoming._ \n\n\n## Build the Model Service\n\nThe complete instructions for building and deploying the Model Service can be found in the\n[llamacpp_python model-service document](../../../model_servers/llamacpp_python/README.md).\n\nThe Model Service can be built from make commands from the [llamacpp_python directory](../../../model_servers/llamacpp_python/).\n\n```bash\n# from path model_servers/llamacpp_python from repo containers/ai-lab-recipes\nmake build\n```\nCheckout the [Makefile](../../../model_servers/llamacpp_python/Makefile) to get more details on different options for how to build.\n\n## Deploy the Model Service\n\nThe local Model Service relies on a volume mount to the localhost to access the model files. It also employs environment variables to dictate the model used and where its served. You can start your local Model Service using the following `make` command from `model_servers/llamacpp_python` set with reasonable defaults:\n\n```bash\n# from path model_servers/llamacpp_python from repo containers/ai-lab-recipes\nmake run\n```\n\n## Build the AI Application\n\nThe AI Application can be built from the make command:\n\n```bash\n# Run this from the current directory (path recipes/natural_language_processing/codegen from repo containers/ai-lab-recipes)\nmake build\n```\n\n## Deploy the AI Application\n\nMake sure the Model Service is up and running before starting this container image. When starting the AI Application container image we need to direct it to the correct `MODEL_ENDPOINT`. This could be any appropriately hosted Model Service (running locally or in the cloud) using an OpenAI compatible API. In our case the Model Service is running inside the Podman machine so we need to provide it with the appropriate address `10.88.0.1`. To deploy the AI application use the following:\n\n```bash\n# Run this from the current directory (path recipes/natural_language_processing/codegen from repo containers/ai-lab-recipes)\nmake run \n```\n\n## Interact with the AI Application\n\nEverything should now be up an running with the code generation application available at [`http://localhost:8501`](http://localhost:8501). By using this recipe and getting this starting point established, users should now have an easier time customizing and building their own LLM enabled code generation applications. \n\n## Embed the AI Application in a Bootable Container Image\n\nTo build a bootable container image that includes this sample code generation workload as a service that starts when a system is booted, run: `make -f Makefile bootc`. You can optionally override the default image / tag you want to give the make command by specifying it as follows: `make -f Makefile BOOTC_IMAGE=<your_bootc_image> bootc`.\n\nSubstituting the bootc/Containerfile FROM command is simple using the Makefile FROM option.\n\n```bash\nmake FROM=registry.redhat.io/rhel9/rhel-bootc:9.4 bootc\n```\n\nSelecting the ARCH for the bootc/Containerfile is simple using the Makefile ARCH= variable.\n\n```\nmake ARCH=x86_64 bootc\n```\n\nThe magic happens when you have a bootc enabled system running. If you do, and you'd like to update the operating system to the OS you just built\nwith the code generation application, it's as simple as ssh-ing into the bootc system and running:\n\n```bash\nbootc switch quay.io/ai-lab/codegen-bootc:latest\n```\n\nUpon a reboot, you'll see that the codegen service is running on the system. Check on the service with:\n\n```bash\nssh user@bootc-system-ip\nsudo systemctl status codegen\n```\n\n### What are bootable containers?\n\nWhat's a [bootable OCI container](https://containers.github.io/bootc/) and what's it got to do with AI?\n\nThat's a good question! We think it's a good idea to embed AI workloads (or any workload!) into bootable images at _build time_ rather than\nat _runtime_. This extends the benefits, such as portability and predictability, that containerizing applications provides to the operating system.\nBootable OCI images bake exactly what you need to run your workloads into the operating system at build time by using your favorite containerization\ntools. Might I suggest [podman](https://podman.io/)?\n\nOnce installed, a bootc enabled system can be updated by providing an updated bootable OCI image from any OCI\nimage registry with a single `bootc` command. This works especially well for fleets of devices that have fixed workloads - think\nfactories or appliances. Who doesn't want to add a little AI to their appliance, am I right?\n\nBootable images lend toward immutable operating systems, and the more immutable an operating system is, the less that can go wrong at runtime!\n\n#### Creating bootable disk images\n\nYou can convert a bootc image to a bootable disk image using the\n[quay.io/centos-bootc/bootc-image-builder](https://github.com/osbuild/bootc-image-builder) container image.\n\nThis container image allows you to build and deploy [multiple disk image types](../../common/README_bootc_image_builder.md) from bootc container images.\n\nDefault image types can be set via the DISK_TYPE Makefile variable.\n\n`make bootc-image-builder DISK_TYPE=ami`\n",
"recommended": [
"hf.ibm-granite.granite-8b-code-instruct",
"hf.TheBloke.mistral-7b-code-16k-qlora.Q4_K_M",
"hf.TheBloke.mistral-7b-codealpaca-lora.Q4_K_M"
],
"backend": "llama-cpp",
"languages": ["python"],
"frameworks": ["streamlit", "langchain"]
},
{
"id": "rag",
"description": "This application illustrates how to integrate RAG (Retrieval Augmented Generation) into LLM applications enabling to interact with your own documents.",
"name": "RAG Chatbot",
"repository": "https://github.com/containers/ai-lab-recipes",
"ref": "v1.3.3.2",
"icon": "natural-language-processing",
"categories": ["natural-language-processing"],
"basedir": "recipes/natural_language_processing/rag",
"readme": "# RAG (Retrieval Augmented Generation) Chat Application\n\nThis demo provides a simple recipe to help developers start to build out their own custom RAG (Retrieval Augmented Generation) applications. It consists of three main components; the Model Service, the Vector Database and the AI Application.\n\nThere are a few options today for local Model Serving, but this recipe will use [`llama-cpp-python`](https://github.com/abetlen/llama-cpp-python) and their OpenAI compatible Model Service. There is a Containerfile provided that can be used to build this Model Service within the repo, [`model_servers/llamacpp_python/base/Containerfile`](/model_servers/llamacpp_python/base/Containerfile).\n\nIn order for the LLM to interact with our documents, we need them stored and available in such a manner that we can retrieve a small subset of them that are relevant to our query. To do this we employ a Vector Database alongside an embedding model. The embedding model converts our documents into numerical representations, vectors, such that similarity searches can be easily performed. The Vector Database stores these vectors for us and makes them available to the LLM. In this recipe we can use [chromaDB](https://docs.trychroma.com/) or [Milvus](https://milvus.io/) as our Vector Database.\n\nOur AI Application will connect to our Model Service via it's OpenAI compatible API. In this example we rely on [Langchain's](https://python.langchain.com/docs/get_started/introduction) python package to simplify communication with our Model Service and we use [Streamlit](https://streamlit.io/) for our UI layer. Below please see an example of the RAG application. \n\n\n\n\n## Try the RAG chat application\n\n_COMING SOON to AI LAB_\nThe [Podman Desktop](https://podman-desktop.io) [AI Lab Extension](https://github.com/containers/podman-desktop-extension-ai-lab) includes this recipe among others. To try it out, open `Recipes Catalog` -> `RAG Chatbot` and follow the instructions to start the application.\n\nIf you prefer building and running the application from terminal, please run the following commands from this directory.\n\nFirst, build application's meta data and run the generated Kubernetes YAML which will spin up a Pod along with a number of containers:\n```\nmake quadlet\npodman kube play build/rag.yaml\n```\n\nThe Pod is named `rag`, so you may use [Podman](https://podman.io) to manage the Pod and its containers:\n```\npodman pod list\npodman ps\n```\n\nTo stop and remove the Pod, run:\n```\npodman pod stop rag\npodman pod rm rag\n```\n\nOnce the Pod is running, please refer to the section below to [interact with the RAG chatbot application](#interact-with-the-ai-application).\n\n# Build the Application\n\nIn order to build this application we will need two models, a Vector Database, a Model Service and an AI Application. \n\n* [Download models](#download-models)\n* [Deploy the Vector Database](#deploy-the-vector-database)\n* [Build the Model Service](#build-the-model-service)\n* [Deploy the Model Service](#deploy-the-model-service)\n* [Build the AI Application](#build-the-ai-application)\n* [Deploy the AI Application](#deploy-the-ai-application)\n* [Interact with the AI Application](#interact-with-the-ai-application)\n\n### Download models\n\nIf you are just getting started, we recommend using [Granite-7B-Lab](https://huggingface.co/instructlab/granite-7b-lab-GGUF). This is a well\nperformant mid-sized model with an apache-2.0 license that has been quanitzed and served into the [GGUF format](https://github.com/ggerganov/ggml/blob/master/docs/gguf.md).\n\nThe recommended model can be downloaded using the code snippet below:\n\n```bash\ncd ../../../models\ncurl -sLO https://huggingface.co/instructlab/granite-7b-lab-GGUF/resolve/main/granite-7b-lab-Q4_K_M.gguf\ncd ../recipes/natural_language_processing/rag\n```\n\n_A full list of supported open models is forthcoming._ \n\nIn addition to the LLM, RAG applications also require an embedding model to convert documents between natural language and vector representations. For this demo we will use [`BAAI/bge-base-en-v1.5`](https://huggingface.co/BAAI/bge-base-en-v1.5) it is a fairly standard model for this use case and has an MIT license. \n\nThe code snippet below can be used to pull a copy of the `BAAI/bge-base-en-v1.5` embedding model and store it in your `models/` directory. \n\n```python \nfrom huggingface_hub import snapshot_download\nsnapshot_download(repo_id=\"BAAI/bge-base-en-v1.5\",\n cache_dir=\"models/\",\n local_files_only=False)\n```\n\n### Deploy the Vector Database \n\nTo deploy the Vector Database service locally, simply use the existing ChromaDB or Milvus image. The Vector Database is ephemeral and will need to be re-populated each time the container restarts. When implementing RAG in production, you will want a long running and backed up Vector Database.\n\n\n#### ChromaDB\n```bash\npodman pull chromadb/chroma\n```\n```bash\npodman run --rm -it -p 8000:8000 chroma\n```\n#### Milvus\n```bash\npodman pull milvusdb/milvus:master-20240426-bed6363f\n```\n```bash\npodman run -it \\\n --name milvus-standalone \\\n --security-opt seccomp:unconfined \\\n -e ETCD_USE_EMBED=true \\\n -e ETCD_CONFIG_PATH=/milvus/configs/embedEtcd.yaml \\\n -e COMMON_STORAGETYPE=local \\\n -v $(pwd)/volumes/milvus:/var/lib/milvus \\\n -v $(pwd)/embedEtcd.yaml:/milvus/configs/embedEtcd.yaml \\\n -p 19530:19530 \\\n -p 9091:9091 \\\n -p 2379:2379 \\\n --health-cmd=\"curl -f http://localhost:9091/healthz\" \\\n --health-interval=30s \\\n --health-start-period=90s \\\n --health-timeout=20s \\\n --health-retries=3 \\\n milvusdb/milvus:master-20240426-bed6363f \\\n milvus run standalone 1> /dev/null\n```\nNote: For running the Milvus instance, make sure you have the `$(pwd)/volumes/milvus` directory and `$(pwd)/embedEtcd.yaml` file as shown in this repository. These are required by the database for its operations.\n\n\n### Build the Model Service\n\nThe complete instructions for building and deploying the Model Service can be found in the [the llamacpp_python model-service document](../model_servers/llamacpp_python/README.md).\n\nThe Model Service can be built with the following code snippet:\n\n```bash\ncd model_servers/llamacpp_python\npodman build -t llamacppserver -f ./base/Containerfile .\n```\n\n\n### Deploy the Model Service\n\nThe complete instructions for building and deploying the Model Service can be found in the [the llamacpp_python model-service document](../model_servers/llamacpp_python/README.md).\n\nThe local Model Service relies on a volume mount to the localhost to access the model files. You can start your local Model Service using the following Podman command:\n```\npodman run --rm -it \\\n -p 8001:8001 \\\n -v Local/path/to/locallm/models:/locallm/models \\\n -e MODEL_PATH=models/<model-filename> \\\n -e HOST=0.0.0.0 \\\n -e PORT=8001 \\\n llamacppserver\n```\n\n### Build the AI Application\n\nNow that the Model Service is running we want to build and deploy our AI Application. Use the provided Containerfile to build the AI Application image in the `rag-langchain/` directory.\n\n```bash\ncd rag\nmake APP_IMAGE=rag build\n```\n\n### Deploy the AI Application\n\nMake sure the Model Service and the Vector Database are up and running before starting this container image. When starting the AI Application container image we need to direct it to the correct `MODEL_ENDPOINT`. This could be any appropriately hosted Model Service (running locally or in the cloud) using an OpenAI compatible API. In our case the Model Service is running inside the Podman machine so we need to provide it with the appropriate address `10.88.0.1`. The same goes for the Vector Database. Make sure the `VECTORDB_HOST` is correctly set to `10.88.0.1` for communication within the Podman virtual machine.\n\nThere also needs to be a volume mount into the `models/` directory so that the application can access the embedding model as well as a volume mount into the `data/` directory where it can pull documents from to populate the Vector Database. \n\nThe following Podman command can be used to run your AI Application:\n\n```bash\npodman run --rm -it -p 8501:8501 \\\n-e MODEL_ENDPOINT=http://10.88.0.1:8001 \\\n-e VECTORDB_HOST=10.88.0.1 \\\n-v Local/path/to/locallm/models/:/rag/models \\\nrag \n```\n\n### Interact with the AI Application\n\nEverything should now be up an running with the rag application available at [`http://localhost:8501`](http://localhost:8501). By using this recipe and getting this starting point established, users should now have an easier time customizing and building their own LLM enabled RAG applications. \n\n### Embed the AI Application in a Bootable Container Image\n\nTo build a bootable container image that includes this sample RAG chatbot workload as a service that starts when a system is booted, cd into this folder\nand run:\n\n\n```\nmake BOOTC_IMAGE=quay.io/your/rag-bootc:latest bootc\n```\n\nSubstituting the bootc/Containerfile FROM command is simple using the Makefile FROM option.\n\n```\nmake FROM=registry.redhat.io/rhel9/rhel-bootc:9.4 BOOTC_IMAGE=quay.io/your/rag-bootc:latest bootc\n```\n\nThe magic happens when you have a bootc enabled system running. If you do, and you'd like to update the operating system to the OS you just built\nwith the RAG chatbot application, it's as simple as ssh-ing into the bootc system and running:\n\n```\nbootc switch quay.io/your/rag-bootc:latest\n```\n\nUpon a reboot, you'll see that the RAG chatbot service is running on the system.\n\nCheck on the service with\n\n```\nssh user@bootc-system-ip\nsudo systemctl status rag\n```\n\n#### What are bootable containers?\n\nWhat's a [bootable OCI container](https://containers.github.io/bootc/) and what's it got to do with AI?\n\nThat's a good question! We think it's a good idea to embed AI workloads (or any workload!) into bootable images at _build time_ rather than\nat _runtime_. This extends the benefits, such as portability and predictability, that containerizing applications provides to the operating system.\nBootable OCI images bake exactly what you need to run your workloads into the operating system at build time by using your favorite containerization\ntools. Might I suggest [podman](https://podman.io/)?\n\nOnce installed, a bootc enabled system can be updated by providing an updated bootable OCI image from any OCI\nimage registry with a single `bootc` command. This works especially well for fleets of devices that have fixed workloads - think\nfactories or appliances. Who doesn't want to add a little AI to their appliance, am I right?\n\nBootable images lend toward immutable operating systems, and the more immutable an operating system is, the less that can go wrong at runtime!\n\n##### Creating bootable disk images\n\nYou can convert a bootc image to a bootable disk image using the\n[quay.io/centos-bootc/bootc-image-builder](https://github.com/osbuild/bootc-image-builder) container image.\n\nThis container image allows you to build and deploy [multiple disk image types](../../common/README_bootc_image_builder.md) from bootc container images.\n\nDefault image types can be set via the DISK_TYPE Makefile variable.\n\n`make bootc-image-builder DISK_TYPE=ami`\n\n### Makefile variables\n\nThere are several [Makefile variables](../../common/README.md) defined within each `recipe` Makefile which can be\nused to override defaults for a variety of make targets.\n",
"recommended": [
"hf.bartowski.granite-3.1-8b-instruct-GGUF",
"hf.instructlab.granite-7b-lab-GGUF",
"hf.instructlab.merlinite-7b-lab-GGUF",
"hf.lmstudio-community.granite-3.0-8b-instruct-GGUF"
],
"backend": "llama-cpp",
"languages": ["python"],
"frameworks": ["streamlit", "langchain", "vectordb"]
},
{
"id": "rag-nodejs",
"description": "This application illustrates how to integrate RAG (Retrieval Augmented Generation) into LLM applications written in Node.js enabling to interact with your own documents.",
"name": "Node.js RAG Chatbot",
"repository": "https://github.com/containers/ai-lab-recipes",
"ref": "28819abe5e941114ef71794c907c86bd6ba09b0b",
"icon": "natural-language-processing",
"categories": ["natural-language-processing"],
"basedir": "recipes/natural_language_processing/rag-nodejs",
"readme": "# RAG (Retrieval Augmented Generation) Chat Application\n\nThis demo provides a simple recipe to help Node.js developers start to build out their own custom RAG (Retrieval Augmented Generation) applications. It consists of three main components; the Model Service, the Vector Database and the AI Application.\n\nThere are a few options today for local Model Serving, but this recipe will use [`llama-cpp-python`](https://github.com/abetlen/llama-cpp-python) and their OpenAI compatible Model Service. There is a Containerfile provided that can be used to build this Model Service within the repo, [`model_servers/llamacpp_python/base/Containerfile`](/model_servers/llamacpp_python/base/Containerfile).\n\nIn order for the LLM to interact with our documents, we need them stored and available in such a manner that we can retrieve a small subset of them that are relevant to our query. To do this we employ a Vector Database alongside an embedding model. The embedding model converts our documents into numerical representations, vectors, such that similarity searches can be easily performed. The Vector Database stores these vectors for us and makes them available to the LLM. In this recipe we can use [chromaDB](https://docs.trychroma.com/) as our Vector Database.\n\nOur AI Application will connect to our Model Service via it's OpenAI compatible API. In this example we rely on [Langchain's](https://js.langchain.com/docs/introduction/) package to simplify communication with our Model Service and we use [React Chatbotify](https://react-chatbotify.com/) and [Next.js](https://nextjs.org/) for our UI layer. Below please see an example of the RAG application. \n\n\n\n\n## Try the RAG chat application\n\n_COMING SOON to AI LAB_\nThe [Podman Desktop](https://podman-desktop.io) [AI Lab Extension](https://github.com/containers/podman-desktop-extension-ai-lab) includes this recipe among others. To try it out, open `Recipes Catalog` -> `RAG Node.js Chatbot` and follow the instructions to start the application.\n\nIf you prefer building and running the application from terminal, please run the following commands from this directory.\n\nFirst, build application's meta data and run the generated Kubernetes YAML which will spin up a Pod along with a number of containers:\n```\nmake quadlet\npodman kube play build/rag-nodesjs.yaml\n```\n\nThe Pod is named `rag_nodejs`, so you may use [Podman](https://podman.io) to manage the Pod and its containers:\n```\npodman pod list\npodman ps\n```\n\nTo stop and remove the Pod, run:\n```\npodman pod stop rag_nodejs\npodman pod rm rag_nodejs\n```\n\nOnce the Pod is running, please refer to the section below to [interact with the RAG chatbot application](#interact-with-the-ai-application).\n\n# Build the Application\n\nIn order to build this application we will need two models, a Vector Database, a Model Service and an AI Application. \n\n* [Download models](#download-models)\n* [Deploy the Vector Database](#deploy-the-vector-database)\n* [Build the Model Service](#build-the-model-service)\n* [Deploy the Model Service](#deploy-the-model-service)\n* [Build the AI Application](#build-the-ai-application)\n* [Deploy the AI Application](#deploy-the-ai-application)\n* [Interact with the AI Application](#interact-with-the-ai-application)\n\n### Download models\n\nIf you are just getting started, we recommend using [Granite-7B-Lab](https://huggingface.co/instructlab/granite-7b-lab-GGUF). This is a well\nperformant mid-sized model with an apache-2.0 license that has been quanitzed and served into the [GGUF format](https://github.com/ggerganov/ggml/blob/master/docs/gguf.md).\n\nThe recommended model can be downloaded using the code snippet below:\n\n```bash\ncd ../../../models\ncurl -sLO https://huggingface.co/instructlab/granite-7b-lab-GGUF/resolve/main/granite-7b-lab-Q4_K_M.gguf\ncd ../recipes/natural_language_processing/rag_nodejs\n```\n\n_A full list of supported open models is forthcoming._ \n\n### Deploy the Vector Database \n\nTo deploy the Vector Database service locally, simply use the existing ChromaDB. The Vector Database is ephemeral and will need to be re-populated each time the container restarts. When implementing RAG in production, you will want a long running and backed up Vector Database.\n\n\n#### ChromaDB\n```bash\npodman pull chromadb/chroma\n```\n```bash\npodman run --rm -it -p 8000:8000 chroma\n```\n\n### Build the Model Service\n\nThe complete instructions for building and deploying the Model Service can be found in the [the llamacpp_python model-service document](../model_servers/llamacpp_python/README.md).\n\nThe Model Service can be built with the following code snippet:\n\n```bash\ncd model_servers/llamacpp_python\npodman build -t llamacppserver -f ./base/Containerfile .\n```\n\n\n### Deploy the Model Service\n\nThe complete instructions for building and deploying the Model Service can be found in the [the llamacpp_python model-service document](../model_servers/llamacpp_python/README.md).\n\nThe local Model Service relies on a volume mount to the localhost to access the model files. You can start your local Model Service using the following Podman command:\n```\npodman run --rm -it \\\n -p 8001:8001 \\\n -v Local/path/to/locallm/models:/locallm/models \\\n -e MODEL_PATH=models/<model-filename> \\\n -e HOST=0.0.0.0 \\\n -e PORT=8001 \\\n llamacppserver\n```\n\n### Build the AI Application\n\nNow that the Model Service is running we want to build and deploy our AI Application. Use the provided Containerfile to build the AI Application image in the `rag-nodejs/` directory.\n\n```bash\ncd rag-nodejs\nmake APP_IMAGE=rag-nodejs build\n```\n\n### Deploy the AI Application\n\nMake sure the Model Service and the Vector Database are up and running before starting this container image. When starting the AI Application container image we need to direct it to the correct `MODEL_ENDPOINT`. This could be any appropriately hosted Model Service (running locally or in the cloud) using an OpenAI compatible API. In our case the Model Service is running inside the Podman machine so we need to provide it with the appropriate address `10.88.0.1`. The same goes for the Vector Database. Make sure the `VECTORDB_HOST` is correctly set to `10.88.0.1` for communication within the Podman virtual machine.\n\nThere also needs to be a volume mount into the `models/` directory so that the application can access the embedding model as well as a volume mount into the `data/` directory where it can pull documents from to populate the Vector Database. \n\nThe following Podman command can be used to run your AI Application:\n\n```bash\npodman run --rm -it -p 8501:8501 \\\n-e MODEL_ENDPOINT=http://10.88.0.1:8001 \\\n-e VECTORDB_HOST=10.88.0.1 \\\n-v Local/path/to/locallm/models/:/rag/models \\\nrag-nodejs \n```\n\n### Interact with the AI Application\n\nEverything should now be up an running with the rag application available at [`http://localhost:8501`](http://localhost:8501). By using this recipe and getting this starting point established, users should now have an easier time customizing and building their own LLM enabled RAG applications. \n\n### Embed the AI Application in a Bootable Container Image\n\nTo build a bootable container image that includes this sample RAG chatbot workload as a service that starts when a system is booted, cd into this folder\nand run:\n\n\n```\nmake BOOTC_IMAGE=quay.io/your/rag-nodejs-bootc:latest bootc\n```\n\nSubstituting the bootc/Containerfile FROM command is simple using the Makefile FROM option.\n\n```\nmake FROM=registry.redhat.io/rhel9/rhel-bootc:9.4 BOOTC_IMAGE=quay.io/your/rag-nodejs-bootc:latest bootc\n```\n\nThe magic happens when you have a bootc enabled system running. If you do, and you'd like to update the operating system to the OS you just built\nwith the RAG Node.js chatbot application, it's as simple as ssh-ing into the bootc system and running:\n\n```\nbootc switch quay.io/your/rag-nodejs-bootc:latest\n```\n\nUpon a reboot, you'll see that the RAG Node.js chatbot service is running on the system.\n\nCheck on the service with\n\n```\nssh user@bootc-system-ip\nsudo systemctl status raa-nodejsg\n```\n\n#### What are bootable containers?\n\nWhat's a [bootable OCI container](https://containers.github.io/bootc/) and what's it got to do with AI?\n\nThat's a good question! We think it's a good idea to embed AI workloads (or any workload!) into bootable images at _build time_ rather than\nat _runtime_. This extends the benefits, such as portability and predictability, that containerizing applications provides to the operating system.\nBootable OCI images bake exactly what you need to run your workloads into the operating system at build time by using your favorite containerization\ntools. Might I suggest [podman](https://podman.io/)?\n\nOnce installed, a bootc enabled system can be updated by providing an updated bootable OCI image from any OCI\nimage registry with a single `bootc` command. This works especially well for fleets of devices that have fixed workloads - think\nfactories or appliances. Who doesn't want to add a little AI to their appliance, am I right?\n\nBootable images lend toward immutable operating systems, and the more immutable an operating system is, the less that can go wrong at runtime!\n\n##### Creating bootable disk images\n\nYou can convert a bootc image to a bootable disk image using the\n[quay.io/centos-bootc/bootc-image-builder](https://github.com/osbuild/bootc-image-builder) container image.\n\nThis container image allows you to build and deploy [multiple disk image types](../../common/README_bootc_image_builder.md) from bootc container images.\n\nDefault image types can be set via the DISK_TYPE Makefile variable.\n\n`make bootc-image-builder DISK_TYPE=ami`\n\n### Makefile variables\n\nThere are several [Makefile variables](../../common/README.md) defined within each `recipe` Makefile which can be\nused to override defaults for a variety of make targets.\n",
"recommended": [
"hf.bartowski.granite-3.1-8b-instruct-GGUF",
"hf.instructlab.granite-7b-lab-GGUF",
"hf.instructlab.merlinite-7b-lab-GGUF",
"hf.lmstudio-community.granite-3.0-8b-instruct-GGUF"
],
"backend": "llama-cpp",
"languages": ["javascript"],
"frameworks": ["react", "langchain", "vectordb"]
},
{
"id": "chatbot-java-quarkus",
"description": "This is a Java Quarkus-based recipe demonstrating how to create an AI-powered chat applications.",
"name": "Java-based ChatBot (Quarkus)",
"repository": "https://github.com/containers/ai-lab-recipes",
"ref": "v1.3.3.2",
"icon": "natural-language-processing",
"categories": ["natural-language-processing"],
"basedir": "recipes/natural_language_processing/chatbot-java-quarkus",
"readme": "# Java-based chatbot application\n\nThis application implements a simple chatbot backed by Quarkus and its\nLangChain4j extension. The UI communicates with the backend application via\nweb sockets and the backend uses the OpenAI API to talk to the model served\nby Podman AI Lab.\n\nDocumentation for Quarkus+LangChain4j can be found at\nhttps://docs.quarkiverse.io/quarkus-langchain4j/dev/.",
"recommended": [
"hf.bartowski.granite-3.1-8b-instruct-GGUF",
"hf.instructlab.granite-7b-lab-GGUF",
"hf.instructlab.merlinite-7b-lab-GGUF",
"hf.lmstudio-community.granite-3.0-8b-instruct-GGUF"
],
"backend": "llama-cpp",
"languages": ["java"],
"frameworks": ["quarkus", "langchain4j"]
},
{
"id": "chatbot-javascript-react",
"description": "This is a NodeJS based recipe demonstrating how to create an AI-powered chat applications.",
"name": "Node.js based ChatBot",
"repository": "https://github.com/containers/ai-lab-recipes",
"ref": "v1.3.3.2",
"icon": "natural-language-processing",
"categories": ["natural-language-processing"],
"basedir": "recipes/natural_language_processing/chatbot-nodejs",
"readme": "# Chat Application\n\n This recipe helps developers start building their own custom LLM enabled chat applications using Node.js and JavaScript. It consists of two main components: the Model Service and the AI Application.\n\n There are a few options today for local Model Serving, but this recipe will use [`llama-cpp-python`](https://github.com/abetlen/llama-cpp-python) and their OpenAI compatible Model Service. There is a Containerfile provided that can be used to build this Model Service within the repo, [`model_servers/llamacpp_python/base/Containerfile`](/model_servers/llamacpp_python/base/Containerfile).\n\n The AI Application will connect to the Model Service via its OpenAI compatible API. The recipe relies on [Langchain's]( https://js.langchain.com/docs/introduction) JavaScript package to simplify communication with the Model Service and uses [react-chatbotify](https://react-chatbotify.com/) for the UI layer. You can find an example of the chat application below.\n\n \n\n\n## Try the Chat Application\n\nThe [Podman Desktop](https://podman-desktop.io) [AI Lab Extension](https://github.com/containers/podman-desktop-extension-ai-lab) includes this recipe among others. To try it out, open `Recipes Catalog` -> `Node.js based Chatbot` and follow the instructions to start the application.\n\n# Build the Application\n\nThe rest of this document will explain how to build and run the application from the terminal, and will\ngo into greater detail on how each container in the Pod above is built, run, and \nwhat purpose it serves in the overall application. All the recipes use a central [Makefile](../../common/Makefile.common) that includes variables populated with default values to simplify getting started. Please review the [Makefile docs](../../common/README.md), to learn about further customizing your application.\n\n\nThis application requires a model, a model service and an AI inferencing application.\n\n* [Quickstart](#quickstart)\n* [Download a model](#download-a-model)\n* [Build the Model Service](#build-the-model-service)\n* [Deploy the Model Service](#deploy-the-model-service)\n* [Build the AI Application](#build-the-ai-application)\n* [Deploy the AI Application](#deploy-the-ai-application)\n* [Interact with the AI Application](#interact-with-the-ai-application)\n* [Embed the AI Application in a Bootable Container Image](#embed-the-ai-application-in-a-bootable-container-image)\n\n\n## Quickstart\nTo run the application with pre-built images from `quay.io/ai-lab`, use `make quadlet`. This command\nbuilds the application's metadata and generates Kubernetes YAML at `./build/chatbot-nodejs.yaml` to spin up a Pod that can then be launched locally.\nTry it with:\n\n```\nmake quadlet\npodman kube play build/chatbot-nodejs.yaml\n```\n\nThis will take a few minutes if the model and model-server container images need to be downloaded. \nThe Pod is named `nodejs chat app`, so you may use [Podman](https://podman.io) to manage the Pod and its containers:\n\n```\npodman pod list\npodman ps\n```\n\nOnce the Pod and its containers are running, the application can be accessed at `http://localhost:8501`. \nPlease refer to the section below for more details about [interacting with the chatbot application](#interact-with-the-ai-application).\n\nTo stop and remove the Pod, run:\n\n```\npodman pod stop chatbot-nodejs\npodman pod rm chatbot-nodejs\n```\n\n## Download a model\n\nIf you are just getting started, we recommend using [granite-7b-lab](https://huggingface.co/instructlab/granite-7b-lab). This is a well\nperformant mid-sized model with an apache-2.0 license. In order to use it with our Model Service we need it converted\nand quantized into the [GGUF format](https://github.com/ggerganov/ggml/blob/master/docs/gguf.md). There are a number of\nways to get a GGUF version of granite-7b-lab, but the simplest is to download a pre-converted one from\n[huggingface.co](https://huggingface.co) here: https://huggingface.co/instructlab/granite-7b-lab-GGUF.\n\nThe recommended model can be downloaded using the code snippet below:\n\n```bash\ncd ../../../models\ncurl -sLO https://huggingface.co/instructlab/granite-7b-lab-GGUF/resolve/main/granite-7b-lab-Q4_K_M.gguf\ncd ../recipes/natural_language_processing/chatbot-nodejs\n```\n\n_A full list of supported open models is forthcoming._ \n\n\n## Build the Model Service\n\nThe complete instructions for building and deploying the Model Service can be found in the\n[llamacpp_python model-service document](../../../model_servers/llamacpp_python/README.md).\n\nThe Model Service can be built from make commands from the [llamacpp_python directory](../../../model_servers/llamacpp_python/).\n\n```bash\n# from path model_servers/llamacpp_python from repo containers/ai-lab-recipes\nmake build\n```\nCheckout the [Makefile](../../../model_servers/llamacpp_python/Makefile) to get more details on different options for how to build.\n\n## Deploy the Model Service\n\nThe local Model Service relies on a volume mount to the localhost to access the model files. It also employs environment variables to dictate the model used and where its served. You can start your local Model Service using the following `make` command from `model_servers/llamacpp_python` set with reasonable defaults:\n\n```bash\n# from path model_servers/llamacpp_python from repo containers/ai-lab-recipes\nmake run\n```\n\n## Build the AI Application\n\nThe AI Application can be built from the make command:\n\n```bash\n# Run this from the current directory (path recipes/natural_language_processing/chatbot-nodejs from repo containers/ai-lab-recipes)\nmake build\n```\n\n## Deploy the AI Application\n\nMake sure the Model Service is up and running before starting this container image. When starting the AI Application container image we need to direct it to the correct `MODEL_ENDPOINT`. This could be any appropriately hosted Model Service (running locally or in the cloud) using an OpenAI compatible API. In our case the Model Service is running inside the Podman machine so we need to provide it with the appropriate address `10.88.0.1`. To deploy the AI application use the following:\n\n```bash\n# Run this from the current directory (path recipes/natural_language_processing/chatbot-nodejs from repo containers/ai-lab-recipes)\nmake run \n```\n\n## Interact with the AI Application\n\nEverything should now be up an running with the chat application available at [`http://localhost:8501`](http://localhost:8501). By using this recipe and getting this starting point established, users should now have an easier time customizing and building their own LLM enabled chatbot applications. \n\n## Embed the AI Application in a Bootable Container Image\n\nTo build a bootable container image that includes this sample chatbot workload as a service that starts when a system is booted, run: `make -f Makefile bootc`. You can optionally override the default image / tag you want to give the make command by specifying it as follows: `make -f Makefile BOOTC_IMAGE=<your_bootc_image> bootc`.\n\nSubstituting the bootc/Containerfile FROM command is simple using the Makefile FROM option.\n\n```bash\nmake FROM=registry.redhat.io/rhel9/rhel-bootc:9.4 bootc\n```\n\nSelecting the ARCH for the bootc/Containerfile is simple using the Makefile ARCH= variable.\n\n```\nmake ARCH=x86_64 bootc\n```\n\nThe magic happens when you have a bootc enabled system running. If you do, and you'd like to update the operating system to the OS you just built\nwith the chatbot application, it's as simple as ssh-ing into the bootc system and running:\n\n```bash\nbootc switch quay.io/ai-lab/chatbot-nodejs-bootc:latest\n```\n\nUpon a reboot, you'll see that the chatbot service is running on the system. Check on the service with:\n\n```bash\nssh user@bootc-system-ip\nsudo systemctl status chatbot-nodejs\n```\n\n### What are bootable containers?\n\nWhat's a [bootable OCI container](https://containers.github.io/bootc/) and what's it got to do with AI?\n\nThat's a good question! We think it's a good idea to embed AI workloads (or any workload!) into bootable images at _build time_ rather than\nat _runtime_. This extends the benefits, such as portability and predictability, that containerizing applications provides to the operating system.\nBootable OCI images bake exactly what you need to run your workloads into the operating system at build time by using your favorite containerization\ntools. Might I suggest [podman](https://podman.io/)?\n\nOnce installed, a bootc enabled system can be updated by providing an updated bootable OCI image from any OCI\nimage registry with a single `bootc` command. This works especially well for fleets of devices that have fixed workloads - think\nfactories or appliances. Who doesn't want to add a little AI to their appliance, am I right?\n\nBootable images lend toward immutable operating systems, and the more immutable an operating system is, the less that can go wrong at runtime!\n\n#### Creating bootable disk images\n\nYou can convert a bootc image to a bootable disk image using the\n[quay.io/centos-bootc/bootc-image-builder](https://github.com/osbuild/bootc-image-builder) container image.\n\nThis container image allows you to build and deploy [multiple disk image types](../../common/README_bootc_image_builder.md) from bootc container images.\n\nDefault image types can be set via the DISK_TYPE Makefile variable.\n\n`make bootc-image-builder DISK_TYPE=ami`\n",
"recommended": [
"hf.bartowski.granite-3.1-8b-instruct-GGUF",
"hf.instructlab.granite-7b-lab-GGUF",
"hf.instructlab.merlinite-7b-lab-GGUF",
"hf.lmstudio-community.granite-3.0-8b-instruct-GGUF"
],
"backend": "llama-cpp",
"languages": ["javascript"],
"frameworks": ["react", "langchain"]
},
{
"id": "function-calling",
"description": "This recipes guides into multiple function calling use cases, showing the ability to structure data and chain multiple tasks, using Streamlit.",
"name": "Function calling",
"repository": "https://github.com/containers/ai-lab-recipes",
"ref": "v1.3.3.2",
"icon": "natural-language-processing",
"categories": ["natural-language-processing"],
"basedir": "recipes/natural_language_processing/function_calling",
"readme": "# Function Calling Application\n\n This recipe helps developers start building their own custom function calling enabled chat applications. It consists of two main components: the Model Service and the AI Application.\n\n There are a few options today for local Model Serving, but this recipe will use [`llama-cpp-python`](https://github.com/abetlen/llama-cpp-python) and their OpenAI compatible Model Service. There is a Containerfile provided that can be used to build this Model Service within the repo, [`model_servers/llamacpp_python/base/Containerfile`](/model_servers/llamacpp_python/base/Containerfile).\n\n The AI Application will connect to the Model Service via its OpenAI compatible API. The recipe relies on [Langchain's](https://python.langchain.com/docs/get_started/introduction) python package to simplify communication with the Model Service and uses [Streamlit](https://streamlit.io/) for the UI layer. You can find an example of the chat application below.\n\n \n\n\n## Try the Function Calling Application\n\nThe [Podman Desktop](https://podman-desktop.io) [AI Lab Extension](https://github.com/containers/podman-desktop-extension-ai-lab) includes this recipe among others. To try it out, open `Recipes Catalog` -> `Function Calling` and follow the instructions to start the application.\n\n# Build the Application\n\nThe rest of this document will explain how to build and run the application from the terminal, and will\ngo into greater detail on how each container in the Pod above is built, run, and \nwhat purpose it serves in the overall application. All the recipes use a central [Makefile](../../common/Makefile.common) that includes variables populated with default values to simplify getting started. Please review the [Makefile docs](../../common/README.md), to learn about further customizing your application.\n\n\nThis application requires a model, a model service and an AI inferencing application.\n\n* [Quickstart](#quickstart)\n* [Download a model](#download-a-model)\n* [Build the Model Service](#build-the-model-service)\n* [Deploy the Model Service](#deploy-the-model-service)\n* [Build the AI Application](#build-the-ai-application)\n* [Deploy the AI Application](#deploy-the-ai-application)\n* [Interact with the AI Application](#interact-with-the-ai-application)\n* [Embed the AI Application in a Bootable Container Image](#embed-the-ai-application-in-a-bootable-container-image)\n\n\n## Quickstart\nTo run the application with pre-built images from `quay.io/ai-lab`, use `make quadlet`. This command\nbuilds the application's metadata and generates Kubernetes YAML at `./build/chatbot.yaml` to spin up a Pod that can then be launched locally.\nTry it with:\n\n```\nmake quadlet\npodman kube play build/chatbot.yaml\n```\n\nThis will take a few minutes if the model and model-server container images need to be downloaded. \nThe Pod is named `chatbot`, so you may use [Podman](https://podman.io) to manage the Pod and its containers:\n\n```\npodman pod list\npodman ps\n```\n\nOnce the Pod and its containers are running, the application can be accessed at `http://localhost:8501`. However, if you started the app via the podman desktop UI, a random port will be assigned instead of `8501`. Please use the AI App Details `Open AI App` button to access it instead. \nPlease refer to the section below for more details about [interacting with the chatbot application](#interact-with-the-ai-application).\n\nTo stop and remove the Pod, run:\n\n```\npodman pod stop chatbot\npodman pod rm chatbot\n```\n\n## Download a model\n\nIf you are just getting started, we recommend using [granite-7b-lab](https://huggingface.co/instructlab/granite-7b-lab). This is a well\nperformant mid-sized model with an apache-2.0 license. In order to use it with our Model Service we need it converted\nand quantized into the [GGUF format](https://github.com/ggerganov/ggml/blob/master/docs/gguf.md). There are a number of\nways to get a GGUF version of granite-7b-lab, but the simplest is to download a pre-converted one from\n[huggingface.co](https://huggingface.co) here: https://huggingface.co/instructlab/granite-7b-lab-GGUF.\n\nThe recommended model can be downloaded using the code snippet below:\n\n```bash\ncd ../../../models\ncurl -sLO https://huggingface.co/instructlab/granite-7b-lab-GGUF/resolve/main/granite-7b-lab-Q4_K_M.gguf\ncd ../recipes/natural_language_processing/chatbot\n```\n\n_A full list of supported open models is forthcoming._ \n\n\n## Build the Model Service\n\nThe complete instructions for building and deploying the Model Service can be found in the\n[llamacpp_python model-service document](../../../model_servers/llamacpp_python/README.md).\n\nThe Model Service can be built from make commands from the [llamacpp_python directory](../../../model_servers/llamacpp_python/).\n\n```bash\n# from path model_servers/llamacpp_python from repo containers/ai-lab-recipes\nmake build\n```\nCheckout the [Makefile](../../../model_servers/llamacpp_python/Makefile) to get more details on different options for how to build.\n\n## Deploy the Model Service\n\nThe local Model Service relies on a volume mount to the localhost to access the model files. It also employs environment variables to dictate the model used and where its served. You can start your local Model Service using the following `make` command from `model_servers/llamacpp_python` set with reasonable defaults:\n\n```bash\n# from path model_servers/llamacpp_python from repo containers/ai-lab-recipes\nmake run\n```\n\n## Build the AI Application\n\nThe AI Application can be built from the make command:\n\n```bash\n# Run this from the current directory (path recipes/natural_language_processing/chatbot from repo containers/ai-lab-recipes)\nmake build\n```\n\n## Deploy the AI Application\n\nMake sure the Model Service is up and running before starting this container image. When starting the AI Application container image we need to direct it to the correct `MODEL_ENDPOINT`. This could be any appropriately hosted Model Service (running locally or in the cloud) using an OpenAI compatible API. In our case the Model Service is running inside the Podman machine so we need to provide it with the appropriate address `10.88.0.1`. To deploy the AI application use the following:\n\n```bash\n# Run this from the current directory (path recipes/natural_language_processing/chatbot from repo containers/ai-lab-recipes)\nmake run \n```\n\n## Interact with the AI Application\n\nEverything should now be up an running with the chat application available at [`http://localhost:8501`](http://localhost:8501). By using this recipe and getting this starting point established, users should now have an easier time customizing and building their own LLM enabled chatbot applications. \n\n## Embed the AI Application in a Bootable Container Image\n\nTo build a bootable container image that includes this sample chatbot workload as a service that starts when a system is booted, run: `make -f Makefile bootc`. You can optionally override the default image / tag you want to give the make command by specifying it as follows: `make -f Makefile BOOTC_IMAGE=<your_bootc_image> bootc`.\n\nSubstituting the bootc/Containerfile FROM command is simple using the Makefile FROM option.\n\n```bash\nmake FROM=registry.redhat.io/rhel9/rhel-bootc:9.4 bootc\n```\n\nSelecting the ARCH for the bootc/Containerfile is simple using the Makefile ARCH= variable.\n\n```\nmake ARCH=x86_64 bootc\n```\n\nThe magic happens when you have a bootc enabled system running. If you do, and you'd like to update the operating system to the OS you just built\nwith the chatbot application, it's as simple as ssh-ing into the bootc system and running:\n\n```bash\nbootc switch quay.io/ai-lab/chatbot-bootc:latest\n```\n\nUpon a reboot, you'll see that the chatbot service is running on the system. Check on the service with:\n\n```bash\nssh user@bootc-system-ip\nsudo systemctl status chatbot\n```\n\n### What are bootable containers?\n\nWhat's a [bootable OCI container](https://containers.github.io/bootc/) and what's it got to do with AI?\n\nThat's a good question! We think it's a good idea to embed AI workloads (or any workload!) into bootable images at _build time_ rather than\nat _runtime_. This extends the benefits, such as portability and predictability, that containerizing applications provides to the operating system.\nBootable OCI images bake exactly what you need to run your workloads into the operating system at build time by using your favorite containerization\ntools. Might I suggest [podman](https://podman.io/)?\n\nOnce installed, a bootc enabled system can be updated by providing an updated bootable OCI image from any OCI\nimage registry with a single `bootc` command. This works especially well for fleets of devices that have fixed workloads - think\nfactories or appliances. Who doesn't want to add a little AI to their appliance, am I right?\n\nBootable images lend toward immutable operating systems, and the more immutable an operating system is, the less that can go wrong at runtime!\n\n#### Creating bootable disk images\n\nYou can convert a bootc image to a bootable disk image using the\n[quay.io/centos-bootc/bootc-image-builder](https://github.com/osbuild/bootc-image-builder) container image.\n\nThis container image allows you to build and deploy [multiple disk image types](../../common/README_bootc_image_builder.md) from bootc container images.\n\nDefault image types can be set via the DISK_TYPE Makefile variable.\n\n`make bootc-image-builder DISK_TYPE=ami`\n",
"recommended": ["hf.MaziyarPanahi.Mistral-7B-Instruct-v0.3.Q4_K_M"],
"backend": "llama-cpp",
"languages": ["python"],
"frameworks": ["streamlit", "langchain"]
},
{
"id": "audio_to_text",
"description": "This application demonstrate how to use LLM for transcripting an audio into text.",
"name": "Audio to Text",
"repository": "https://github.com/containers/ai-lab-recipes",
"ref": "v1.3.3.2",
"icon": "generator",
"categories": ["audio"],
"basedir": "recipes/audio/audio_to_text",
"readme": "# Audio to Text Application\n\nThis recipe helps developers start building their own custom AI enabled audio transcription applications. It consists of two main components: the Model Service and the AI Application.\n\nThere are a few options today for local Model Serving, but this recipe will use [`whisper-cpp`](https://github.com/ggerganov/whisper.cpp.git) and its included Model Service. There is a Containerfile provided that can be used to build this Model Service within the repo, [`model_servers/whispercpp/base/Containerfile`](/model_servers/whispercpp/base/Containerfile).\n\nThe AI Application will connect to the Model Service via an API. The recipe relies on [Langchain's](https://python.langchain.com/docs/get_started/introduction) python package to simplify communication with the Model Service and uses [Streamlit](https://streamlit.io/) for the UI layer. You can find an example of the audio to text application below.\n\n\n \n\n## Try the Audio to Text Application:\n\nThe [Podman Desktop](https://podman-desktop.io) [AI Lab Extension](https://github.com/containers/podman-desktop-extension-ai-lab) includes this recipe among others. To try it out, open `Recipes Catalog` -> `Audio to Text` and follow the instructions to start the application.\n\n# Build the Application\n\nThe rest of this document will explain how to build and run the application from the terminal, and will go into greater detail on how each container in the application above is built, run, and what purpose it serves in the overall application. All the recipes use a central [Makefile](../../common/Makefile.common) that includes variables populated with default values to simplify getting started. Please review the [Makefile docs](../../common/README.md), to learn about further customizing your application.\n\n* [Download a model](#download-a-model)\n* [Build the Model Service](#build-the-model-service)\n* [Deploy the Model Service](#deploy-the-model-service)\n* [Build the AI Application](#build-the-ai-application)\n* [Deploy the AI Application](#deploy-the-ai-application)\n* [Interact with the AI Application](#interact-with-the-ai-application)\n * [Input audio files](#input-audio-files)\n\n## Download a model\n\nIf you are just getting started, we recommend using [ggerganov/whisper.cpp](https://huggingface.co/ggerganov/whisper.cpp).\nThis is a well performant model with an MIT license.\nIt's simple to download a pre-converted whisper model from [huggingface.co](https://huggingface.co)\nhere: https://huggingface.co/ggerganov/whisper.cpp. There are a number of options, but we recommend to start with `ggml-small.bin`.\n\nThe recommended model can be downloaded using the code snippet below:\n\n```bash\ncd ../../../models\ncurl -sLO https://huggingface.co/ggerganov/whisper.cpp/resolve/main/ggml-small.bin\ncd ../recipes/audio/audio_to_text\n```\n\n_A full list of supported open models is forthcoming._\n\n\n## Build the Model Service\n\nThe complete instructions for building and deploying the Model Service can be found in the [whispercpp model-service document](../../../model_servers/whispercpp/README.md).\n\n```bash\n# from path model_servers/whispercpp from repo containers/ai-lab-recipes\nmake build\n```\nCheckout the [Makefile](../../../model_servers/whispercpp/Makefile) to get more details on different options for how to build.\n\n## Deploy the Model Service\n\nThe local Model Service relies on a volume mount to the localhost to access the model files. It also employs environment variables to dictate the model used and where its served. You can start your local Model Service using the following `make` command from `model_servers/whispercpp` set with reasonable defaults:\n\n```bash\n# from path model_servers/whispercpp from repo containers/ai-lab-recipes\nmake run\n```\n\n## Build the AI Application\n\nNow that the Model Service is running we want to build and deploy our AI Application. Use the provided Containerfile to build the AI Application\nimage from the [`audio-to-text/`](./) directory.\n\n```bash\n# from path recipes/audio/audio_to_text from repo containers/ai-lab-recipes\npodman build -t audio-to-text app\n```\n### Deploy the AI Application\n\nMake sure the Model Service is up and running before starting this container image.\nWhen starting the AI Application container image we need to direct it to the correct `MODEL_ENDPOINT`.\nThis could be any appropriately hosted Model Service (running locally or in the cloud) using a compatible API.\nThe following Podman command can be used to run your AI Application:\n\n```bash\npodman run --rm -it -p 8501:8501 -e MODEL_ENDPOINT=http://10.88.0.1:8001/inference audio-to-text \n```\n\n### Interact with the AI Application\n\nOnce the streamlit application is up and running, you should be able to access it at `http://localhost:8501`.\nFrom here, you can upload audio files from your local machine and translate the audio files as shown below.\n\nBy using this recipe and getting this starting point established,\nusers should now have an easier time customizing and building their own AI enabled applications.\n\n#### Input audio files\n\nWhisper.cpp requires as an input 16-bit WAV audio files.\nTo convert your input audio files to 16-bit WAV format you can use `ffmpeg` like this:\n\n```bash\nffmpeg -i <input.mp3> -ar 16000 -ac 1 -c:a pcm_s16le <output.wav>\n```\n",
"recommended": ["hf.ggerganov.whisper.cpp"],
"backend": "whisper-cpp",
"languages": ["python"],
"frameworks": ["streamlit"]
},
{
"id": "object_detection",
"description": "This recipe illustrates how to use LLM to interact with images and build object detection applications.",
"name": "Object Detection",
"repository": "https://github.com/containers/ai-lab-recipes",
"ref": "v1.3.3.2",
"icon": "generator",
"categories": ["computer-vision"],
"basedir": "recipes/computer_vision/object_detection",
"readme": "# Object Detection\n\nThis recipe helps developers start building their own custom AI enabled object detection applications. It consists of two main components: the Model Service and the AI Application.\n\nThere are a few options today for local Model Serving, but this recipe will use our FastAPI [`object_detection_python`](../../../model_servers/object_detection_python/src/object_detection_server.py) model server. There is a Containerfile provided that can be used to build this Model Service within the repo, [`model_servers/object_detection_python/base/Containerfile`](/model_servers/object_detection_python/base/Containerfile).\n\nThe AI Application will connect to the Model Service via an API. The recipe relies on [Streamlit](https://streamlit.io/) for the UI layer. You can find an example of the object detection application below.\n\n \n\n## Try the Object Detection Application:\n\nThe [Podman Desktop](https://podman-desktop.io) [AI Lab Extension](https://github.com/containers/podman-desktop-extension-ai-lab) includes this recipe among others. To try it out, open `Recipes Catalog` -> `Object Detection` and follow the instructions to start the application.\n\n# Build the Application\n\nThe rest of this document will explain how to build and run the application from the terminal, and will go into greater detail on how each container in the application above is built, run, and what purpose it serves in the overall application. All the Model Server elements of the recipe use a central Model Server [Makefile](../../../model_servers/common/Makefile.common) that includes variables populated with default values to simplify getting started. Currently we do not have a Makefile for the Application elements of the Recipe, but this coming soon, and will leverage the recipes common [Makefile](../../common/Makefile.common) to provide variable configuration and reasonable defaults to this Recipe's application.\n\n* [Download a model](#download-a-model)\n* [Build the Model Service](#build-the-model-service)\n* [Deploy the Model Service](#deploy-the-model-service)\n* [Build the AI Application](#build-the-ai-application)\n* [Deploy the AI Application](#deploy-the-ai-application)\n* [Interact with the AI Application](#interact-with-the-ai-application)\n\n## Download a model\n\nIf you are just getting started, we recommend using [facebook/detr-resnet-101](https://huggingface.co/facebook/detr-resnet-101).\nThis is a well performant model with an Apache-2.0 license.\nIt's simple to download a copy of the model from [huggingface.co](https://huggingface.co)\n\nYou can use the `download-model-facebook-detr-resnet-101` make target in the `model_servers/object_detection_python` directory to download and move the model into the models directory for you:\n\n```bash\n# from path model_servers/object_detection_python from repo containers/ai-lab-recipes\n make download-model-facebook-detr-resnet-101\n```\n\n## Build the Model Service\n\nThe You can build the Model Service from the [object_detection_python model-service directory](../../../model_servers/object_detection_python).\n\n```bash\n# from path model_servers/object_detection_python from repo containers/ai-lab-recipes\nmake build\n```\n\nCheckout the [Makefile](../../../model_servers/object_detection_python/Makefile) to get more details on different options for how to build.\n\n## Deploy the Model Service\n\nThe local Model Service relies on a volume mount to the localhost to access the model files. It also employs environment variables to dictate the model used and where its served. You can start your local Model Service using the following `make` command from the [`model_servers/object_detection_python`](../../../model_servers/object_detection_python) directory, which will be set with reasonable defaults:\n\n```bash\n# from path model_servers/object_detection_python from repo containers/ai-lab-recipes\nmake run\n```\n\nAs stated above, by default the model service will use [`facebook/detr-resnet-101`](https://huggingface.co/facebook/detr-resnet-101). However you can use other compatabale models. Simply pass the new `MODEL_NAME` and `MODEL_PATH` to the make command. Make sure the model is downloaded and exists in the [models directory](../../../models/):\n\n```bash\n# from path model_servers/object_detection_python from repo containers/ai-lab-recipes\nmake MODEL_NAME=facebook/detr-resnet-50 MODEL_PATH=/models/facebook/detr-resnet-50 run\n```\n\n## Build the AI Application\n\nNow that the Model Service is running we want to build and deploy our AI Application. Use the provided Containerfile to build the AI Application\nimage from the [`object_detection/`](./) recipe directory.\n\n```bash\n# from path recipes/computer_vision/object_detection from repo containers/ai-lab-recipes\npodman build -t object_detection_client .\n```\n\n### Deploy the AI Application\n\nMake sure the Model Service is up and running before starting this container image.\nWhen starting the AI Application container image we need to direct it to the correct `MODEL_ENDPOINT`.\nThis could be any appropriately hosted Model Service (running locally or in the cloud) using a compatible API.\nThe following Podman command can be used to run your AI Application:\n\n```bash\npodman run -p 8501:8501 -e MODEL_ENDPOINT=http://10.88.0.1:8000/detection object_detection_client\n```\n\n### Interact with the AI Application\n\nOnce the client is up a running, you should be able to access it at `http://localhost:8501`. From here you can upload images from your local machine and detect objects in the image as shown below. \n\nBy using this recipe and getting this starting point established,\nusers should now have an easier time customizing and building their own AI enabled applications.\n",
"recommended": ["hf.facebook.detr-resnet-101"],
"backend": "none",
"languages": ["python"],
"frameworks": ["streamlit"]
}
],
"models": [
{
"id": "hf.bartowski.granite-3.1-8b-instruct-GGUF",
"name": "bartowski/granite-3.1-8b-instruct-GGUF",
"description": "# Granite-3.1-8B-Instruct\n\n**Model Summary:**\nGranite-3.1-8B-Instruct is a 8B parameter long-context instruct model finetuned from Granite-3.1-8B-Base using a combination of open source instruction datasets with permissive license and internally collected synthetic datasets tailored for solving long context problems. This model is developed using a diverse set of techniques with a structured chat format, including supervised finetuning, model alignment using reinforcement learning, and model merging.\n\n- **Developers:** Granite Team, IBM\n- **GitHub Repository:** [ibm-granite/granite-3.1-language-models](https://github.com/ibm-granite/granite-3.1-language-models)\n- **Website**: [Granite Docs](https://www.ibm.com/granite/docs/)\n- **Paper:** [Granite 3.1 Language Models (coming soon)](https://huggingface.co/collections/ibm-granite/granite-31-language-models-6751dbbf2f3389bec5c6f02d) \n- **Release Date**: December 18th, 2024\n- **License:** [Apache 2.0](https://www.apache.org/licenses/LICENSE-2.0)\n\n**Supported Languages:** \nEnglish, German, Spanish, French, Japanese, Portuguese, Arabic, Czech, Italian, Korean, Dutch, and Chinese. Users may finetune Granite 3.1 models for languages beyond these 12 languages.\n\n**Intended Use:** \nThe model is designed to respond to general instructions and can be used to build AI assistants for multiple domains, including business applications.\n\n*Capabilities*\n* Summarization\n* Text classification\n* Text extraction\n* Question-answering\n* Retrieval Augmented Generation (RAG)\n* Code related tasks\n* Function-calling tasks\n* Multilingual dialog use cases\n* Long-context tasks including long document/meeting summarization, long document QA, etc.\n\n**Generation:** \nThis is a simple example of how to use Granite-3.1-8B-Instruct model.\n\nInstall the following libraries:\n\n```shell\npip install torch torchvision torchaudio\npip install accelerate\npip install transformers\n```\nThen, copy the snippet from the section that is relevant for your use case.\n\n```python\nimport torch\nfrom transformers import AutoModelForCausalLM, AutoTokenizer\n\ndevice = \"auto\"\nmodel_path = \"ibm-granite/granite-3.1-8b-instruct\"\ntokenizer = AutoTokenizer.from_pretrained(model_path)\n# drop device_map if running on CPU\nmodel = AutoModelForCausalLM.from_pretrained(model_path, device_map=device)\nmodel.eval()\n# change input text as desired\nchat = [\n { \"role\": \"user\", \"content\": \"Please list one IBM Research laboratory located in the United States. You should only output its name and location.\" },\n]\nchat = tokenizer.apply_chat_template(chat, tokenize=False, add_generation_prompt=True)\n# tokenize the text\ninput_tokens = tokenizer(chat, return_tensors=\"pt\").to(device)\n# generate output tokens\noutput = model.generate(**input_tokens, \n max_new_tokens=100)\n# decode output tokens into text\noutput = tokenizer.batch_decode(output)\n# print output\nprint(output)\n```\n\n**Model Architecture:**\nGranite-3.1-8B-Instruct is based on a decoder-only dense transformer architecture. Core components of this architecture are: GQA and RoPE, MLP with SwiGLU, RMSNorm, and shared input/output embeddings.\n\n| Model | 2B Dense | 8B Dense | 1B MoE | 3B MoE |\n| :-------- | :--------| :-------- | :------| :------|\n| Embedding size | 2048 | **4096** | 1024 | 1536 |\n| Number of layers | 40 | **40** | 24 | 32 |\n| Attention head size | 64 | **128** | 64 | 64 |\n| Number of attention heads | 32 | **32** | 16 | 24 |\n| Number of KV heads | 8 | **8** | 8 | 8 |\n| MLP hidden size | 8192 | **12800** | 512 | 512 |\n| MLP activation | SwiGLU | **SwiGLU** | SwiGLU | SwiGLU |\n| Number of experts | — | **—** | 32 | 40 |\n| MoE TopK | — | **—** | 8 | 8 |\n| Initialization std | 0.1 | **0.1** | 0.1 | 0.1 |\n| Sequence length | 128K | **128K** | 128K | 128K | \n| Position embedding | RoPE | **RoPE** | RoPE | RoPE |\n| # Parameters | 2.5B | **8.1B** | 1.3B | 3.3B |\n| # Active parameters | 2.5B | **8.1B** | 400M | 800M |\n| # Training tokens | 12T | **12T** | 10T | 10T |\n\n**Training Data:** \nOverall, our SFT data is largely comprised of three key sources: (1) publicly available datasets with permissive license, (2) internal synthetic data targeting specific capabilities including long-context tasks, and (3) very small amounts of human-curated data. A detailed attribution of datasets can be found in the [Granite 3.0 Technical Report](https://github.com/ibm-granite/granite-3.0-language-models/blob/main/paper.pdf), [Granite 3.1 Technical Report (coming soon)](https://huggingface.co/collections/ibm-granite/granite-31-language-models-6751dbbf2f3389bec5c6f02d), and [Accompanying Author List](https://github.com/ibm-granite/granite-3.0-language-models/blob/main/author-ack.pdf).\n\n**Infrastructure:**\nWe train Granite 3.1 Language Models using IBM's super computing cluster, Blue Vela, which is outfitted with NVIDIA H100 GPUs. This cluster provides a scalable and efficient infrastructure for training our models over thousands of GPUs.\n\n**Ethical Considerations and Limitations:** \nGranite 3.1 Instruct Models are primarily finetuned using instruction-response pairs mostly in English, but also multilingual data covering eleven languages. Although this model can handle multilingual dialog use cases, its performance might not be similar to English tasks. In such case, introducing a small number of examples (few-shot) can help the model in generating more accurate outputs. While this model has been aligned by keeping safety in consideration, the model may in some cases produce inaccurate, biased, or unsafe responses to user prompts. So we urge the community to use this model with proper safety testing and tuning tailored for their specific tasks.\n\n**Resources**\n- ⭐\uFE0F Learn about the latest updates with Granite: https://www.ibm.com/granite\n- \uD83D\uDCC4 Get started with tutorials, best practices, and prompt engineering advice: https://www.ibm.com/granite/docs/\n- \uD83D\uDCA1 Learn about the latest Granite learning resources: https://ibm.biz/granite-learning-resources\n\n<!-- ## Citation\n```\n@misc{granite-models,\n author = {author 1, author2, ...},\n title = {},\n journal = {},\n volume = {},\n year = {2024},\n url = {https://arxiv.org/abs/0000.00000},\n}\n``` -->",
"registry": "Hugging Face",
"license": "Apache-2.0",
"url": "https://huggingface.co/bartowski/granite-3.1-8b-instruct-GGUF/resolve/main/granite-3.1-8b-instruct-Q4_K_M.gguf",
"memory": 4939212390,
"properties": {
"chatFormat": "openchat"
},
"sha256": "b72cfca8e30f23af77f922ce18d6fe1a5d4925907dddf7249c0cabc2739d48c8",
"backend": "llama-cpp"
},
{
"id": "hf.lmstudio-community.granite-3.0-8b-instruct-GGUF",
"name": "lmstudio-community/granite-3.0-8b-instruct-GGUF",
"description": "\n\n# lmstudio-community/granite-3.0-8b-instruct\nThis is the Q4_K_M converted version of the original [`ibm-granite/granite-3.0-8b-instruct`](https://huggingface.co/ibm-granite/granite-3.0-8b-instruct).\nRefer to the [original model card](https://huggingface.co/ibm-granite/granite-3.0-8b-instruct) for more details.",
"registry": "Hugging Face",
"license": "Apache-2.0",
"url": "https://huggingface.co/lmstudio-community/granite-3.0-8b-instruct-GGUF/resolve/main/granite-3.0-8b-instruct-Q4_K_M.gguf",
"memory": 4942856128,
"properties": {
"chatFormat": "openchat"
},
"sha256": "bb32555f5a0bfa077aa2bfb17d43b7f76d372e7e57d433999592dc32d5310ab8",
"backend": "llama-cpp"
},
{
"id": "hf.instructlab.granite-7b-lab-GGUF",
"name": "instructlab/granite-7b-lab-GGUF",
"description": "# Model Card for Granite-7b-lab [Paper](https://arxiv.org/abs/2403.01081) \n\n### Overview\n\n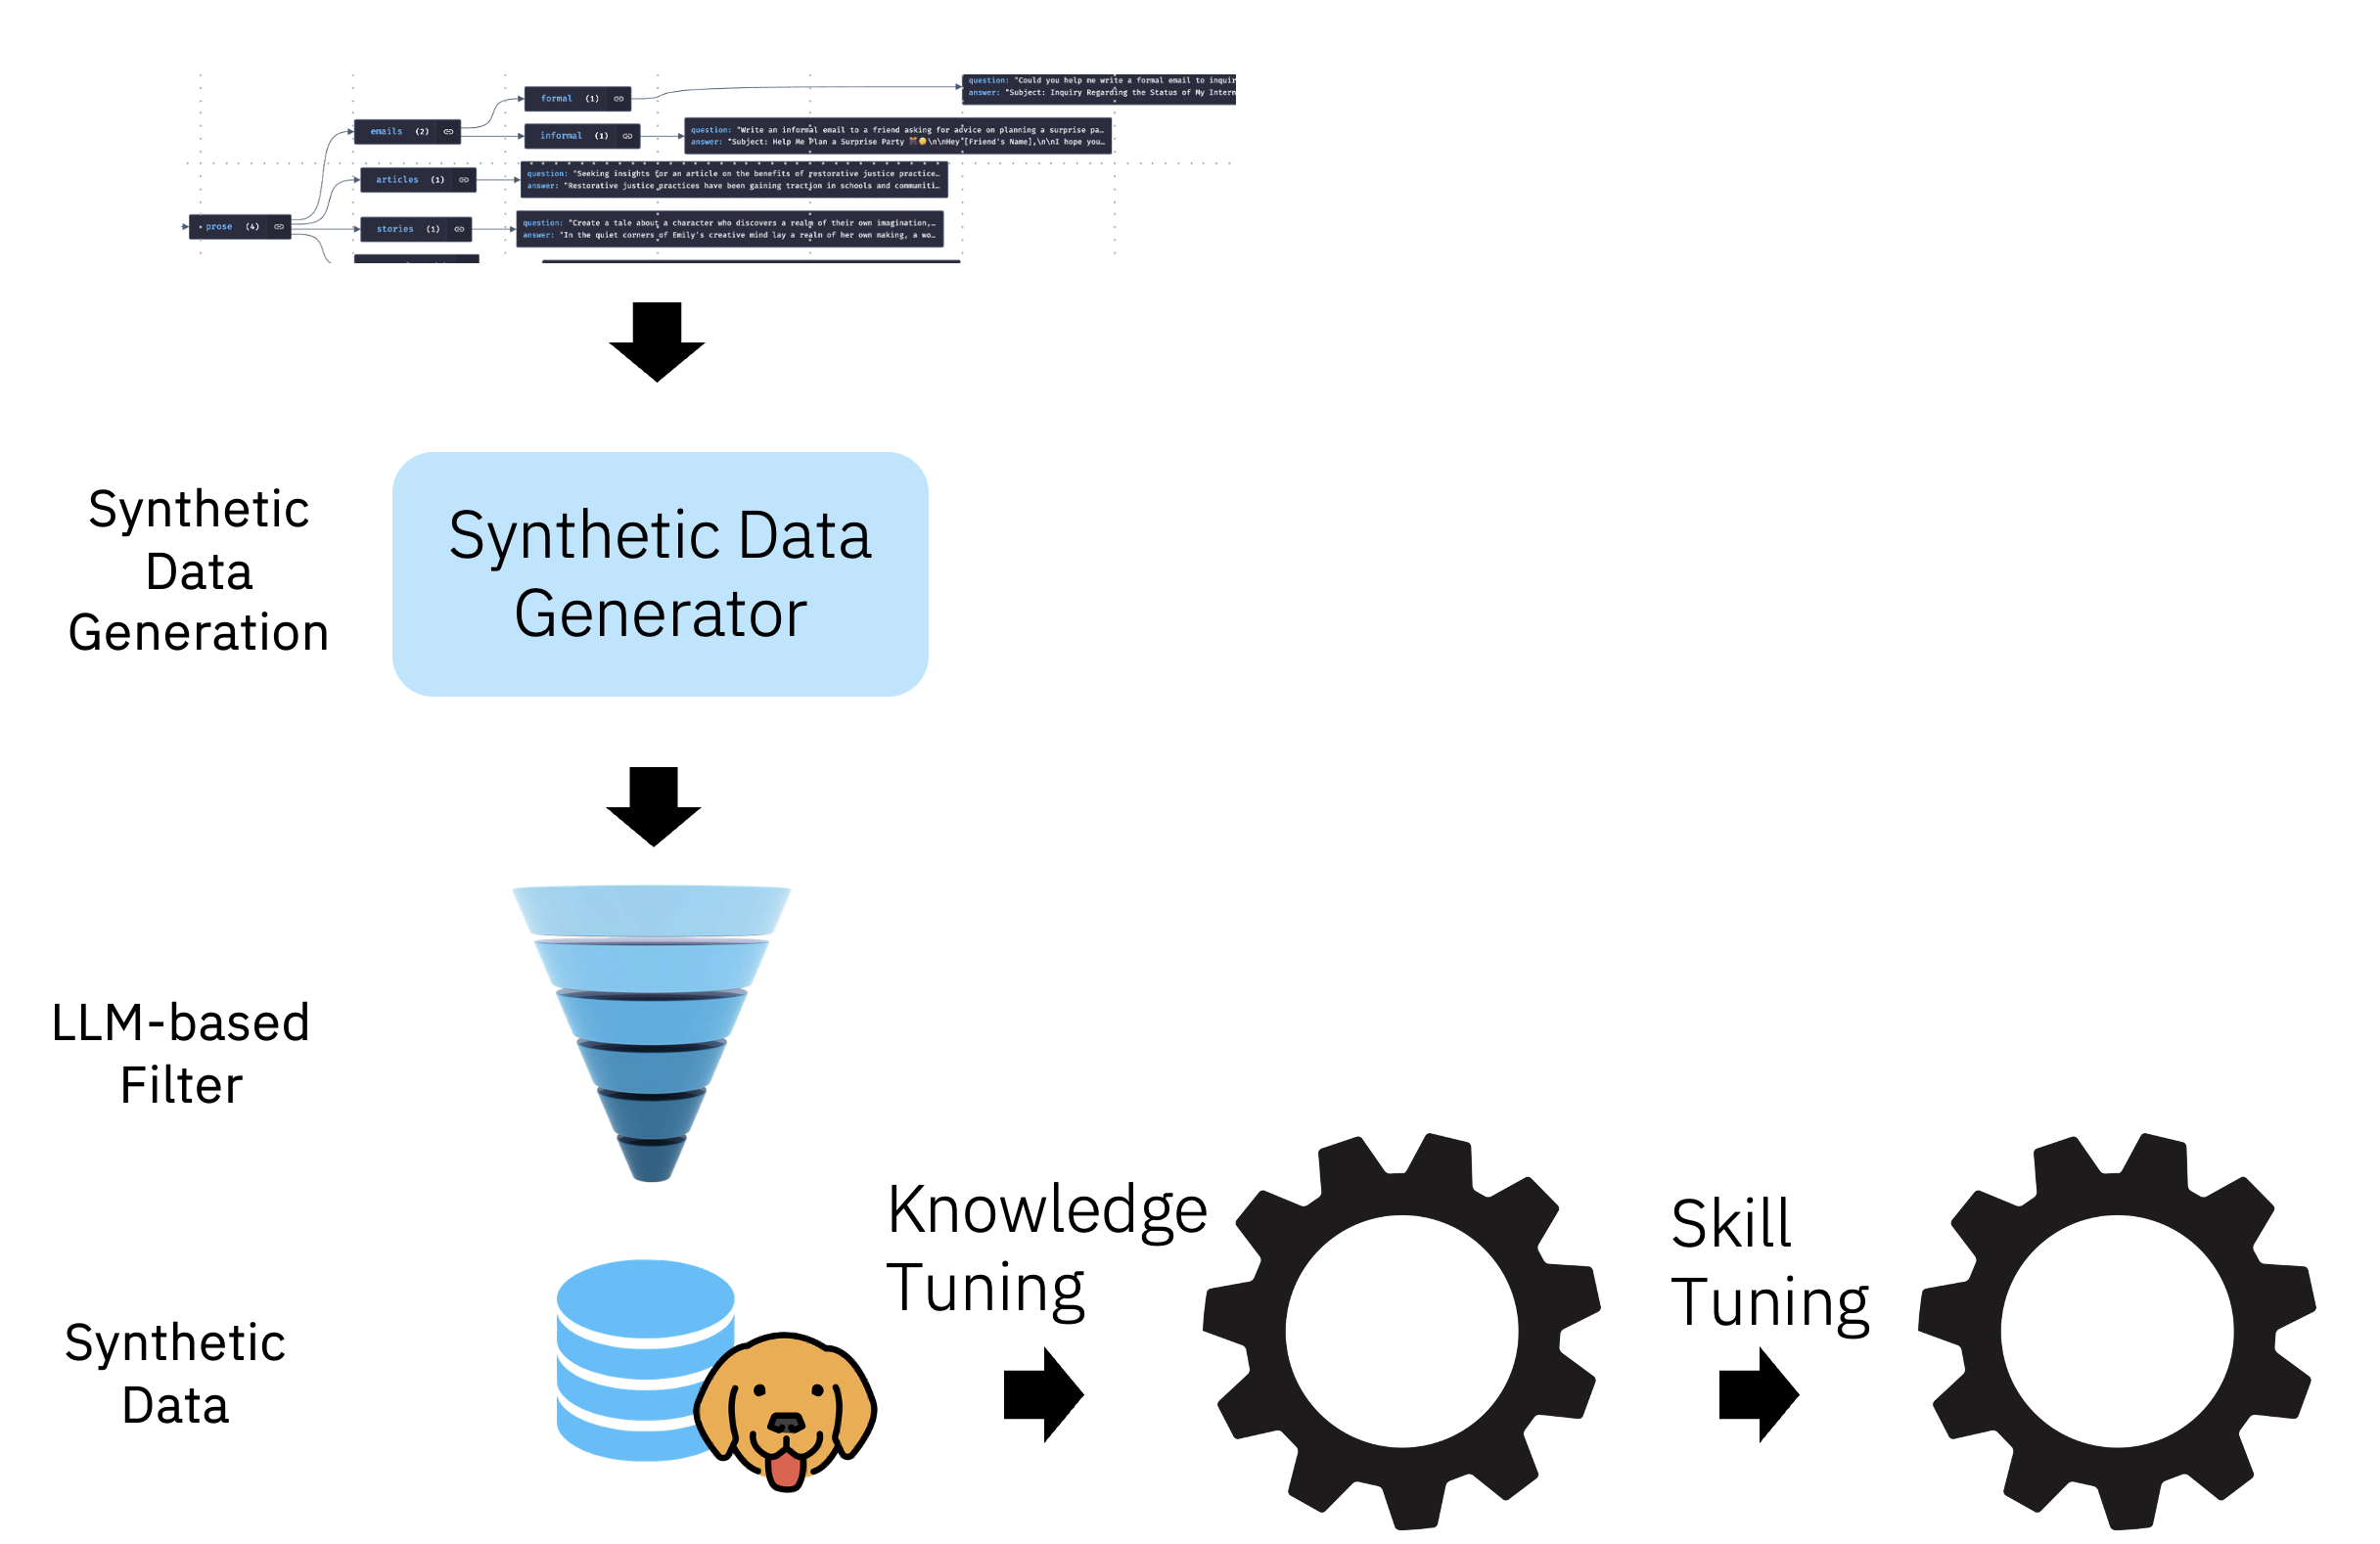\n\n### Performance\n\n| Model | Alignment | Base | Teacher | MTBench (Avg) * | MMLU(5-shot) |\n| --- | --- | --- | --- | --- | --- |\n| [Llama-2-13b-chat-hf](https://huggingface.co/meta-llama/Llama-2-13b-chat-hf) | RLHF | Llama-2-13b | Human Annotators | 6.65 |54.58 | \n| [Orca-2-13b](https://huggingface.co/microsoft/Orca-2-13b) | Progressive Training | Llama-2-13b | GPT-4 | 6.15 | 60.37 * |\n| [WizardLM-13B-V1.2](https://huggingface.co/WizardLM/WizardLM-13B-V1.2) | Evol-Instruct | Llama-2-13b | GPT-4 | 7.20 | 54.83 |\n| [Labradorite-13b](https://huggingface.co/ibm/labradorite-13b) | Large-scale Alignment for chatBots (LAB) | Llama-2-13b | Mixtral-8x7B-Instruct | 7.23 | 58.89 |\n| [Mistral-7B-Instruct-v0.1](https://huggingface.co/mistralai/Mistral-7B-Instruct-v0.1) | SFT | Mistral-7B-v0.1 | - | 6.84 | 60.37 |\n| [zephyr-7b-beta](https://huggingface.co/HuggingFaceH4/zephyr-7b-beta) | SFT/DPO | Mistral-7B-v0.1 | GPT-4 | 7.34 | 61.07 |\n| [Mistral-7B-Instruct-v0.2](https://huggingface.co/mistralai/Mistral-7B-Instruct-v0.2) | SFT | Mistral-7B-v0.1 | - | 7.6** | 60.78 | \n| [Merlinite-7b-lab](https://huggingface.co/instructlab/merlinite-7b-lab) | Large-scale Alignment for chatBots (LAB) | Mistral-7B-v0.1 | Mixtral-8x7B-Instruct | 7.66 |64.88 | \n| Granite-7b-lab | Large-scale Alignment for chatBots (LAB) | Granite-7b-base| Mixtral-8x7B-Instruct | 6.69 | 51.91 |\n\n[*] Numbers for models other than Merlinite-7b-lab, Granite-7b-lab and [Labradorite-13b](https://huggingface.co/ibm/labradorite-13b) are taken from [lmsys/chatbot-arena-leaderboard](https://huggingface.co/spaces/lmsys/chatbot-arena-leaderboard)\n\n[**] Numbers taken from [MistralAI Release Blog](https://mistral.ai/news/la-plateforme/)\n\n### Method\n\nLAB: **L**arge-scale **A**lignment for chat**B**ots is a novel synthetic data-based alignment tuning method for LLMs from IBM Research. Granite-7b-lab is a Granite-7b-base derivative model trained with the LAB methodology, using Mixtral-8x7b-Instruct as a teacher model.\n\nLAB consists of three key components:\n\n1. Taxonomy-driven data curation process\n2. Large-scale synthetic data generator\n3. Two-phased-training with replay buffers\n\n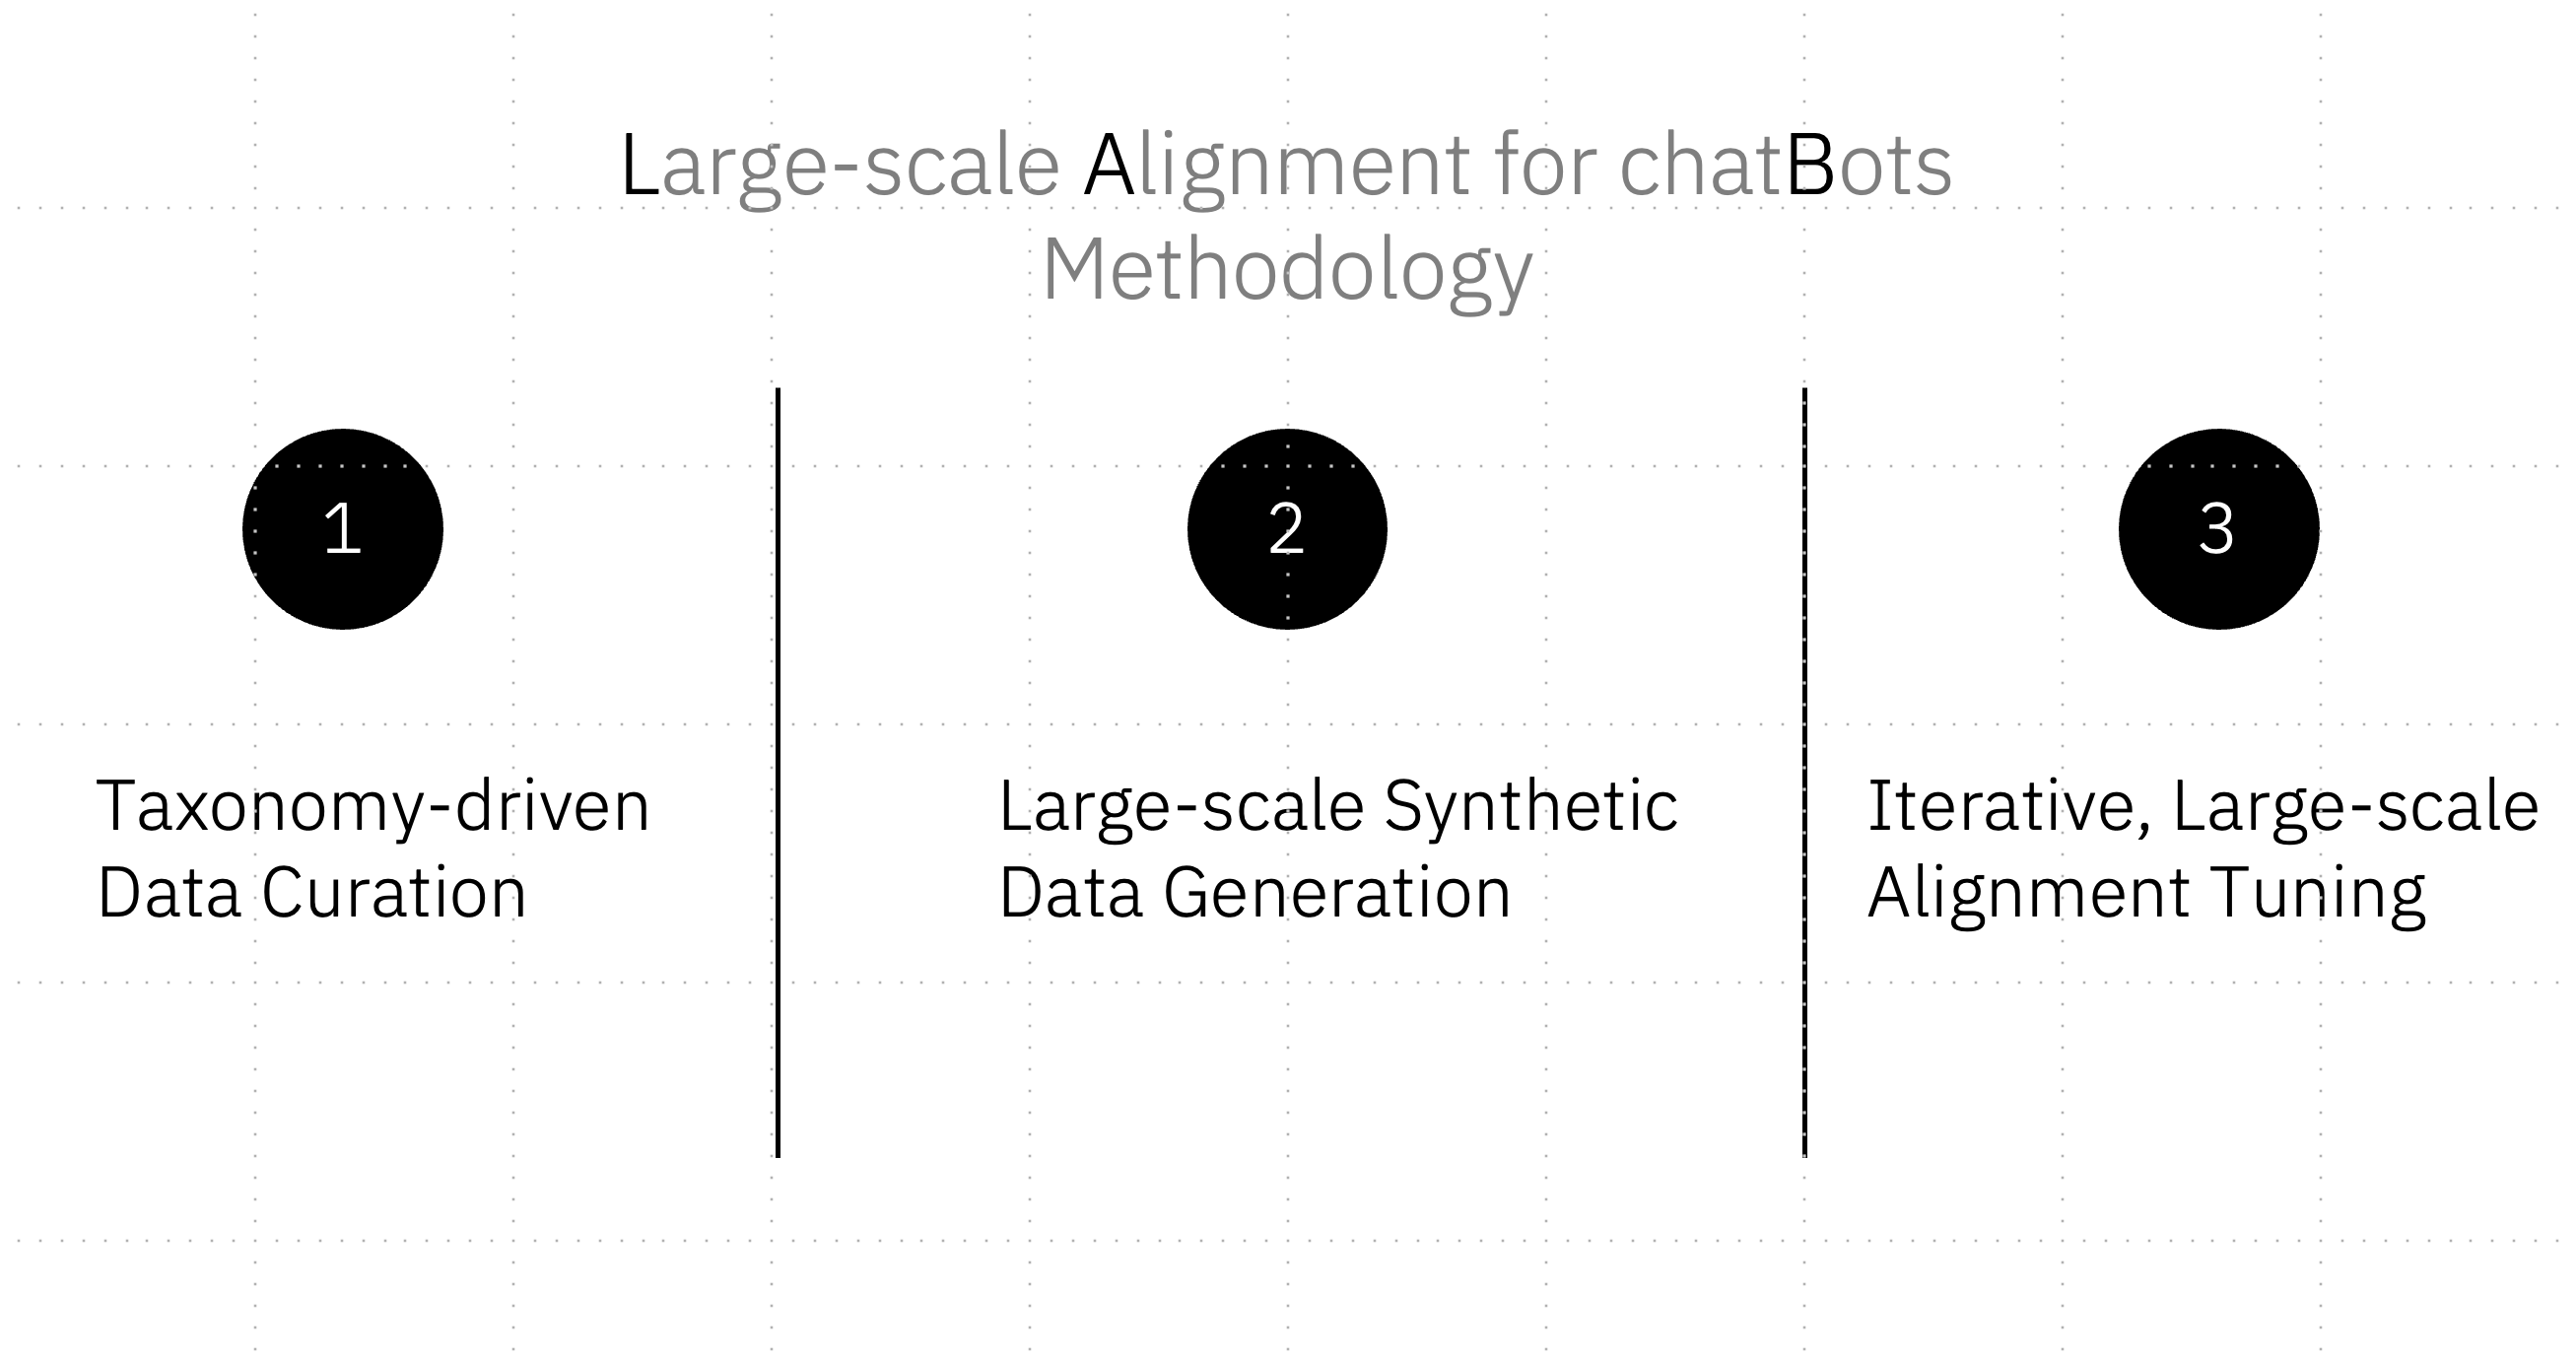\n\nLAB approach allows for adding new knowledge and skills, in an incremental fashion, to an already pre-trained model without suffering from catastrophic forgetting.\n\nTaxonomy is a tree of seed examples that are used to prompt a teacher model to generate synthetic data. Taxonomy allows the data curator or the model designer to easily specify a diverse set of the knowledge-domains and skills that they would like to include in their LLM. At a high level, these can be categorized into three high-level bins - knowledge, foundational skills, and compositional skills. The leaf nodes of the taxonomy are tasks associated with one or more seed examples.\n\n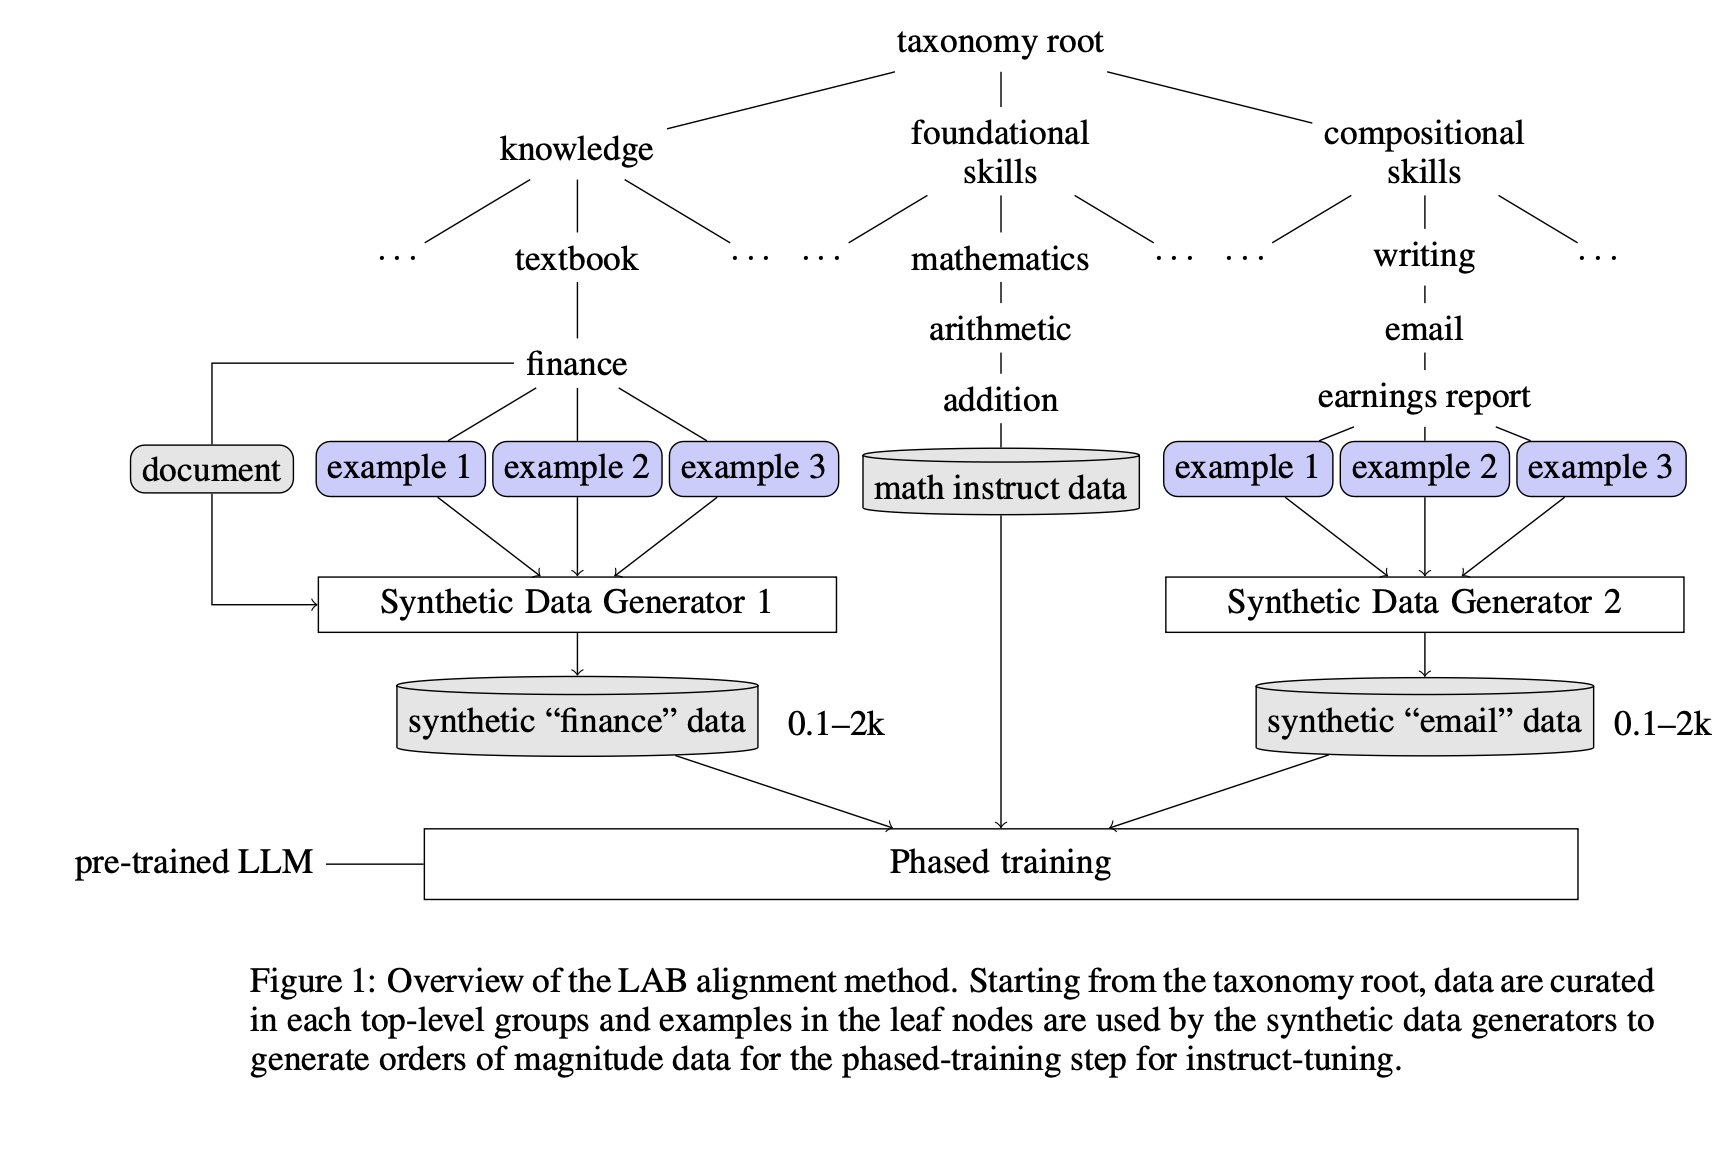\n\nDuring the synthetic data generation, **unlike previous approaches where seed examples are uniformly drawn from the entire pool (i.e. self-instruct), we use the taxonomy to drive the sampling process**: For each knowledge/skill, we only use the local examples within the leaf node as seeds to prompt the teacher model.\nThis makes the teacher model better exploit the task distributions defined by the local examples of each node and the diversity in the taxonomy itself ensures the entire generation covers a wide range of tasks, as illustrated below. In turns, this allows for using Mixtral 8x7B as the teacher model for generation while performing very competitively with models such as ORCA-2, WizardLM, and Zephyr Beta that rely on synthetic data generated by much larger and capable models like GPT-4.\n\n\n\nFor adding new domain-specific knowledge, we provide an external knowledge source (document) and prompt the model to generate questions and answers based on the document.\nFoundational skills such as reasoning and compositional skills such as creative writing are generated through in-context learning using the seed examples from the taxonomy. \n\nAdditionally, to ensure the data is high-quality and safe, we employ steps to check the questions and answers to ensure that they are grounded and safe. This is done using the same teacher model that generated the data. \n\nOur training consists of two major phases: knowledge tuning and skills tuning. \nThere are two steps in knowledge tuning where the first step learns simple knowledge (short samples) and the second step learns complicated knowledge (longer samples).\nThe second step uses replay a replay buffer with data from the first step.\nBoth foundational skills and compositional skills are learned during the skills tuning phases, where a replay buffer of data from the knowledge phase is used.\nImportantly, we use a set of hyper-parameters for training that are very different from standard small-scale supervised fine-training: larger batch size and carefully optimized learning rate and scheduler.\n\n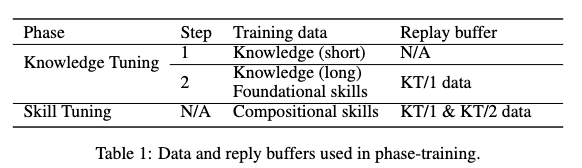\n\n## Model description\n- **Model Name**: Granite-7b-lab\n- **Language(s):** Primarily English\n- **License:** Apache 2.0\n- **Base model:** [ibm/granite-7b-base](https://huggingface.co/ibm/granite-7b-base)\n- **Teacher Model:** [mistralai/Mixtral-8x7B-Instruct-v0.1](https://huggingface.co/mistralai/Mixtral-8x7B-Instruct-v0.1)\n\n## Prompt Template\n\n```python\nsys_prompt = \"You are an AI language model developed by IBM Research. You are a cautious assistant. You carefully follow instructions. You are helpful and harmless and you follow ethical guidelines and promote positive behavior.\"\nprompt = f'<|system|>\\n{sys_prompt}\\n<|user|>\\n{inputs}\\n<|assistant|>\\n'\nstop_token = '<|endoftext|>'\n```\n\nWe advise utilizing the system prompt employed during the model's training for optimal inference performance, as there could be performance variations based on the provided instructions. \n\n\n\n**Bias, Risks, and Limitations**\n\nGranite-7b-lab is a base model and has not undergone any safety alignment, there it may produce problematic outputs. In the absence of adequate safeguards and RLHF, there exists a risk of malicious utilization of these models for generating disinformation or harmful content. Caution is urged against complete reliance on a specific language model for crucial decisions or impactful information, as preventing these models from fabricating content is not straightforward. Additionally, it remains uncertain whether smaller models might exhibit increased susceptibility to hallucination in ungrounded generation scenarios due to their reduced sizes and memorization capacities. This aspect is currently an active area of research, and we anticipate more rigorous exploration, comprehension, and mitigations in this domain.",
"registry": "Hugging Face",
"license": "Apache-2.0",
"url": "https://huggingface.co/instructlab/granite-7b-lab-GGUF/resolve/main/granite-7b-lab-Q4_K_M.gguf",
"memory": 4080218931,
"properties": {
"chatFormat": "openchat"
},
"sha256": "6adeaad8c048b35ea54562c55e454cc32c63118a32c7b8152cf706b290611487",
"backend": "llama-cpp"
},
{
"id": "hf.instructlab.merlinite-7b-lab-GGUF",
"name": "instructlab/merlinite-7b-lab-GGUF",
"description": "# Merlinite 7b - GGUF\n\n4-bit quantized version of [instructlab/merlinite-7b-lab](https://huggingface.co/instructlab/merlinite-7b-lab)",
"registry": "Hugging Face",
"license": "Apache-2.0",
"url": "https://huggingface.co/instructlab/merlinite-7b-lab-GGUF/resolve/main/merlinite-7b-lab-Q4_K_M.gguf",
"memory": 4370129224,
"properties": {
"chatFormat": "openchat"
},
"sha256": "9ca044d727db34750e1aeb04e3b18c3cf4a8c064a9ac96cf00448c506631d16c",
"backend": "llama-cpp"
},
{
"id": "hf.TheBloke.mistral-7b-instruct-v0.2.Q4_K_M",
"name": "TheBloke/Mistral-7B-Instruct-v0.2-GGUF",
"description": "# Mistral 7B Instruct v0.2 - GGUF\n- Model creator: [Mistral AI](https://huggingface.co/mistralai)\n- Original model: [Mistral 7B Instruct v0.2](https://huggingface.co/mistralai/Mistral-7B-Instruct-v0.2)\n\n<!-- description start -->\n## Description\n\nThis repo contains GGUF format model files for [Mistral AI's Mistral 7B Instruct v0.2](https://huggingface.co/mistralai/Mistral-7B-Instruct-v0.2).\n",
"registry": "Hugging Face",
"license": "Apache-2.0",
"url": "https://huggingface.co/TheBloke/Mistral-7B-Instruct-v0.2-GGUF/resolve/main/mistral-7b-instruct-v0.2.Q4_K_M.gguf",
"memory": 4370129224,
"sha256": "3e0039fd0273fcbebb49228943b17831aadd55cbcbf56f0af00499be2040ccf9",
"backend": "llama-cpp"
},
{
"id": "hf.NousResearch.Hermes-2-Pro-Mistral-7B.Q4_K_M",
"name": "NousResearch/Hermes-2-Pro-Mistral-7B-GGUF",
"description": "## Model Description\n\nHermes 2 Pro on Mistral 7B is the new flagship 7B Hermes!\n\nHermes 2 Pro is an upgraded, retrained version of Nous Hermes 2, consisting of an updated and cleaned version of the OpenHermes 2.5 Dataset, as well as a newly introduced Function Calling and JSON Mode dataset developed in-house.\n\nThis new version of Hermes maintains its excellent general task and conversation capabilities - but also excels at Function Calling, JSON Structured Outputs, and has improved on several other metrics as well, scoring a 90% on our function calling evaluation built in partnership with Fireworks.AI, and an 84% on our structured JSON Output evaluation.\n\nHermes Pro takes advantage of a special system prompt and multi-turn function calling structure with a new chatml role in order to make function calling reliable and easy to parse. Learn more about prompting below.\n\nThis work was a collaboration between Nous Research, @interstellarninja, and Fireworks.AI\n\nLearn more about the function calling system for this model on our github repo here: https://github.com/NousResearch/Hermes-Function-Calling",
"registry": "Hugging Face",
"license": "Apache-2.0",
"url": "https://huggingface.co/NousResearch/Hermes-2-Pro-Mistral-7B-GGUF/resolve/main/Hermes-2-Pro-Mistral-7B.Q4_K_M.gguf",
"memory": 4370129224,
"sha256": "e1e4253b94e3c04c7b6544250f29ad864a56eb2126e61eb440991a8284453674",
"backend": "llama-cpp"
},
{
"id": "hf.ibm.merlinite-7b-Q4_K_M",
"name": "ibm/merlinite-7b-GGUF",
"description": "# Merlinite 7b - GGUF\n\n4-bit quantized version of [ibm/merlinite-7b](https://huggingface.co/ibm/merlinite-7b)",
"registry": "Hugging Face",
"license": "Apache-2.0",
"url": "https://huggingface.co/ibm/merlinite-7b-GGUF/resolve/main/merlinite-7b-Q4_K_M.gguf",
"memory": 4370129224,
"properties": {
"chatFormat": "openchat"
},
"sha256": "94f3a16321c9604ca22e970f3b89931ae5b4bbfd4c5d996e2bb606c506590666",
"backend": "llama-cpp"
},
{
"id": "hf.ibm-granite.granite-8b-code-instruct",
"name": "ibm-granite/granite-8b-code-instruct-GGUF",
"description": "\n\n# ibm-granite/granite-8b-code-instruct-GGUF\nThis is the Q4_K_M converted version of the original [`ibm-granite/granite-8b-code-instruct`](https://huggingface.co/ibm-granite/granite-8b-code-instruct).\nRefer to the [original model card](https://huggingface.co/ibm-granite/granite-8b-code-instruct) for more details.\n\n## Use with llama.cpp\n```shell\ngit clone https://github.com/ggerganov/llama.cpp\ncd llama.cpp\n\n# install\nmake\n\n# run generation\n./main -m granite-8b-code-instruct-GGUF/granite-8b-code-instruct.Q4_K_M.gguf -n 128 -p \"def generate_random(x: int):\" --color\n```",
"registry": "Hugging Face",
"license": "Apache-2.0",
"url": "https://huggingface.co/ibm-granite/granite-8b-code-instruct-GGUF/resolve/main/granite-8b-code-instruct.Q4_K_M.gguf",
"memory": 5347234284,
"properties": {
"chatFormat": "openchat"
},
"sha256": "bc8804cb43c4e1e82e2188658569b147587f83a89640600a64d5f7d7de2565b4",
"backend": "llama-cpp"
},
{
"id": "hf.TheBloke.mistral-7b-codealpaca-lora.Q4_K_M",
"name": "TheBloke/Mistral-7B-codealpaca-lora-GGUF",
"description": "# Mistral 7B CodeAlpaca Lora - GGUF\n- Model creator: [Kamil](https://huggingface.co/Nondzu)\n- Original model: [Mistral 7B CodeAlpaca Lora](https://huggingface.co/Nondzu/Mistral-7B-codealpaca-lora)\n\n<!-- description start -->\n## Description\n\nThis repo contains GGUF format model files for [Kamil's Mistral 7B CodeAlpaca Lora](https://huggingface.co/Nondzu/Mistral-7B-codealpaca-lora).\n\nThese files were quantised using hardware kindly provided by [Massed Compute](https://massedcompute.com/).\n",
"registry": "Hugging Face",
"license": "Apache-2.0",
"url": "https://huggingface.co/TheBloke/Mistral-7B-codealpaca-lora-GGUF/resolve/main/mistral-7b-codealpaca-lora.Q4_K_M.gguf",
"memory": 4370129224,
"sha256": "69c07f27f682ca8da59fcd8a981335876882a2577f0f9df51b49cf6b97fd470f",
"backend": "llama-cpp"
},
{
"id": "hf.TheBloke.mistral-7b-code-16k-qlora.Q4_K_M",
"name": "TheBloke/Mistral-7B-Code-16K-qlora-GGUF",
"description": "# Mistral 7B Code 16K qLoRA - GGUF\n- Model creator: [Kamil](https://huggingface.co/Nondzu)\n- Original model: [Mistral 7B Code 16K qLoRA](https://huggingface.co/Nondzu/Mistral-7B-code-16k-qlora)\n\n<!-- description start -->\n## Description\n\nThis repo contains GGUF format model files for [Kamil's Mistral 7B Code 16K qLoRA](https://huggingface.co/Nondzu/Mistral-7B-code-16k-qlora).",
"registry": "Hugging Face",
"license": "Apache-2.0",
"url": "https://huggingface.co/TheBloke/Mistral-7B-Code-16K-qlora-GGUF/resolve/main/mistral-7b-code-16k-qlora.Q4_K_M.gguf",
"memory": 4370129224,
"sha256": "0f3c9aced2de6caad52323fea5a92a22fba0b4efddb564fda7a3071e0614443f",
"backend": "llama-cpp"
},
{
"id": "hf.froggeric.Cerebrum-1.0-7b-Q4_KS",
"name": "froggeric/Cerebrum-1.0-7b-GGUF",
"description": "GGUF quantisations of [AetherResearch/Cerebrum-1.0-7b](https://huggingface.co/AetherResearch/Cerebrum-1.0-7b)\n\n## Introduction\n\nCerebrum 7b is a large language model (LLM) created specifically for reasoning tasks. It is based on the Mistral 7b model, fine-tuned on a small custom dataset of native chain of thought data and further improved with targeted RLHF (tRLHF), a novel technique for sample-efficient LLM alignment. Unlike numerous other recent fine-tuning approaches, our training pipeline includes under 5000 training prompts and even fewer labeled datapoints for tRLHF.\n\nNative chain of thought approach means that Cerebrum is trained to devise a tactical plan before tackling problems that require thinking. For brainstorming, knowledge intensive, and creative tasks Cerebrum will typically omit unnecessarily verbose considerations.\n\nZero-shot prompted Cerebrum significantly outperforms few-shot prompted Mistral 7b as well as much larger models (such as Llama 2 70b) on a range of tasks that require reasoning, including ARC Challenge, GSM8k, and Math.\n\nThis LLM model works a lot better than any other mistral mixtral models for agent data, tested on 14th March 2024.\n",
"registry": "Hugging Face",
"license": "Apache-2.0",
"url": "https://huggingface.co/froggeric/Cerebrum-1.0-7b-GGUF/resolve/main/Cerebrum-1.0-7b-Q4_KS.gguf",
"memory": 4144643441,
"properties": {
"chatFormat": "openchat"
},
"sha256": "98861462a0a80e08704631df23ffee860bd5634551c48d069d4daa3c8931bc52",
"backend": "llama-cpp"
},
{
"id": "hf.TheBloke.openchat-3.5-0106.Q4_K_M",
"name": "TheBloke/openchat-3.5-0106-GGUF",
"description": "# Openchat 3.5 0106 - GGUF\n- Model creator: [OpenChat](https://huggingface.co/openchat)\n- Original model: [Openchat 3.5 0106](https://huggingface.co/openchat/openchat-3.5-0106)\n\n<!-- description start -->\n## Description\n\nThis repo contains GGUF format model files for [OpenChat's Openchat 3.5 0106](https://huggingface.co/openchat/openchat-3.5-0106).\n\nThese files were quantised using hardware kindly provided by [Massed Compute](https://massedcompute.com/).",
"registry": "Hugging Face",
"license": "Apache-2.0",
"url": "https://huggingface.co/TheBloke/openchat-3.5-0106-GGUF/resolve/main/openchat-3.5-0106.Q4_K_M.gguf",
"memory": 4370129224,
"sha256": "49190d4d039e6dea463e567ebce707eb001648f4ba01e43eb7fa88d9975fc0ce",
"backend": "llama-cpp"
},
{
"id": "hf.TheBloke.mistral-7b-openorca.Q4_K_M",
"name": "TheBloke/Mistral-7B-OpenOrca-GGUF",
"description": "# Mistral 7B OpenOrca - GGUF\n- Model creator: [OpenOrca](https://huggingface.co/Open-Orca)\n- Original model: [Mistral 7B OpenOrca](https://huggingface.co/Open-Orca/Mistral-7B-OpenOrca)\n\n<!-- description start -->\n## Description\n\nThis repo contains GGUF format model files for [OpenOrca's Mistral 7B OpenOrca](https://huggingface.co/Open-Orca/Mistral-7B-OpenOrca).",
"registry": "Hugging Face",
"license": "Apache-2.0",
"url": "https://huggingface.co/TheBloke/Mistral-7B-OpenOrca-GGUF/resolve/main/mistral-7b-openorca.Q4_K_M.gguf",
"memory": 4370129224,
"sha256": "83967e58c10c25fbe9d358b6d9e9a8212ca8a292061110dcb68511d39133407b",
"backend": "llama-cpp"
},
{
"id": "hf.MaziyarPanahi.phi-2.Q4_K_M",
"name": "MaziyarPanahi/phi-2-GGUF",
"description": "# [MaziyarPanahi/phi-2-GGUF](https://huggingface.co/MaziyarPanahi/phi-2-GGUF)\n- Model creator: [microsoft](https://huggingface.co/microsoft)\n- Original model: [microsoft/phi-2](https://huggingface.co/microsoft/phi-2)\n\n## Description\n[MaziyarPanahi/phi-2-GGUF](https://huggingface.co/MaziyarPanahi/phi-2-GGUF) contains GGUF format model files for [microsoft/phi-2](https://huggingface.co/microsoft/phi-2).",
"registry": "Hugging Face",
"license": "Apache-2.0",
"url": "https://huggingface.co/MaziyarPanahi/phi-2-GGUF/resolve/main/phi-2.Q4_K_M.gguf",
"memory": 1739461755,
"sha256": "013e0e421b70dc169adb0c0010171202371e907e5f648084e4ddc8ad9985127a",
"backend": "llama-cpp"
},
{
"id": "hf.llmware.dragon-mistral-7b-q4_k_m",
"name": "llmware/dragon-mistral-7b-v0",
"description": "# Model Card for Model ID\n\n<!-- Provide a quick summary of what the model is/does. -->\n\ndragon-mistral-7b-v0 part of the dRAGon (\"Delivering RAG On ...\") model series, RAG-instruct trained on top of a Mistral-7B base model.\n\nDRAGON models have been fine-tuned with the specific objective of fact-based question-answering over complex business and legal documents with an emphasis on reducing hallucinations and providing short, clear answers for workflow automation.",
"registry": "Hugging Face",
"license": "Apache-2.0",
"url": "https://huggingface.co/llmware/dragon-mistral-7b-v0/resolve/main/dragon-mistral-7b-q4_k_m.gguf",
"memory": 4370129224,
"properties": {
"chatFormat": "openchat"
},
"sha256": "1d8f463c4917480b770db5d7921f3d144471891c45a0d25ba3ab3dd753ec620f",
"backend": "llama-cpp"
},
{
"id": "hf.MaziyarPanahi.MixTAO-7Bx2-MoE-Instruct-v7.0.Q4_K_M",
"name": "MaziyarPanahi/MixTAO-7Bx2-MoE-Instruct-v7.0-GGUF",
"description": "# [MaziyarPanahi/MixTAO-7Bx2-MoE-Instruct-v7.0-GGUF](https://huggingface.co/MaziyarPanahi/MixTAO-7Bx2-MoE-Instruct-v7.0-GGUF)\n- Model creator: [zhengr](https://huggingface.co/zhengr)\n- Original model: [zhengr/MixTAO-7Bx2-MoE-Instruct-v7.0](https://huggingface.co/zhengr/MixTAO-7Bx2-MoE-Instruct-v7.0)\n\n## Description\n[MaziyarPanahi/MixTAO-7Bx2-MoE-Instruct-v7.0-GGUF](https://huggingface.co/MaziyarPanahi/MixTAO-7Bx2-MoE-Instruct-v7.0-GGUF) contains GGUF format model files for [zhengr/MixTAO-7Bx2-MoE-Instruct-v7.0](https://huggingface.co/zhengr/MixTAO-7Bx2-MoE-Instruct-v7.0).\n",
"registry": "Hugging Face",
"license": "Apache-2.0",
"url": "https://huggingface.co/MaziyarPanahi/MixTAO-7Bx2-MoE-Instruct-v7.0-GGUF/resolve/main/MixTAO-7Bx2-MoE-Instruct-v7.0.Q4_K_M.gguf",
"memory": 7784628224,
"sha256": "f5fcf04c77a5b69ae37791b48df90daa553e40b5a39efc9068258bedef373182",
"backend": "llama-cpp"
},
{
"id": "hf.ggerganov.whisper.cpp",
"name": "ggerganov/whisper.cpp",
"description": "# OpenAI's Whisper models converted to ggml format\n\n[Available models](https://huggingface.co/ggerganov/whisper.cpp/tree/main)\n",
"registry": "Hugging Face",
"license": "Apache-2.0",
"url": "https://huggingface.co/ggerganov/whisper.cpp/resolve/main/ggml-small.bin",
"memory": 487010000,
"sha256": "1be3a9b2063867b937e64e2ec7483364a79917e157fa98c5d94b5c1fffea987b",
"backend": "whisper-cpp"
},
{
"id": "hf.facebook.detr-resnet-101",
"name": "facebook/detr-resnet-101",
"description": "# DETR (End-to-End Object Detection) model with ResNet-101 backbone\n\nDEtection TRansformer (DETR) model trained end-to-end on COCO 2017 object detection (118k annotated images). It was introduced in the paper [End-to-End Object Detection with Transformers](https://arxiv.org/abs/2005.12872) by Carion et al. and first released in [this repository](https://github.com/facebookresearch/detr). \n\nDisclaimer: The team releasing DETR did not write a model card for this model so this model card has been written by the Hugging Face team.\n\n## Model description\n\nThe DETR model is an encoder-decoder transformer with a convolutional backbone. Two heads are added on top of the decoder outputs in order to perform object detection: a linear layer for the class labels and a MLP (multi-layer perceptron) for the bounding boxes. The model uses so-called object queries to detect objects in an image. Each object query looks for a particular object in the image. For COCO, the number of object queries is set to 100. \n\nThe model is trained using a \"bipartite matching loss\": one compares the predicted classes + bounding boxes of each of the N = 100 object queries to the ground truth annotations, padded up to the same length N (so if an image only contains 4 objects, 96 annotations will just have a \"no object\" as class and \"no bounding box\" as bounding box). The Hungarian matching algorithm is used to create an optimal one-to-one mapping between each of the N queries and each of the N annotations. Next, standard cross-entropy (for the classes) and a linear combination of the L1 and generalized IoU loss (for the bounding boxes) are used to optimize the parameters of the model.\n\n\n\n## Intended uses & limitations\n\nYou can use the raw model for object detection. See the [model hub](https://huggingface.co/models?search=facebook/detr) to look for all available DETR models.",
"registry": "Hugging Face",
"license": "Apache-2.0",
"url": "https://huggingface.co/facebook/detr-resnet-101/resolve/no_timm/pytorch_model.bin",
"memory": 242980000,
"properties": {
"name": "facebook/detr-resnet-101"
},
"sha256": "893ae2442b36b2e8e1134ccbf8c0d9bd670648d0964509202ab30c9cbb3d2114",
"backend": "none"
},
{
"id": "hf.MaziyarPanahi.Mistral-7B-Instruct-v0.3.Q4_K_M",
"name": "MaziyarPanahi/Mistral-7B-Instruct-v0.3.Q4_K_M",
"description": "# [MaziyarPanahi/Mistral-7B-Instruct-v0.3-GGUF](https://huggingface.co/MaziyarPanahi/Mistral-7B-Instruct-v0.3-GGUF)\n- Model creator: [mistralai](https://huggingface.co/mistralai)\n- Original model: [mistralai/Mistral-7B-Instruct-v0.3](https://huggingface.co/mistralai/Mistral-7B-Instruct-v0.3)\n\n## Description\n[MaziyarPanahi/Mistral-7B-Instruct-v0.3-GGUF](https://huggingface.co/MaziyarPanahi/Mistral-7B-Instruct-v0.3-GGUF) contains GGUF format model files for [mistralai/Mistral-7B-Instruct-v0.3](https://huggingface.co/mistralai/Mistral-7B-Instruct-v0.3).",
"registry": "Hugging Face",
"license": "Apache-2.0",
"url": "https://huggingface.co/MaziyarPanahi/Mistral-7B-Instruct-v0.3-GGUF/resolve/main/Mistral-7B-Instruct-v0.3.Q4_K_M.gguf",
"properties": {
"chatFormat": "chatml-function-calling"
},
"memory": 4372811936,
"backend": "llama-cpp"
}
],
"categories": [
{
"id": "natural-language-processing",
"name": "Natural Language Processing",
"description": "Models that work with text: classify, summarize, translate, or generate text."
},
{
"id": "computer-vision",
"description": "Process images, from classification to object detection and segmentation.",
"name": "Computer Vision"
},
{
"id": "audio",
"description": "Recognize speech or classify audio with audio models.",
"name": "Audio"
},
{
"id": "multimodal",
"description": "Stuff about multimodal models goes here omg yes amazing.",
"name": "Multimodal"
}
]
}