Body Doodles API is the backend service used by the Body Doodles Application.
- Development Goals
- Agile Planning
- API End Points
- Future Features
- Database Design
- Security
- Technologies
- Testing
- Deployment
- Credits
The goal of this API is provide a backend service to allow the Body Doodles front end application to perform, Create, Read, Update and Delete operations via the user interface.
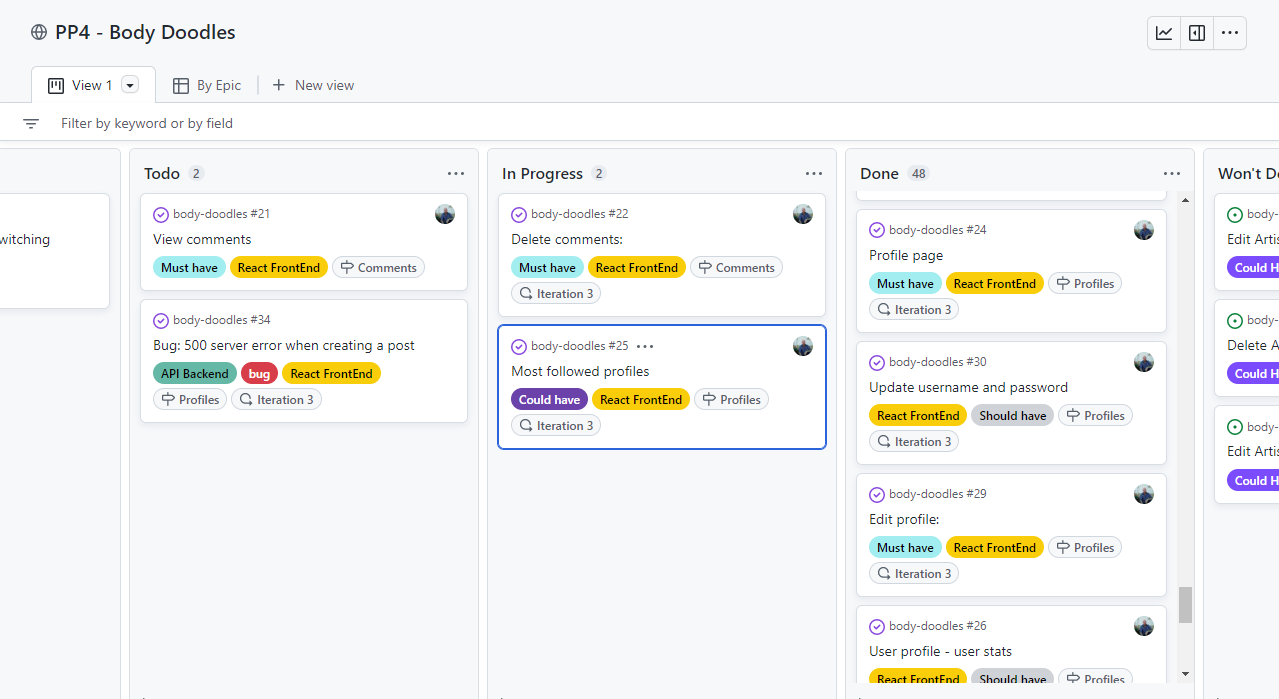
This project was developed using agile methodologies by delivering small features in incremental sprints. There were 3 sprints in total, spaced out evenly over three weeks.
All stories were assigned to epics, prioritized under the labels, Must have, should have, could have and assigned to sprints. "Must have" stories were completed first, "should haves" and then finally "could haves". It was done this way to ensure that all core requirements were completed first to give the project a complete feel, with the nice to have features being added should there be capacity.
The Kanban board was created using github projects and can be located here and can be viewed to see more information on the project cards. All stories except the documentation tasks have a full set of acceptance criteria in order to define the functionality that marks that story as complete.
Set Up
This Epic covers all the initial setup of the Django application and Django REST Framework in order to begin coding the features.
Posts
This Epic covers all API endpoint creation and database connections relating to the CRUD functionality of user posts. This includes like activity.
Comments
This Epic covers all API endpoint creation and database connections relating to the CRUD functionality of user comments in relation to posts.
Profiles
This Epic covers all API endpoint creation and database connections relating to the CRUD functionality of user created profiles. This includes following functionality.
Artists
This Epic covers all API endpoint creation and database connections relating to the CRUD functionality of users who register as Artists.
Reviews
This Epic covers all API endpoint creation and database connections relating to the CRUD functionality of Artist reviews and average rating as displayed on user profile.
By Epics
Setup
-
As a developer, I need to create the base project set up so that I can build out the features.
-
As a developer, I need to create the google cloud bucket and create the connection to the project so that static images can be uploaded by users.
-
As a user I can create a new account so that I can access all the features for signed up users
Artists
- As a developer, I want to create api views for artists so that they are available to the front end
Contact
- As a developer, I want to create a contact model and API view so that users can contact the site owner with issues
Posts
- As a user, I want to be able to view edit or delete a post
- As a user, I want to able to create a post and list posts
Profiles
- As a developer, I want to create a new blank profile with default image when a user is created.
- As a user, I want to able to get a list of profiles
User Story:
As a developer, I need to create the base project set up so that I can build out the features.
Implementation:
The base project was created and a virtual environment created with all neccessary packages installed and frozen into the requirements.
The settings were also edited to hide any secret variables and set dev and production environments apart.
User Story:
As a developer, I need to create the google cloud bucket and create the connection to the project so that static images can be uploaded by users.
Implementation:
A google cloud bucket was created and a service account created to allow image uploads via the service account. Create and read IAM roles were givent to the service account to ensure it had only the minimum required permissions.
User Story:
As a user I can create a new account so that I can access all the features for signed up users
Implementation:
Django rest framework and dj_rest_auth were installed and added to the url patterns and site packages to make use of their built in authentication system.
User Story:
As a developer, I want to create api views for artists so that they are available to the front end
Implementation:
Endpoint: /artists/
Methods:
- POST - Used to create an artist
- GET - Used to retrieve a list of artists
Endpoint: /artists/int:pk/
Methods:
- GET - Used to view single artist profile
- PUT - Used to update an artist profile
- DELETE - Used to delete an artist profile
User Story:
As a developer, I want to create a contact model and API view so that users can contact the site owner with issues
Implementation:
Endpoint: /contacts/
Methods:
- POST - Used to create contact request
- GET - Used to get a list of contact requests
Endpoint: /contacts/int:pk/
Methods:
- GET - Get a single contact request
- PUT - Used to update a single contact request
- DELETE - Used to delete a contact request
User Story:
As a user, I want to be able to view edit or delete a post
As a user, I want to able to create a post and list posts
Implementation:
Endpoint: /posts/
Methods:
- POST - Used to create post
- GET - Used to get a list of posts
Endpoint: /posts/int:pk/
Methods:
- GET - Get a single post
- PUT - Used to update a single post
- DELETE - Used to delete a post
User Story:
As a developer, I want to create a new blank profile with default image when a user is created.
Implementation:
In the profiles app, a signal was created in order to create a new user profile on signup.
User Story:
As a user, I want to able to get a list of profiles
Implementation:
Endpoint: /profiles/
Methods:
- POST - Used to create post
- GET - Used to get a list of posts
Endpoint: /profiles/int:pk/
Methods:
- GET - Get a single profile
- PUT - Used to update a single profile
- DELETE - Used to delete a profile

A permissions class was added called IsOwnerOrReadOnly to ensure only users who create the content are able to edit or delete it.
GCP IAMS permissions for service account were added for create and read only to ensure minimum permissions needed were granted.
- Django
- Main framework used for application creation
- Django REST Framework
- Framework used for creating API
- Google Cloud Platform
- Used for static image hosting
- Heroku
- Used for hosting the application
- Git
- Used for version control
- Github
- Repository for storing code base and docs
Details of packages
- dj-database-url==1.0.0
- Used to parse the DATABASE_URL connection settings
- dj-rest-auth==2.2.5
- Used with auth system
- Django==4.1.1
- Main framework used to start the project
- django-allauth==0.50.0
- Used for authentication
- django-cors-headers==3.13.0
- Used for Cross-Origin Resource Sharing (CORS) headers to responses
- django-filter==22.1
- Used to filter API results in serializers
- django-storages==1.13.1
- Used to help connect with the google cloud storage bucket
- djangorestframework==3.13.1
- Framework used to build the API endpoints
- djangorestframework-simplejwt==5.2.0
- Used with djange rest framework to create access tokens for authentication
- gunicorn==20.1.0
- Used for deployment of WSGI applications
- Pillow==9.2.0
- Imaging Libray - used for image uploading
- psycopg2==2.9.3
- PostgreSQL database adapter to allow deployed application to perform crud on the postgresql db
- PyJWT==2.5.0
- For creating the Python Json Web Tokens for authentication
Installed as package dependcies with above installations:
- asgiref==3.5.2
- autopep8==1.7.0
- cachetools==5.2.0
- certifi==2022.6.15.1
- cffi==1.15.1
- charset-normalizer==2.1.1
- cryptography==38.0.1
- defusedxml==0.7.1
- idna==3.3
- oauthlib==3.2.1
- protobuf==4.21.5
- pyasn1==0.4.8
- pyasn1-modules==0.2.8
- pycodestyle==2.9.1
- pycparser==2.21
- python3-openid==3.2.0
- pytz==2022.2.1
- requests==2.28.1
- requests-oauthlib==1.3.1
- rsa==4.9
- six==1.16.0
- sqlparse==0.4.2
- toml==0.10.2
- types-cryptography==3.3.23
- tzdata==2022.2
- urllib3==1.26.12
Auto installed as package dependencies with django-storages[GOOGLE] to aid connection to google cloud buckets for static image hosting:
- google-api-core==2.10.0
- google-auth==2.11.0
- google-cloud-core==2.3.2
- google-cloud-storage==2.5.0
- google-crc32c==1.5.0
- google-resumable-media==2.3.3
- googleapis-common-protos==1.56.4
Unit tests in posts app

The API's were tested locally during development but the core testing was done as part of the front end repos and testing to the real API's manually via form inputs and page loads.
The results can be found in Body Doodles
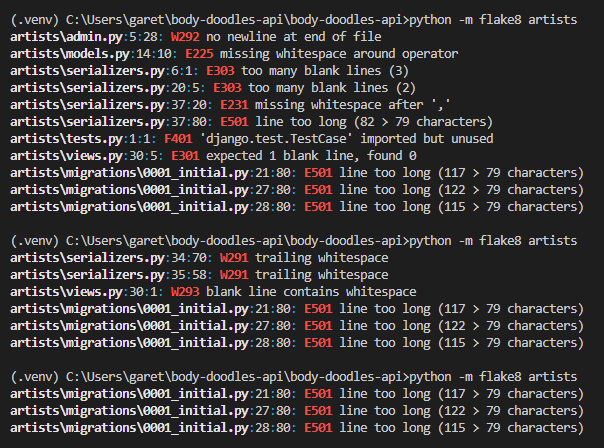
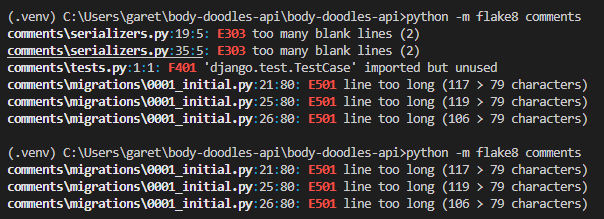
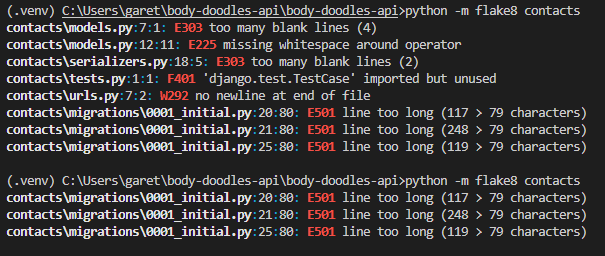
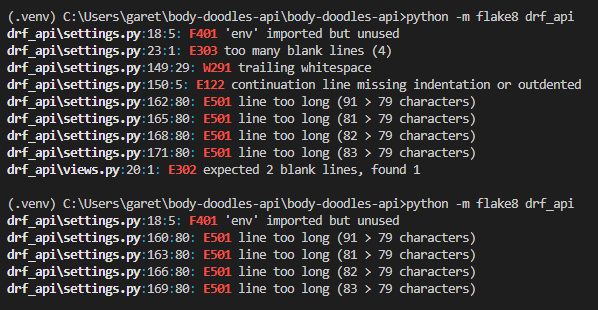
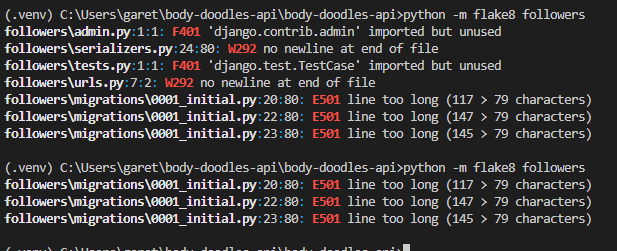
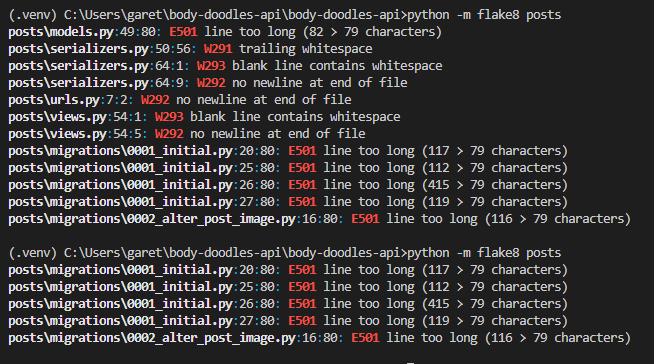
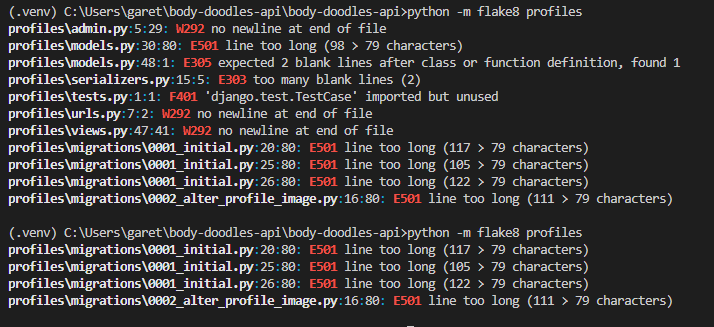
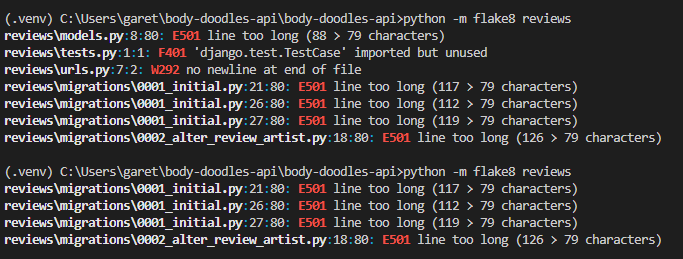
Validator Results
All folders were run through flake8. Several issues appeared with various reasons, lines too long, blank spaces, indentation and docstrings.
All issues were resolved with the exception of lines too long in migration files (these are auto generated so I did not fix) and the auth validator lines in the settings.py which seem to be unbreakable but are framework code.
A warning appeared for env.py being imported but unused although this is being used in the development version, so this was ignored.

Bugs and their fixes
A bug occured causing a 500 error on post and profile form submissions. It was caused by GCP not accepting dulicate file names so to remedy this, I created a function to renamed the files before uploading with a uuid.
The site was created using the Visual Studio Code editor and pushed to github to the remote repository ‘Gars-Steakhouse’.
The following git commands were used throughout development to push code to the remote repo:
git add <file> - This command was used to add the file(s) to the staging area before they are committed.
git commit -m “commit message” - This command was used to commit changes to the local repository queue ready for the final step.
git push - This command was used to push all committed code to the remote repository on github.
The site was deployed to Heroku. The steps to deploy are as follows:
-
Navigate to heroku and create an account
-
Click the new button in the top right corner
-
Select create new app
-
Enter app name
-
Select region and click create app
-
Click the resources tab and search for Heroku Postgres
-
Select hobby dev and continue
-
Go to the settings tab and then click reveal config vars
-
Add the following config vars:
- SECRET_KEY: (Your secret key)
- DATABASE_URL: (This should already exist)
- ALLOWED_HOST:
- CLIENT_ORIGIN: url for the client front end react application that wil be making requests to these APIs
- CLIENT_ORIGIN_DEV: address of the local server used to preview and test UI during development of the front end client application
- GOOGLE_APPLICATION_CREDENTIALS:
- GOOGLE_CREDENTIALS: json file with authentication keys and tokens to access the google cloud bucket where images are stored
- GS_BUCKET_NAME: name of the bucket to upload images to.
-
Click the deploy tab
-
Scroll down to Connect to GitHub and sign in / authorize when prompted
-
In the search box, find the repositoy you want to deploy and click connect
-
Scroll down to Manual deploy and choose the main branch
-
Click deploy
To set up bucket and service account. Please see - Medium Article. The service account credentials will be needed for deployment.
Code
Packages needed for deployment:
- django-storages[google]
- Pillow
Create a .profile file with the following line inside:
echo ${GOOGLE_CREDENTIALS} > /app/ga-creds.json
This line is used to instruct heroku that the GOOGLE_CREDENTIALS var is called ga-creds.json
Heroku
-
Log in to heroku and open the boody-doodle-api app
-
Click settings
-
Click Config vars
-
Add the following variables:
- Key: GOOGLE_APPLICATION_CREDENTIALS - Value: ga-creds.json
- Key: GOOGLE_CREDENTIALS - Value: json contents of the service account key
- Key: GS_BUCKET_NAME - Value: Name of the bucket where files are stored
Navigate to the GitHub Repository you want to clone to use locally:
- Click on the code drop down button
- Click on HTTPS
- Copy the repository link to the clipboard
- Open your IDE of choice (git must be installed for the next steps)
- Type git clone copied-git-url into the IDE terminal
The project will now have been cloned on your local machine for use.
In order to run, you will need to create an env.py file and add the config vars as used in heroku steps above.
Create Environment Variables locally
Virtual Environment setup
Windows:
python -m venv venv \
venv/Scripts/activate \
pip install -r requirements.txt
Mac:
python -m venv venv \
source venv/bin/activate \
pip install -r requirements.txt
Most commonly, forks are used to either propose changes to someone else's project or to use someone else's project as a starting point for your own idea.
-
Navigate to the GitHub Repository you want to fork.
-
On the top right of the page under the header, click the fork button.
-
This will create a duplicate of the full project in your GitHub Repository.
This article was followed in order to implement google cloud storage for static image hosting.
This article was followed in order to implement google cloud storage for static image hosting:
This article was followed in order to implement average rating calculations in the correct way