- Checkout a new branch named
feat/authand push it to remote.
Now we're going to prepare a function to check for and verify a JSON web token.
- In the root directory, add another directory named
auth- Add
restricion.jsto your newauthdirectory.
- Add
auth/restriction.js
const jwt = require('jsonwebtoken');

module.exports = (req, res, next) => {

  const token = req.headers.authorization;

  if (token) {
    const secret = process.env.JWT_SECRET || "Let me tell you a myth about secrets..";

    jwt.verify(token, secret, (err, decodedToken) => {
      if (err) {
        res.status(401).json({ message: 'Invalid Credentials' });
      } else {
        req.decodedJwt = decodedToken;
        next();
      }
    });
  } else {
    res.status(400).json({ message: 'No credentials provided' });
  }

};- Then go into your user-router and implement this middleware
users/user-router.js
const restricted = require('../auth/restriction.js');

router.get('/', restricted, (req, res) => {
  Users.find()
  	...
  	...
} -
Test out this restriction by trying to
GET /api/usersin Insomnia or Postman and looking for the relevant error. -
Commit and push
- Write meaningful tests for both Login and Register endpoints that take into account any constraints of your DB (again, since we're using Postgres here watch out for those primary keys!)
-
In
auth/create 3 files- auth-helpers.js
- login-router.js
- register-router.js
-
First write a helper function to get the JSON Web Token
auth/auth-helpers.js
const jwt = require('jsonwebtoken');

module.exports = {
  getJwt
}

function getJwt(username) {
  const payload = {
    username
  };

  const secret = process.env.JWT_SECRET || "Let me tell you a myth about secrets..";

  const options = {
    expiresIn: '1d'
  };

  return jwt.sign(payload, secret, options)
}- Then write a route for logging in, using our new
getJWT()function
auth/login-router.js
const router = require('express').Router();
const bcrypt = require('bcryptjs');
const jwt = require('jsonwebtoken');

const Users = require('../users/user-model');
const Token = require('./auth-helpers.js');

router.post('/', (req, res) => {

  let { username, password } = req.body;

  Users.findBy({ username })
    .first()
    .then(user => {

      if (user && bcrypt.compareSync(password, user.password)) {

        const token = Token.getJwt(user.username);

        res.status(200).json({
          id: user.id,
          username: user.username,
          token
        });
      } else {
        res.status(401).json({ message: 'Invalid credentials' });
      }
    })
    .catch(error => {
      res.status(500).json(error);
    });
})


module.exports = router;- And a route for registering, using the same
getJWT()function.
auth/register-router.js
const router = require('express').Router();
const bcrypt = require('bcryptjs');

const Users = require('../users/user-model.js');
const Token = require('./auth-helpers.js');
const { validateUser } = require('../users/user-helpers.js');

router.post('/', (req, res) => {

  let user = req.body;

  const validateResult = validateUser(user);

  if (validateResult.isSuccessful === true) {

    const hash = bcrypt.hashSync(user.password, 10);
    user.password = hash;

    const token = Token.getJwt(user.username);

    Users.add(user)
      .then(saved => {
        res.status(201).json({ id: saved.id, username: saved.username, token: token });
      })
      .catch(error => {
        res.status(500).json(error);
      })

  } else {

    res.status(400).json({
      message: 'Invalid user info, see errors',
      errors: validateResult.errors
    });
  }
})

module.exports = router;-
Don't forget to incorporate your validation function from before into each
post, both login and register routers need this validation. -
Now go into your server and
.usethese new routes
const express = require('express');
const cors = require('cors');
const helmet = require('helmet');

const logger = require('../middleware/logger');

const usersRouter = require("../users/user-router");
const loginRouter = require("../auth/login-router.js");
const registerRouter = require("../auth/register-router.js");

const server = express();

server.use(helmet());
server.use(logger);
server.use(express.json());
server.use(cors());

server.use("/api/login", loginRouter);
server.use("/api/register", registerRouter);
server.use("/api/users", usersRouter);

server.get('/', (req, res) => {
  res.send('<h1>🎣</h1>');
})

module.exports = server;- Commit and push these changes
-
On a new branch, make sure that each of your
/api/...endpoints are documented well, including any body data they require, filtering they may offer, validation included, and what data each endpoint returns. Document this clearly and concisely, so that it is very easy to browse. -
Commit and push these changes
We're ready to merge these new changes into master now, so let's first go to Heroku and get our staging application ready.
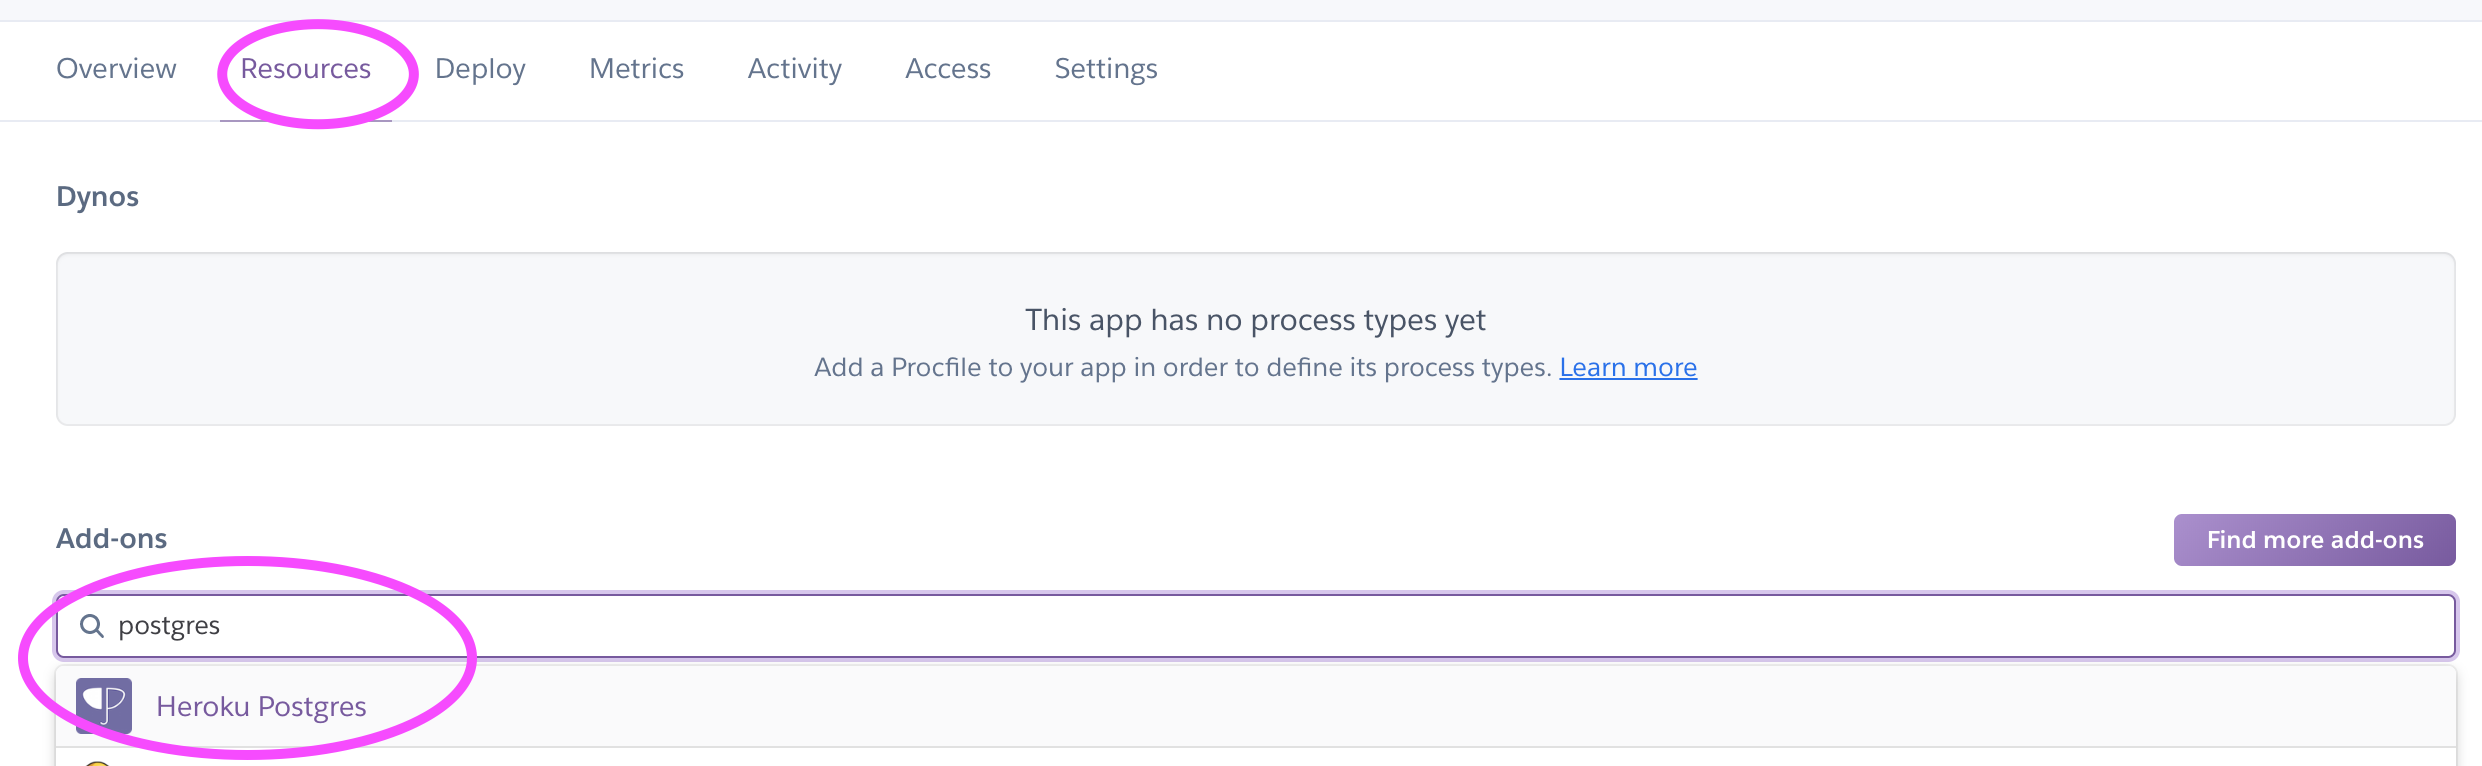
- First, navigate to the
Resourcestab. - Under
Add-onssearch for postgres and provision a new DB.
Once the Postgres DB is added, you'll be able to navigate to Settings in your Heroku staging application, and click on Reveal Config Vars. Here you'll notice that Heroku has added a DATABASE_URL for us. Cool! We'll need to add a few more Config Vars too while we're here.
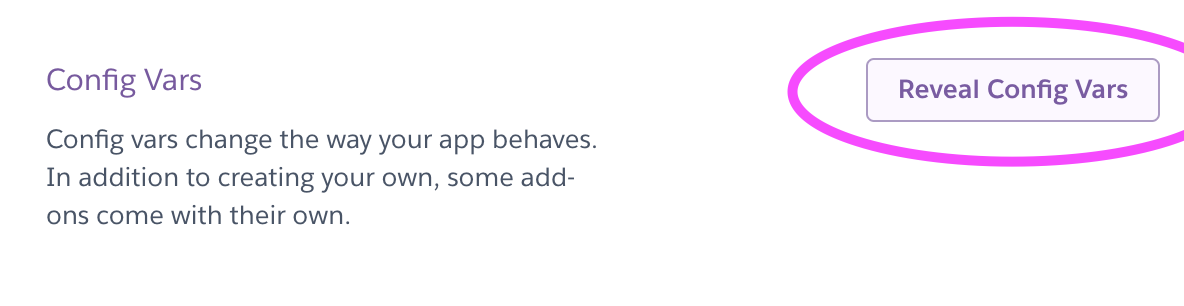
-
Add a
DB_ENVkey with a value ofproduction -
Add a
JWT_SECRETkey with a secure value of your choosing. -
Now, merge your most recent changes into
master, and check your Heroku Activity feed for progress/errors -
Once the application is deployed, we'll need to run our migrations. There are a few ways to do this, but for simplicity's sake here we'll use Heroku's Console that they provide under the
Moredropdown in the top right of your application dashboard. ChooseRun Console
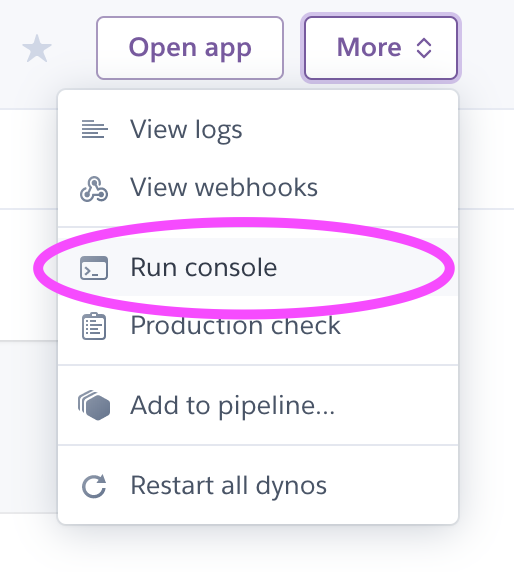
- run
knex migrate:latest, and once the batch has run, - Using Postman or Insomnia, register a new user at the URL of your deployed app (
/api/register) - Using Postman or Insomnia, try to access
/api/userswith the token that is returned fromregisteras anauthorizationheader - Once this staging application is running as expected, go into your
productionapplication and:- Provision a Postgres DB
- Add
DB_ENVandJWT_SECRETConfig Vars - Manually deploy from
master - Run your migrations
- Test out production